Uploading bootloader and firmware using Atmel Studio
-
Re: Help updating bootloader with Atmel-ICE
Hello everyone,
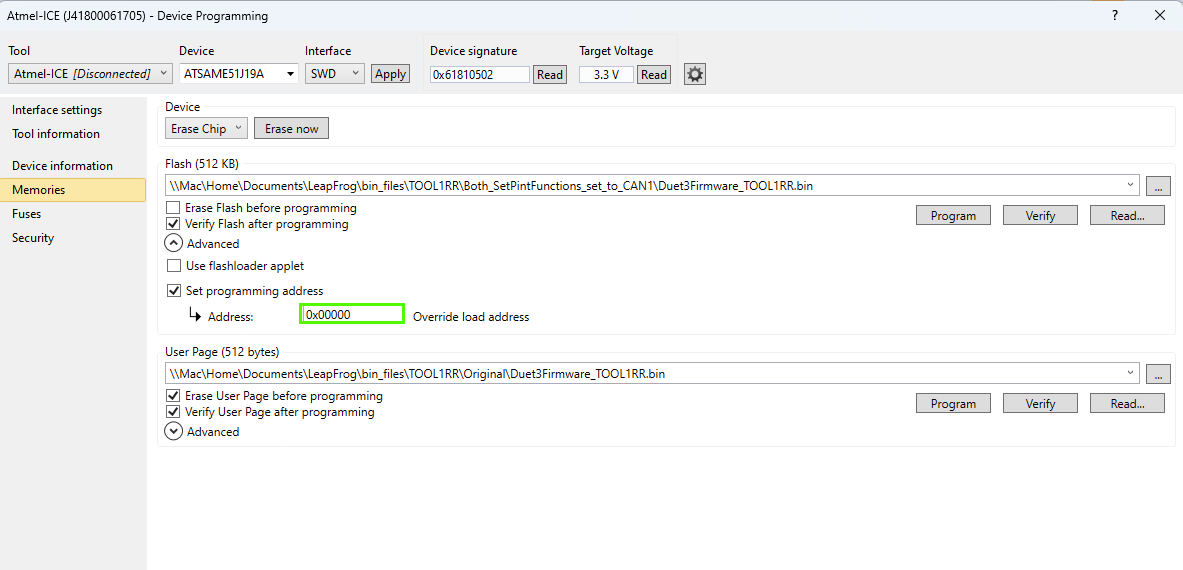
I saw the topic mentioned above, and I am working on something similar. I am trying to program an Adafruit Feather M4 CAN Express with the "Duet3Bootloader-SAME5x.bin" file and a modified version of the Roto Toolboard and EXP3HC firmware. I am using Atmel Studio and an Atmel-ICE for this task. Are specific programming addresses required for flashing the bootloader and firmware?
-
@Jords27 https://docs.duet3d.com/en/User_manual/RepRapFirmware/Updating_bootloader does not note any specific addresses; I'd select 'Erase Flash after Programming' for posterity.
-
@Jords27 That looks like you are trying to upload the firmware into the "User Page", I don't think that is correct, it should almost certainly be going into the main flash area (but at a different address to the bootloader), you may need to upload the bootloader first followed by the main firmware (make sure you do not erase the bootloader in the process!).
-
@gloomyandy Thanks for your response. I accidentally tried uploading to the user page once, but it just remained there. If I upload the bootloader first, followed by the firmware, how can I ensure that the bootloader is not erased in the process?
-
@Jords27 the address to write the bootloader to is zero. You should check "Erase flash before programming", or else press the Erase Chip button first.
You do not need to write the User Page. As you have already programmed the user page, I suggest you erase it to prevent the bootloader trying to load CAN parameters from it.
The SAME5x bootloader first determines which board it is running on in order to choose the correct pins for flashing the LEDs and request the correct firmware name. The code that does this is in file https://github.com/Duet3D/Duet3Bootloader/blob/dev/src/BoardType.cpp starting at line 176. The device on your board is a SAME51J which the current code does not handle. So you will need to modify that code to set up variables useAlternateCanPins, doHardwareReset, defaultAddress and boardTypeIndex appropriately.
-
@dc42 and @gloomyandy thank you again for your help, experimenting with this has been fun and insightfull.
It has been a while but last week I tried uploading the roto toolboard firmware to a devboard with the same MCU as the roto toolboard. I select the Atmel-ICE and ATSAME51G19A, and am then able to get the correct device signature and 3.3V as the Target Voltage. I upload the bootloader to 0x0 and after that the TOOL1RR firmware to 0x10000. Doing al this I don't get any errors. I would assume that after doing that the devboard "thinks" it is a roto toolboard but when connection it to a 6hc mainboard there isn't any sign of life. I have also tested this method on a completely whiped Roto Toolboard. This seemed to work because the Roto Toolboard worked just as expected after. Would you or someone else know if I could be missing something?
Thanks to everyone again on this forum, everyone here is always awesome!
-
@Jords27 some suggestions:
-
Make sure you have configured pins for the two LED ports in the bootloader, and have LEDs attached to them. That way you will be able to see if the bootloader is running and what error code (if any) it is flashing.
-
These MCUs have two CAN ports. Make sure that both the bootloader and the firmware are configured to use whichever one your dev boards provides the CAN transceiver for (or whichever one you have connected if it provided two CAN transceivers).
-
Make sure you have a common ground connection between the 6HC and the dev board.
-
Bear in mind that if/when you want to re-flash the bootloader there is a special sequence that you need to go through, to remove the bootloader protection and prevent it from being re-installed before you finish flashing the bootloader.
-
-
@dc42 Thank you again for your help. It took a while but we figured out that the external oscillator was not producing the correct frequency. After replacing the oscillator with another model everything was working as expected!
-
@Jords27 said in Uploading bootloader and firmware using Atmel Studio:
@dc42 Thank you again for your help. It took a while but we figured out that the external oscillator was not producing the correct frequency. After replacing the oscillator with another model everything was working as expected!
That's something I didn't think of! All Duet 3 expansion boards use a 25MHz crystal, so that is what the bootloader and firmware startup code assume.
-
 undefined dc42 marked this topic as a question
-
 undefined dc42 has marked this topic as solved