3Dtouch (BLTOUCH clone) not deploying
-
I have followed the BLTouch setup guide trying to set up my 3Dtouch (BLTouch Clone).
I am at the point where I sent "M280 P3 S10 I1" to deploy the probe but nothing happens.
powering on the probe will go up and down twice and here is the Gcode I am using:
; Endstops
M574 X1 Y0 S0 ; Set active low endstops; Z-Probe
M574 Z1 S2 ; Set endstops controlled by probe
M307 H3 A-1 C-1 D-1 ; reserve pin 21 for M42 or servo use
M558 P9 X0 Y0 Z1 H5 F100 T2000 I1 ; Set Z probe type to switch and the dive height + speeds
G31 X0 Y0 Z0 P25 ; Set Z probe trigger value, offset and trigger height
M557 X5:280 Y5:270 S20 ; Define mesh gridAn M307 H3 command was never in my config-override.g file
<y Z-probe in the web interface is reading 1000
Any help would be greatly appreciated as have no idea what else I can try at this stage.
-
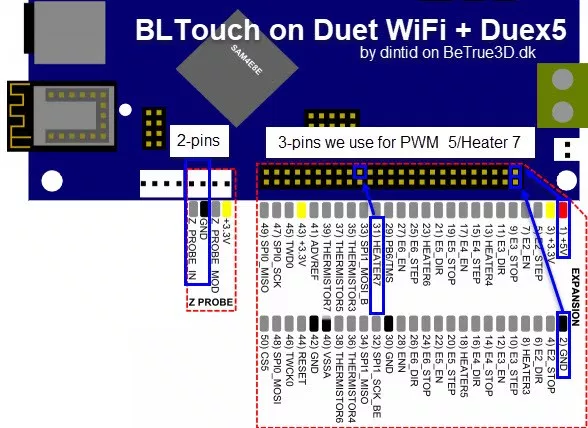
- Did you manually check the wiring to make sure the signal connected to the right extension connector pin on the DuetWifi (assuming you don't have an extension card). There are a lot of pins and you can easily be one number off. The image example that is usually shown below is upside down in comparison to how people usually mount their control cards. Make sure you are using the correct pin and orientation. Make sure your probe pinout matches the orientation also.
- Make sure your set up the 3Dtouch for 3.3V output with a soldered resistor on the output terminal if it does not have a jumper to set the output voltage.
Manually probe the voltage and verify that its giving the right readout and voltages on the Duetwifi connector side.
Your config looks close. The G31 command has a low P number. Usually I have P500. I had issues deploying at first but it turns out I was missing the I1 command on my M280. It looks like you have it on yours.
-
Thanks for the quick reply,
I had one pin in pin8 (Heater 3) instead of pin 31(Heater7).
Having swapped that I am still not getting anything from the 3Dtouch.
when the probe pins are connected to the zprobe i am getting a zprobe reading of 1000 and when i pull the wires I get 0, I do not have any resistor connected currently as I am a bit confused by how to do it, is it between the Z PROBE IN and GND terminals it is to be connected to and would a 220, 10 and 10 ohm resistor in series do? i dont have any 240 ohm resistors
-
-
I lost a lot of time on bltouch. I think there is a bug in firmware with some config. Try with a config standard like this and try the bltouch!
; Configuration file for testing Duet Ethernet and Wifi with V1.19 firmware
FOR TESTING ONLY! USE https://configurator.reprapfirmware.org/ to generate configuration files for your printer!
; Communication and general
M111 S0 ; Debug off
M550 PDuetTest ; Machine name and Netbios name (can be anything you like)
M551 Preprap ; Machine password (used for FTP)
;*** If you have more than one Duet on your network, they must all have different MAC addresses, so change the last digits
M540 P0xBE:0xEF:0xDE:0xAD:0xFE:0xED ; MAC Address;*** Networking
M552 S1 ; Turn network on;*** Ethernet networking: Adjust the IP address and gateway in the following 2 lines to suit your network
M552 P192.168.1.14 ; (0 = DHCP)
M554 P192.168.1.255 ; Gateway
M553 P255.255.255.0 ; NetmaskM555 P2 ; Set output to look like Marlin
G21 ; Work in millimetres
G90 ; Send absolute coordinates...
M83 ; ...but relative extruder moves; Disable Fan 1 thermostatic mode
M106 P1 H-1; Axis and motor configuration
M569 P0 S1 ; Drive 0 goes forwards
M569 P1 S1 ; Drive 1 goes forwards
M569 P2 S1 ; Drive 2 goes forwards
M569 P3 S1 ; Drive 3 goes forwards
M569 P4 S1 ; Drive 4 goes forwards
M574 X2 Y2 Z2 S1 ; set endstop configuration (all endstops at high end, active high)
;*** The homed height is deliberately set too high in the following - you will adjust it during calibration
M665 R105.6 L215.0 B85 H250 ; set delta radius, diagonal rod length, printable radius and homed height
M666 X0 Y0 Z0 ; put your endstop adjustments here, or let auto calibration find them
M350 X16 Y16 Z16 E16:16 I1 ; Set 16x microstepping with interpolation
M92 X80 Y80 Z80 ; Set axis steps/mm
M906 X1000 Y1000 Z1000 E800 I60 ; Set motor currents (mA) and increase idle current to 60%
M201 X1000 Y1000 Z1000 E1000 ; Accelerations (mm/s^2)
M203 X20000 Y20000 Z20000 E3600 ; Maximum speeds (mm/min)
M566 X1200 Y1200 Z1200 E1200 ; Maximum instant speed changes mm/minute; Thermistors
M305 P0 T100000 B3950 R4700 H30 L0 ; Put your own H and/or L values here to set the bed thermistor ADC correction
M305 P1 T100000 B3974 R4700 H30 L0 ; Put your own H and/or L values here to set first nozzle thermistor ADC correction
M305 P2 T100000 B3974 R4700 H30 L0 ; Put your own H and/or L values here to set 2nd nozzle thermistor ADC correctionM570 S180 ; Hot end may be a little slow to heat up so allow it 180 seconds
; Adjustments for J-heads used as dummy heaters on test rig
M307 H0 A250 C140 D5.5 B1
M307 H1 A250 C140 D5.5 B0
M307 H2 A250 C140 D5.5 B0; Fans
M106 P1 S-1 ; disable thermostatic mode for fan 1; Tool definitions
M563 P0 D0 H1 ; Define tool 0
G10 P0 S0 R0 ; Set tool 0 operating and standby temperatures
;*** If you have a single-nozzle build, comment the next 2 lines
M563 P1 D1 H2 ; Define tool 1
G10 P1 S0 R0 ; Set tool 1 operating and standby temperatures
M92 E663:663 ; Set extruder steps per mm; Z-Probe
M574 Z1 S2 ; Set endstops controlled by probe
M307 H3 A-1 C-1 D-1 ; reserve pin 21 for M42 or servo use
M558 P9 X0 Y0 Z1 H5 F100 T2000 I1 ; Set Z probe type to switch and the dive height + speeds
G31 X0 Y0 Z0 P25 ; Set Z probe trigger value, offset and trigger height
M557 X5:280 Y5:270 S20 ; Define mesh grid;*** If you are using axis compensation, put the figures in the following command
M556 S78 X0 Y0 Z0 ; Axis compensation hereM208 S1 Z-0.2 ; set minimum Z
T0 ; select first hot end
M117 Use https://configurator.reprapfirmware.org/ to set up your printer configFor the reading of 1000 yes this was normal also for me.... you need to send a specific test command in order to check the correct working of bltouch. You must use : M280 S3 S60 I1 if you want to see the value 1000 drop to 0
-
I don't know if you damaged anything in the probe circuit or on the Duet with the 5V output. The Duet2 Maestro can handle the 5V (up to 30V).
You can use two resistor in series to get the value close enough. You can use a 220 ohm with a 20 ohm in series. You can also use two 470 resistors in parallel (value will be 235 ohms, but close enough). If you are good with soldering SMT parts, the two 470 resistors is easier to solder on the output pin to ground. I used 0402 sized resistors, but you can use the larger 0603 size also.
Make sure you have 1.21 version and later since you are using P9 mode. If you are using an older version, change it to P5.
Does it give you any error when you send the commands? Check the console for any messages. Are you sending the commands with a macro? When you send the commands, does the probe blink?
If you have a servo motor, you can also use that to check if the wiring is correct. I found out my servo did not deploy and so the error was somewhere with my config and software and not the hardware.
Lots of detail and info here:
https://duet3d.dozuki.com/Wiki/Connecting_a_Z_probe