Duet3D Logo Duet3D
    • Tags
    • Documentation
    • Order
    • Register
    • Login
    1. Home
    2. clark
    • Profile
    • Following 0
    • Followers 0
    • Topics 2
    • Posts 6
    • Best 0
    • Controversial 0
    • Groups 0

    clark

    @clark

    0
    Reputation
    1
    Profile views
    6
    Posts
    0
    Followers
    0
    Following
    Joined Last Online

    clark Unfollow Follow

    Latest posts made by clark

    • RE: Duet Maestro and BLTouch, M401 and M402 do nothing

      @Veti said in Duet Maestro and BLTouch, M401 and M402 do nothing:

      however the trigger signal is zprobe.in

      its written like that on the site you linked
      9446d3fc-19be-4572-9b6d-04d6c6f830bd-image.png

      Oh I see. I changed both of the .mods to .ins on the first go. Now when I only changed the M558 to zprobe.in, M401 started working. Thanks a lot! This can be marked as solved 🙂

      posted in Duet Hardware and wiring
      clarkundefined
      clark
    • RE: Duet Maestro and BLTouch, M401 and M402 do nothing

      @Veti said in Duet Maestro and BLTouch, M401 and M402 do nothing:

      that should be zprobe.in

      I tried this, didn't help. However, it changed the DWC value of Z-probe from 1000 to 0. Anyway, the instructions (https://duet3d.dozuki.com/Wiki/Connecting_a_Z_probe#Section_BLTouch) clearly state: "On a Duet Maestro it is zprobe.mod".

      posted in Duet Hardware and wiring
      clarkundefined
      clark
    • Duet Maestro and BLTouch, M401 and M402 do nothing

      Hi,

      I'm running Duet Maestro with RepRap 3.1.1. I have a genuine Antclabs BLTouch 3.0+, could be 3.1 as well.

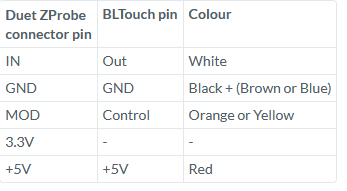
      The BLTouch is connected as instructed alt text and all the wires have been checked with multimeter.

      On power-up the BLTouch deploys twice and it's lighted up implying that it is in a working state. However, I get nothing with M401 and M402. I have done everything according to these instructions: https://duet3d.dozuki.com/Wiki/Connecting_a_Z_probe#Section_BLTouch (using those instructions that apply when you have a Duet Maestro with RRF 3)

      I have also checked the BLTouch troubleshooting section (https://duet3d.dozuki.com/Wiki/BLTouch_Troubleshooting) but nothing seems to help.

      My DWC shows value '1000' in a red box at the Z-probe section.

      config.g:

      ; Drives
      M569 P0 S0                                         ; physical drive 0 goes backwards
      M569 P1 S0                                         ; physical drive 1 goes backwards
      M569 P2 S1                                         ; physical drive 2 goes forwards
      M569 P3 S0                                         ; physical drive 3 goes backwards
      M584 X0 Y1 Z2 E3                                   ; set drive mapping
      M350 X16 Y16 Z16 E16 I1                            ; configure microstepping with interpolation
      M92 X80.00 Y80.00 Z1600.00 E108.84                   ; set steps per mm
      M566 X600.00 Y600.00 Z60.00 E300.00                ; set maximum instantaneous speed changes (mm/min)
      M203 X9000.00 Y9000.00 Z300.00 E6000.00            ; set maximum speeds (mm/min)
      M201 X500.00 Y500.00 Z120.00 E5000.00              ; set accelerations (mm/s^2)
      M906 X800 Y800 Z800 E1000 I50                      ; set motor currents (mA) and motor idle factor in per cent
      M84 S30                                            ; Set idle timeout
      
      ; Axis Limits
      M208 X0 Y0 Z0 S1                                   ; set axis minima
      M208 X235 Y235 Z221.9 S0                             ; set axis maxima
      
      ; Endstops
      M574 X1 S1 P"xstop"                                ; configure active-high endstop for low end on X via pin xstop
      M574 Y1 S1 P"ystop"                                ; configure active-high endstop for low end on Y via pin ystop
      M574 Z2 S1 P"zstop"                                ; configure active-high endstop for low end on Z via pin zstop -- vaihdettu Z1 -> Z2 high end stop
      
      ; Z-Probe
      M558 P9 C"zprobe.mod" H5 F100 T2000
      M950 S0 C"zprobe.mod"
      M557 X5:190 Y5:215 S10                              ; Define mesh grid
      G31 P25 X-43 Y-21 Z2.072                            ; Set BLTouch offsets
      
      ; Heaters
      M308 S0 P"bedtemp" Y"thermistor" T98801 B4185      ; configure sensor 0 as thermistor on pin bedtemp
      M950 H0 C"bedheat" T0                              ; create bed heater output on bedheat and map it to sensor 0
      M307 H0 B0 S1.00                                   ; disable bang-bang mode for the bed heater and set PWM limit
      M140 H0                                            ; map heated bed to heater 0
      M143 H0 S80                                        ; set temperature limit for heater 0 to 80C
      M308 S1 P"e0temp" Y"thermistor" T98801 B4185       ; configure sensor 1 as thermistor on pin e0temp
      M950 H1 C"e0heat" T1                               ; create nozzle heater output on e0heat and map it to sensor 1
      M307 H1 B0 S1.00                                   ; disable bang-bang mode for heater  and set PWM limit
      
      ; Fans
      M950 F0 C"fan0" Q20                                ; create fan 0 on pin fan0 and set its frequency
      M106 P0 S0 H-1                                     ; set fan 0 value. Thermostatic control is turned off
      M950 F1 C"fan1" Q20                               ; create fan 1 on pin fan1 and set its frequency
      M106 P1 S1 H1 T45                                  ; set fan 1 value. Thermostatic control is turned on
      M950 F2 C"fan2" Q20                               ; create fan 2 on pin fan2 and set its frequency
      M106 P2 S0.92 H1:0 T45                                ; set fan 2 value. Thermostatic control is turned on
      
      ; Tools
      M563 P0 S"Hotend" D0 H1 F0                         ; define tool 0
      G10 P0 X0 Y0 Z0                                    ; set tool 0 axis offsets
      G10 P0 R0 S0                                       ; set initial tool 0 active and standby temperatures to 0C
      
      ; Custom settings are not defined
      M912 P0 S5.1                                       ; delta T between CPU and room
      
      ; Miscellaneous
      M501                                               ; load saved parameters from non-volatile memory
      M911 S21 R23 P"M913 X0 Y0 G91 M83 G1 Z3 E-5 F1000" ; set voltage thresholds and actions to run on power loss
      T0                                                 ; select first tool
      

      deployprobe.g:

      M280 P0 S10
      

      retractprobe.g:

      M280 P0 S90
      

      config-override.g:

      ; Heater model parameters
      M307 H0 A144.5 C584.1 D0.4 S1.00 V24.0 B0
      M307 H1 A348.0 C119.1 D4.5 S1.00 V24.1 B0
      ; Workplace coordinates
      G10 L2 P1 X0.00 Y0.00 Z0.00
      G10 L2 P2 X0.00 Y0.00 Z0.00
      G10 L2 P3 X0.00 Y0.00 Z0.00
      G10 L2 P4 X0.00 Y0.00 Z0.00
      G10 L2 P5 X0.00 Y0.00 Z0.00
      G10 L2 P6 X0.00 Y0.00 Z0.00
      G10 L2 P7 X0.00 Y0.00 Z0.00
      G10 L2 P8 X0.00 Y0.00 Z0.00
      G10 L2 P9 X0.00 Y0.00 Z0.00
      
      posted in Duet Hardware and wiring
      clarkundefined
      clark
    • RE: Low voltage on Duet 2 Maestro FAN1 and FAN2 ports

      @dc42
      Thanks a lot! This fixed it.

      posted in Duet Hardware and wiring
      clarkundefined
      clark
    • RE: Low voltage on Duet 2 Maestro FAN1 and FAN2 ports

      @Phaedrux Sure

      ; Fans
      M950 F0 C"fan0" Q500                               ; create fan 0 on pin fan0 and set its frequency
      M106 P0 S0 H-1                                     ; set fan 0 value. Thermostatic control is turned off
      M950 F1 C"fan1" Q500                               ; create fan 1 on pin fan1 and set its frequency
      M106 P1 S0 H1 T45                                  ; set fan 1 value. Thermostatic control is turned on
      M950 F2 C"fan2" Q500                               ; create fan 2 on pin fan2 and set its frequency
      M106 P2 S0 H1:0 T45                                ; set fan 2 value. Thermostatic control is turned on
      
      posted in Duet Hardware and wiring
      clarkundefined
      clark
    • Low voltage on Duet 2 Maestro FAN1 and FAN2 ports

      Hello everyone,

      I'm in the process of upgrading my Ender 3 Pro fans to 12V. I'm using Duet 2 Maestro with firmware 3.1.1 (2020-05-19b2).

      I have a buck converter with inputs wired to VIN+ and VIN-. The converter is set up to output 12V and this is verified with multimeter.

      I have wired the buck converter OUTPUT+ to both V_FAN_A (jumper middle pin) and V_FAN_B (jumper middle pin). (Same problem existed when I had it only wired to V_FAN_A)

      When I power up the machine and start checking the fan ports with multimeter I get the following results:

      Always-on-fan 12V (correctly).
      FAN0, FAN1 and FAN2 0V (correctly).

      After this I heat the hot end to 55 C (fan temperature threshold at 45 C), set the part cooling fan to 100% from DWC and check the ports with multimeter again:

      Always-on-fan 12V (correctly)
      FAN0 12V (correctly)
      FAN1 7V
      FAN2 7V

      So something is wrong with FAN1 and FAN2 voltage and I can't figure out what it is. Can anyone help?

      posted in Duet Hardware and wiring
      clarkundefined
      clark