Duet3D Logo Duet3D
    • Tags
    • Documentation
    • Order
    • Register
    • Login
    1. Home
    2. graybilldustin
    3. Posts
    • Profile
    • Following 0
    • Followers 0
    • Topics 3
    • Posts 11
    • Best 0
    • Controversial 0
    • Groups 0

    Posts made by graybilldustin

    • RE: Print Artifacts

      @jens55 I forgot to answer that in the last post. Without belts the carriage is so smooth that it moves to one corner under gravity because my workbench is not perfectly level. With the belts on and the set screws of the stepper pulley loose it is still +very smooth and easy to move so I don't think it's that.

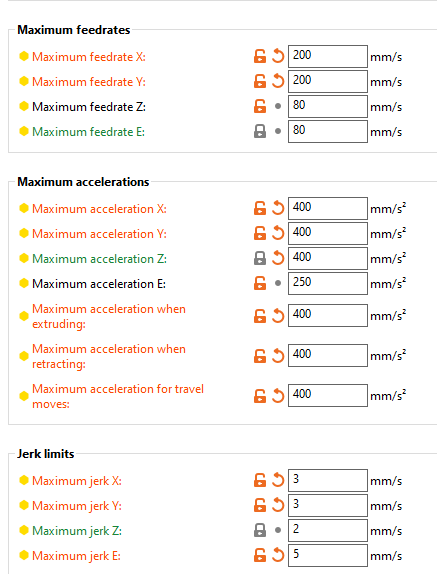
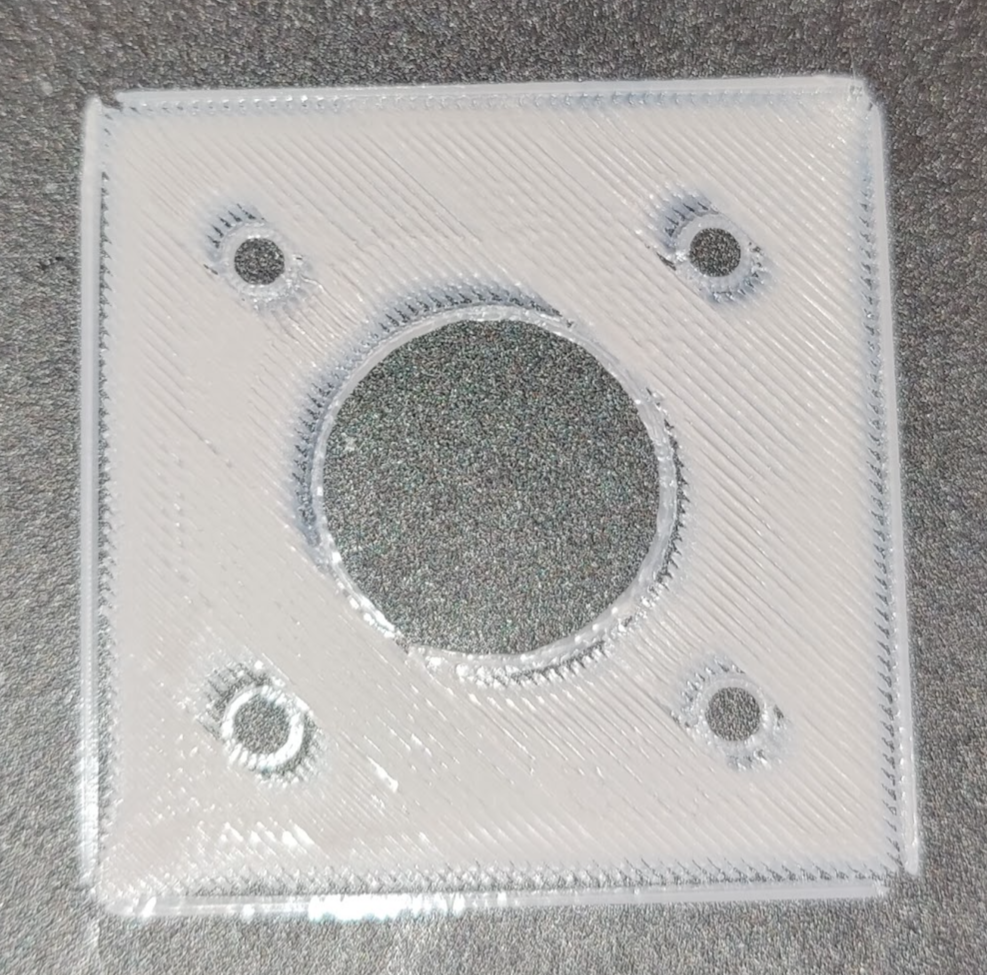
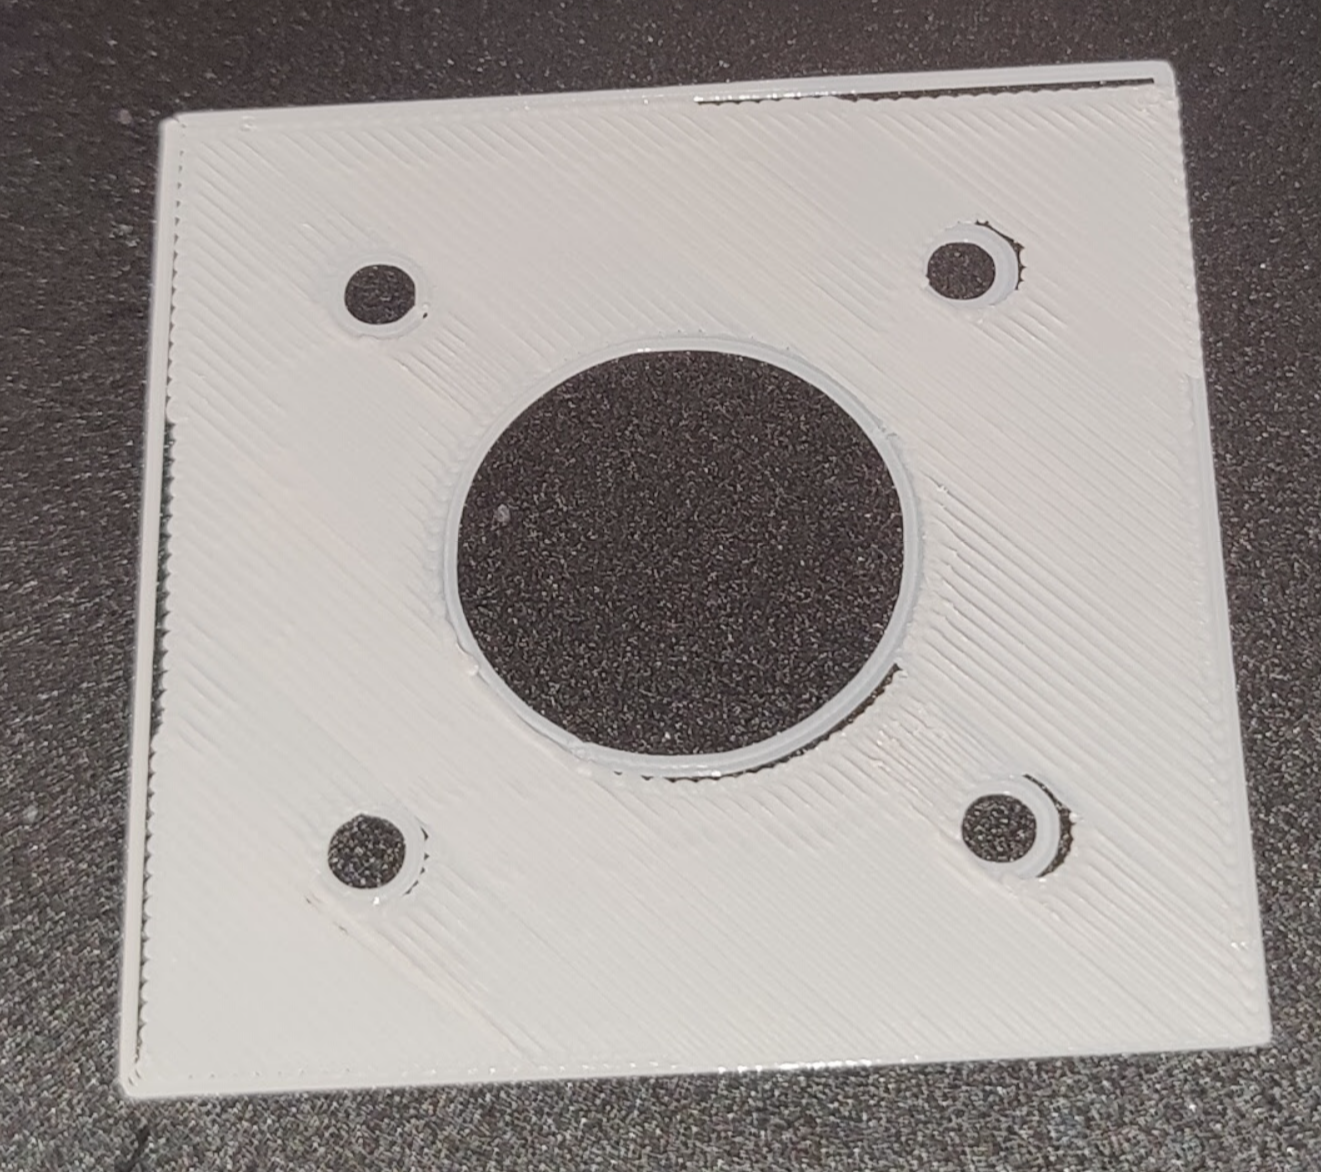
      The last picture I posted doesn't really seem to have an offset like the first photo did it looked more to me like under extrusion at the end of a move but as I said I have pressure advance turned off. Well I decided to take a look at the PA settings while printing and found out that Prusa Slicer was modifying my PA settings during the print. I didn't even know this was a setting in there but it was set to 0.4 which is way too high for the Hemera hotend I have. I set the PA in Prusa Slicer to 0 until I have time to properly calibrate and now the first layer is looking more like what I would expect so I think I had a combination of skipping steps and bad PA settings. Still a lot of calibration to do but at least i'm now where I expect to be. Thanks for all the input.

      posted in Tuning and tweaking
      graybilldustinundefined
      graybilldustin
    • RE: Print Artifacts

      I turned everything way way down and I get slightly different but similar results:

      6afb74da-e0aa-4067-901d-4f33067f116f-image.png

      74a2e7d4-7c3c-476a-9051-53cfd8cf050e-image.png

      posted in Tuning and tweaking
      graybilldustinundefined
      graybilldustin
    • RE: Print Artifacts

      @jens55 Yes I suppose I should clarify. There is a gap on the left perimeter that should not be there. At the top and bottom the gap is small and in the middle it is bigger. On the right the infill actually overlaps the perimeter. On the right side at the top it overlaps so much that it goes past the perimeter. So it's like the entire infill is shifted off to the right. I have the steppers set to 800mA. They are from an old CR10S, they are JD42HS40-1004A-02F. Best I could find max current is most likely 1A so I tried to play it safe.

      I am running mesh bed levelling with a BL Touch. The bed is 400 x 400 and it's not very flat so right now i'm running 100 probe points until I can do some more testing to find out what is necessary.

      posted in Tuning and tweaking
      graybilldustinundefined
      graybilldustin
    • Print Artifacts

      Hopefully this is okay to ask here. I guess if it's not you can delete it.

      I am hoping someone can point me in the right direction on a weird issue i'm having with my first test print of a new printer. I am building a homebrew CoreXY with a Duet3 6HC mainboard. I can get in to specific specs if you want but I don't know where to start so i'm hoping the picture will lead to questions.

      I have been 3d printing for a very long time and I have owned a lot of different machines but I have never built my own from scratch and I have never had a CoreXY printer. I tried my first test print today and below is a photo of my first layer and I have never seen anything like this.

      I don't believe I am skipping steps as I'm not hearing anything from the steppers. I even tried making the belts very loose to alleviate some stress on the steppers and the result was the same, and I have the print speed very low. Lastly I have done a backlash test with a dial indicator in both X and Y at max speed and max accel and I always return to within .001 or .002" of where I started.

      The gantry and bed are very rigid so I don't think they are to culprit. I don't currently have any features turned on like input shaping or pressure advance. I'm wondering if it could be something weird with the way the steppers interpolate their position?

      Any advise would be much appreciated. Thanks.

      4e97e769-3468-4d4c-b39d-055046d21de0-image.png

      posted in Tuning and tweaking
      graybilldustinundefined
      graybilldustin
    • RE: Homeall runs homez

      @dc42 Ok interesting so for now I will just comment out my homez file and finish writing my homeall file and once that is done it should no longer run homez after. Thanks!

      posted in Tuning and tweaking
      graybilldustinundefined
      graybilldustin
    • Homeall runs homez

      Is it common for homeall to run homez after all of the gcode in homeall? It is happening for me and I can't find any documentation that this is supposed to happen. I am writing my x and y homing code in homeall and during testing it's still running homez. I can confirm this because if I go comment out everything in homez and run homeall again it doesn't do it. After further testing if I remove everything in my homeall except this:

      G91               			; relative positioning
      G1 H2 Z10 F3000    			; lift Z relative to current position
      

      It works fine. It just lifts Z up 10mm. But as soon as I add the next line:

      G91               			; relative positioning
      G1 H2 Z10 F3000    			; lift Z relative to current position
      
      G1 H1 X-325 Y400 F6000 			; move quickly to X and Y axis endstop and stop there (first pass)
      

      It now lifts Z 10mm, homes X and Y once, then runs whatever is in my homez file. I am completely lost here.

      posted in Tuning and tweaking
      graybilldustinundefined
      graybilldustin
    • RE: Quad Z Sensorless Homing + BLTouch

      Common problem on a lot of forums but I hoped this one was going to be different. I came here to ask for help to do something, not to ask for recommendations on what to do. Everyone has different ways of doing things and reasons for that. I have decided what I want to do and just needed help figuring out how to do it. I was not asking for something crazy that isn't supported so there wasn't any reason to tell me to do something else. And lastly my BL Touch doesn't get close enough to my screws for this to work. In one corner the probe is probably at least 4" away from the screw

      I was able to figure it out on my own and it works absolutely perfectly. For those that think a lead screw doesn't work with sensorless homing that is 100% inaccurate as long as you have a hard stop that will completely stall the motor and not just flex when the end is reached. As long as your axis hits a hard stop and the motor completely stalls sensorless homing works just fine.

      posted in Tuning and tweaking
      graybilldustinundefined
      graybilldustin
    • RE: Quad Z Sensorless Homing + BLTouch

      @gloomyandy

      That's not the same thing. When the gantry is crooked the nozzle is crooked to the bed and you will end up with artifacts on flat top layer surfaces because the nozzle is not flat.

      posted in Tuning and tweaking
      graybilldustinundefined
      graybilldustin
    • RE: Quad Z Sensorless Homing + BLTouch

      @gloomyandy said in Quad Z Sensorless Homing + BLTouch:

      sure if you spend a little time searching you will find other similar comments.
      I'm still not sure why you want to home the bed this way, if you have a probe why not use that

      When I shut the machine off and some of the motors fall down and the entire gantry is slightly crooked, then what do I do?

      In all of those other posts people mention mechanical advantage which doesn't really make sense. A stall is a stall. When it hits the mechanical end stop the motor can not turn any further regardless if it is driven by a belt or a screw. I could see mid print stall detection on a screw not working well but sensorless homing should not matter in this way. I am convinced that I have some settings wrong. I have previously only used Marlin and Rep Rap is a whole different beast that i'm still struggling to understand.

      posted in Tuning and tweaking
      graybilldustinundefined
      graybilldustin
    • RE: Quad Z Sensorless Homing + BLTouch

      I changed it to M915 X Y Z S-64 R0 F0 and it still does not seem to work.

      The G92 Z0 is left over from the default file I just haven't changed it yet, I was more concerned with getting the stall detection to work first.

      I am using rods, this is the first I have heard anyone mention it being harder to do than with belts. My prusa minis use sensorless homing on the Z axis with rods. What in particular makes it harder to do?

      posted in Tuning and tweaking
      graybilldustinundefined
      graybilldustin
    • Quad Z Sensorless Homing + BLTouch

      I have read through the sections about sensorless homing in the documentation and several posts here and i'm still not having any luck. I have a Corexy machine with 4 Z steppers and a BLTouch on the hotend. I would like to home Z all the way to the top and use the BLTouch for mesh bed levelling. I am not able to get the Z steppers to detect the stall at the end of their travel. Please make me feel dumb and tell me what simple thing I missed.

      ; Configuration file for Duet 3 MB 6HC (firmware version 3.3)
      ; executed by the firmware on start-up
      ;
      ; generated by RepRapFirmware Configuration Tool v3.3.16 on Sun Sep 10 2023 16:30:42 GMT-0500 (Central Daylight Time)
      
      ; General preferences
      G90                                                ; send absolute coordinates...
      M83                                                ; ...but relative extruder moves
      M550 P"My Printer"                                 ; set printer name
      M669 K1                                            ; select CoreXY mode
      
      ; Wait a moment for the CAN expansion boards to start
      G4 S2
      
      ; Network
      ;M551 P"hnsxjhew"                                  ; set password
      M552 I1 S1                                   	   ; enable network and acquire dynamic address via DHCP
      M586 P0 S1                                         ; enable HTTP
      M586 P1 S0                                         ; disable FTP
      M586 P2 S0                                         ; disable Telnet
      
      ; Drives
      M569 P0.0 S0                           			   ; physical drive 0.0 goes backwards
      M569 P0.1 S0                           			   ; physical drive 0.1 goes backwards
      M569 P0.2 S1                           			   ; physical drive 0.2 goes forwards
      M569 P0.3 S1                           			   ; physical drive 1.0 goes forwards
      M569 P0.4 S1                           			   ; physical drive 1.1 goes forwards
      M569 P0.5 S1                           			   ; physical drive 1.2 goes forwards
      M569 P121.0 S1                         			   ; physical drive 121.0 goes forwards
      M584 X0.0 Y0.1 Z0.2:0.3:0.4:0.5 E121.0 			   ; set drive mapping
      M350 X16 Y16 Z16 E16 I1                            ; configure microstepping with interpolation
      M92 X80.00 Y80.00 Z400.00 E420.00                  ; set steps per mm
      M566 X900.00 Y900.00 Z60.00 E120.00                ; set maximum instantaneous speed changes (mm/min)
      M203 X6000.00 Y6000.00 Z180.00 E1200.00            ; set maximum speeds (mm/min)
      M201 X500.00 Y500.00 Z20.00 E250.00                ; set accelerations (mm/s^2)
      M906 X800 Y800 Z800 E800 I30                       ; set motor currents (mA) and motor idle factor in per cent
      M84 S30                                            ; Set idle timeout
      
      ; Axis Limits
      M208 X0 Y0 Z0 S1                                   ; set axis minima
      M208 X230 Y210 Z200 S0                             ; set axis maxima
      
      ; Endstops
      M574 X1 S3                                         ; configure sensorless endstop for low end on X
      M574 Y1 S3                                         ; configure sensorless endstop for low end on Y
      M574 Z2 S4                                         ; configure sensorless endstop for low end on Z
      M915 X Y R0 F0
      
      ; Z-Probe
      M950 S0 C"121.io0.out"                             ; create servo pin 0 for BLTouch
      M558 P9 C"121.io0.in" H5 F120 T6000                ; set Z probe type to bltouch and the dive height + speeds
      G31 P500 X0 Y0 Z2.5                                ; set Z probe trigger value, offset and trigger height
      M557 X15:215 Y15:195 S20                           ; define mesh grid
      
      ; Heaters
      M308 S0 P"temp0" Y"thermistor" T100000 B4138       ; configure sensor 0 as thermistor on pin temp0
      M950 H0 C"out0" T0                                 ; create bed heater output on out0 and map it to sensor 0
      M307 H0 R0.668 K0.501:0.000 D4.24 E1.35 S1.00 B0   ; disable bang-bang mode for the bed heater and set PWM limit
      M140 H0                                            ; map heated bed to heater 0
      M143 H0 S120                                       ; set temperature limit for heater 0 to 120C
      M308 S1 P"121.temp0" Y"thermistor" T100000 B4138   ; configure sensor 1 as thermistor on pin 121.temp0
      M950 H1 C"121.out0" T1                             ; create nozzle heater output on 121.out0 and map it to sensor 1
      M307 H1 B0 S1.00                                   ; disable bang-bang mode for heater  and set PWM limit
      M143 H1 S280                                       ; set temperature limit for heater 1 to 280C
      
      ; Fans
      M950 F0 C"121.out1" Q500                           ; create fan 0 on pin 121.out1 and set its frequency
      M106 P0 S0 H-1                                     ; set fan 0 value. Thermostatic control is turned off
      M950 F1 C"121.out2" Q500                           ; create fan 1 on pin 121.out2 and set its frequency
      M106 P1 S1 H-1                                     ; set fan 1 value. Thermostatic control is turned off
      
      ; Tools
      M563 P0 D0 H1 F0                                   ; define tool 0
      G10 P0 X0 Y0 Z0                                    ; set tool 0 axis offsets
      G10 P0 R0 S0                                       ; set initial tool 0 active and standby temperatures to 0C
      
      ; Custom settings are not defined
      
      ; Miscellaneous
      M911 S10 R11 P"M913 X0 Y0 G91 M83 G1 Z3 E-5 F1000" ; set voltage thresholds and actions to run on power loss


      ; homez.g
      ; called to home the Z axis
      ;
      M400 			  ; Wait for current moves to finish
      M913 Z70	 	  ; drop motor current to 70%
      M400
      G91               ; relative positioning
      ;G1 H2 Z5 F10000   ; lift Z relative to current position
      G1 H1 Z600 F7000  ; move Z down until the endstop is triggered
      G92 Z0            ; set Z position to axis minimum (you may want to adjust this)
      M400
      M913 Z100	 	  ; return current to 100%
      M400
      ; Uncomment the following lines to lift Z after probing
      ;G91              ; relative positioning
      ;G1 Z5 F100       ; lift Z relative to current position
      ;G90              ; absolute positioning


      posted in Tuning and tweaking
      graybilldustinundefined
      graybilldustin