M566 setting for a humble retraction
-
@r123 How are you testing and setting the retraction parameters? If you aren't already doing so, I'd highly recommend that you use firmware retraction just because it allows you to change any or all of the parameters "on the fly". Once you have found the optimum settings, you can always re-enable retraction via the slicer using the values that you derived from the firmware method. The parameters you can change are listed under M207 and include different retraction and un-retraction amounts as well as speeds https://duet3d.dozuki.com/Wiki/Gcode#Section_M207_Set_retract_length
Another thing that might help is pressure advance which reduces the amount of retraction needed.
-
@deckingman Recently implemented firmware retraction: all of the testing is frankly unimaginable without it.
Have a Bondtech BMG 3:1 direct extruder (with 0.9deg motor) which normally is the bees knees in precision (at least by comparison with what has gone before). As things get more dialled in would love to test the extra parameters you refer to.
-
@r123 said in M566 setting for a humble retraction:
It feels like the Duet is gathering it's breath between layers.
What slicer are you using? Do you have wipe on layer change or something like that enabled?
-
@Phaedrux That's a good point. I have Simplify3d and the relevant settings (which I took to be defaults, didn't change them, they sounded sensible) are as below. What do you think?
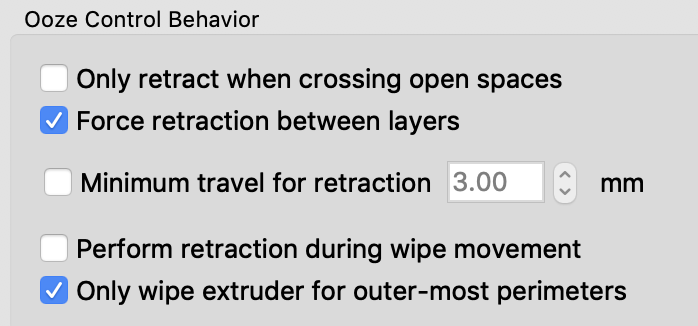
(retraction distance set in Firmware not here - bit longer than average 'cos using a Volcano - M207 S1.4 F2500 )

-
@r123 I'm not a S3D user, so I'm not really sure if that combination of settings will be using wipe or not. It looks sensible though.
Using pressure advance may let you reduce the retraction distance a bit, which would reduce the retraction pause a bit.
You could also post your config.g so we can see what your settings actually are.
-
Yeah, it's always interesting looking at other people's config.g 's. Still there are a few rogue elements in there like the 20% idle current. Why not?
<code>
; Configuration file for My Printer
; Communication and general
M111 S0 ; Debug off
M550 PRailCore ; Machine name and Netbios name (can be anything you like)
;M551 Pmyrap ; Machine password (used for FTP)
;*** If you have more than one Duet on your network, they must all have different MAC addresses, so change the last digits
M540 P0xBE:0xEF:0xDE:0xAD:0xFE:0xEE ; MAC Address
;*** Wifi Networking
M552 S1 ; Enable WiFi
M555 P2 ; Set output to look like Marlin
M575 P1 B57600 S1 ; Comms parameters for PanelDueG21 ; Work in millimetres
G90 ; Send absolute coordinates...
M83 ; ...but relative extruder moves; Axis and motor configuration
M667 S1 ; CoreXY modeM584 X0 Y1 Z5:6:7 E3:4:8:9 ; Map Z to drivers 5, 6, 7. Define unused drivers 3,4,8 and 9 as extruders
M569 P0 S1 ; Drive 0 goes forwards (change to S0 to reverse it) X stepper (Rear)
M569 P1 S0 ; Drive 1 goes backwards Y Stepper (Front)
M569 P2 S1 ; Drive 2 goes forwards Unused
M569 P3 S1 ; Drive 3 goes forwards Extruder
M569 P4 S1 ; Drive 4 goes forwards Extruder (unused)
M569 P5 S0 ; Drive 5 goes backwards Front Left Z
M569 P6 S0 ; Drive 6 goes backwards Rear Left Z
M569 P7 S1 ; Drive 7 goes backwards Right Z;Leadscrew locations
M671 X-10:-10:333 Y22.5:277.5:150 S7.5 ;Front left, Rear Left, Right S7.5 is the max correction - measure your own offsets, to the bolt for the yoke of each leadscrewM350 X16 Y16 Z16 E16 I1 ; set 16x microstepping for axes& extruder, with interpolation
M574 X2 Y1 Z0 S1 ; set homing switch configuration (x,y at min, z at max) IF YOU NEED TO REVERSE YOUR HOMING SWITCHES CHANGE S1 to S0
M906 X1400 Y1400 Z1000 E1250 I20 ; Set motor currents (mA) I20 is percentage current when in standbyM201 X3000 Y3000 Z400 E5000 ; Accelerations (mm/s^2)
M203 X24000 Y24000 Z900 E3600 ; Maximum speeds (mm/min)
M566 X600 Y600 Z120 E100 ; Maximum jerk speeds mm/minute (extruder jerk value only "used" in "pressure advance")M208 X290 Y280 Z280 ; set axis maxima and high homing switch positions (adjust to suit your machine)
M208 X-20 Y-12 Z-0.5 S1 ; set axis minima and low homing switch positions (adjust to make X=0 and Y=0 bed corner)
M92 X200 Y200 Z1600 E822 ; steps/mm (note Bondtech BMG cites 415 as their e-step value)M207 S1.4 F2500 ; in case using firmware retraction (G10/G11)in slicer, where values should be in start code, put default settings here
; Thermistors
M305 P0 T100000 B3950 R4700 H0 L0 S"bed" ; Put your own H and/or L values here to set the bed thermistor ADC correction
M305 P1 T100000 B4725 R4700 H0 L0 C7.06e-8 S"nozzle" ; Put your own H and/or L values here to set the first nozzle thermistor ADC correctionM305 P2 T100000 B4725 R4700 H0 L0 C7.06e-8 S"chamber" ; chamber temperature
M307 H0 A396.9 C698.1 D10.9 S1.00 V24.2 B0 ; Bed Heater
M307 H1 A283.0 C168.6 D3.6 S1.00 V24.1 B0 ;Heater 1 - HotendM570 S360 ; Hot end may be a little slow to heat up so allow it 180 seconds
M143 H1 S285 ; max temperature for H1 hotend; Fans
M106 P0 H-1 ; disable thermostatic mode for fan 0 (PARTS FAN)
M106 P0 S0 ; turn off PARTS FANM106 P1 T45 H1 F22500 S0.4 ; Trigger hotend 1 (left) fan at 45 C, PWM 40% @ 22500Hz (PWM necessary small fan)
M106 P2 H-1 ; disable thermostatic mode for fan 2
M106 P2 S0 ; turn off fan 2 (not used); Tool definitions
M563 P0 D0 H1 ; Define tool 0
G10 P0 S0 R0 ; Set tool 0 operating and standby temperatures
;*** If you have a single-nozzle build, comment the next 2 lines
M563 P1 D1 H2 ; Define tool 1
;G10 P1 S0 R0 X0 Y17 ; Set tool 1 operating and standby temperatures; Z probe and compensation definition
;*** If you have a switch instead of an IR probe, change P1 to P4 in the following M558 command
; IR Probe - uncomment the following 2 lines if you have a and IR Probe, and comment out the BLTouch section below
;M558 P1 X0 Y0 Z1 ; Z probe is an IR probe and is not used for homing any axes
;G31 X0 Y30 Z2.00 P500 ; Set the zprobe height and threshold (put your own values here);BLTouch - comment out the following 3 lines if using a IR Probe
M307 H3 A-1 C-1 D-1
M558 P9 X0 Y0 Z1 H1 F50 T6000 A5 S0.02 R0.7 ; R = probe recovery time in seconds
G31 X2 Y42 Z1.95 P25 ; Smaller number, looser first layer - do a paper test, and put the probed value in the Z value hereM208 S1 Z-0.2 ; set minimum Z
;
T0 ; select first hot endG29 S1 ; load heightmap.csv - mesh bed levelling result - which will activate mesh levelling
; Power Failure auto-resume
M911 S21.0 R23.0 P"M913 X0 Y0 G91 M83 G1 Z3 E-5 F1000" ;when drops below 21v perform actions, when voltage recovers 23v run resurrect-prologue.g; ref https://duet3d.dozuki.com/Wiki/Setting_up_to_resume_a_print_after_a_power_failure
</code>
-
I can't see anything that would lead to pauses between layers. That's likely to reside in the slicer settings.
I do notice that you set the M208 Z minimum in two places. That may lead to confusion at some point.
I also notice that you load the heightmap at the end of config.g which may not be best practice. Probably better to either load it at the end of homeall once the Z height has been established, or load it before a print in the slicer start gcode or in the start.g macro.
-
@r123 The comment you make in your config.g about extruder "jerk" only being used in pressure advance isn't accurate. When we were talking earlier about retractions, they are extruder only moves and in those situations, extruder jerk does not apply. However, for print moves extruder jerk does apply. I said before that the print head will slow down at the end of a move until it reaches the lowest instantaneous speed (jerk) of either X, Y or E. So setting extruder jerk too low will cause all print moves to slow down until the extruder reaches that "jerk" speed. Which is why I said set it high - like 2000 plus (in fact I use 3600). But you have it at 100 mm/minute (1.67mm/sec) which will potentially slow down the print head at the end of every move and could be the reason why you see that pause at layer change (because it has to wait for the extruder to slow right down before instigating the layer change move).
Also, M667 is deprecated in RRF 2.03 and later so if you are using a later firmware, use M669 K8 instead of M667 S1.
-
@deckingman @Phaedrux Thanks for excellent input. Have done some tidying up.
Actually had tried jerk with a high number but, after not noticing a difference, put it back down again since 100 was the default in my community. Now orrected as you suggest.
Must admit, though, for want of concrete examples, find it hard to imagine asking extruder to make large speed jumps when its job seems like a tough one.
Looking at the paperwork it's probably M669 K1 for a simple CoreXY like the Railcore? K8 is more super duper?
-
@r123 said in M566 setting for a humble retraction:
Must admit, though, for want of concrete examples, find it hard to imagine asking extruder to make large speed jumps when its job seems like a tough one.
Setting the instantaneous speed threshold high for the extruder won't be asking it to make large speed jumps. During print moves, X,Y and E must all be in sync so high extruder jerk will always be overridden by the lower jerk for X and Y. During extruder only moves, such as retractions (as we've already discussed), extruder jerk is not applied. The only time that extruder jerk comes into play is when it is so low that it overrides the X and Y jerk values and thus reduces print head speed.
Looking at the paperwork it's probably M669 K1 for a simple CoreXY like the Railcore? K8 is more super duper?
My bad. K8 is what I use but that's for a CoreXYUV (two XY gantries homed individually but in sync the rest of the time). So for a Railcore (CoreXY) you should indeed use M669 K1 (instead of the M667 S1) that you had.