• Tags
  • Documentation
  • Order
  • Register
  • Login
Duet3D Logo Duet3D
  • Tags
  • Documentation
  • Order
  • Register
  • Login

BL-Touch and the Duex 5

Scheduled Pinned Locked Moved Solved
Duet Hardware and wiring
10
68
7.2k
Loading More Posts
  • Oldest to Newest
  • Newest to Oldest
  • Most Votes
Reply
  • Reply as topic
Log in to reply
This topic has been deleted. Only users with topic management privileges can see it.
  • undefined
    JustD
    last edited by 15 Jul 2019, 15:54

    Push.. no Idea?

    Own Tronxy X5S modified to 360x360x430, 7 linear-rails (4 Z; 2 Y; 1 X-Axis), 3 independent Z-Axis with 3 Steppers; BL-Touch..
    Duet 2 Wifi 1.04 + DUEX5, 3input-nozzle with 3 extruders, 6mm Glas Plate and 600W silicon-headbed with own powersupply.

    1 Reply Last reply Reply Quote 0
    • undefined
      Phaedrux Moderator
      last edited by 15 Jul 2019, 18:31

      What is the PCB revision of the Duet? You can see the version number on the PCB itself. If you have a v1.03 or v1.04 board, you don't have to worry about 3.3v versus 5v.

      The web interface shows 1000 most of the time because the trigger time is very short before the pin retracts, so it's not easy to catch it changing.

      Z-Bot CoreXY Build | Thingiverse Profile

      1 Reply Last reply Reply Quote 0
      • undefined
        JustD
        last edited by JustD 15 Jul 2019, 20:22

        It´s an rev. v1.04
        Thank you for this... but I´m stucking with:

        1. my 3 Z-Axis & the 3 Extruders..
        2. the BLTouch.. without any function

        I play somthing around with different drivers for teh Z-Axis.. and BL-Touch.. and my last version of Config.g is this.. but don´t wirking right.

        M584 X0 Y1 Z5:6:7 U5 V6 W7 P8 S1 ; three Z motors connected to driver outputs 5, 6 and 7 (U,V,W), driver 8 for E2
        ;M667 S1 ; Select CoreXY mode
        M669 K2 Z3 ; switch to CoreXZ mode and multiply motor movements by 3 for the Z axis

        ; Define the X and Y coordinates of the leadscrews.
        ; Must come after M584 (Set drive mapping), M667 (Select CoreXY Mode) and M669 (Choosing Kinematics type)
        ; Motor order: Front right (1), front left (2), rear center (3).
        ; Snn Maximum correction in mm to apply to each leadscrew (optional, default 1.0)
        ;
        M671 X0:320:162 Y0:0:320 S3

        ; Drives
        M569 P0 S0 ; Drive 0 goes backwards X
        M569 P1 S0 ; Drive 1 goes backwards Y
        M569 P3 S0 ; Drive 3 goes backwards E0 (E1)
        M569 P4 S0 ; Drive 4 goes backwards E1 (E2)
        M569 P5 S0 ; Drive 5 goes backwards Z1/U
        M569 P6 S0 ; Drive 6 goes backwards Z2 V
        M569 P7 S0 ; Drive 7 goes backwards Z3 W
        M569 P8 S0 ; Drive 8 goes backwards E2

        M350 X16 Y16 Z16:16:16 U16 V16 W16 E16:16:16 I1 ; Configure microstepping with interpolation
        M92 X80 Y80 Z800:800:800 U800 V800 W800 E93:93:93 ; Set steps per mm
        M566 X900 Y900 Z12:12:12 U12 V12 w12 E120:120:120 ; Set maximum instantaneous speed changes (mm/min)
        M203 X12000 Y12000 Z800:800:800 U800 V800 w800 E1200:1200:1200 ; Set maximum speeds (mm/min)
        M201 X500 Y500 Z300:300:300 U300 V300 W300 E250:250:250 ; Set accelerations (mm/s^2)
        M906 X950 Y950 Z1800:1800:1800 U1800 V1800 W1800 E950:950:950 I30 ; Set motor currents (mA) and motor idle factor in per cent
        M84 S30 ; Set idle timeout

        ; Axis Limits
        M208 X0 Y0 Z0 U0 V0 W0 S1 ; Set axis minima
        M208 X324 Y324 Z355 U355 V355 W355 S0 ; Set axis maxima

        ; Endstops
        M574 X1 Y2 S1 ; Set X=low end Y= high end active high endstops

        ; Z-Probe
        ;M574 Z1 S1 ; Define Z to use Probe. Home to Min.
        M574 Z5 S2 ; Define Z to use Probe. Home to Min. <-- möglich?
        M558 P9 H7 F500 T9000 X0 Y0 Z1:U1:V1:W1 B1 ; Set Z probe type 9 to bltouch and the heater (7) height + speeds
        ;G31 P25 X+33 Y0 Z0.894 ; Set Z probe trigger value (1-25, not 500), offset and trigger height (3fach-PH noMixing)
        G31 P25 X+26.4 Y15.8 Z0.894 ; Set Z probe trigger value (1-25, not 500), offset and trigger height (Diamond-org)
        M557 X45:325 Y25:325 S30 ; Define mesh grid

        ; BLTouch - Heater 3
        M307 H7 A-1 C-1 D-1 ; Disable heater 5 to free up PWM channel 1 on the Duex board.

        ; Heaters
        M305 P0 T100000 B4138 C0 R4700 ; Set thermistor + ADC parameters for heater 0 (Bed)
        M143 H0 S125 ; Set temperature limit for heater 0 to 125C
        M305 P1 T100000 B4138 C0 R4700 ; Set thermistor + ADC parameters for heater 1 (Nozzle)
        M143 H1 S285 ; Set temperature limit for heater 1 to 285C
        ;M140 S35

        Own Tronxy X5S modified to 360x360x430, 7 linear-rails (4 Z; 2 Y; 1 X-Axis), 3 independent Z-Axis with 3 Steppers; BL-Touch..
        Duet 2 Wifi 1.04 + DUEX5, 3input-nozzle with 3 extruders, 6mm Glas Plate and 600W silicon-headbed with own powersupply.

        undefined 1 Reply Last reply 15 Jul 2019, 20:53 Reply Quote 0
        • undefined
          JustD
          last edited by 15 Jul 2019, 20:31

          I don´t know if it´s really right to have U,V And W.. or not...
          Or ist it usefull, to all Z-Axis at the duet (5-7) and no use of the original Z?? I dont know

          Nobody can show me really the connection between Heater and PWM.Channels as a Table..(not Pin-#)

          I´m sorry.. I´m not a programmer.. so it´s possible I dont know.. what anybody knows.. who can write programs for ... 3D printers...
          for the Moment I´m at the end of my Knowledge.. but I want to understand what I do.

          Own Tronxy X5S modified to 360x360x430, 7 linear-rails (4 Z; 2 Y; 1 X-Axis), 3 independent Z-Axis with 3 Steppers; BL-Touch..
          Duet 2 Wifi 1.04 + DUEX5, 3input-nozzle with 3 extruders, 6mm Glas Plate and 600W silicon-headbed with own powersupply.

          1 Reply Last reply Reply Quote 0
          • undefined
            Phaedrux Moderator @JustD
            last edited by 15 Jul 2019, 20:53

            @justd said in BL-Touch and the Duex 5:

            M669 K2 Z3 ; switch to CoreXZ mode and multiply motor movements by 3 for the Z axis

            Is this a CoreXY or CoreXZ?

            I'm not sure what part you're getting stuck on for connecting the BLTouch.
            https://duet3d.dozuki.com/Wiki/Connecting_a_Z_probe#Section_Duet_2_WiFi_Ethernet_with_Duex_2_or_Duex_5_expansion_board

            Have you tested the probe using this? https://duet3d.dozuki.com/Wiki/Test_and_calibrate_the_Z_probe

            Z-Bot CoreXY Build | Thingiverse Profile

            1 Reply Last reply Reply Quote 0
            • undefined
              JustD
              last edited by JustD 16 Jul 2019, 05:11

              uups.. yes.. this is one of my test and play around..

              It´s an Core XY Printer and I actually delete this line. and use the Line above as CoreXY

              Thats what I mean with.. "1. my 3 Z-Axis & the 3 Extruders.."
              "Another Test to the extruders shows.. ohh. something goes really wrong!
              Instead of any extruder.. following situation If I try to extrude (if the Nozzle is hot enough):
              E0 extrude= no reaction..nothing
              E1 extrude= the front left Z (U) is flatering not moving
              E2 extrude= the rear middle Z (V) is flatering not moving

              Yes I know this two Links.. and I tested it... Thats what I describe.. I can´t test the Deploy or retract, if the BL-Touch doesn´t working correctly.. means .. the normal LED (red in my).. is not lighting.
              Nothing.. so you can do no function test.
              I checkt the Cabeling twice and more.. messure from the connector up to the connector at the BLTouch... it´s ok.
              I messure the Output of the board.. nothing to messure.. = no output.. I describe it above.

              Own Tronxy X5S modified to 360x360x430, 7 linear-rails (4 Z; 2 Y; 1 X-Axis), 3 independent Z-Axis with 3 Steppers; BL-Touch..
              Duet 2 Wifi 1.04 + DUEX5, 3input-nozzle with 3 extruders, 6mm Glas Plate and 600W silicon-headbed with own powersupply.

              1 Reply Last reply Reply Quote 0
              • undefined
                JustD
                last edited by JustD 16 Jul 2019, 17:59

                Additional some information.. maybe.. who knows what one of the problems.

                ; bed.g
                ; Called using G32
                ; Called to perform True Autolevel using 3-point probe
                ;
                M561 ; clear any bed transform
                G29 S2; Clear bed height map
                ; Probe 3-point
                M98 Pdeployprobe.g ; deploy mechanical Z probe
                M401 ; Deploy probe - deployprobe.g
                G30 P0 X0 Y0 Z-9999 ; Front Right
                G30 P1 X324 Y0 Z-9999 ; Front Left
                G30 P2 X162 Y324 Z-9999 S3 ; Center Rear
                M402

                ; deployprobe.g
                ; called to deploy a physical Z probe
                M280 P7 S10

                ; retractprobe.g
                ; called to retract a physical Z probe
                M280 P7 S90

                ; homez.g
                ; called to home the Z axis
                ;betrue3d.dk´s Homing-Z5
                ; Homez.g
                G30 ; Do a single probe to home our Z axis
                G90 ; Make sure we are in absolute mode
                G1 Z10 F8000 ; Rapidly move the Z axis to Z=10

                macros/Alarm Release + Pin UP
                M280 P7 S160 ; Alarm Release and Push-Pin UP

                I´v done sucessfull a update.. so I´m actual at the newest Firmaware since two weeks.
                The Powerin is 24V 360W for Board´s and Nozzle-Heater H1
                Bed (H0) has it´s own Powersupply weith 600W

                How can I check the DUEX-Board.. for correct function or is it enogh, if the Z-drivers working?

                Own Tronxy X5S modified to 360x360x430, 7 linear-rails (4 Z; 2 Y; 1 X-Axis), 3 independent Z-Axis with 3 Steppers; BL-Touch..
                Duet 2 Wifi 1.04 + DUEX5, 3input-nozzle with 3 extruders, 6mm Glas Plate and 600W silicon-headbed with own powersupply.

                1 Reply Last reply Reply Quote 0
                • undefined
                  JustD
                  last edited by 22 Jul 2019, 16:07

                  Please help me out.. any hints for Checks.. or solutions?

                  Own Tronxy X5S modified to 360x360x430, 7 linear-rails (4 Z; 2 Y; 1 X-Axis), 3 independent Z-Axis with 3 Steppers; BL-Touch..
                  Duet 2 Wifi 1.04 + DUEX5, 3input-nozzle with 3 extruders, 6mm Glas Plate and 600W silicon-headbed with own powersupply.

                  1 Reply Last reply Reply Quote 0
                  • undefined
                    Phaedrux Moderator
                    last edited by 22 Jul 2019, 16:43

                    Sorry, but I'm having a hard time following what the issue is at this point. Can you restate the problem as clearly as possible?

                    Z-Bot CoreXY Build | Thingiverse Profile

                    1 Reply Last reply Reply Quote 0
                    • undefined
                      JustD
                      last edited by JustD 22 Jul 2019, 20:22

                      The Issue is..

                      1. the BLTouch doesn´t work .. nothing.. no light.. no function (check on E3/E5/E7, all the same connected with DUEX5)
                      2. the three Extruder don´t work... instead of the Extruder working... Z-Axis (connected over DUEX5)wobble/vibrating .. . one Z-Axis in order of one Extruder... (E0 [Duet-E0]->Z1[Duet-Z] /E1 [Duet-E1]=Z2 [DUEX-Dr6] / E2 [DUEX-Dr8]=z3 [DUEX-Dr7]) to each corresponding Z-Axis.

                      Own Tronxy X5S modified to 360x360x430, 7 linear-rails (4 Z; 2 Y; 1 X-Axis), 3 independent Z-Axis with 3 Steppers; BL-Touch..
                      Duet 2 Wifi 1.04 + DUEX5, 3input-nozzle with 3 extruders, 6mm Glas Plate and 600W silicon-headbed with own powersupply.

                      undefined 1 Reply Last reply 22 Jul 2019, 20:51 Reply Quote 0
                      • undefined
                        deckingman @JustD
                        last edited by 22 Jul 2019, 20:51

                        @justd If this is how you have the motors connected...........,

                        M569 P0 S0 ; X
                        M569 P1 S0 ; Y
                        M569 P3 S0 ; E0 (E1)
                        M569 P4 S0 ; E1 (E2)
                        M569 P5 S0 ; Z1/U
                        M569 P6 S0 ; Z2 V
                        M569 P7 S0 ; Z3 W
                        M569 P8 S0 ; E2

                        ....then your mapping should look like this

                        M584 X0 Y1 Z5:6:7 U5 V6 W7 E3:4:8

                        Ian
                        https://somei3deas.wordpress.com/
                        https://www.youtube.com/@deckingman

                        1 Reply Last reply Reply Quote 1
                        • undefined
                          JustD
                          last edited by JustD 23 Jul 2019, 05:25

                          Hi Ian, big thank you.... thats the problem with the extruders..!!
                          One Problem solved..
                          Next the BLTouch.. I will check it later...

                          Now I´m checked the BLTouch again and again.. Check wiring.. and setup as Betrue to it.

                          If I try to Homing Z, I get this Message.
                          "G28 Z

                          Error: Z probe already triggered at start of probing move
                          Error: G0/G1: insufficient axes homed"

                          Sometimes.. for a very short while.. the Value of the Z-Probe at the WEB-interface depends on 875 and switch quickly back to 1000.

                          Thats the relevant Config.g and Deploy.g/retract.g

                          ; Mapping of Driver for X,Y, Z1-3, E1-3
                          M584 X0 Y1 Z5:6:7 U5 V6 W7 E3:4:8 ; three Z motors connected to driver outputs 5, 6 and 7 (U,V,W), driver 8 for E2

                          M667 S1 ; Select CoreXY mode

                          ; Define the X and Y coordinates of the leadscrews.
                          ; Must come after M584 (Set drive mapping), M667 (Select CoreXY Mode) and M669 (Choosing Kinematics type)
                          ; Motor order: Front right (1), front left (2), rear center (3).
                          ; Snn Maximum correction in mm to apply to each leadscrew (optional, default 1.0)
                          ;
                          M671 X0:320:162 Y0:0:320 S3

                          ; Drives
                          M569 P0 S0 ; Drive 0 goes backwards X
                          M569 P1 S0 ; Drive 1 goes backwards Y
                          M569 P3 S0 ; Drive 3 goes backwards E0 (E1)
                          M569 P4 S0 ; Drive 4 goes backwards E1 (E2)
                          M569 P5 S0 ; Drive 5 goes backwards Z1/U
                          M569 P6 S0 ; Drive 6 goes backwards Z2 V
                          M569 P7 S0 ; Drive 7 goes backwards Z3 W
                          M569 P8 S0 ; Drive 8 goes backwards E2

                          M350 X16 Y16 Z16:16:16 U16 V16 W16 E16:16:16 I1 ; Configure microstepping with interpolation
                          M92 X80 Y80 Z800:800:800 U800 V800 W800 E93:93:93 ; Set steps per mm
                          M566 X900 Y900 Z12:12:12 U12 V12 w12 E120:120:120 ; Set maximum instantaneous speed changes (mm/min)
                          M203 X12000 Y12000 Z800:800:800 U800 V800 w800 E1200:1200:1200 ; Set maximum speeds (mm/min)
                          M201 X500 Y500 Z300:300:300 U300 V300 W300 E250:250:250 ; Set accelerations (mm/s^2)
                          M906 X950 Y950 Z1800:1800:1800 U1800 V1800 W1800 E950:950:950 I30 ; Set motor currents (mA) and motor idle factor in per cent
                          M84 S30 ; Set idle timeout

                          ; Axis Limits
                          M208 X0 Y0 Z0 U0 V0 W0 S1 ; Set axis minima
                          M208 X324 Y324 Z355 U355 V355 W355 S0 ; Set axis maxima

                          ; Endstops
                          M574 X1 Y2 S1 ; Set X=low end Y= high end active high endstops

                          ; Z-Probe
                          M574 Z1 S2 ; Define Z1 to use Probe at low End. Home to Min. S2 = Z probe
                          M558 P5 H7 F500 T9000 X0 Y0 Z1:U1:V1:W1 ; Set Z probe type 9 to bltouch (P5 as Betrue3D) and the heater (7) height + speeds (+ B1)
                          ;G31 P25 X+33 Y0 Z0.894 ; Set Z probe trigger value (1-25, not 500), offset and trigger height (3fach-PH noMixing)
                          G31 P25 X+26.4 Y15.8 Z0.894 ; Set Z probe trigger value (1-25, not 500), offset and trigger height (Diamond-org)
                          M557 X45:325 Y25:325 S30 ; Define mesh grid

                          ; BLTouch - Heater 7
                          M307 H7 A-1 C-1 D-1 ; Disable heater 7 to free up PWM channel 5 on the Duex board.

                          ; deployprobe.g
                          ; called to deploy a physical Z probe
                          ; in order to use the DUEX-5, the ( I1) parameter is not needed.
                          ; generated by RepRapFirmware Configuration Tool on Fri Mar 22 2019 12:45:27 GMT+0100 (Mitteleuropäische Normalzeit)
                          M280 P7 S10

                          ; retractprobe.g
                          ; called to retract a physical Z probe
                          ; in order to use the DUEX-5, the ( I1) parameter is not needed.
                          ; generated by RepRapFirmware Configuration Tool on Fri Mar 22 2019 12:45:27 GMT+0100 (Mitteleuropäische Normalzeit)
                          M280 P7 S90

                          Own Tronxy X5S modified to 360x360x430, 7 linear-rails (4 Z; 2 Y; 1 X-Axis), 3 independent Z-Axis with 3 Steppers; BL-Touch..
                          Duet 2 Wifi 1.04 + DUEX5, 3input-nozzle with 3 extruders, 6mm Glas Plate and 600W silicon-headbed with own powersupply.

                          undefined 1 Reply Last reply 23 Jul 2019, 18:09 Reply Quote 0
                          • undefined
                            JustD
                            last edited by 23 Jul 2019, 16:32

                            Is there any Jumper to push/remove?

                            Why does the BLTouch don´t have Power? (LED is lighten)

                            Own Tronxy X5S modified to 360x360x430, 7 linear-rails (4 Z; 2 Y; 1 X-Axis), 3 independent Z-Axis with 3 Steppers; BL-Touch..
                            Duet 2 Wifi 1.04 + DUEX5, 3input-nozzle with 3 extruders, 6mm Glas Plate and 600W silicon-headbed with own powersupply.

                            1 Reply Last reply Reply Quote 0
                            • undefined
                              Phaedrux Moderator @JustD
                              last edited by 23 Jul 2019, 18:09

                              @justd said in BL-Touch and the Duex 5:

                              Error: G0/G1: insufficient axes homed"

                              https://duet3d.dozuki.com/Wiki/FAQ#Section_I_get_this_error_message_Error_G0_G1_insufficient_axes_homed

                              You'll need to modify your homing files to add S2 to any G1 moves that attempt to move an axis before it is homed.

                              Can you post your homing files please?

                              M558 P5
                              Please change to P9 to use the BLTouch probe type.

                              When you first power on the printer does the BLTouch pop the pin in and out?

                              Z-Bot CoreXY Build | Thingiverse Profile

                              1 Reply Last reply Reply Quote 0
                              • undefined
                                samlogan87
                                last edited by 23 Jul 2019, 20:04

                                Not sure if this matters at all but should the

                                M307 H7 A-1 C-1 D-1 ; Disable heater 7 to free up PWM channel 5 on the Duex board.

                                come before or after the

                                M558 P5 H7 F500 T9000 X0 Y0 Z1:U1:V1:W1 ; Set Z probe type 9 to bltouch (P5 as Betrue3D) and the heater (7) height + speeds (+ B1)

                                or does it not matter. Currently it is after.

                                Regards,

                                Sam

                                Custom Core-XY

                                1 Reply Last reply Reply Quote 0
                                • undefined
                                  JustD
                                  last edited by JustD 23 Jul 2019, 21:14

                                  @Phaedrux. No.. the BLTouch is absolute without any function

                                  Now I have this..

                                  ; homex.g
                                  ; called to home the X axis
                                  ;
                                  ; generated by RepRapFirmware Configuration Tool on Fri Mar 22 2019 12:45:27 GMT+0100 (Mitteleuropäische Normalzeit)
                                  G91 ; relative positioning
                                  G1 Z5 F9000 S2 ; lift Z relative to current position
                                  G1 S1 X-365 F1800 S2 ; move quickly to X axis endstop and stop there (first pass)
                                  G1 X5 F9000 S2 ; go back a few mm
                                  G1 S1 X-365 F360 S2 ; move slowly to X axis endstop once more (second pass)
                                  G1 Z-5 F9000 S2 ; lower Z again
                                  G90 ; absolute positioning

                                  ; homey.g
                                  ; called to home the Y axis
                                  ;
                                  ; generated by RepRapFirmware Configuration Tool on Fri Mar 22 2019 12:45:27 GMT+0100 (Mitteleuropäische Normalzeit)
                                  G91 ; relative positioning
                                  G1 Z5 F9000 S2 ; lift Z relative to current position
                                  G1 S1 Y355 F1800 S2 ; move quickly to Y axis endstop and stop there (first pass)
                                  G1 Y-5 F9000 S2 ; go back a few mm
                                  G1 S1 Y355 F360 S2 ; move slowly to Y axis endstop once more (second pass)
                                  G1 Z-5 F9000 S2 ; lower Z again
                                  G90 ; absolute positioning

                                  ; homez.g
                                  ; called to home the Z axis
                                  ;
                                  ;betrue3d.dk´s Homing-Z5
                                  ; Homez.g
                                  G30 ; Do a single probe to home our Z axis
                                  G90 ; Make sure we are in absolute mode
                                  G1 Z10 F8000 S2 ; Rapidly move the Z axis to Z=10

                                  HomeU.g/ Homev.g/ Homew.g are copy´s of Homez.g

                                  Now I get this Errormessage

                                  " G28 Z

                                  Error: Z probe already triggered at start of probing move
                                  Error: Homing failed"

                                  @SAM: Thats a good question

                                  Own Tronxy X5S modified to 360x360x430, 7 linear-rails (4 Z; 2 Y; 1 X-Axis), 3 independent Z-Axis with 3 Steppers; BL-Touch..
                                  Duet 2 Wifi 1.04 + DUEX5, 3input-nozzle with 3 extruders, 6mm Glas Plate and 600W silicon-headbed with own powersupply.

                                  undefined 1 Reply Last reply 23 Jul 2019, 21:51 Reply Quote 0
                                  • undefined
                                    Phaedrux Moderator @JustD
                                    last edited by 23 Jul 2019, 21:51

                                    @justd said in BL-Touch and the Duex 5:

                                    ; homez.g
                                    ; called to home the Z axis
                                    ;
                                    ;betrue3d.dk´s Homing-Z5
                                    ; Homez.g
                                    G30 ; Do a single probe to home our Z axis
                                    G90 ; Make sure we are in absolute mode
                                    G1 Z10 F8000 S2 ; Rapidly move the Z axis to Z=10

                                    Error: Z probe already triggered at start of probing move
                                    Error: Homing failed"

                                    That error is likely because you haven't moved the probe into position before doing the G30.

                                    You need something like this

                                    ; Homez.g
                                    G90 ; Make sure we are in absolute mode
                                    G1 X150 Y150 F8000 ; move probe to bed center. Adjust to make the probe be in the center of the bed. Note that X and Y must be homed first.
                                    G30 ; Do a single probe to home our Z axis
                                    G1 Z10 ; Rapidly move the Z axis to Z=10
                                    G1 X0 Y0 ; return to home position. Adjust as needed.

                                    I don't think it matters if the heater unbinding comes before or after as long as it is unbound when the probe is called into action. I've seen people do both.

                                    If the probe doesn't respond at all and appears to be dead that means that either the wiring is incorrect or damaged, or the probe is dead.

                                    Can you temporarily setup the BLTouch without the Duex? Just to see if you can get it working that way to prove if the probe is dead or alive. It may also help to verify the wiring.

                                    Can you post a photo of how exactly it is wired?

                                    Z-Bot CoreXY Build | Thingiverse Profile

                                    1 Reply Last reply Reply Quote 0
                                    • undefined
                                      JustD
                                      last edited by 24 Jul 2019, 05:58

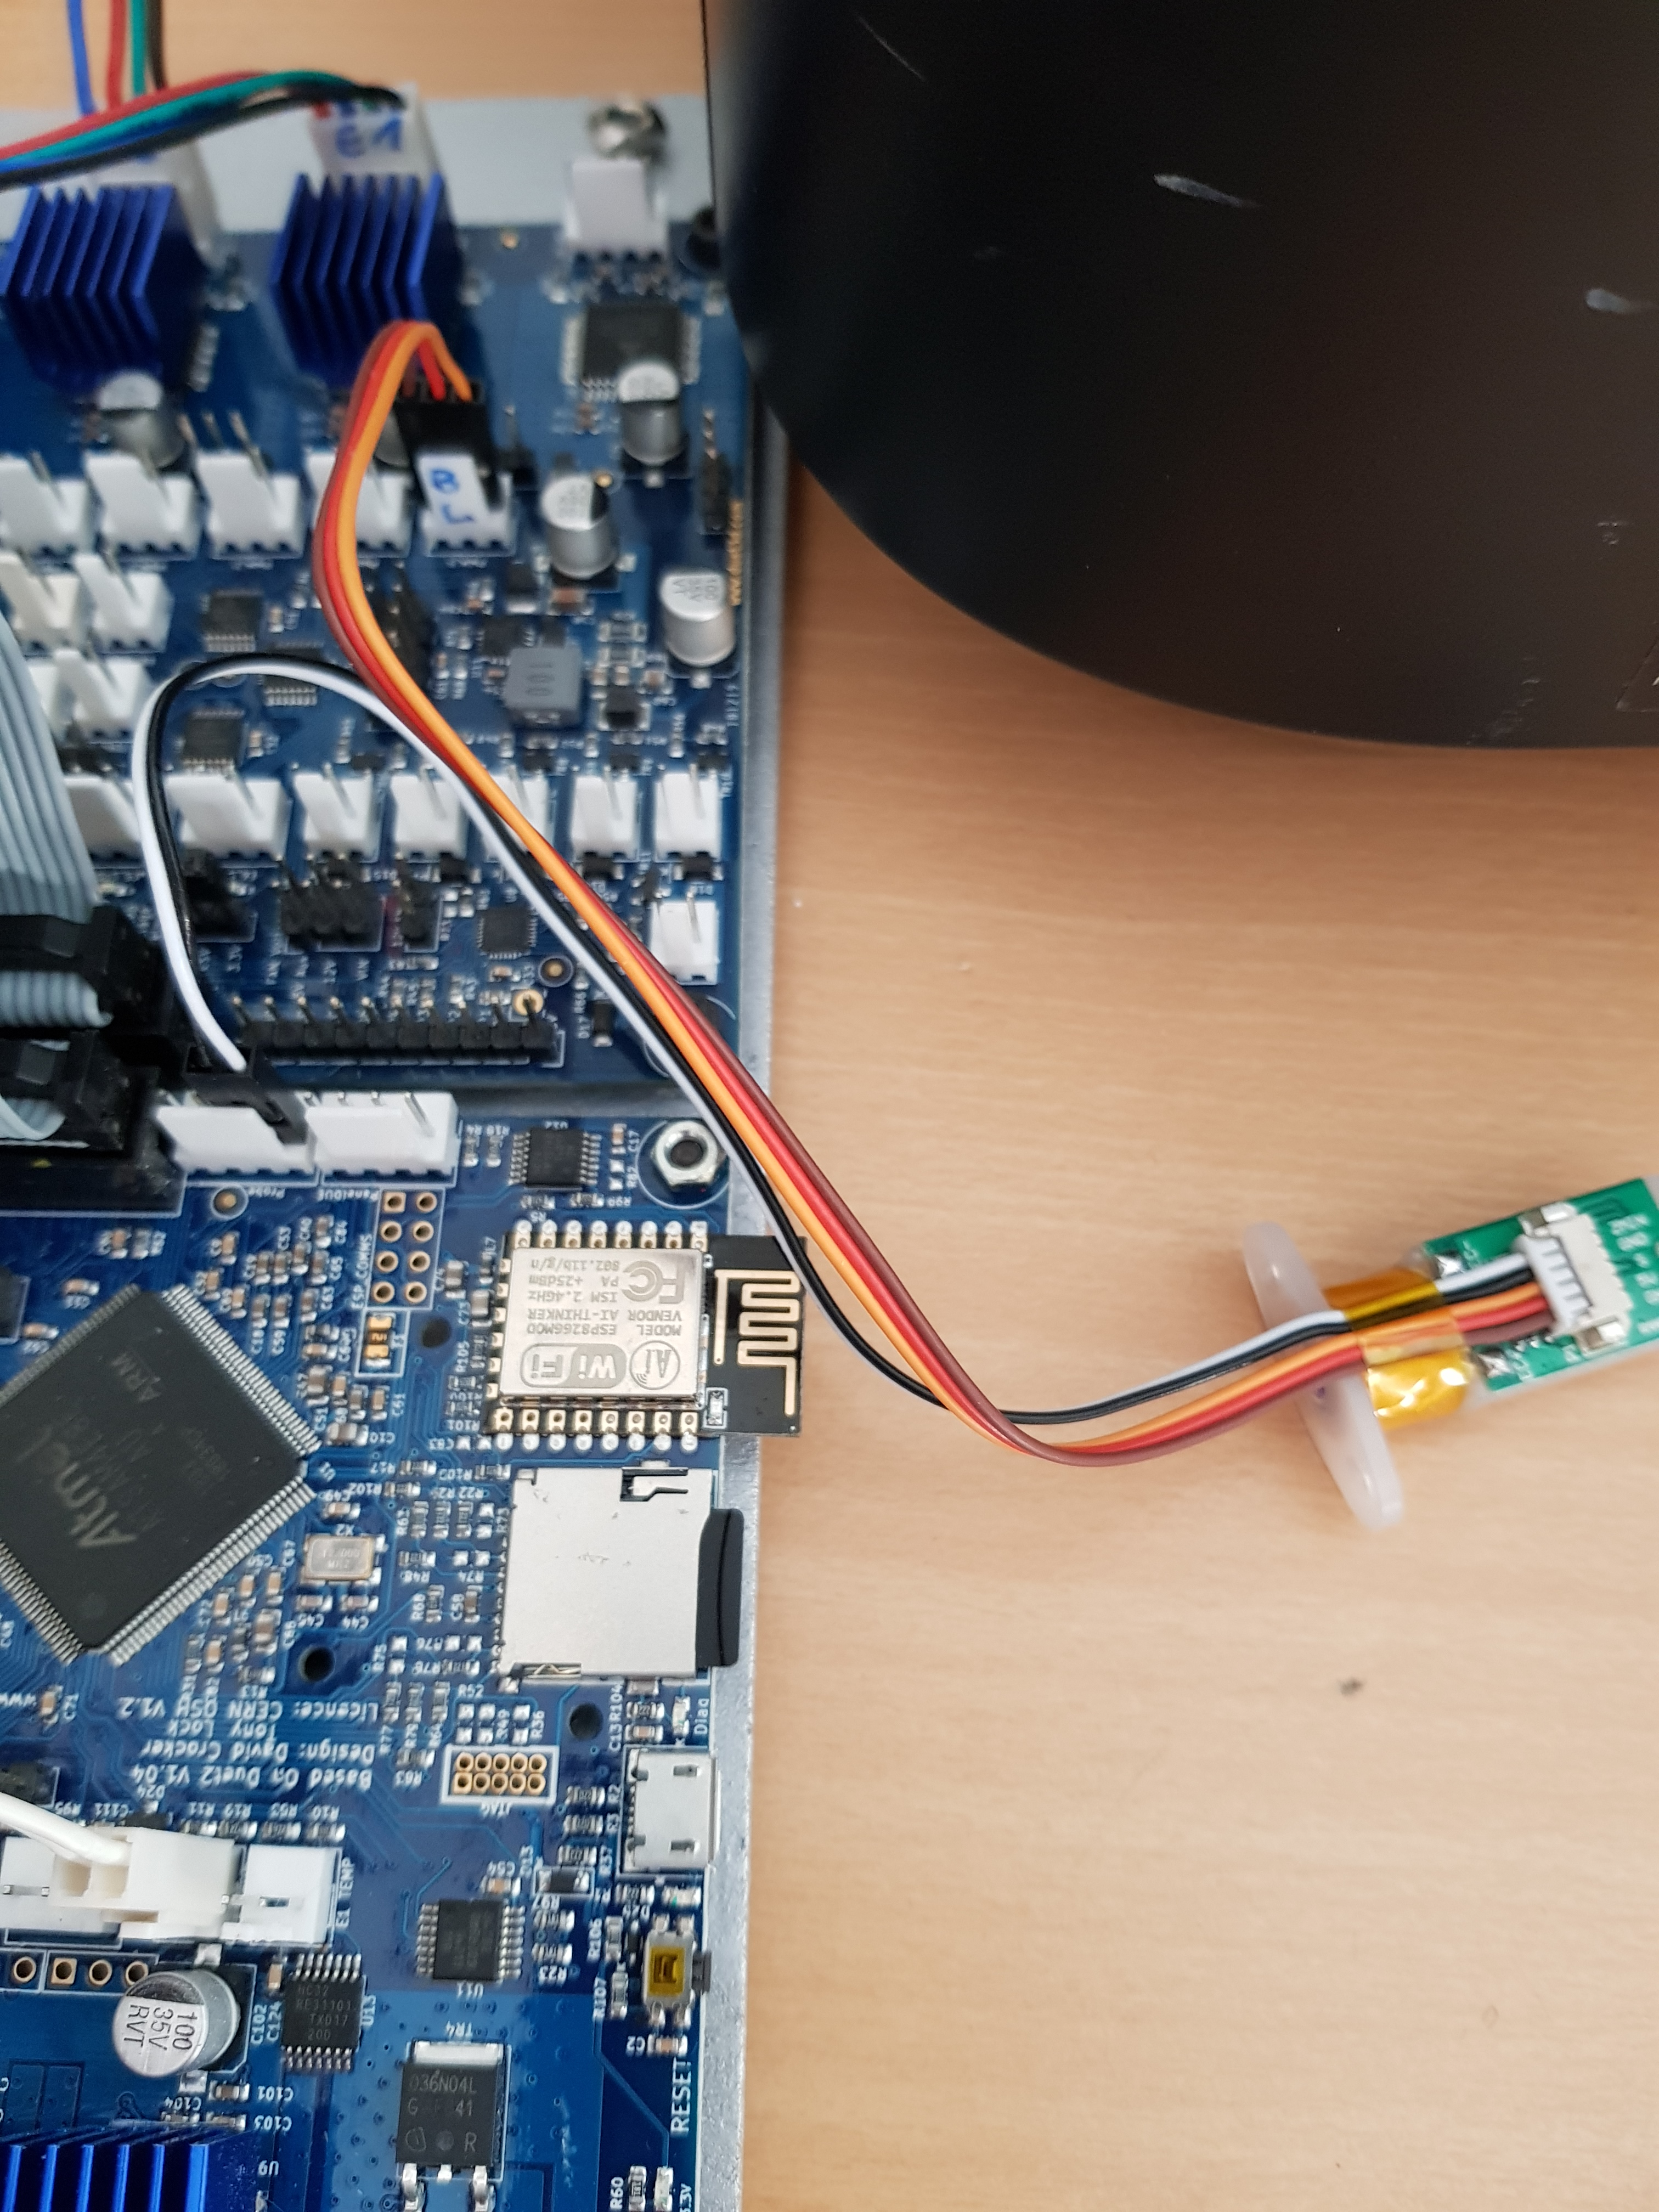
                                      I have an spare BLTouch.. and for testing I connected directly

                                      0_1563947848943_20190724_074213.jpg

                                      Own Tronxy X5S modified to 360x360x430, 7 linear-rails (4 Z; 2 Y; 1 X-Axis), 3 independent Z-Axis with 3 Steppers; BL-Touch..
                                      Duet 2 Wifi 1.04 + DUEX5, 3input-nozzle with 3 extruders, 6mm Glas Plate and 600W silicon-headbed with own powersupply.

                                      1 Reply Last reply Reply Quote 0
                                      • undefined
                                        Phaedrux Moderator
                                        last edited by 24 Jul 2019, 06:01

                                        Did it work?

                                        Z-Bot CoreXY Build | Thingiverse Profile

                                        1 Reply Last reply Reply Quote 0
                                        • undefined
                                          JustD
                                          last edited by JustD 24 Jul 2019, 06:09

                                          No.. not..
                                          I still get this Errormessage

                                          " G28 Z

                                          Error: Z probe already triggered at start of probing move
                                          Error: Homing failed"

                                          I think it´s not a Problem of homing.. ..
                                          For my viepoint it is a point at the PWM-Channel ..-- What I say.. after I connect the DUEX, the BLTouch never have the Light on.... in normal mode..

                                          I search at the Wiki.. but I see nothing.. to set a jumper. or so..

                                          Also I try.. to switch to Heater 5.. or 3.. so.. Heater 3 is on PWM1 (right?)
                                          Where is heater 5 assigned... to wich PWM Channel?

                                          Own Tronxy X5S modified to 360x360x430, 7 linear-rails (4 Z; 2 Y; 1 X-Axis), 3 independent Z-Axis with 3 Steppers; BL-Touch..
                                          Duet 2 Wifi 1.04 + DUEX5, 3input-nozzle with 3 extruders, 6mm Glas Plate and 600W silicon-headbed with own powersupply.

                                          undefined 1 Reply Last reply 24 Jul 2019, 07:22 Reply Quote 0
                                          24 out of 68
                                          • First post
                                            24/68
                                            Last post
                                          Unless otherwise noted, all forum content is licensed under CC-BY-SA