Z Wobble with 2 Independantly Driven Z Motors
-
I've got a z-wobble which is being a little persistent on a P3Steel setup. I've shortish 1.68A steppers on the z both wired to different drivers. I use G32 to level the x-axis to the bed and this is normally fine with just two repeats.
I've tried the following physical set ups:
Flexi coupler + screw constrained at the top with a bearing.
Flexi coupler + screw top free.
Solid coupler with no constraint at top.
Solid coupler with no constraint at top and the z nut loosened back from the blocks by 1mm (bolts screwed into in nylocks)The last option is working best. When I had a look closer at the part it looks to me that the part is periodically getting fatter and thinner, rather than a shift in the centring of the x-y plain. I'm wondering if this is because it is most probable that the motors will not be both aligned in terms of both at a major step, one will likely be a number of micro steps ahead or behind the other.
So, is it bes to do homing, then switch to no microsteps on the z axis and run the G32 cycles before returning to the normal microstepping and doing bed level correction etc?
-
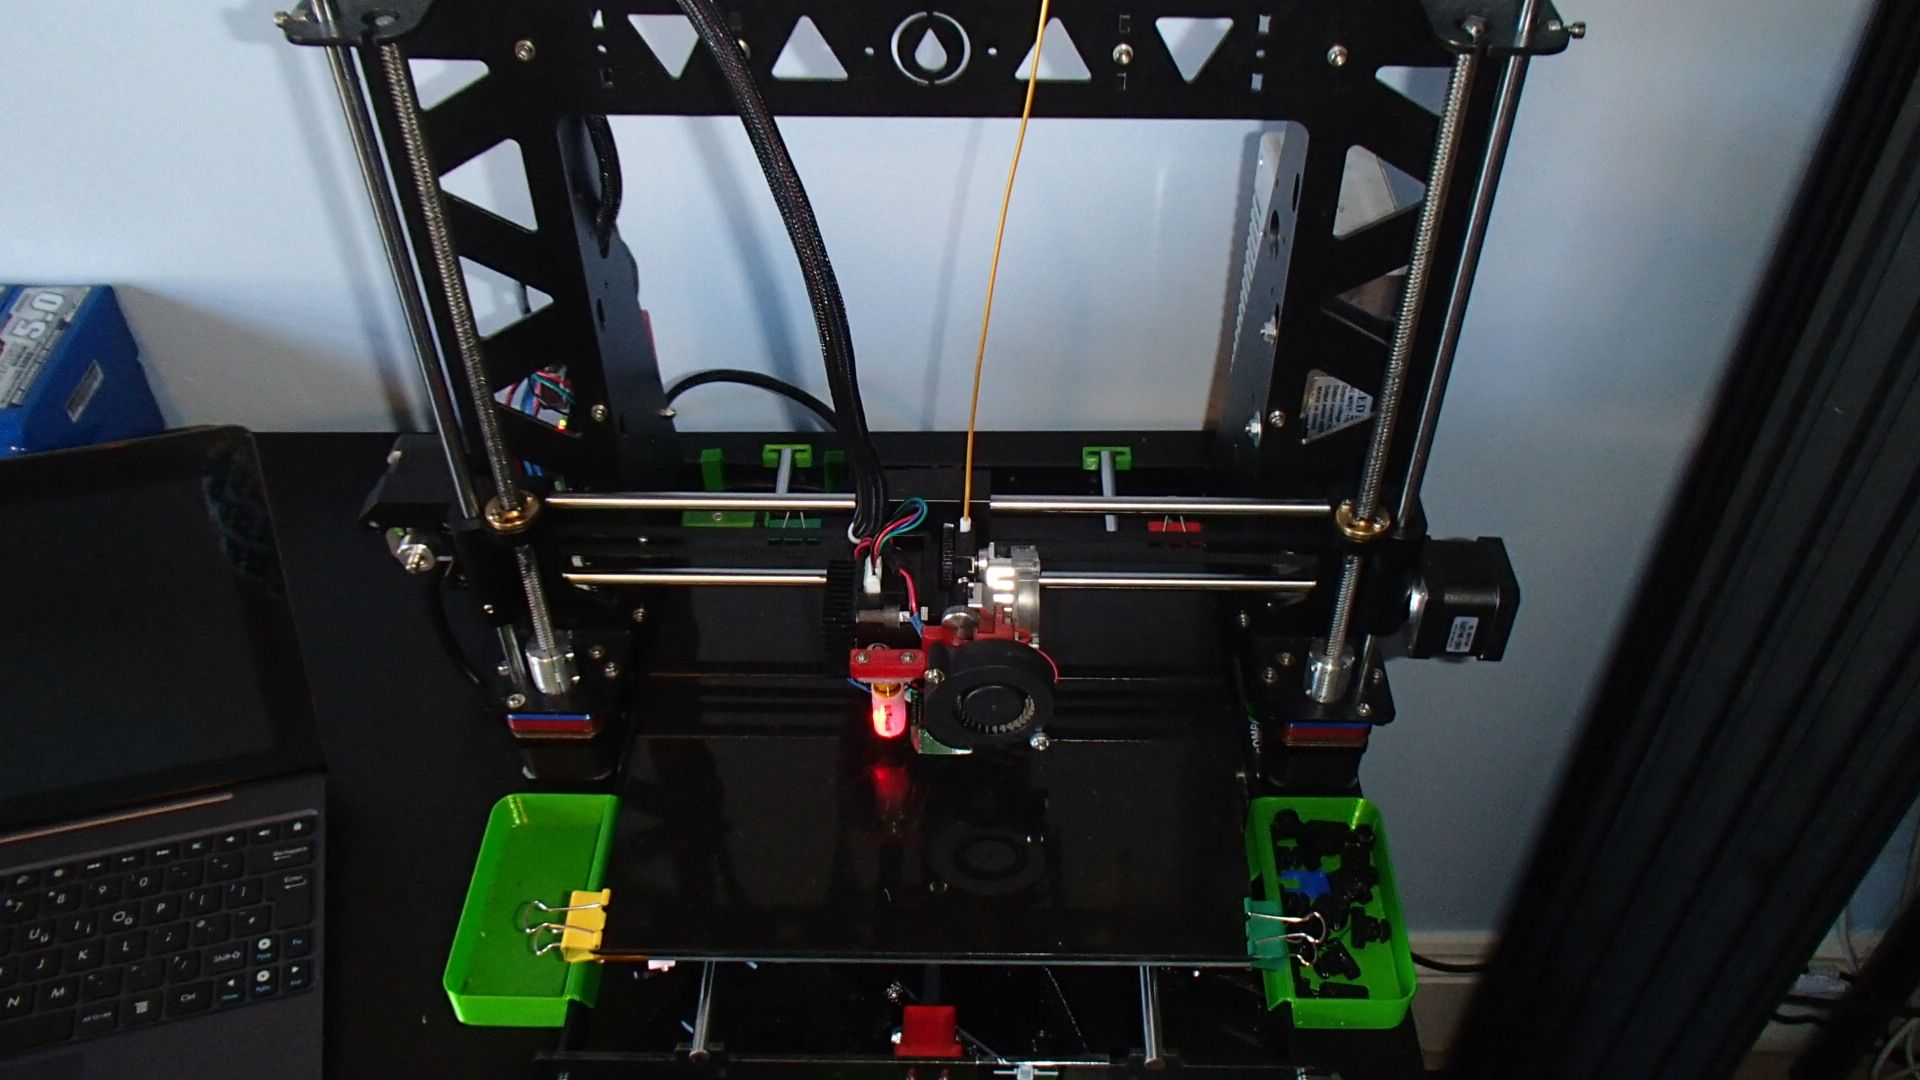
I've had a similar problem that I'm slowly closing in on. The Z axis on my cartesian machine is currently 2 motors with built-in T8 leadscrew with 4mm lead, 800 steps per mm. It was initially M5 stainless threaded rod with a flexible coupler to the motor, but these were a bit short to use the full Z height, and I prefer the leadscrew for speed. Tops of both leadscrews are unconstrained, leadscrews (and stainless rod before them) are straight, but the X axis rests on 'Z isolators' rather than being firmly attached to leadscrew nut, so any X/Y movement in the Z rods is not transferred to the X axis.
I had both Z motors on the Z axis stepper driver, and had nice even layers. I moved the right-hand Z motor to E0, and added
M584 X0 Y1 Z2:3 E4. However, I had Z wobble. I played around with microstepping, until I finally realised that I had made the newbie mistake of putting M584 after the 'Drives' section in config.g, so the motor attached to E0 was using motor defaults, whatever they are! So one motor was losing steps compared to the other.After moving M584, there was a good improvement, but I'm not completely happy. Like you, I'm wondering if the interplay of microstepping between the two motors, with them not being aligned on steps, which they are if they are both on the Z axis. One of the test I'm going to do today is to print a cylinder with the Z motors on separate drivers, and then together, to test this. I also think I've got slightly inconsistent extrusion, which doesn't help.
For bed levelling when I have the Z motors driven separately, I set up the X axis square to the printer frame. I then use the manual three point bed levelling, then tram the bed using mesh compensation. This usually means putting a shim under one corner of the printer to get the bed running level! However, after that the bed is usually very stable and flat (PCB with 3mm glass on top). Unless I move the printer again, all I have to do at startup is run an X axis levelling macro (below) rather than G32, to set the X axis level with the bed. Then I don't need to run any compensation, so the Z isn't overworked by compensation.
G29 S2                            ; disable compensation
M671 X-181.5:181.5 Y0:0 P0.5     ; leadscrews at left (-181.5,0) and right (181.5,0)
G30 P0 X-85 Y0 Z-99999            ; probe near an adjusting screw
G30 P1 X85 Y0 Z-99999 S2         ; probe near an adjusting screw and report adjustments needed
G1 X0 Y0 F6000
However, I think the X axis levelling is causing the two Z motors to be at different microsteps, and causing the subtle Z wobble. So your idea of switching to full stepping might help, though I think if you do this on the fly you need to rehome the axis, as the firmware sees this as a loss of position. May also try the X axis levelling with full stepping. To be confirmed!
Picture of my cartesian machine for reference:
Ian
-
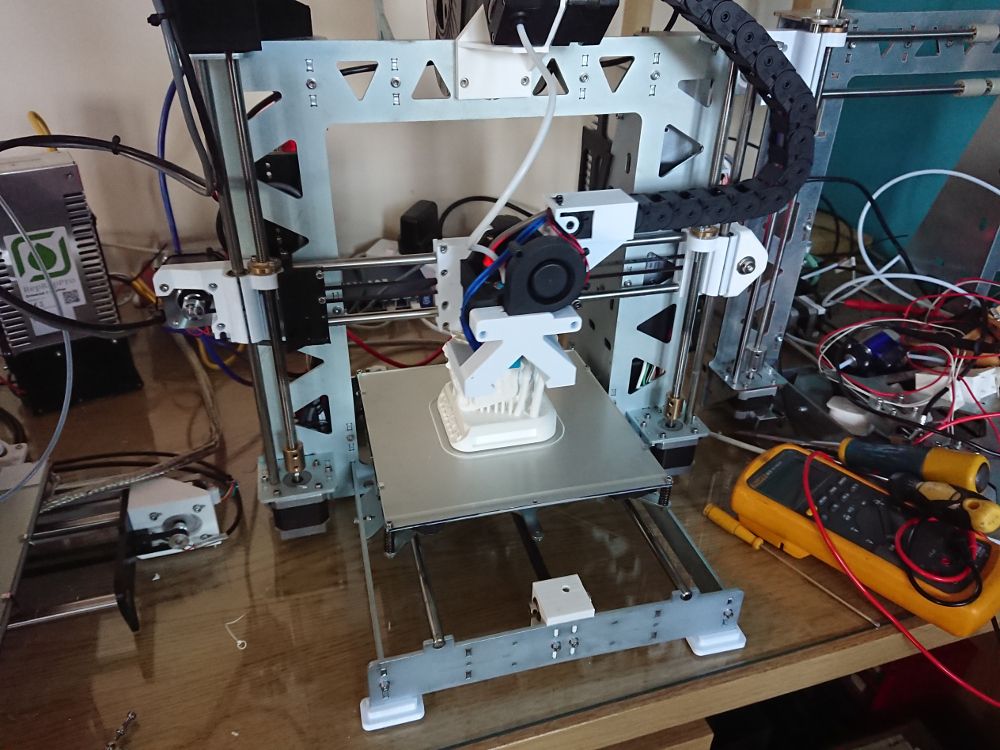
I am also using a very similar setup and had the same Z banding, but in my case it was down to the X axis not being correctly aligned with the Z axis, it is quite difficult on the P3 Steel to get this correct PA020197.JPG
-
@droftarts Thanks, your comment about the z isolators is really useful as that was one of the things I was considering. I think the ramps folk don't tend to have an issue because they wire the motors in series or parallel. Like wise I think prusa rams the axis to a hard stop, which effectively major step synchronises the drives.
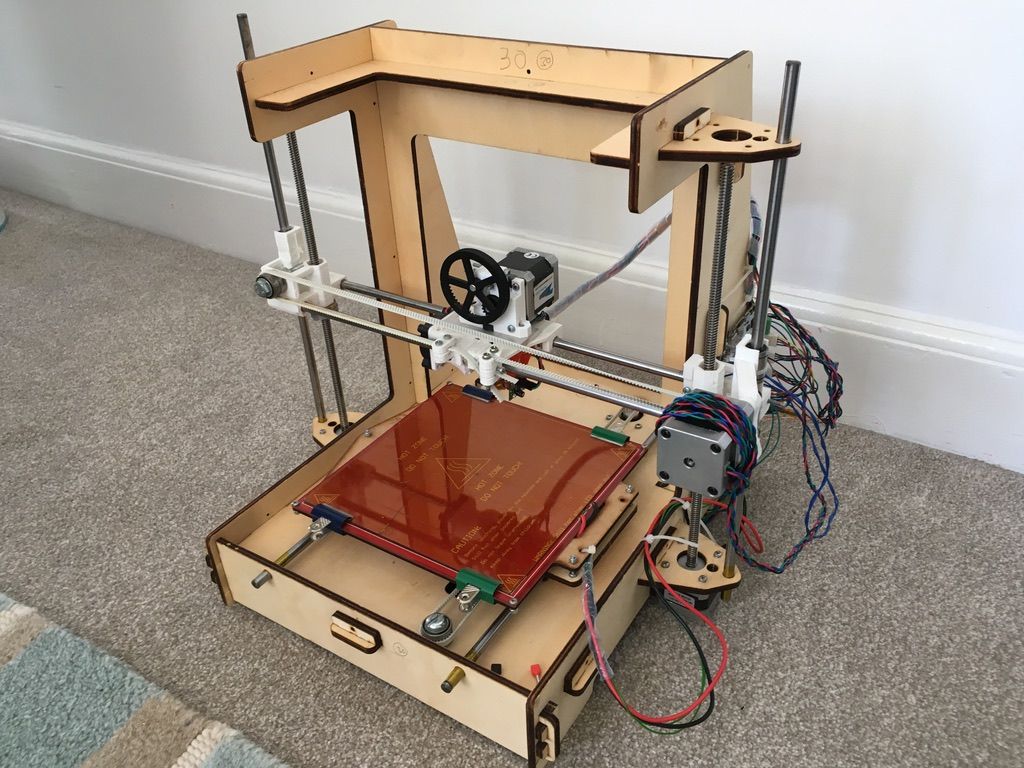
Here's my machine. The design is a work in progress. Carriage is deep because it is supposed to easily swap between direct drive and bowden. Currently on bowden as the carriage redesign is a challenge for later! I'll probably swap the cooling to two radial fans but with each duct having additional vents to cool the part around the hot end, not all pointed to the nozzle. Pulleys are 16T GT2 drive pulles both ends, hense why the x axis idle tensioner is way out to the right as it is too deep to fit in the idle block. I've got a better design for that in the second P3 that is in build.
Edit: @droftarts Iike the smooth rods laid flat. I do wonder if the y axis motion sets up a resonance in my vertiacally arranged x-axis smooth rods. v-slot axis planned for the third build!
Running 3 P3Steel with Duet 2. Duet 3 on the shelf looking for a suitable machine. One first generation Duet in a Logo/Turtle style robot!
-
@boldnuts Nice, what's the motor at the bottom right as you are looking at it?
-
It's just an empty motor with lead inside it to counter balance the X axis correctly
-
@boldnuts thanks, another thing I hadn't considered!

-
@DocTrucker said in Z Wobble with 2 Independantly Driven Z Motors:
@droftarts Thanks, your comment about the z isolators is really useful as that was one of the things I was considering. I think the ramps folk don't tend to have an issue because they wire the motors in series or parallel. Like wise I think prusa rams the axis to a hard stop, which effectively major step synchronises the drives.
Z isolators are useful if the Z threaded rod/leadscrew is not perfectly straight, or if there is a smooth rod/leadscrew alignment issue. If you get your Z motors to turn the leadscrews fast, you should see if it's not straight, or if the motor/leadscrew coupler is causing it to be off centre - another thing to watch out for!
Prusa i2 machines had a problem that the distance between the Z leadscrew and Z smooth rod were different between the X ends and the Z motor mounts, which caused the Z leadscrew to run eccentrically, and why everyone couldn't firmly mount their Z motors! I reported this, and other issues, but it never got fixed. Z isolators cure most of these sorts of problems. So worth checking the spacing between smooth rod and leadscrew in your X ends, and top and bottom, as this will force the X axis into a wobble if the top is constrained.
Edit: @droftarts Iike the smooth rods laid flat. I do wonder if the y axis motion sets up a resonance in my vertically arranged x-axis smooth rods. v-slot axis planned for the third build!
This is just me being lazy and old-school; I printed this axis in 2011, has worked well though a number of different machines/extruder/hot end combinations. I'll update it to vertical bars/Prusa style when I run out of 3mm filament! Some of my issue may also be related to the old 3mm filament I'm pushing through this machine; I'm going to get a food dehydrator to dry the filament to see if that also helps with consistency.
Nice to see your Ormerod and RepRapPro sticker on the PSU! I was tech support there for 3 years, until it shut down.
@boldnuts Good idea to counterbalance X axis. I put an old drill chuck in the idler end of my X axis! But it's generally okay without it once the X axis is levelled and square to the printer.
Ian
Bed-slinger - Mini5+ WiFi/1LC | RRP Fisher v1 - D2 WiFi | Polargraph - D2 WiFi | TronXY X5S - 6HC/Roto | CNC router - 6HC | Tractus3D T1250 - D2 Eth
-
@droftarts said in Z Wobble with 2 Independantly Driven Z Motors:
Nice to see your Ormerod and RepRapPro sticker on the PSU! I was tech support there for 3 years, until it shut down.
I thought you were. Chatted to you many times via email (possibly my old Voith email address) when building and setting up on in 2014. Issues with some strangeness with Orthogonal correction was what got me onto dc42's software.
I've two recognisable as Ormerods and a third which is made from Ormerod bits but not really an Ormerod any more:
https://reprap.org/forum/read.php?340,839175
I do get some great results from the Ormerods but I needed something more stable and less intensive to support my work. They need a fair bit of care!
-
@DocTrucker Nice! Always good to see the development continuing! Ormerods caused me support headaches, due to launching an entirely new machine layout, new electronics and new firmware, in quantity, all at the same time!
I always prefer getting printers mechanically square so I didn't have to use compensation; it always seems to complicate things. I use the calibration/compensation reports to let me know what needs adjusting physically, or to point out problems.
Ian
Bed-slinger - Mini5+ WiFi/1LC | RRP Fisher v1 - D2 WiFi | Polargraph - D2 WiFi | TronXY X5S - 6HC/Roto | CNC router - 6HC | Tractus3D T1250 - D2 Eth
-
@droftarts was Ormerod 2 the first involvement of RS? When did the Ormerod 1 come out, only marketed by RepRapPro?
Edit: Appreciate the difficulties you had there. Very tough situation.
-
Ormerod 1 (printed in red, like the RS logo) was an RS exclusive. I think we made 500 of them, for Christmas 2013. We updated parts and put shielded wire and housing on the Duet for Ormerod 2, which came out a few months later. Sold lots of them over a couple of years, but can't remember exactly how many!
Ian
-
Ok, I did have a good plan for this but alas the v0.6 and v0.8.5 boards do not support changing the microstepping mode. The A4982 drivers do, through MS1 and MS2, but on both of the first generation boards these are pulled up to 3.3V, or if you really want to you can cut the jumper and permanently drop them to full, half, or quarter step.
Plan B is hard wiring wiring the motors together. Thankfully I have a board kicking about that can do that (5V regulator board for a v0.6) without too much fuss. This will obviously permanently disable the G32 axis levelling. However, if this shows that the motors being out of sync can cause z wobble issues then I would consider the v0.6 & v0.8.5 boards of being in capable of x axis levelling.
Edit:
My plan was to create a macro with the following:- Home all axis.
- Move to 30mm above dead centre.
- Change Z microstepping mode to full step with M350 Z1
- Set the current z position to 30 with G92 Z30
- Run G32 a number of times.
- Move to 30mm above dead centre.
- Change Z microstepping mode back to default.
- Set the current z position to 30 with G92 Z30
- ...continue.
I would be interested to hear how someone with a Duet2 gets on with that. To be complete I guess the bed should be levelled to be good enough to not need bed levelling, but if that was a contributing factor I would expect the banding not to be parallel to the xy plane.
I will report on the effect of hard wired z soon.
Edit 2: Hard wired hasn't eliminated the issue. Will be comparing bed correction to no bed correction before changing back to independent steppers.
-
I'm returning my system to dual drive. There didn't appear to be any positive effect at this stage from running the steppers in series. Only negative; I needed to slow the system down so that it didn't lose steps on the Z.
I'm not saying it has no effect, it's just something else is having a far greater effect. Will try and set my z axis up again!
-
@DocTrucker It is not clear from your pic, but do you constrain the leadscrews at the top of the printer?
If so, don't do this, as this certainly causes Z-wobble. -
Yeah, tried both ways and over contraint was worse. On my sulk off to the shops I realised I could of made a mistake on the CAD in the location of the centre of the lead screw relative to the smooth rod. Will also try flipping the z nuts so the bodies aren't constrained by the x axis end blocks...
-
Looks like it may have been a noddy mistake! My attempts at de coupling the z axis by winding the nuts back did nothing because the nuts were a close fit in the x axis end blocks. Flipping the nuts made them much looser and the right hand rod wobbled around while the axis was going up and down. Think bought 6 trapizoidal lead screws and 2 of them so far have been wobbly!
This is the most clearly wrong thing I have found so far, so I am hopeful for the current benchy!
-
Time for Z-isolators, then...
Ian
-
I did a quick test with my current set up - T8 4mm leadscrews, Z isolators, not constrained at top, independent Z motor drivers, no switching to full steps - and I can't discern any difference between that and when I was using M5 (0.5mm lead) stainless rod with Z motors in series. So I think any further Z wobble on my setup is down to extrusion variation and using old filament. Food dehydrator has been ordered!
Ian
-
@droftarts said in Z Wobble with 2 Independantly Driven Z Motors:
Prusa i2 machines had a problem that the distance between the Z leadscrew and Z smooth rod were different between the X ends and the Z motor mounts, which caused the Z leadscrew to run eccentrically,
+10 points!As far as I can see the motor and rod holes on the z motor mounts are 17mm apart and 13mm from the edge of the part and on the top plate 17mm apart but 12.7mm from the top plate. This makes a lot of sense.I think I had made improvements with mounting the motor on a flexi mount. I'll now look to print a z motor mount and correct the spacing after I've double checked the main back plate CAD.You would have thought they would have fixed that when copying the designs to Steel wouldn't you?!!