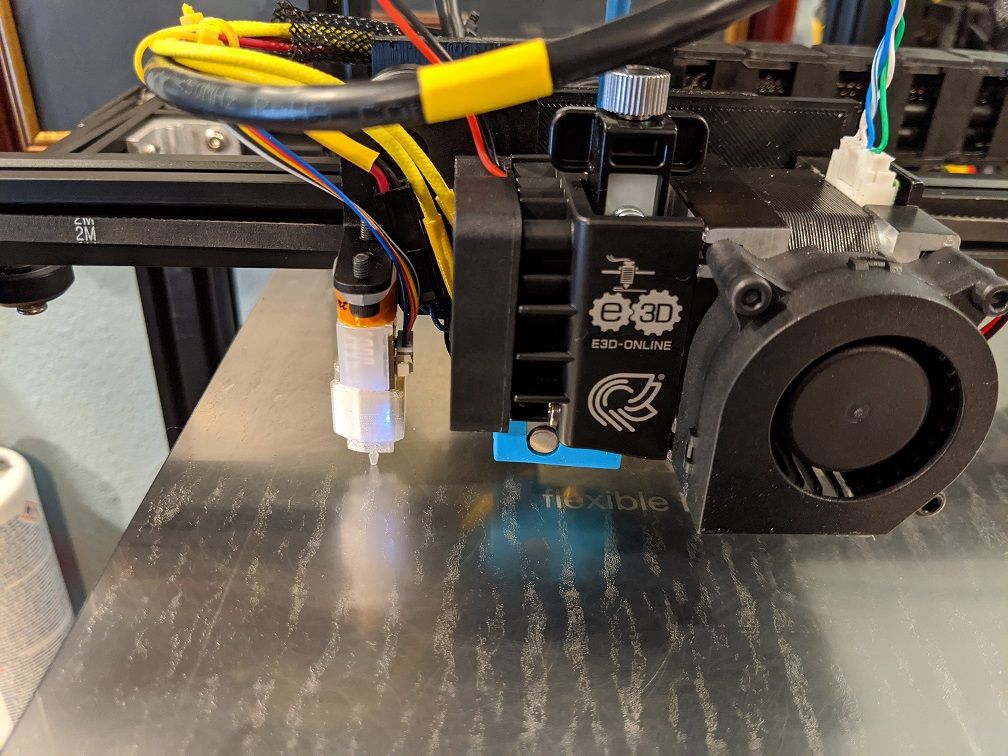
Ender 5 + Hemera + BL Touch
-
I am brand new to the Duet Eth board and RepRap. I am in the process of getting an ender 5 pro + hemera up and running and I wanted to use this topic to exchange settings with others that may have a similar setup.
What works:
-
BL Touch
-
Home X and Y
-
Fan 0 (Part Cooling Fan)
Not working:
-
Z home is VERY slow and it seems to timeout before it even reaches the BL Touch sensor.
-
Fans 1 and 2 are no where to be found on the UI
Haven't tested:
-
Heaters
-
Hemera (E0)
I would like to get the basic homing working before proceeding. Please share your settings and success if you have a similar setup.
I will post a few install images for anyone interested as I was looking around for the same when I was installing.
Here is my G-Code:
; Configuration file for Duet WiFi (firmware version 3) ; executed by the firmware on start-up ; ; generated by RepRapFirmware Configuration Tool v2.1.8 on Sat Feb 01 2020 19:54:19 GMT-0600 (Central Standard Time) ; General preferences G90 ; send absolute coordinates... M83 ; ...but relative extruder moves M550 P"Ender 5 Hemera" ; set printer name M918 P1 E4 F2000000 ; configure direct-connect display ; Network M552 P0.0.0.0 S1 ; enable network and acquire dynamic address via DHCP M586 P0 S1 ; enable HTTP M586 P1 S0 ; disable FTP M586 P2 S0 ; disable Telnet ; Drives M569 P0 S1 ; physical drive 0 goes forwards M569 P1 S1 ; physical drive 1 goes forwards M569 P2 S0 ; physical drive 2 goes backwards M569 P3 S1 ; physical drive 3 goes forwards M584 X0 Y1 Z2 E3 ; set drive mapping M350 X32 Y32 Z32 I0 ; configure microstepping without interpolation M350 E16 I1 ; configure microstepping with interpolation M92 X160.00 Y160.00 Z800.00 E409.00 ; set steps per mm M566 X1200.00 Y1200.00 Z24.00 E300.00 ; set maximum instantaneous speed changes (mm/min) M203 X9000.00 Y9000.00 Z180.00 E3600.00 ; set maximum speeds (mm/min) M201 X500.00 Y500.00 Z100.00 E5000.00 ; set accelerations (mm/s^2) M906 X800 Y800 Z800 E800 I50 ; set motor currents (mA) and motor idle factor in per cent M84 S30 ; Set idle timeout ; Axis Limits M208 X0 Y0 Z0 S1 ; set axis minima M208 X220 Y220 Z300 S0 ; set axis maxima ; Endstops M574 X1 S1 P"xstop" ; configure active-high endstop for low end on X via pin xstop M574 Y1 S1 P"ystop" ; configure active-high endstop for low end on Y via pin ystop M574 Z1 S2 ; configure Z-probe endstop for low end on Z ; Z-Probe M950 S0 C"exp.heater4" ; create servo pin 0 for BLTouch M558 P9 C"zprobe.in+zprobe.mod" H5 F120 T6000 ; set Z probe type to bltouch and the dive height + speeds G31 P500 X-43 Y3 Z2.5 ; set Z probe trigger value, offset and trigger height M557 X15:215 Y15:195 S20 ; define mesh grid ; Heaters M308 S0 P"bedtemp" Y"thermistor" T100000 B4138 ; configure sensor 0 as thermistor on pin bedtemp M950 H0 C"bedheat" T0 ; create bed heater output on bedheat and map it to sensor 0 M143 H0 S120 ; set temperature limit for heater 0 to 120C M307 H0 B0 S1.00 ; disable bang-bang mode for the bed heater and set PWM limit M140 H0 ; map heated bed to heater 0 M308 S1 P"e0temp" Y"thermistor" T100000 B4725 C7.06e-8 ; configure sensor 1 as thermistor on pin e0temp M950 H1 C"e0heat" T1 ; create nozzle heater output on e0heat and map it to sensor 1 M143 H1 S285 ; set temperature limit for heater 1 to 285C M307 H1 B0 S1.00 ; disable bang-bang mode for heater and set PWM limit ; Fans M950 F0 C"fan0" Q20 ; create fan 0 on pin fan0 and set its frequency M106 P0 S0 H-1 ; set fan 0 value. Thermostatic control is turned off M950 F1 C"fan1" Q20 ; create fan 1 on pin fan1 and set its frequency M106 P1 S1 H1 T45 ; set fan 1 value. Thermostatic control is turned on M950 F2 C"fan2" Q20 ; create fan 2 on pin fan2 and set its frequency M106 P2 S1 H1:0 T45 ; set fan 2 value. Thermostatic control is turned on ; Tools M563 P0 D0 H1 F0 ; define tool 0 G10 P0 X0 Y0 Z0 ; set tool 0 axis offsets G10 P0 R0 S0 ; set initial tool 0 active and standby temperatures to 0C ; Custom settings are not defined -
-
@mitch said in Ender 5 + Hemera + BL Touch:
M350 X32 Y32 Z32 I0 ; configure microstepping without interpolation
unless there is a specific reason you should use x16 with interpolation.
@mitch said in Ender 5 + Hemera + BL Touch:
M203 X9000.00 Y9000.00 Z180.00 E3600.00
you z speed is 3mm/sec try increasing that
-
@mitch said in Ender 5 + Hemera + BL Touch:
180
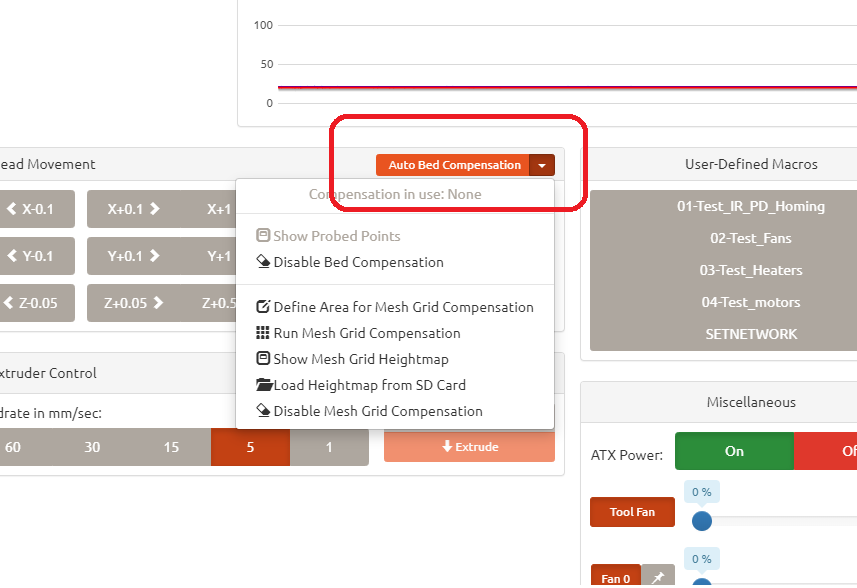
Thanks, That seemed to solve the Z travel. Now I am attempting to get "Autobed Compensation" working.
Pressing the button causes the printer to violently slam the head into the far left (max X) position before I have to hit an emergency stop.
I have the BLtouch bed offset defined correctly as well as defining the area for the mesh grid. It is almost as if the macro for this process isn't taking any of that information into consideration.
-
Which button exactly are you pushing? I suspect that it's running bed.g
-
@mitch said in Ender 5 + Hemera + BL Touch:
Pressing the button causes the printer to violently slam the head into the far left (max X) position before I have to hit an emergency stop.
is your movement correct? i suspect you need to invert the x direction for the x stepper.
-
My movement works fine. I can home all three axis with no issue.
-
did you change the microstepping and forget to change the steps/mm?
-
Can you elaborate. Chances are I didn't "forget" as much as I am asking for guidance.
-
when i said you should use x16 microstepping, did you do any changes?
-
No, could you indicated what those changes are for the ender 5 steppers? I see where the changes should be made but not sure what the setting should be.
-
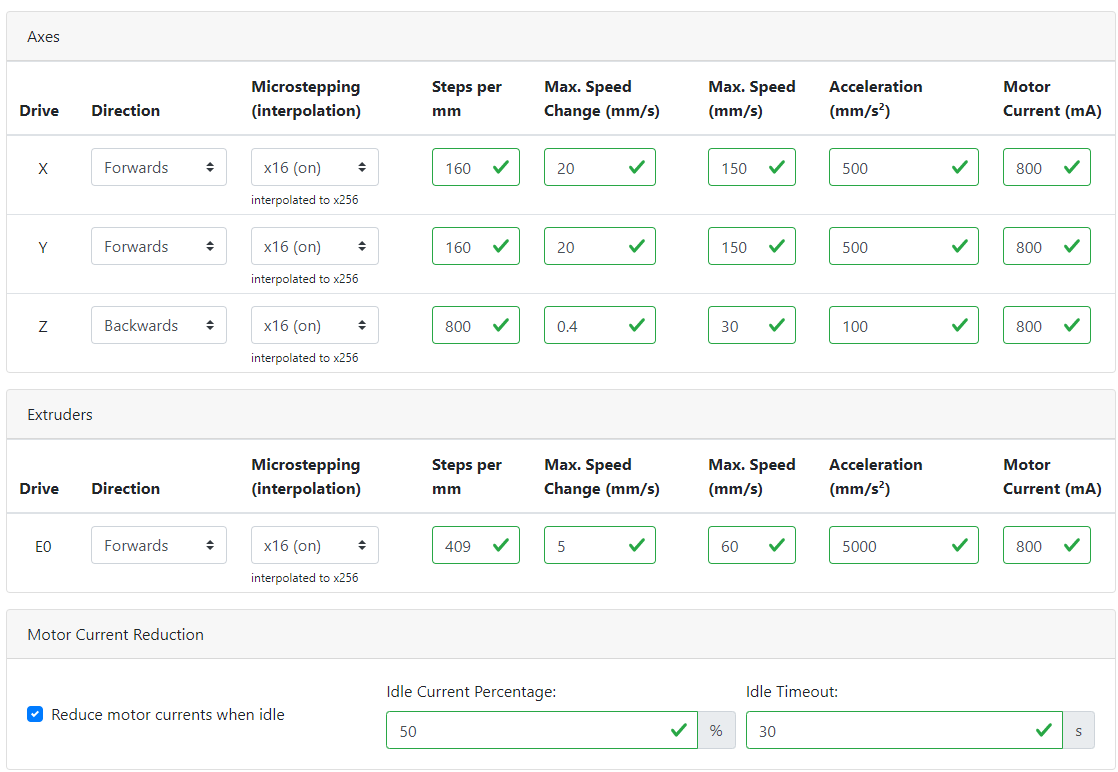
if you go from x32 to x16 microstepping you need to half the steps per mm
so change the 160 to 80
-
@Phaedrux how can I verify this? I was under the impression that the system would reference my configuration to compensate. Do I need to go manually change a bunch of files?
-
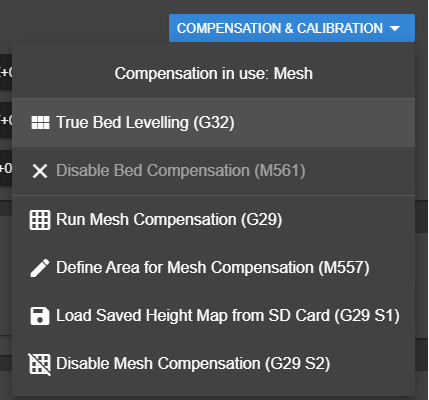
I wasn't sure which button you pressed. There are 2 different bed leveling/compensation features.
The first is mesh compensation which uses G29 which probes a grid on the bed and makes a heightmap to adjust the Z position.
The second is G32, which does nothing in and of itself, since it actually just runs a macro called bed.g. In that macro you can specify whatever you want to happen. I suspected that the button you pushed triggered that macro, and that in bed.g there were some movement commands that were unexpected.
Open bed.g in the /sys folder to check what's in it, but I don't think that's the button you pressed.
Were you able to get the steps per mm and microstepping sorted?
-
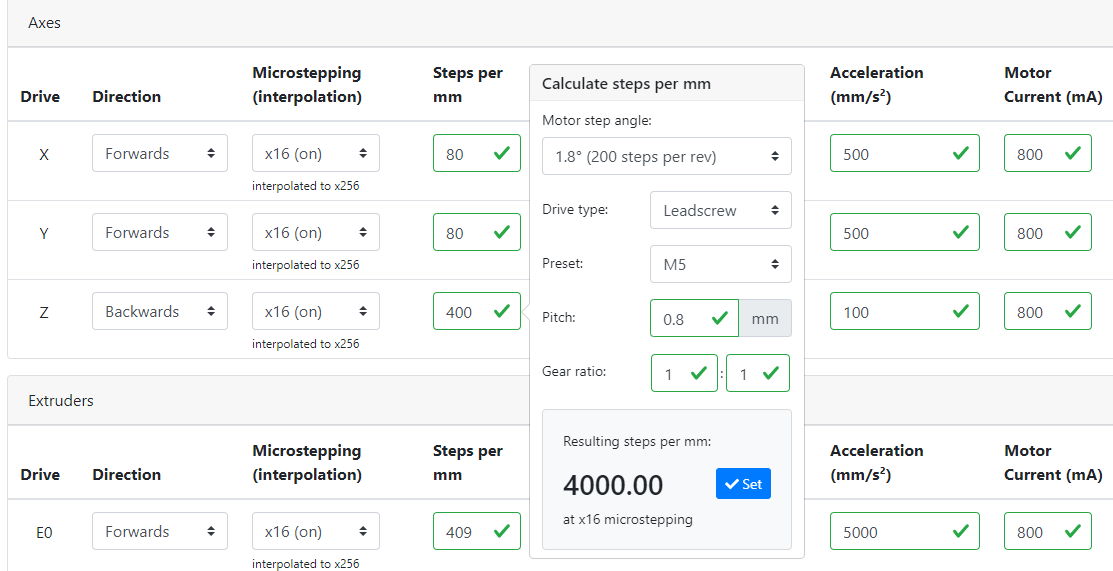
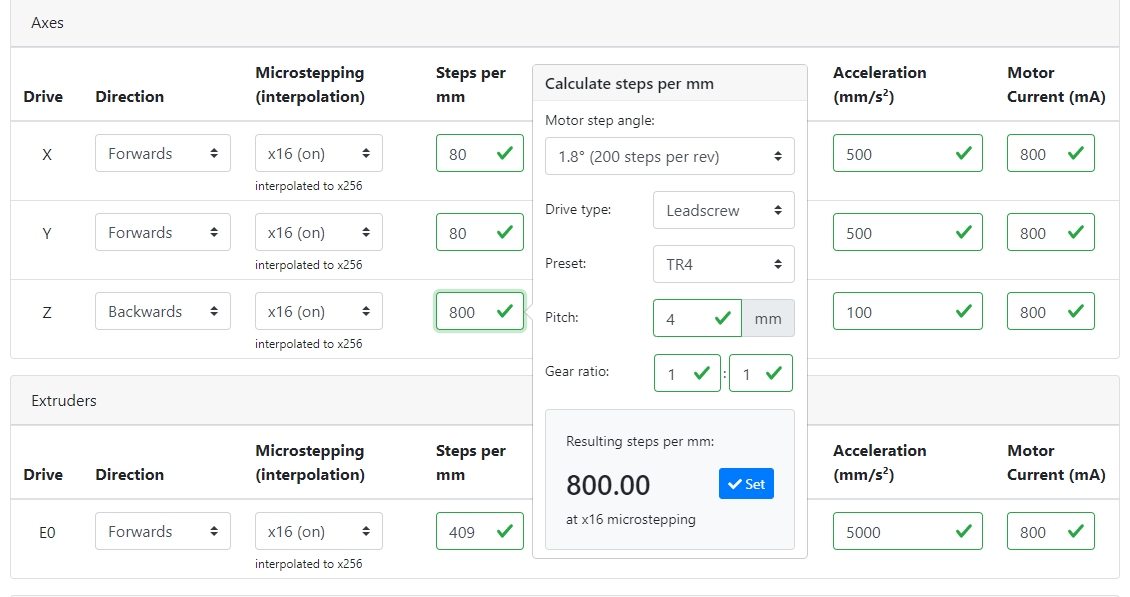
For X and Y the built in reprap calculator seems to arrive at the same value of 80 for X and Y but I think i have something for the Z.
I have the Ender Pro which is supposed to have a new leadscrew and I recall from Marlin it was at 800 steps/mm but not sure if the Marlin config was using a setting of 16 for microstepping.
What Preset and Pitch would be used for the Ender Pro leadscrew? Should the solution be 400 or 800 steps/mm?
-
@mitch
the ender 5 pro z is 800 -
Great,
Thank you.
So here is where I am now.
I updated my DWC to the latest and now the autobed compensation seems to be working better with some weird flaws. The newest SW does not prompt to reboot after update. But it seems to me that a power cycle is needed for the changes to take effect. Is this correct?
With my Hemera setup I have found the max bed size to be:
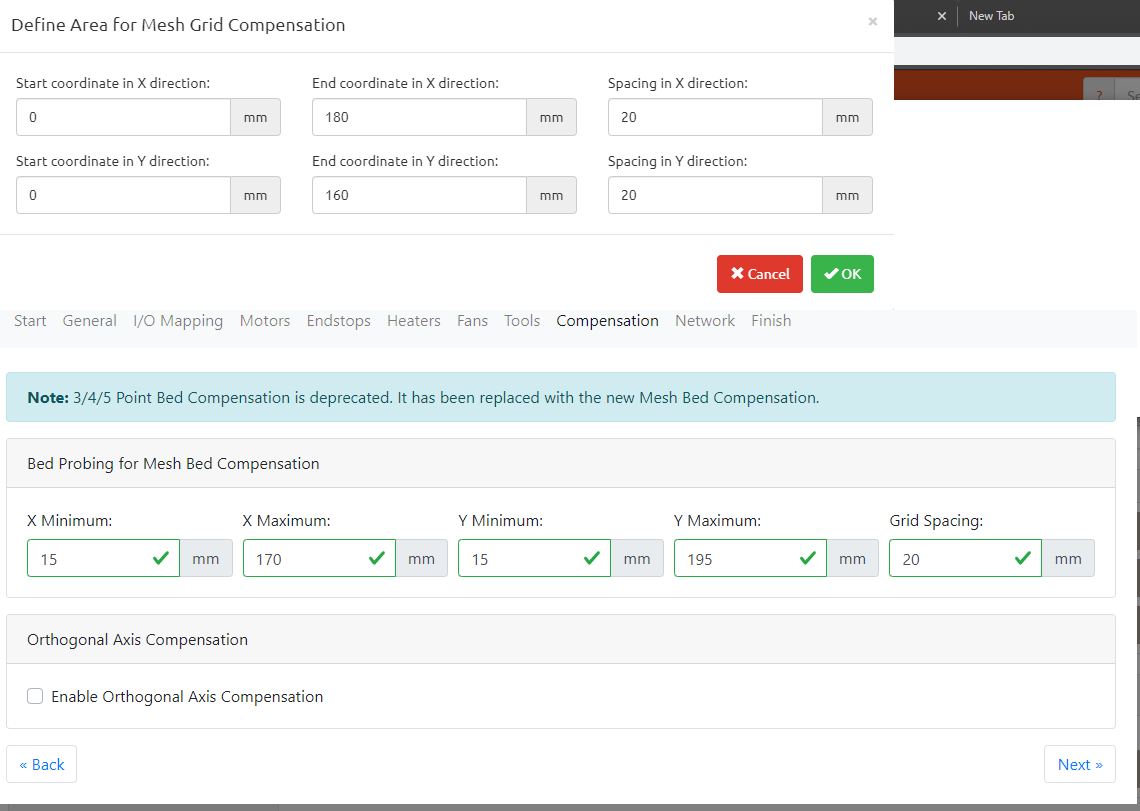
x = 220mm
y = 207mmI have restricted the mesh parameters to X=180 and Y=200 to keep the probe on the bed. But it doesn't seem to care what is defined because it still goes past 180 in the x direction when probing.

-
Are you sure the probe offset is correct?
X- goes to the left, X+ goes to the right, Y- goes to the front, Y+ goes to the back. 0,0 is the front left corner.
-
@mitch said in Ender 5 + Hemera + BL Touch:
have restricted the mesh parameters to X=180 and Y=200
no you restrict the movement in the
Printer Geometry
section with max x and y -
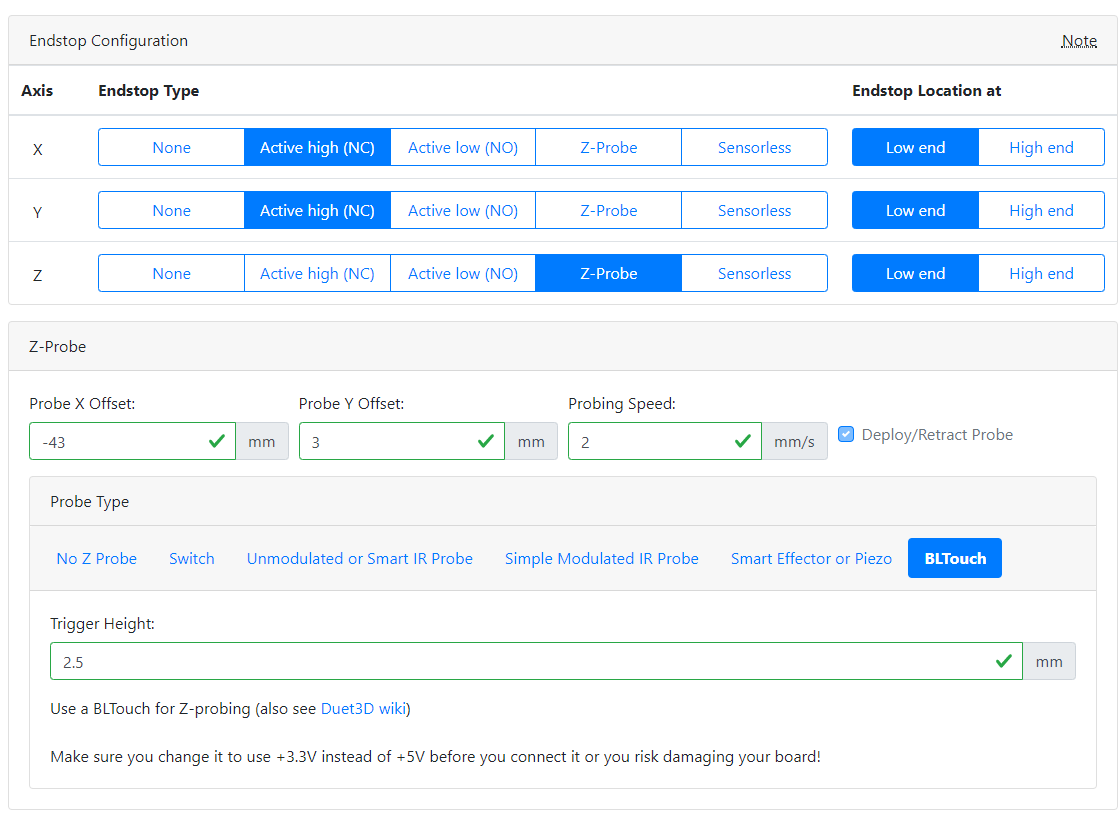
I have calculated the BLtouch offset to be:
Probe X Offset = -43mm (43 mm to the left of the head)
Probe Y Offset = 3mm (3 mm behind the head)The total usable Bed (Print Geometry):
X (0 - 220mm)
Y (0 - 207mm) Due to the hemera contacting the front supportNote: Even though you can print in the X direction up to 220 mm. You can only use the probe as far as 180mm or you will be off the bed with the probe.
So it was my understanding that if I restricted the mesh parameter to 180mm it would do just that. Not exceed 180mm.
I just ran the "Mesh Compensation G29" under the compensation and calibration it it worked perfectly going to all extremes of the bed with the probe and not exceeding what was defined in the Mesh Parameters. It just seems that the "True Bed Leveling G32" violates the limits and attempts to probe too far in the X direction to the extent that the probe would be off the bed.
-
@mitch said in Ender 5 + Hemera + BL Touch:
"True Bed Leveling G32" violates the limits and attempts to probe too far in the X direction to the extent that the probe would be off the bed.
That would be executing bed.g. You still haven't shown us what's in that file, so we don't actually know what it's trying to do. But generally you won't actually need to use that at all unless you're trying to do something specific and custom like independent Z motor bed tilt correction. G29 is usually enough.