Duet3D Logo Duet3D
    • Tags
    • Documentation
    • Order
    • Register
    • Login
    1. Home
    2. mitch
    • Profile
    • Following 0
    • Followers 1
    • Topics 29
    • Posts 143
    • Best 17
    • Controversial 1
    • Groups 0

    mitch

    @mitch

    21
    Reputation
    17
    Profile views
    143
    Posts
    1
    Followers
    0
    Following
    Joined Last Online

    mitch Unfollow Follow

    Best posts made by mitch

    • Indirect Laser Monitor Remix II - working!

      Although I own a original duet laser filament monitor (v2) I also have a magnetic sensor on order. I have been playing with the various indirect filament monitor approaches lately with limited success and reliability.

      FINALLY, I have something that works reliably:
      https://www.thingiverse.com/thing:4587312

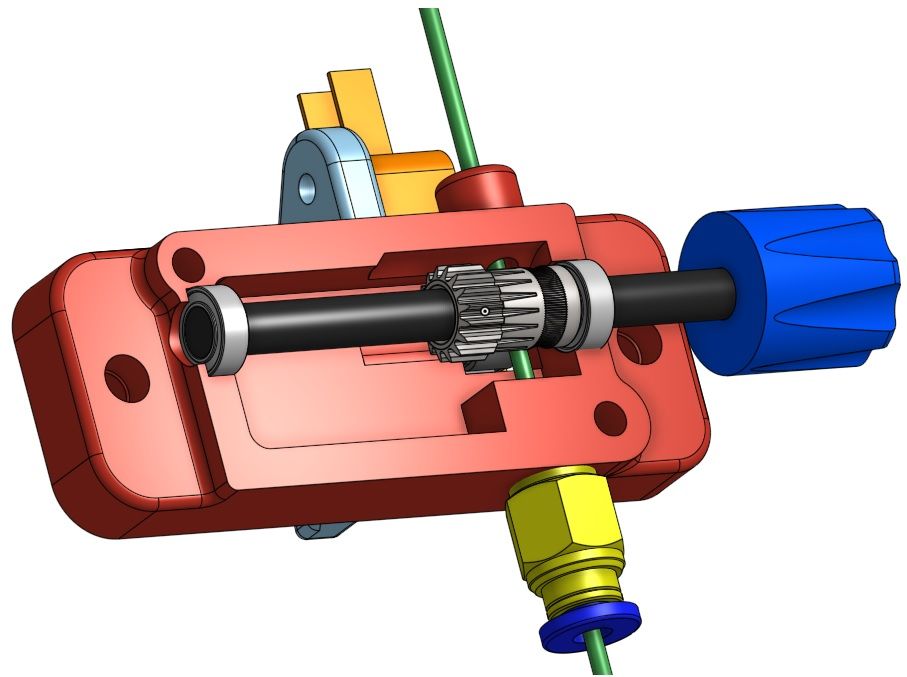
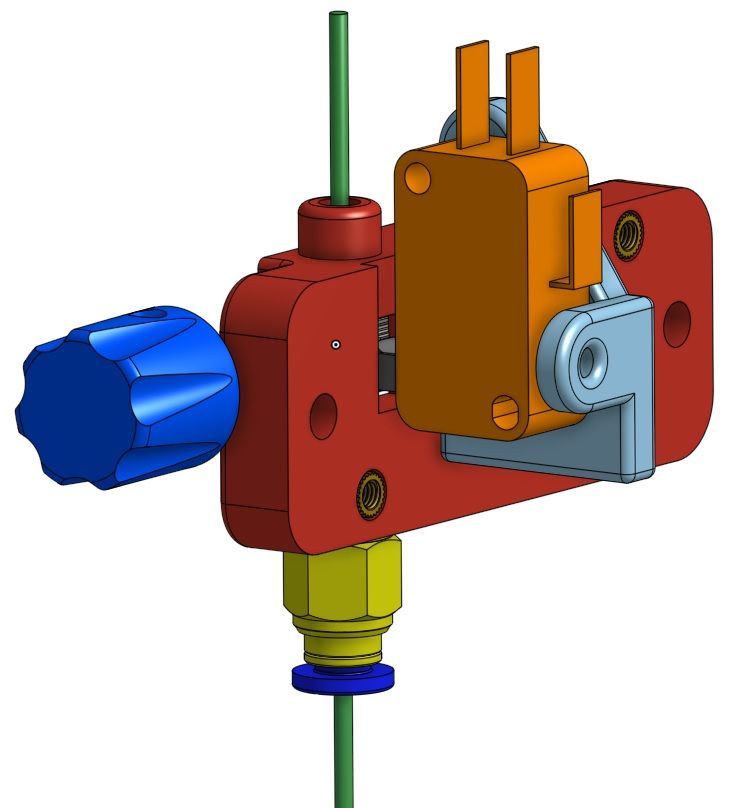
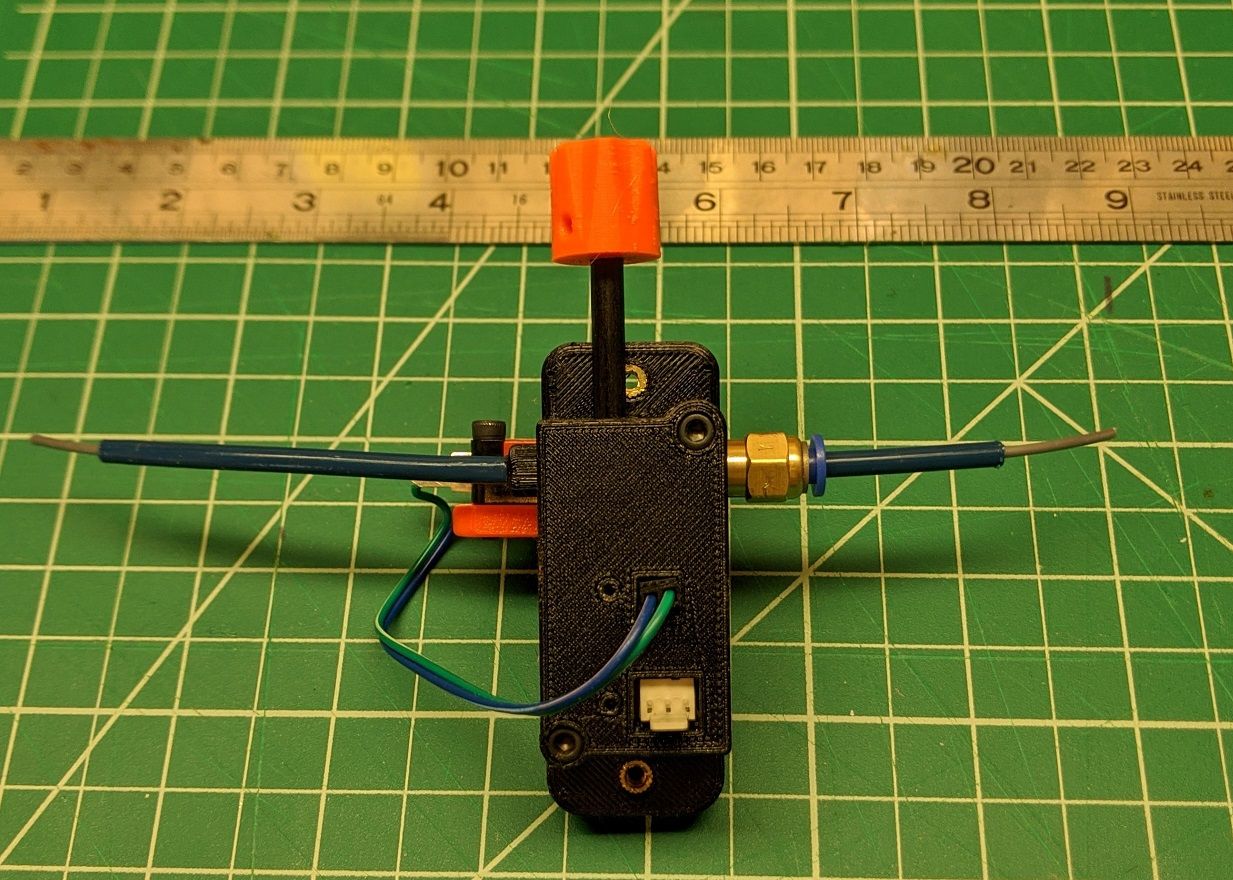
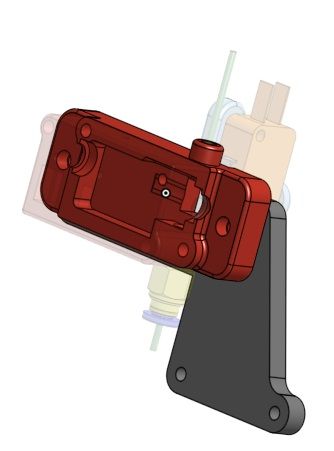
      I have remixed the latest carbon fiber method with lots of tweaks as well as getting rid if the idler assembly and instead killing two birds by using a micro switch as the idler assembly.

      back with switch.jpg

      The build was much easier than the original.
      IMG_20200903_091123.jpg

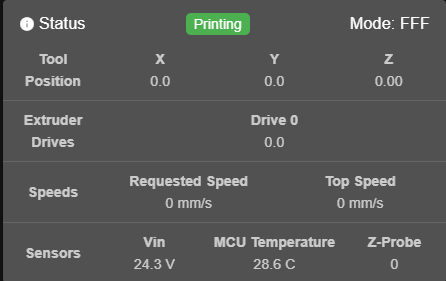
      My test run yielded very reliable results:

      9/3/2020, 12:48:32 PM	M591 D0
      Duet3D laser filament monitor v2 with switch on pin e0stop, disabled, allow 70% to 130%, check every 3.0mm, version 2, quality 223, brightness 255, shutter 92, measured min 228% avg 247% max 268% over 2450.8mm
      
      M591 D0
      Duet3D laser filament monitor v2 with switch on pin e0stop, disabled, allow 70% to 130%, check every 3.0mm, version 2, quality 223, brightness 255, shutter 89, measured min 228% avg 247% max 268% over 2273.6mm
      
      M591 D0
      Duet3D laser filament monitor v2 with switch on pin e0stop, disabled, allow 70% to 130%, check every 3.0mm, version 2, quality 223, brightness 255, shutter 88, measured min 229% avg 247% max 267% over 609.2mm
      

      I have also asked DC to include the L parameter into the the M591 command so that we can tune the ratio to normalize the output and he is making the change per v3.2:

      M591 D0 P6 C"e0stop" R70:130 L0.4 E3.0 S0
      

      Lnn (firmware 3.2 and later) Calibration factor, default 1.0. The filament movement reported by the laser sensor is multiplied by this value before being compared with the commanded extrusion. Intended for use with sensors that use the laser to read movement of a wheel that is turned by the filament.

      I would estimate this indirect setup would L0.4 based on the test runs.

      The microswitch has a tuner screw to fine tune the operating distance on the switch by simply turning the set screw.
      IMG_20200903_141234.jpg

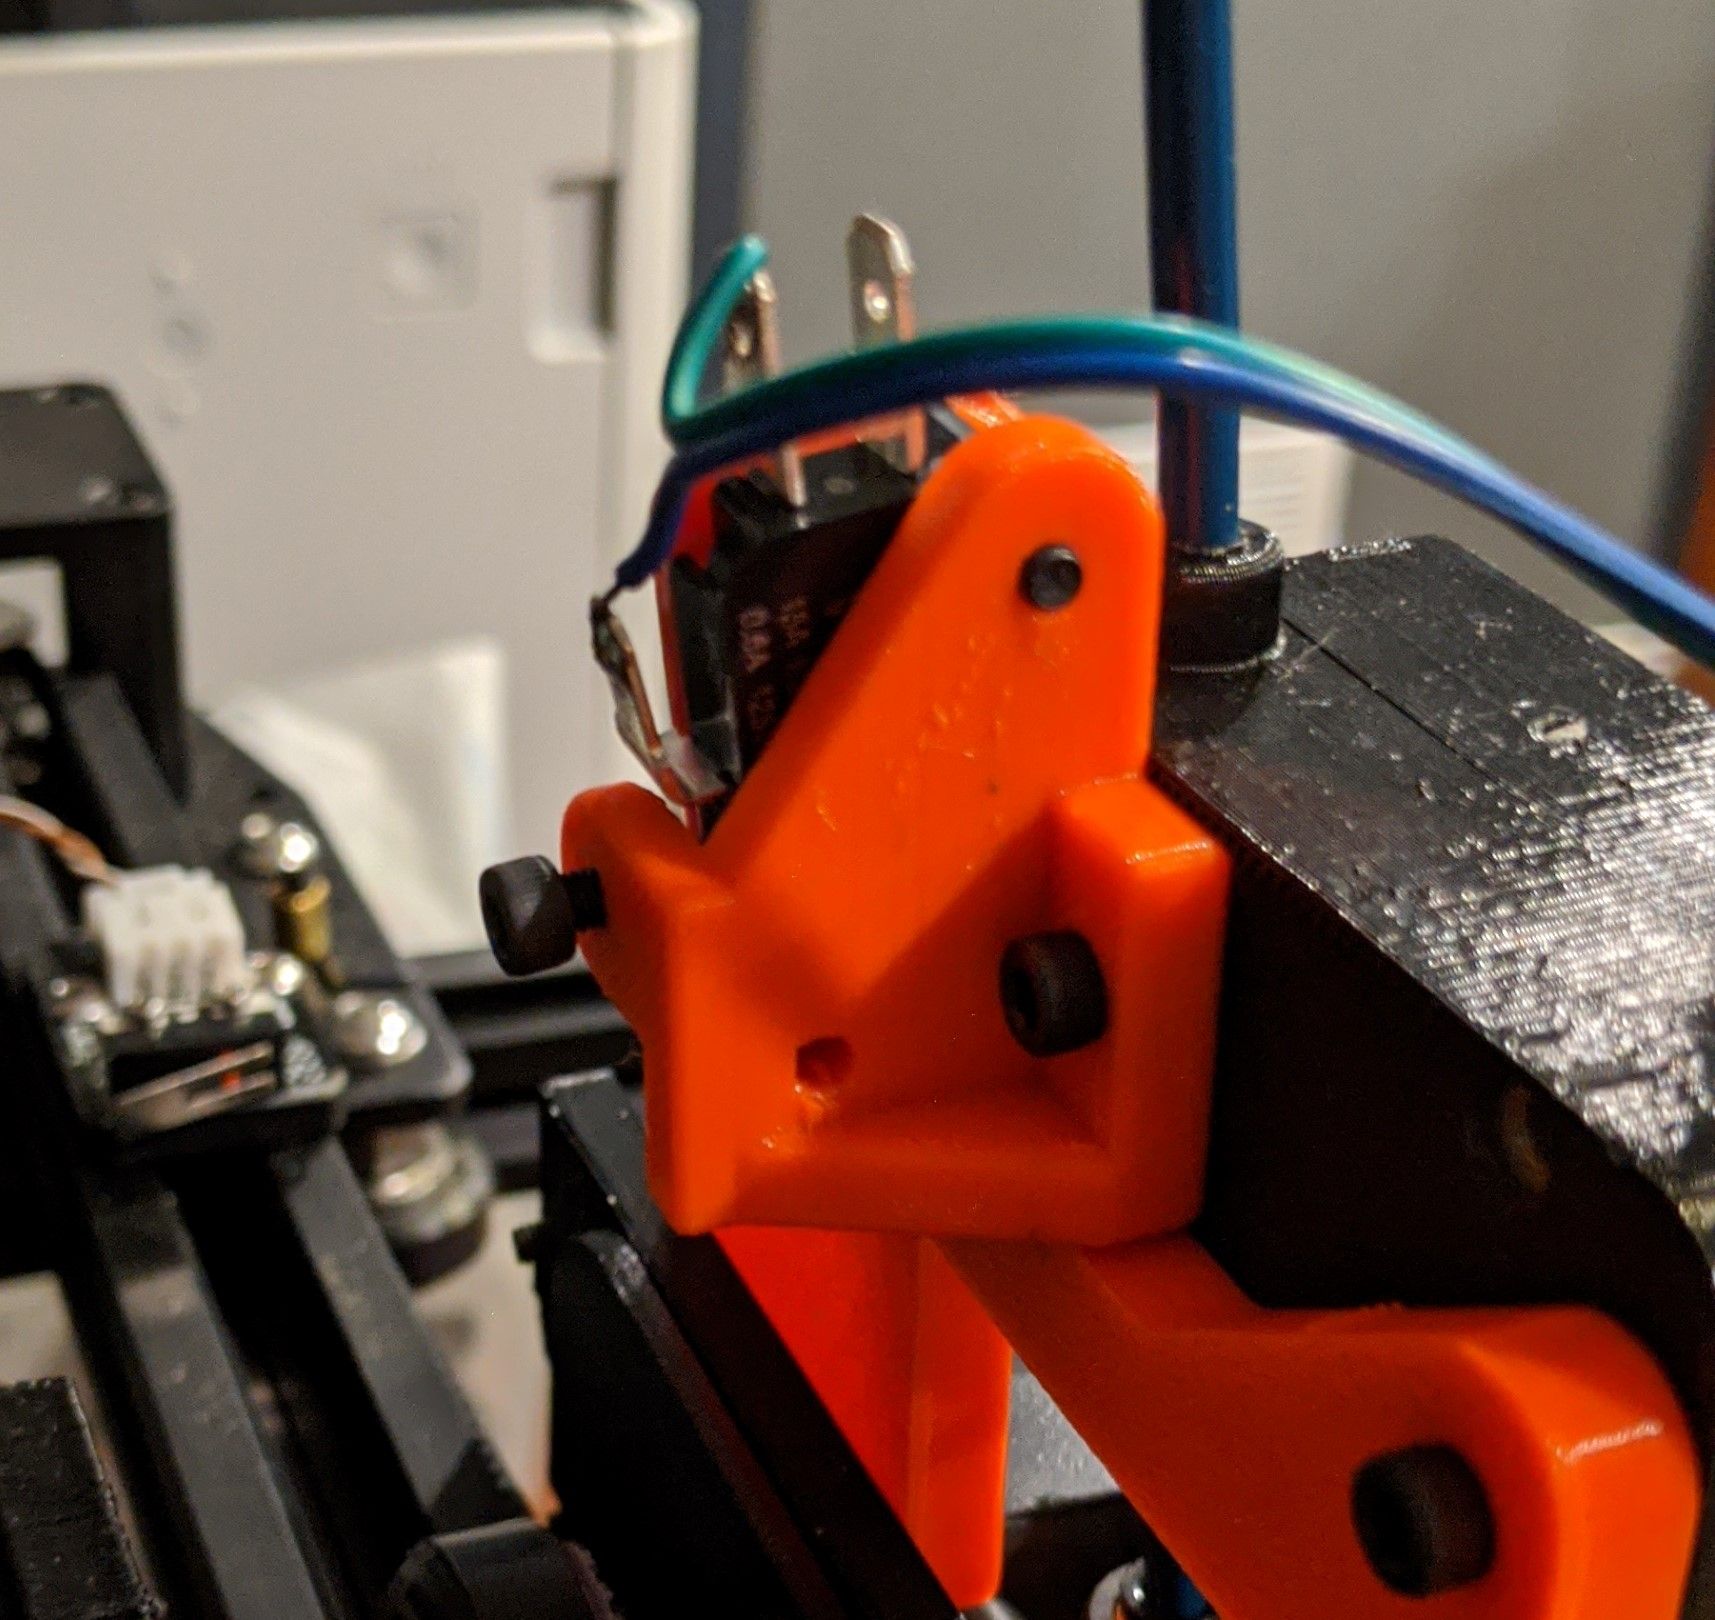
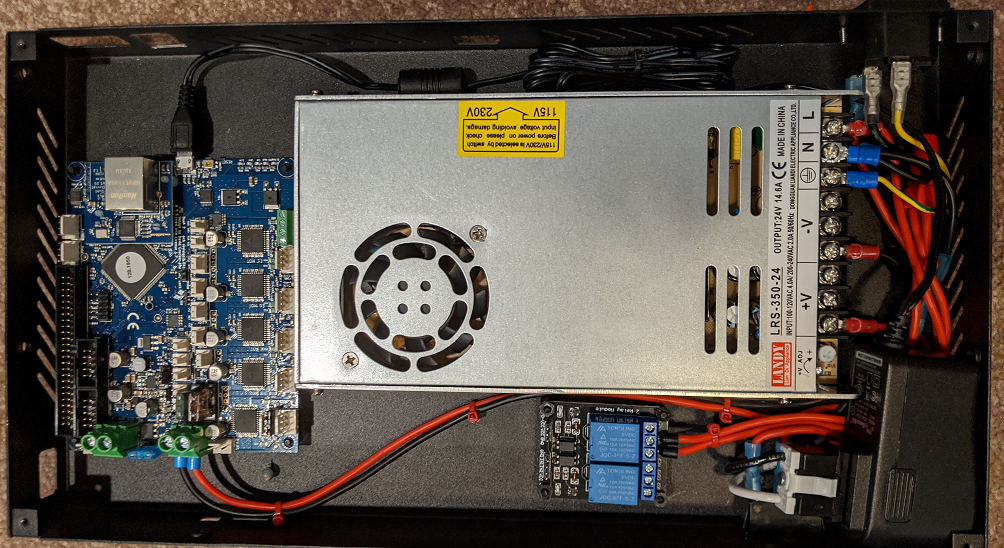
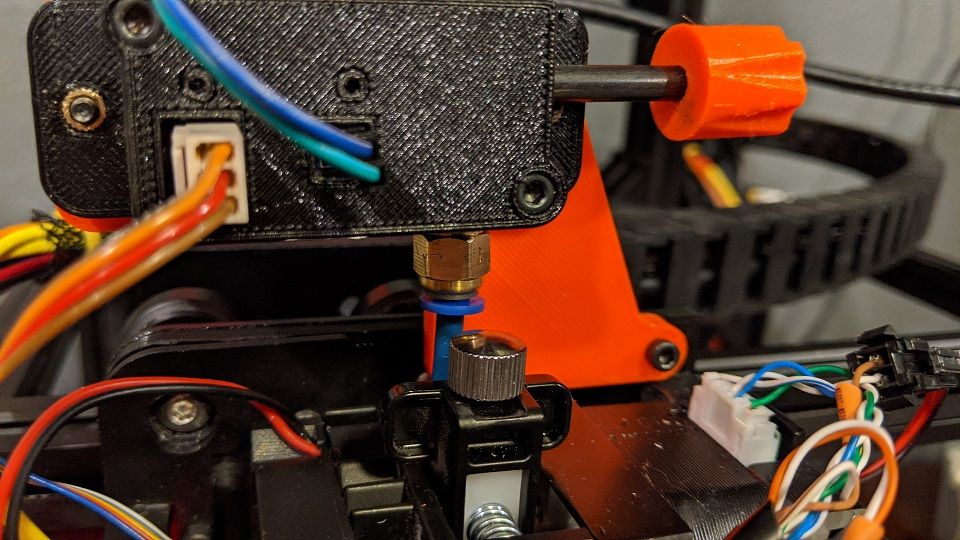
      I am printing on a modified Ender 5 with a direct drive Hemera. I have also included a bracket (orange) to make this a rigid mount to make loading and unloading easier. Right now I just push in the filament and it feeds through pretty easily and provides enough clearance to engage/disengage the hemera tension lever.
      IMG_20200903_132410.jpg

      Hemera bracket.jpg

      The real trick was playing with the different hob gear options. The original used a gear that was just to "slick" and didn't have a concave channel to keep the filament centered and create more friction. I had to move to a Mk3 gear in black to get the best performance.
      inside.jpg

      posted in Filament Monitor
      mitchundefined
      mitch
    • Duet 2 Super Soft Power Mod

      Thanks to many on this forum I implemented full soft power control and automatic shutdown of my Duet 2 +Hemera based ender 5 build.

      I wanted to capture my install for my own reference but also to anyone who might be attempting to do the same.

      The first step was the relay based control of the 24VDC PSU. This mod has been done many times before but it is the first stop towards full soft power control. I have attempted to document that here:
      https://www.randoprojects.com/2020/07/26/ender-5-mainboard-upgrade/

      The big difference in the other soft power mods I have seen before was the addition of soft power control extended to the microcontroller of the Duet 2. I have attempted to document that approach here:
      https://www.randoprojects.com/2020/07/30/duet-2-soft-power-control/

      I have a ton of respect for those that have written very clear tutorials. In the process of retro documenting the steps I took I see many ways I could improve the way I documented this modification. I plan to add a video shortly of the finished system operating.

      Again, thanks to the forum for helping me get this machine up and running!

      posted in Duet Hardware and wiring
      mitchundefined
      mitch
    • RE: Community Projects Wiki

      Added soft power control mods to the hardware section.

      posted in General Discussion
      mitchundefined
      mitch
    • RE: Problem with Laser filament monitor

      I was getting erratic readings with my laser filament monitor. Eventually ordered the mag rotating version. The mag version is still back ordered so I started to experiment with these indirect laser concepts.

      https://forum.duet3d.com/topic/18497/indirect-laser-monitor-remix-ii-working

      At this point i am really pleased with it to the extent that I am not sure I need the mag version.

      It consumes a little time to put it together but in the end I felt I had a monitor that was accurate regardless of the filament I loaded.

      Mine was mounted right above a direct drive. I have never seen negative values but the range varied a great deal.

      posted in Filament Monitor
      mitchundefined
      mitch
    • Filament Sensor status added to Sensor Summary

      The current status window under the sensor summary shows the status of my Z probe sensor but not the Filament Sensor (I use laser version).

      With some filaments the calibration is different and it would be helpful to be able to monitor how the sensor is behaving periodically.

      Can the filament sensor data be summarized in the sensor section of the status window on the next DWC update or added to the queue of requests?

      status.png

      posted in Duet Web Control wishlist
      mitchundefined
      mitch
    • Ender 5 + Hemera + BL Touch

      I am brand new to the Duet Eth board and RepRap. I am in the process of getting an ender 5 pro + hemera up and running and I wanted to use this topic to exchange settings with others that may have a similar setup.

      What works:

      • BL Touch

      • Home X and Y

      • Fan 0 (Part Cooling Fan)

      Not working:

      • Z home is VERY slow and it seems to timeout before it even reaches the BL Touch sensor.

      • Fans 1 and 2 are no where to be found on the UI

      Haven't tested:

      • Heaters

      • Hemera (E0)

      I would like to get the basic homing working before proceeding. Please share your settings and success if you have a similar setup.

      I will post a few install images for anyone interested as I was looking around for the same when I was installing.

      IMG_20200201_114323.png

      Here is my G-Code:

      ; Configuration file for Duet WiFi (firmware version 3)
      ; executed by the firmware on start-up
      ;
      ; generated by RepRapFirmware Configuration Tool v2.1.8 on Sat Feb 01 2020 19:54:19 GMT-0600 (Central Standard Time)
      
      ; General preferences
      G90                                                    ; send absolute coordinates...
      M83                                                    ; ...but relative extruder moves
      M550 P"Ender 5 Hemera"                                 ; set printer name
      M918 P1 E4 F2000000                                    ; configure direct-connect display
      
      ; Network
      M552 P0.0.0.0 S1                                       ; enable network and acquire dynamic address via DHCP
      M586 P0 S1                                             ; enable HTTP
      M586 P1 S0                                             ; disable FTP
      M586 P2 S0                                             ; disable Telnet
      
      ; Drives
      M569 P0 S1                                             ; physical drive 0 goes forwards
      M569 P1 S1                                             ; physical drive 1 goes forwards
      M569 P2 S0                                             ; physical drive 2 goes backwards
      M569 P3 S1                                             ; physical drive 3 goes forwards
      M584 X0 Y1 Z2 E3                                       ; set drive mapping
      M350 X32 Y32 Z32 I0                                    ; configure microstepping without interpolation
      M350 E16 I1                                            ; configure microstepping with interpolation
      M92 X160.00 Y160.00 Z800.00 E409.00                    ; set steps per mm
      M566 X1200.00 Y1200.00 Z24.00 E300.00                  ; set maximum instantaneous speed changes (mm/min)
      M203 X9000.00 Y9000.00 Z180.00 E3600.00                ; set maximum speeds (mm/min)
      M201 X500.00 Y500.00 Z100.00 E5000.00                  ; set accelerations (mm/s^2)
      M906 X800 Y800 Z800 E800 I50                           ; set motor currents (mA) and motor idle factor in per cent
      M84 S30                                                ; Set idle timeout
      
      ; Axis Limits
      M208 X0 Y0 Z0 S1                                       ; set axis minima
      M208 X220 Y220 Z300 S0                                 ; set axis maxima
      
      ; Endstops
      M574 X1 S1 P"xstop"                                    ; configure active-high endstop for low end on X via pin xstop
      M574 Y1 S1 P"ystop"                                    ; configure active-high endstop for low end on Y via pin ystop
      M574 Z1 S2                                             ; configure Z-probe endstop for low end on Z
      
      ; Z-Probe
      M950 S0 C"exp.heater4"                                 ; create servo pin 0 for BLTouch
      M558 P9 C"zprobe.in+zprobe.mod" H5 F120 T6000          ; set Z probe type to bltouch and the dive height + speeds
      G31 P500 X-43 Y3 Z2.5                                  ; set Z probe trigger value, offset and trigger height
      M557 X15:215 Y15:195 S20                               ; define mesh grid
      
      ; Heaters
      M308 S0 P"bedtemp" Y"thermistor" T100000 B4138         ; configure sensor 0 as thermistor on pin bedtemp
      M950 H0 C"bedheat" T0                                  ; create bed heater output on bedheat and map it to sensor 0
      M143 H0 S120                                           ; set temperature limit for heater 0 to 120C
      M307 H0 B0 S1.00                                       ; disable bang-bang mode for the bed heater and set PWM limit
      M140 H0                                                ; map heated bed to heater 0
      M308 S1 P"e0temp" Y"thermistor" T100000 B4725 C7.06e-8 ; configure sensor 1 as thermistor on pin e0temp
      M950 H1 C"e0heat" T1                                   ; create nozzle heater output on e0heat and map it to sensor 1
      M143 H1 S285                                           ; set temperature limit for heater 1 to 285C
      M307 H1 B0 S1.00                                       ; disable bang-bang mode for heater  and set PWM limit
      
      ; Fans
      M950 F0 C"fan0" Q20                                    ; create fan 0 on pin fan0 and set its frequency
      M106 P0 S0 H-1                                         ; set fan 0 value. Thermostatic control is turned off
      M950 F1 C"fan1" Q20                                    ; create fan 1 on pin fan1 and set its frequency
      M106 P1 S1 H1 T45                                      ; set fan 1 value. Thermostatic control is turned on
      M950 F2 C"fan2" Q20                                    ; create fan 2 on pin fan2 and set its frequency
      M106 P2 S1 H1:0 T45                                    ; set fan 2 value. Thermostatic control is turned on
      
      ; Tools
      M563 P0 D0 H1 F0                                       ; define tool 0
      G10 P0 X0 Y0 Z0                                        ; set tool 0 axis offsets
      G10 P0 R0 S0                                           ; set initial tool 0 active and standby temperatures to 0C
      
      ; Custom settings are not defined
      
      posted in Tuning and tweaking
      mitchundefined
      mitch
    • RE: Ender 5+ and Duet 2 wifi Configuration

      Another reference. I rewired my ender 5 pro for duet2:

      Here is my wiring diagram using Cat6 cables and the original Z axis wiring.
      https://drive.google.com/file/d/1IE73tfQX7RgpArzxZJwyxEA-VIYsMFzE/view

      I did add a BLtouch as well. My config is at the bottom:
      https://www.randoprojects.com/2020/07/26/ender-5-mainboard-upgrade/

      posted in General Discussion
      mitchundefined
      mitch
    • RE: state.status and filament runout?

      @Kolbi That is why I like this forum so much. Lots of quick responses and several ways to skin the cat. I think I am going to go with the file loaded as it seems to be the easiest way to solve this one.

      Although, this is really all your fault because the macros you have on your github sparked the inspiration to dig into some of this.

      BLtouch assisted bed leveling macro:
      The next idea I had was to look at a way to make a BLtouch bed leveling assistant macro. The idea would be to have the bltouch probe go to each leveling point so the user just adjusts the bed level slowly until the BL touch activates. I figure doing this in 3 or 4 passes to include the center point should make it a much shorter process that the trial and error of leveling and re-running the entire G29 to figure out where you want to tweak and re-run.

      Thanks for the help.

      posted in Gcode meta commands
      mitchundefined
      mitch
    • RE: Indirect Laser Filament Monitor Build

      Image of the carbon fiber shaft.

      IMG_20200814_222859 (1).jpg

      Image of the mounted PCB
      IMG_20200814_223120.jpg

      I am thinking perhaps a hobbed version of the shaft pulley would be better such as this one:
      https://amzn.to/2Ed1Qez

      Instead of the idler pulley this type of microswitch has a short lever arm and more pressure is required. This could serve as both the idler pulley and the filament out microswitch:
      https://amzn.to/3asXKeB

      Another option would be to sandwich the filament between two hobbed pulleys that are connected by a gear:
      https://amzn.to/3iMtoXn

      Trying to decide if/when to give up on the laser and go to the hall effect style rotating sensor. Thoughts?

      posted in Filament Monitor
      mitchundefined
      mitch
    • slicer start macro for temp tuned heightmaps

      I had been playing around with some macros by @Kolbi. After much tweaking I adapted the approach and thought I might share it with the board:

      I created a start macro that will create custom heightmaps based on the slicer specified bed temp and attempt to load a heightmap if one already exists. Separating the heightmap logic from the DWC filament config has really simplified my slicer start code as well as my filament configuration files.

      The resulting heightmaps are stored with the temp as the leading value in the filename so they are grouped together in the system directory and easy to delete or see what I have available:

      70.0C_heightmap.csv
      80.0C_heightmap.csv
      

      Slicer Start Script (simplify3D):

      ; Simplify3D Start G-Code
      
      ; Set nozzle and bed to the specific temperatures declared within this slicer
      M140 S[bed0_temperature]                         ; set bed temp
      M104 S[extruder0_temperature]                 ; set extruder temp
      
      ; Home Bedlevel and primeline
      M98 P"0:/sys/primeLine.g"                          ; primeline macro
      
      • The slicer start code warms the system to a desired bed and extruder temp
      • The primeline.g script is called
      • the script looks for a heightmap for that given temp
      • If a heightmap is found then it prints with it, if not, then it creates one

      Just that simple.

      /sys/primeline.g

      ; 0:/sys/primeline.g
      ; Home axes, wait for temps, create heightmap, and wipe a primeline
       
      ; Determine if we need to Home first or not
      if !move.axes[0].homed || !move.axes[1].homed || !move.axes[2].homed
          G28		                                               ; Home all axes
      
      G90                                                        ; Absolute Positioning.
      G1 Z50 F1000                                               ; [BLTouch] Last chance to check nozzle cleanliness.
      
      G29 S1 [P{"0:/sys/" ^ heat.heaters[0].active ^ "C_heightmap.csv"}] ; Load bed mesh for the slicer set bed temp.
      if result > 1                                             ; If the file doesn't exist, perform mesh and save.
         M291 P{"Creating a height map for the bed temp of " ^ heat.heaters[0].active ^ "C."} T10
         M116                                                   ; Wait for temps
         G29                                                    ; Perform mesh now.
         G29 S3 [P{"0:/sys/" ^ heat.heaters[0].active ^ "C_heightmap.csv"}] ; Save heightmap.csv based on commanded temp
      
      M400                                                       ; Finish all moves, clear the buffer.
      M83                                                        ; Extruder relative mode.
      M116                                                       ; Wait for temps
      
      ; Charge! tune
      M98 P/macros/Tunes/Charge!.g	
      
      G1 Z3.0 F3000                                             ; move z up little to prevent scratching of surface
      G1 X0.1 Y20 Z0.3 F5000.0                                  ; move to start-line position
      
      M117 "Printing Wipe Line"
      G1 X0.1 Y200.0 Z0.3 F1500.0 E15                           ; draw 1st line
      G1 X0.4 Y200.0 Z0.3 F5000.0                               ; move to side a little
      G1 X0.4 Y20 Z0.3 F1500.0 E30                              ; draw 2nd line
      
      G92 E0                                                    ; reset extruder
      G1 Z3.0 F1500                                             ; move z up little to prevent scratching of surface
      M400                                                      ; finish all moves
      
      M117 "Printing"
      
      posted in Tuning and tweaking
      mitchundefined
      mitch

    Latest posts made by mitch

    • RE: Extra 7" panel

      @mitch I got a response on the display. Happy printing.

      posted in PanelDue
      mitchundefined
      mitch
    • RE: Extra 7" panel

      @elmoret I don't have a business selling anything. I just have an extra display that came off of a printer and thought it might be better to have someone get use out of it over sending it to the garbage. These are pretty low dollar items. Certainly not making any money on this.

      I have always purchased authentic duet boards and sensors because I feel it is a safety case and I trust the workmanship.

      But for displays I think I grabbed what was available at the time. Sorry if that offends anyone. Just trying to save perfectly good electronics from going to trash heap. I am looking at recycling options for some of the equipment as well. if anyone wants the display and case. Only asking for shipping.

      posted in PanelDue
      mitchundefined
      mitch
    • RE: Extra 7" panel

      @Phaedrux

      Iowa

      posted in PanelDue
      mitchundefined
      mitch
    • Extra 7" panel

      I have an extra working 7" panel and enclosure of anyone is interested. Wasn't sure where to post this. Apologies if I missed the buy/sell/trade forum. Kindly redirect.

      7inch PanelDue 5i / 7i Integrated Paneldue Colour Touch Screen Controllers For DuetWifi Duet 2

      posted in PanelDue
      mitchundefined
      mitch
    • RE: Klipper on Duet 3 Mainboard

      @flopo76 I have recently built the Mercury One zeroG Hydra 1.1 conversion of an Ender 5. I have RPI driving Duet mini 5+ and a HUVUD tool board running CAN from duet USB-Can bridge.

      Everything has flashed fine but I am having intermittent issues. When I try to move the bed in large movement all three Z stepper get way out of sync. I am wondering if the USB speed from RPI to Duet is limited and causing communication issues. I really want to use this board but it has been one headache after another.

      posted in Using Duet Controllers
      mitchundefined
      mitch
    • RE: Duet2 wifi + ebmpapst fan wiring

      @T3P3Tony Thanks. I had a more accessable ground going to my filament runout sensor so I ended up using that.

      posted in Duet Hardware and wiring
      mitchundefined
      mitch
    • RE: FAN0 and FAN2 not working

      @dc42

      Well, I messed up and I think I need to replace some MOSFETS for Fans1 and 2.

      I was trying to connect a 3 wire part cooling fan and I accidently shorted the GND of the 3 wire fan to the PWM GND of Fan1 and I saw a little smoke come out of the new 3 wire fan.

      To try to determine what exactly I broke. I tested the fan fuse and it is fine.
      I took a known good fan and connected it one at a time to
      Fan0, used the M106 P0 S1 command and it turned on
      Fan1, used the M106 P1 S1 command and it wouldn't turn on
      Fan2, used the M106 P2 S1 command and it wouldn't turn on

      I saw this post where you indicated that the MOSFET most likely went out.

      Am I correct to assume that means that I need to replace MOSFETs for both Fan1 and Fan2 with PMV20XNE?

      I have a hot air station but I wouldn't say I am great at it. I could use some recommendations on temps for removing the existing part and putting the new one on.

      Thanks in advance.

      posted in Duet Hardware and wiring
      mitchundefined
      mitch
    • Duet2 wifi + ebmpapst fan wiring

      Printer: Ender 5 Pro,
      Mainboard: Duet2 Wifi
      Extruder/Hotend: E3D 24VDC Hemera Revo
      Part Cooling Fan: 24VDC ebmpapst 5015, model RLF35-8/12N
      Bed Sensor: BL Touch

      I have an ender5 Pro that I am updating to use this new fan duct design for the Hemera Revo + 5015 epmpapst blower.
      https://rene-jurack.de/well-engineered-hemera-fan-duct-2/

      The part cooling fan that I am removing only had two leads (PWR & GND). The new fan has three leads, one for PWR (red), GND (black), and PWM (blue).

      I found the following post that describes how to connect it to the Duet2:
      https://duet3d.dozuki.com/Wiki/Connecting_and_configuring_fans#Section_Connecting_3_or_4_wire_fans

      My current fan connections are:
      PWM Fans V_FAN connected to Red PWR
      PWM Fans FAN0(-) connected to Black GND

      On Duet 2, for 3-wire fans, the recommended connections are:
      Red (PWR) of an always-on fan connector.
      Black (GND)
      Blue (PWM control) connect it to the FAN- pin of your chosen controlled fan connector.

      Question:
      Before I start changing connections I wanted to ask about the GND. I am attempting to connect this new fan without fishing another wire up through the to the hotend. I am only missing the GND for the new fan connection. The only GND wire I have going to the Hemera that I could splice from looks like the GND going to the BL Touch.

      I know that for a two wire PWM fan the GND is the PWM control and you cannot bond that GND with other GND wires. However, for the three wire fans I believe it will be OK to bond the GND of the part fan with the GND on the BL Touch since it is truly acting as a standard GND. I wanted to get the forum's experienced opinion on the matter. Is it OK to bond the BL Touch GND with my three wire ebmpapst GND?

      My new connections would be:
      Always On Fans V_FAN connected to Red PWR of 5015
      Splice the GND going to BL Touch and connect to GND (Black) of 5015
      PWM Fans FAN0(-) connected to Blue (PWM Control) of 5015

      posted in Duet Hardware and wiring
      mitchundefined
      mitch
    • RE: Can't touch the bed (bed leveling macro)

      @PaulHew

      I ended up commenting out the "G31 Z0" near the top and changed the "G92 Z5" to "G92 G10" and now I have enough to get to the bed and complete the macro.

      I am all for using built in leveling but I haven't found anything that seems to be as quick and accurate as something like this macro. I tried this process:
      https://duet3d.dozuki.com/Wiki/Using_the_manual_bed_levelling_assistant

      Numerous times and it ends up being a giant game of go fish. Just no way to adjust a knob based on a fraction of rotation and get any kind of accuracy out of it. Just constantly missing the mark and the number of iterations takes far longer than just running a macro like this to tune it in. I am all for learning though. Perhaps with some clarification I might see how the M671 is supposed to be faster or more accurate?

      posted in Tuning and tweaking
      mitchundefined
      mitch
    • RE: Can't touch the bed (bed leveling macro)

      @paulhew

      Appreciate the reply. This is going to be helpful to get to the bottom of this.

      The Bed.g file actually defines that you are doing a four point bed calibration. It is the coordinates of your four adjustment screws and not defining that you have steppers at those screws from my understanding.

      Please expand on the bed leveling built into the firmware. If you are referring to this:
      https://duet3d.dozuki.com/Wiki/Using_the_manual_bed_levelling_assistant

      I haven't found that to be useful at all. After it completes it tells me some rough fraction of a turn on a knob which is anything but accurate. I find that it is far more convenient and accurate to actually adjust the knob until you get contact. Please elaborate if I am misunderstanding the built in feature but I have used it and haven't found it to be faster or more accurate. In fact, quite the opposite.

      posted in Tuning and tweaking
      mitchundefined
      mitch