Cartesian to CoreXY conversion
-
You are not alone, lot of users have trouble with CoreXY motor directions. I suggest you follow https://duet3d.dozuki.com/Wiki/ConfiguringRepRapFirmwareCoreXYPrinter and post again if you still have trouble.
-
@Valld Also see https://duet3d.dozuki.com/Wiki/Test_axes_or_motors_individually
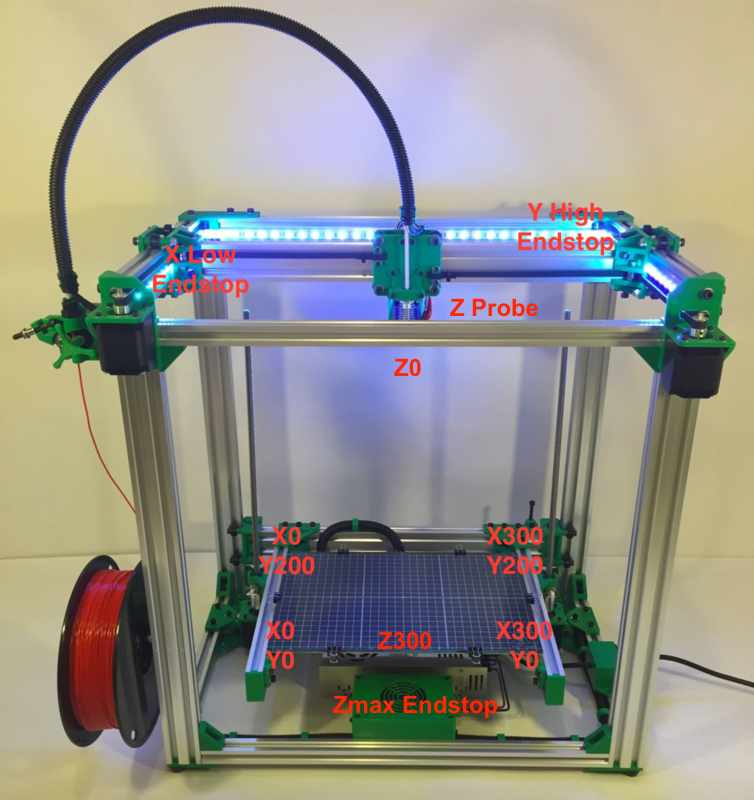
The origin (X0,Y0) should ideally be when the nozzle is over the front left corner of the bed. You can also set it to the centre (I do). Positive X moves should move the nozzle to the right, positive Y moves should move it back.
You may need to swap the motor connections (or remap X to Y and Y to X with M584 in config.g) if the motors are moving the carriage in the wrong direction.
With the Z axis, don't be confused by some of the comments in the home.g files. They say things like 'Move Z up'. But this is assuming the nozzle moves up (like in a machine with a gantry), rather than the bed moving down! Think of it as Z 'increasing', ie more distance between the nozzle and bed.
Perhaps draw a diagram of your printer similar to this, to help visualise where everything is:

Ian
-
@dc42 I did follow the instructions and everything went easy and well, except that Y is X and X is Y ( when I try to navigate from the Machine Movement). If I send G91 followed by G1 S2 X10 F3000 as per the instructions the gantry goes towards + X +Y , same for G1 S2 Y10 F3000, it moves in +X and -Y. Z moves properly, X and Y homing is OK, the BL touch is homing Z correctly, Z offset is fine, If I could swap the X and Y in the Machine Movement section on the web interface I wouldn't have a question (and I still don't know if I really have a problem). Ill post my config.g (drives and endstops section) and homeall.g belo9w:
; Drives
M667 S1 ; switch to CoreXY mode; M669 K1
M569 P0 S0 ; physical drive 0 goes backwards
M569 P1 S1 ; physical drive 1 goes backwards
M569 P2 S1 ; physical drive 2 goes forwards
M569 P3 S1 ; physical drive 3 goes backwards
M584 X0 Y1 Z2:4 E3 ; set drive mapping k
M350 X32 Y32 Z32 E32 I1 ; configure microstepping with interpolation
M92 X160.00 Y160.00 Z3200.00 E818.00 ; set steps per mm
M566 X1000.00 Y1000.00 Z24.00 E300.00 ; set maximum instantaneous speed changes (mm/min) (Z was 24)
M203 X8000.00 Y8000.00 Z400.00 E8000.00 ; set maximum speeds (mm/min) (Z was 180)
M201 X500.00 Y500.00 Z120.00 E3000.00 ; set accelerations (mm/s^2) (Z was 100)
M906 X800 Y800 Z800 E900 I40 ; set motor currents (mA) and motor idle factor in per cent
M84 S30 ; Set idle timeout; Axis Limits
M208 X0 Y0 Z0 S1 ; set axis minima
M208 X340 Y345 Z700 S0 ; set axis maximaG91 ; relative positioning
G1 H2 Z5 F6000 ; lift Z relative to current position
G1 H1 X320 Y320 F3000 ; home X and Y
G1 H1 X320 ; coarse home X
G1 H1 Y320 ; coarse home YG90 ; absolute positioning
G1 X175 Y175 F6000 ; go to MidBed and home ZG30 ; home Z by probing the bed
G29 S1 ; load heiht map automatically -
@droftarts Thanks for the input. My machine configuration is exactly the same as on the photo, with two differences, my X and Y motors are mounted at the back side and I'm using Y high and X high endstops, so the gantry homes at the right back side of the printer at X340 Y340, Origin at X0 Y0 at front left corner. I tried swapping the two motors and went bad, everything moves in different direction. Photo below:

-
@Valld said in Cartesian to CoreXY conversion:
@dc42 I did follow the instructions and everything went easy and well, except that Y is X and X is Y ( when I try to navigate from the Machine Movement). If I send G91 followed by G1 S2 X10 F3000 as per the instructions the gantry goes towards + X +Y , same for G1 S2 Y10 F3000, it moves in +X and -Y.
First decide which directions you want to be +X and +Y, and then get the motors moving in the correct directions, as described in the instructions.
-
@Valld Are you saying that you press the X buttons in DWC, the carriage moves in Y? What happens if you send G1 X10? And are you sure it moves in +X and -Y for G1 S2 Y10 F3000, not -X and +Y?
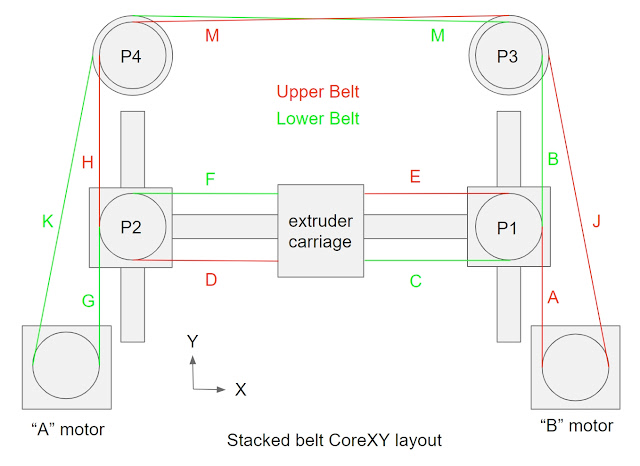
On a different note, is that a SecKit SK-Go? Your belt connections to the X carriage are not correct; they are joining at an angle, when they should be straight. You're going to have problems with belt tensioning, and X accuracy across the bed. Certain belts on a CoreXY MUST be parallel or perpendicular to each other. See @mrehorstdmd excellent blog here: https://drmrehorst.blogspot.com/2018/08/corexy-mechanism-layout-and-belt.html

To quote: "[belt] segments A-H must be parallel to the guide rails or the belt tension will vary with the position of the extruder carriage."
Ian
-
@droftarts Thank you! I finally managed to sort out the motor movement, as dc42 said more than ones, "follow the instructions". All moves and homes properly now.
Regarding your note on the belt connections to the X carriage, yes, I used the design from the SecKit SK-Go and was wondering why the XY joiner pulleys are not combined, and now thanks to you I know. I will complete all the wiring and see how it prints and when i see that its not printing properly, I'll change my design accordingly, thanks for the heads up, I really appreciate it!
-
@dc42 Thanks for your help, you were 100% right to say "follow the instructions". All movement and homing works perfect now (in terms of direction)
-
@Valld said in Cartesian to CoreXY conversion:
I will complete all the wiring and see how it prints and when i see that its not printing properly, I'll change my design accordingly
I'd fix it now. It may print correctly in the middle, but it will be putting extra load on the belts when the carriage is at the end of the axes, eg when homing. Try feeling the belt tension when the carriage is in the middle versus when it's at X0 Y0. Often with CoreXY you need accurately and consistently tensioned belts to square the X axis to the Y axis, so this may also be moving around as the carriage moves.
Ian
-
@droftarts I cannot express how much I appreciate your input on this, just to confirm, I need to make this marked in red two sections of the belts from the joiner to the gantry mount parallel , correct, see the photo below:

-
@Valld yes, and the same on the other side of the X carriage.
Ian
-
@Valld And not just parallel to each other, but parallel to the X axis guide rail.