Mesh Compensation settings disappear.
-
@SoDamnInsane There has been some issues with the latest version of DWC.
May I suggest you rollback to 2.07, as I had to and wait for the update to 2.1.1HTH,
Paul. -
@PaulHew said in Mesh Compensation settings disappear.:
@SoDamnInsane There has been some issues with the latest version of DWC.
May I suggest you rollback to 2.07, as I had to and wait for the update to 2.1.1HTH,
Paul.Thx... I heard this, indeed. But I have the 2.1.1 version already!
-
Just upload 2.07 and it will overwrite your current version.
IIRC most of it was bug fixes.
The issue I found was that it did not turn all of my heaters off with 'Turn Everything Off' and there was an issue with the the heightmaps, which may or not be related to your issue.You could use
M557 X0:200 Y0:220 S20to define your mesh map.
HTH
Paul. -
@PaulHew said in Mesh Compensation settings disappear.:
Just upload 2.07 and it will overwrite your current version.
IIRC most of it was bug fixes.
The issue I found was that it did not turn all of my heaters off with 'Turn Everything Off' and there was an issue with the the heightmaps, which may or not be related to your issue.You could use
M557 X0:200 Y0:220 S20to define your mesh map.
HTH
Paul.Thx. Paul. I will try this. Just 1 other question, if I may... What are the best homing configs to use with the BL Touch. I've tried several. But all have other issues.

-
You may!
Please post your config.g, and firmware version.
What issues are you experiencing?
Do you have a single stepper Z axis or multiple steppers for your ZOr use the documentation here
https://duet3d.dozuki.com/Wiki/Connecting_a_Z_probe
and
https://duet3d.dozuki.com/Wiki/Test_and_calibrate_the_Z_probeRegards,
Paul. -
@PaulHew said in Mesh Compensation settings disappear.:
You may!
Please post your config.g, and firmware version.
What issues are you experiencing?
Do you have a single stepper Z axis or multiple steppers for your ZOr use the documentation here
https://duet3d.dozuki.com/Wiki/Connecting_a_Z_probe
and
https://duet3d.dozuki.com/Wiki/Test_and_calibrate_the_Z_probeRegards,
Paul.Hi Paul,
Thx. for replying.
I just downgraded to DWC 2.0.7.
And a few problems are solved now.But I'm pretty confused, about the settings for the HOME configs ( X, Y, Z and ALL)
And I read that I must also adjust the startcode of the PrusaSlicer.
I did that, but it reacts strange.I have multiple Z steppers. Upgraded my old Anet A6.
This is my current firmware:

My config.g file
; Configuration file for Duet WiFi (firmware version 3) ; executed by the firmware on start-up ; ; generated by Raymond Ebbers on Tue Apr 7 2020 13:08:56 GMT+0100 (Midden-Europese standaardtijd) ; General preferences BL-Touch Install G90 ; send absolute coordinates... M83 ; ...but relative extruder moves M550 P"Anet AM6" ; set printer name ; Network M552 S1 ; enable network M586 P0 S1 ; enable HTTP M586 P1 S0 ; disable FTP M586 P2 S0 ; disable Telnet ; Drives M569 P0 S1 ; physical drive 0 goes forwards M569 P1 S1 ; physical drive 1 goes forwards M569 P2 S0 ; physical drive 2 goes backwards M569 P3 S0 ; physical drive 3 goes backwards M584 X0 Y1 Z2 E3 ; set drive mapping M350 X32 Y32 Z32 I0 ; configure microstepping without interpolation M350 E16 I1 ; configure microstepping with interpolation M92 X200.00 Y200.00 Z800.00 E430.35 ; set steps per mm M566 X600.00 Y600.00 Z18.00 E300.00 ; set maximum instantaneous speed changes (mm/min) M203 X54000.00 Y54000.00 Z720.00 E6000.00 ; set maximum speeds (mm/min) M201 X9000.00 Y5000.00 Z100.00 E5000.00 ; set accelerations (mm/s^2) M906 X720 Y720 Z1460 E1460 I30 ; set motor currents (mA) and motor idle factor in per cent M84 S30 ; Set idle timeout ; Axis Limits M208 X0 Y0 Z0 S1 ; set axis minima M208 X237 Y220 Z240 S0 ; set axis maxima ; Endstops M574 X1 S1 P"xstop" ; configure active-high endstop for low end on X via pin xstop M574 Y1 S1 P"ystop" ; configure active-high endstop for low end on Y via pin ystop M574 Z1 S2 P"zstop" ; configure active-high endstop for low end on Z via pin zstop ; Z-Probe M558 P9 C"^zprobe.in" H5 F500 T2000 ; Specify probe type 9 and the input pin M950 S0 C"exp.heater3" ; Create a GPIO/Servo pin index using your chosen control pin M557 X0:200 Y20:220 S20 ; define mesh grid G31 X39 Y-16 Z2.41 P25 ; Set up the probe offsets, trigger height and trigger value ; Heaters M308 S0 P"bedtemp" Y"thermistor" T100000 B3950 ; configure sensor 0 as thermistor on pin bedtemp M950 H0 C"bedheat" T0 ; create bed heater output on bedheat and map it to sensor 0 M143 H0 S120 ; set temperature limit for heater 0 to 120C M307 H0 B1 S1.00 ; enable bang-bang mode for the bed heater and set PWM limit M140 H0 ; map heated bed to heater 0 M308 S1 P"e0temp" Y"thermistor" T100000 B3950 ; configure sensor 1 as thermistor on pin e0temp M950 H1 C"e0heat" T1 ; create nozzle heater output on e0heat and map it to sensor 1 M143 H1 S290 ; set temperature limit for heater 1 to 280C M307 H1 B0 S1.00 ; disable bang-bang mode for heater and set PWM limit ; Fans M950 F0 C"fan0" Q500 ; create fan 0 on pin fan0 and set its frequency M106 P0 S0 H-1 ; set fan 0 value. Thermostatic control is turned off M950 F1 C"fan1" Q500 ; create fan 1 on pin fan1 and set its frequency M106 P1 S0.7 H1 T45 ; set fan 1 value. Thermostatic control is turned on ; Tools M563 P0 D0 H1 F0 ; define tool 0 G10 P0 X0 Y0 Z0 ; set tool 0 axis offsets G10 P0 R0 S0 ; set initial tool 0 active and standby temperatures to 0C ; Custom settings are not defined ; Miscellaneous M911 S10 R11 P"M913 X0 Y0 G91 M83 G1 Z3 E-5 F1000" ; set voltage thresholds and actions to run on power loss M501 ; load saved parameters from non-volatile memory ;T0 ; select first tool -
Please post your homeall.g and your slicer start gcode.
@SoDamnInsane said in Mesh Compensation settings disappear.:
I did that, but it reacts strange.
what does it do?
-
@Phaedrux said in Mesh Compensation settings disappear.:
Please post your homeall.g and your slicer start gcode.
@SoDamnInsane said in Mesh Compensation settings disappear.:
I did that, but it reacts strange.
what does it do?
Sorry for my late reply, I was a little bit sick for a few days. ( No, NOT Corona. lol)
Down here I will post my config.g and PrusaSlicer Start code.
The BL-Touch is working well now.
But there are a few questions left.
I posted them also in a Facebook group, but no reply('s)..When I or especially you guys can help me with these. Then I'll promise you that I will never post a similar question again. LOL.
Because it's my first Duet2 Wifi mainboard, I'll get confused about all the different answers and tips i get.
Don't misunderstand me, I REALLY appreciate everything you do to help me out, really.
But when 1 problem is solved, I get another one.
These are my 2 final questions... Related to these problems.. Hahaha")
1 is PrusaSlider related, so i completely understand that you can't or won't answer them. Np of courseAt this moment I have installed:
- Firmware: RepRapFirmware for Duet 2 WiFi/Ethernet 3.0 (2020-01-03b3)
- Duet WiFi Server Version: 1.23
- And Duet Web Control 2.1.1
The questions / problems.
When installed DWC 2.07
- The part cooling fan sliders not working
When installed DWCB 2.1
- The part cooling fan sliders not working
- And the Extrusion Control not working. ( known issue).
When installed DWC 2.1.1
- All the above are working. (Fan sliders and Extrusion Control)
- Mesh compensation NOT working.
As a noob, i think the DWC files don't change my Fan settings.
So, HOW can it be that these only work in DWB 2.1.1?There are some people saying to change the Fan settings in the config.g file.
But i can't imagine that this is the problem?? Or am i so wrong?Last and final question
The manual i used to config the probe, said that I have to change my START-Code.
I did that of course.
But when i read the exported G-Code, I see that the temp settings are mentioned twice.
And when i want to print the part right after exporting the G-Code file, the printer starts printing.
And the temperatures are about 30 degrees celsiusI know i ask a lot guys. And I'm really sorry for that.
But i really, really like this mainboard. And my next printer will have a Duet2 or maybe Duet3 mainboard of course,So i want, and have to learn as most as i can about Duet3D hardware and RRF.
But when several people are saying completely different things, it's hard to get to the point. (for me at least, lol).
And I haven't mentioned that there are differences between de RRF 2.x and RRF 3.xSo i hope you can understand me, and can clear this for me..
Thanks in advance!!!
Greetzzzzz Raymond.config.g
; Configuration file for Duet WiFi (firmware version 3) ; executed by the firmware on start-up ; ; generated by Raymond Ebbers on Tue Apr 7 2020 13:08:56 GMT+0100 (Midden-Europese standaardtijd) ; General preferences BL-Touch Install G90 ; send absolute coordinates... M83 ; ...but relative extruder moves M550 P"Anet AM6" ; set printer name ; Network M552 S1 ; enable network M586 P0 S1 ; enable HTTP M586 P1 S0 ; disable FTP M586 P2 S0 ; disable Telnet ; Drives M569 P0 S1 ; physical drive 0 goes forwards M569 P1 S1 ; physical drive 1 goes forwards M569 P2 S0 ; physical drive 2 goes backwards M569 P3 S0 ; physical drive 3 goes backwards M584 X0 Y1 Z2 E3 ; set drive mapping M350 X32 Y32 Z32 I0 ; configure microstepping without interpolation M350 E16 I1 ; configure microstepping with interpolation M92 X200.00 Y200.00 Z800.00 E455.59 ; set steps per mm M566 X600.00 Y600.00 Z18.00 E300.00 ; set maximum instantaneous speed changes (mm/min) M203 X54000.00 Y54000.00 Z720.00 E6000.00 ; set maximum speeds (mm/min) M201 X9000.00 Y5000.00 Z100.00 E5000.00 ; set accelerations (mm/s^2) M906 X720 Y720 Z1460 E1460 I30 ; set motor currents (mA) and motor idle factor in per cent M84 S30 ; Set idle timeout ; Axis Limits M208 X0 Y0 Z0 S1 ; set axis minima M208 X237 Y220 Z240 S0 ; set axis maxima ; Endstops M574 X1 S1 P"xstop" ; configure active-high endstop for low end on X via pin xstop M574 Y1 S1 P"ystop" ; configure active-high endstop for low end on Y via pin ystop M574 Z1 S2 P"zstop" ; configure active-high endstop for low end on Z via pin zstop ; Z-Probe M558 P9 C"^zprobe.in" H5 F500 T2000 ; Specify probe type 9 and the input pin M950 S0 C"exp.heater3" ; Create a GPIO/Servo pin index using your chosen control pin M557 X0:220 Y20:220 S20 ; define mesh grid G31 X30 Y-15 Z0.87 P25 ; Set up the probe offsets, trigger height and trigger value ; Heaters M308 S0 P"bedtemp" Y"thermistor" T100000 B3950 ; configure sensor 0 as thermistor on pin bedtemp M950 H0 C"bedheat" T0 ; create bed heater output on bedheat and map it to sensor 0 M143 H0 S120 ; set temperature limit for heater 0 to 120C M307 H0 B1 S1.00 ; enable bang-bang mode for the bed heater and set PWM limit M140 H0 ; map heated bed to heater 0 M308 S1 P"e0temp" Y"thermistor" T100000 B3950 ; configure sensor 1 as thermistor on pin e0temp M950 H1 C"e0heat" T1 ; create nozzle heater output on e0heat and map it to sensor 1 M143 H1 S290 ; set temperature limit for heater 1 to 280C M307 H1 B0 S1.00 ; disable bang-bang mode for heater and set PWM limit ; Fans M950 F0 C"fan0" Q500 ; create fan 0 on pin fan0 and set its frequency M106 P0 S0 H-1 ; set fan 0 value. Thermostatic control is turned off M950 F1 C"fan1" Q500 ; create fan 1 on pin fan1 and set its frequency M106 P1 S0.7 H1 T45 ; set fan 1 value. Thermostatic control is turned on ; Tools M563 P0 D0 H1 F0 ; define tool 0 G10 P0 X0 Y0 Z0 ; set tool 0 axis offsets G10 P0 R0 S0 ; set initial tool 0 active and standby temperatures to 0C ; Custom settings are not defined ; Miscellaneous M911 S10 R11 P"M913 X0 Y0 G91 M83 G1 Z3 E-5 F1000" ; set voltage thresholds and actions to run on power loss M501 ; load saved parameters from non-volatile memory ;T0 ; select first tool -
My homeall.g (what is working well now)
; homeall.g
; called to home all axes
;
;

G91 						; relative mode
G1 H2 Z4 F200 				; raise head 4mm
G1 H1 X-240 Y-240 F3000 	; move up to 240mm in the -X and -Y directions until the homing switches are triggered
G1 H2 X4 Y4 F600			; move slowly 6mm in +X and +Y
directions
G1 H1 X-10 Y-10 			; move up to 10mm in the -X and -Y directions until the homing switches are triggered
G90 						; back to absolute mode
G1 X100 Y130 F2000 			; put head over the centre of the bed, or wherever you want to probe
G30 						; lower head, stop when probe triggered and set Z to trigger height
G29 S1
My PrusaSlicer START CODE
G91 			; relative mode
G1 H2 Z4 F200 		; raise head 4mm
G1 H1 X-240 Y-240 F3000 	; move up to 240mm in the -X and -Y directions until the homing switches are triggered
G1 H2 X4 Y4 F600		; move slowly 6mm in +X and +Y directions
G1 H1 X-10 Y-10 		; move up to 10mm in the -X and -Y directions until the homing switches are triggered
G90 			; back to absolute mode
G1 X80 Y130 F2000 		; put head over the centre of the bed, or wherever you want to probe
G30
G29 S1
Sample exported G-Code file
; generated by PrusaSlicer 2.2.0+win64 on 2020-04-12 at 16:41:19 UTC ; ; external perimeters extrusion width = 0.40mm ; perimeters extrusion width = 0.40mm ; infill extrusion width = 0.40mm ; solid infill extrusion width = 0.40mm ; top infill extrusion width = 0.40mm ; support material extrusion width = 0.35mm ; first layer extrusion width = 0.40mm M107 M190 S70 ; set bed temperature and wait for it to be reached M104 S227 ; set temperature G91 ; relative mode G1 H2 Z4 F200 ; raise head 4mm G1 H1 X-240 Y-240 F3000 ; move up to 240mm in the -X and -Y directions until the homing switches are triggered G1 H2 X4 Y4 F600 ; move slowly 6mm in +X and +Y directions G1 H1 X-10 Y-10 ; move up to 10mm in the -X and -Y directions until the homing switches are triggered G90 ; back to absolute mode G1 X80 Y130 F2000 ; put head over the centre of the bed, or wherever you want to probe G30 G29 S1 M109 S227 ; set temperature and wait for it to be reached G21 ; set units to millimeters G90 ; use absolute coordinates M83 ; use relative distances for extrusion G1 Z0.200 F7800.000 G1 E-2.00000 F2400.00000 G1 X92.159 Y78.538 F7800.000 G1 E2.00000 F2400.00000 -
No worries about the questions. We're here to help.
First, the fan question. What exactly doesn't work at this point?
According to your config, you should have Fan0 controllable by slider in the DWC. Fan1 is controlled by the hotend temp.
Your homeall looks fine.
Your slicer start gcode has more than you need. It looks like you've duplicated the entire homeall in there. You only need G28 to call homeall. So remove:
G91 			; relative mode
G1 H2 Z4 F200 		; raise head 4mm
G1 H1 X-240 Y-240 F3000 	; move up to 240mm in the -X and -Y directions until the homing switches are triggered
G1 H2 X4 Y4 F600		; move slowly 6mm in +X and +Y directions
G1 H1 X-10 Y-10 		; move up to 10mm in the -X and -Y directions until the homing switches are triggered
G90 			; back to absolute mode
G1 X80 Y130 F2000 		; put head over the centre of the bed, or wherever you want to probe
G30
G29 S1
And have just G28 instead.
You have T0 commented out in your config.g which means you probably don't have a tool selected at the start of the print, which would explain why it's not heating.
At the end of your config.g you have
;T0 ; select first toolremove the;
You can also addT0to your slicer start gcode just to ensure you have a tool selected at the start of the print. That should take care of all cases. -
@Phaedrux said in Mesh Compensation settings disappear.:
No worries about the questions. We're here to help.
First, the fan question. What exactly doesn't work at this point?
According to your config, you should have Fan0 controllable by slider in the DWC. Fan1 is controlled by the hotend temp.
Your homeall looks fine.
Your slicer start gcode has more than you need. It looks like you've duplicated the entire homeall in there. You only need G28 to call homeall. So remove:
G91 			; relative mode
G1 H2 Z4 F200 		; raise head 4mm
G1 H1 X-240 Y-240 F3000 	; move up to 240mm in the -X and -Y directions until the homing switches are triggered
G1 H2 X4 Y4 F600		; move slowly 6mm in +X and +Y directions
G1 H1 X-10 Y-10 		; move up to 10mm in the -X and -Y directions until the homing switches are triggered
G90 			; back to absolute mode
G1 X80 Y130 F2000 		; put head over the centre of the bed, or wherever you want to probe
G30
G29 S1
And have just G28 instead.
You have T0 commented out in your config.g which means you probably don't have a tool selected at the start of the print, which would explain why it's not heating.
At the end of your config.g you have
;T0 ; select first toolremove the;
You can also addT0to your slicer start gcode just to ensure you have a tool selected at the start of the print. That should take care of all cases.Thanks, @Phaedrux !!
I've connected the extruder fan on the ALWAYS ON pin, as advised by Duet3D. And the part cooling fan on the FAN0 pins. That should be the default firmware settings. I connected the extruder cooling on the ALWAYS ON pins, because I'm afraid that I maybe forget to power this one on. And because I have a Titan Aero direct drive extruder, I have to completely remove the x carrier and disassemble everything, just to replace or unclog the heatbreak/nozzle.

But when I heat up the nozzle. Not one of these sliders are working.
 ( And the Mesh compensation area can't be changed within the browser.
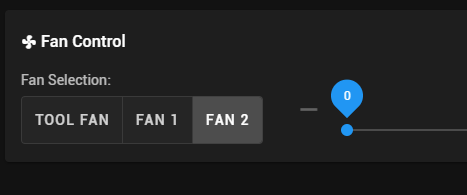
I have changed the homeall.g file, as you said. I took this example from the manual.
I also changed the tool selection about 1 hour ago, lol.Thanks again man!!
-
Using always on for the hotend is fine.
If you select tool fan does the slider work to control the tool fan?
Are you sure you have the part cooling fan plugged into the Fan0 port?
-
@Phaedrux said in Mesh Compensation settings disappear.:
Using always on for the hotend is fine.
If you select tool fan does the slider work to control the tool fan?
Are you sure you have the part cooling fan plugged into the Fan0 port?
I can move the slider(s), but the fan doesn't start.
B.t.w., if I use the FAN1 pins, it works.
Isn't that strange?