BL touch seems doesn't adjust
-
Hello,
I think my BL touch doesn`t work. I don't feel or barely feel some movement on the lead screw, more like vibrations seem like. My right side of the bed is always more squished than the left side. Maybe somebody can shine some light?
There are my config and starting script:; Configuration file for Duet WiFi (firmware version 2.03) ; executed by the firmware on start-up ; ; generated by RepRapFirmware Configuration Tool v2.1.4 on Thu Jan 02 2020 22:17:48 GMT+0100 (Central European Standard Time) ; General preferences G90 ; send absolute coordinates... M83 ; ...but relative extruder moves M550 P"own" ; set printer name M667 S1 ; select CoreXY mode ; Network M552 S1 ; enable network M586 P0 S1 ; enable HTTP M586 P1 S0 ; disable FTP M586 P2 S0 ; disable Telnet ; Drives M569 P0 R-1 M569 P0 S1 ; physical drive 0 goes forwards M569 P1 S1 ; physical drive 1 goes forwards M569 P2 S1 ; physical drive 2 goes forwards M569 P3 S1 ; physical drive 3 goes backwards M569 P4 S1 ; physical drive 4 goes forwards M584 X4 Y1 Z2 E3:0 ; set drive mapping M350 X16 Y16 Z16 E16:16 I1 ; configure microstepping with interpolation M92 X200.8 Y200.8 Z401 E415:415 ; set steps per mm M566 X650 Y650 Z50 E2000.00:2000.00 ; set maximum instantaneous speed changes (mm/min) M203 X15000 Y15000.00 Z600 E13000.00:13000.00 ; set maximum speeds (mm/min) M201 X1500 Y1500 Z150 E4000.00:4000.00 ; set accelerations (mm/s^2) M906 X1200 Y1200 Z1500 E500:500 I30 ; set motor currents (mA) and motor idle factor in per cent M84 S90 ; Set idle timeout ; Axis Limits M208 X-16 Y0 Z0 S1 ; set axis minima M208 X321 Y208 Z345 S0 ; set axis maxima ; Endstops M574 Z1 S2 ; set active low and disabled endstops M574 X1 S0 ; set active high endstops M574 Y2 S0 ; Z-Probe M307 H3 A-1 C-1 D-1 ; disable heater on PWM channel for BLTouch M558 A10 S0.003 P9 H3 F600 T5000 R0.3 ; set Z probe type to bltouch and the dive height + speeds G31 P25 X-10 Y-45.952 Z0.304 ; set Z probe trigger value, offset and trigger height (positive value brings bed closer) M557 X0:290 Y-45.952:190 S15 ; define mesh grid ; Heaters M305 P103 S"Chamber" P3 X1 T100000 B4725 C7.060000e-8 R4725 ;set thermistor for heated chamber M307 H0 B0 S1.00 ; disable bang-bang mode for the bed heater and set PWM limit M305 P0 T100000 B4138 R4700 ; set thermistor + ADC parameters for heater 0 M143 H0 S150 ; set temperature limit for heater 0 to 150C M305 P1 X200 ; configure PT100 for heater 1 M143 H1 S450 ; set temperature limit for heater 1 to 450C M305 P2 X201 ; configure PT100 for heater 2 M143 H2 S450 ; set temperature limit for heater 2 to 450C ; Fans M106 P0 S0 I0 F500 H-1 ; set fan 0 value, PWM signal inversion and frequency. Thermostatic control is turned off M106 P1 S1 I0 F500 H-1 ; set fan 1 value, PWM signal inversion and frequency. Thermostatic control is turned off M106 P2 S1 I0 F500 H-1 ; set fan 2 value, PWM signal inversion and frequency. Thermostatic control is turned off ; Tools M563 P0 S"Left" D0 H1 F-1 ; define tool 0 G10 P0 X0 Y0 Z0 ; set tool 0 axis offsets G10 P0 S0 R175 ; Set tool 0 active and standby temperatures M563 P1 S"Right" D1 H2 F-1 ; define tool 1 G10 P1 X20.09 Y0 Z0 ; set tool 1 axis offsets G10 P1 S0 R175 ; Set tool 0 active and standby temperatures ; Custom settings are not defined ; Miscellaneous M501 ; load saved parameters from non-volatile memoryStarting script:
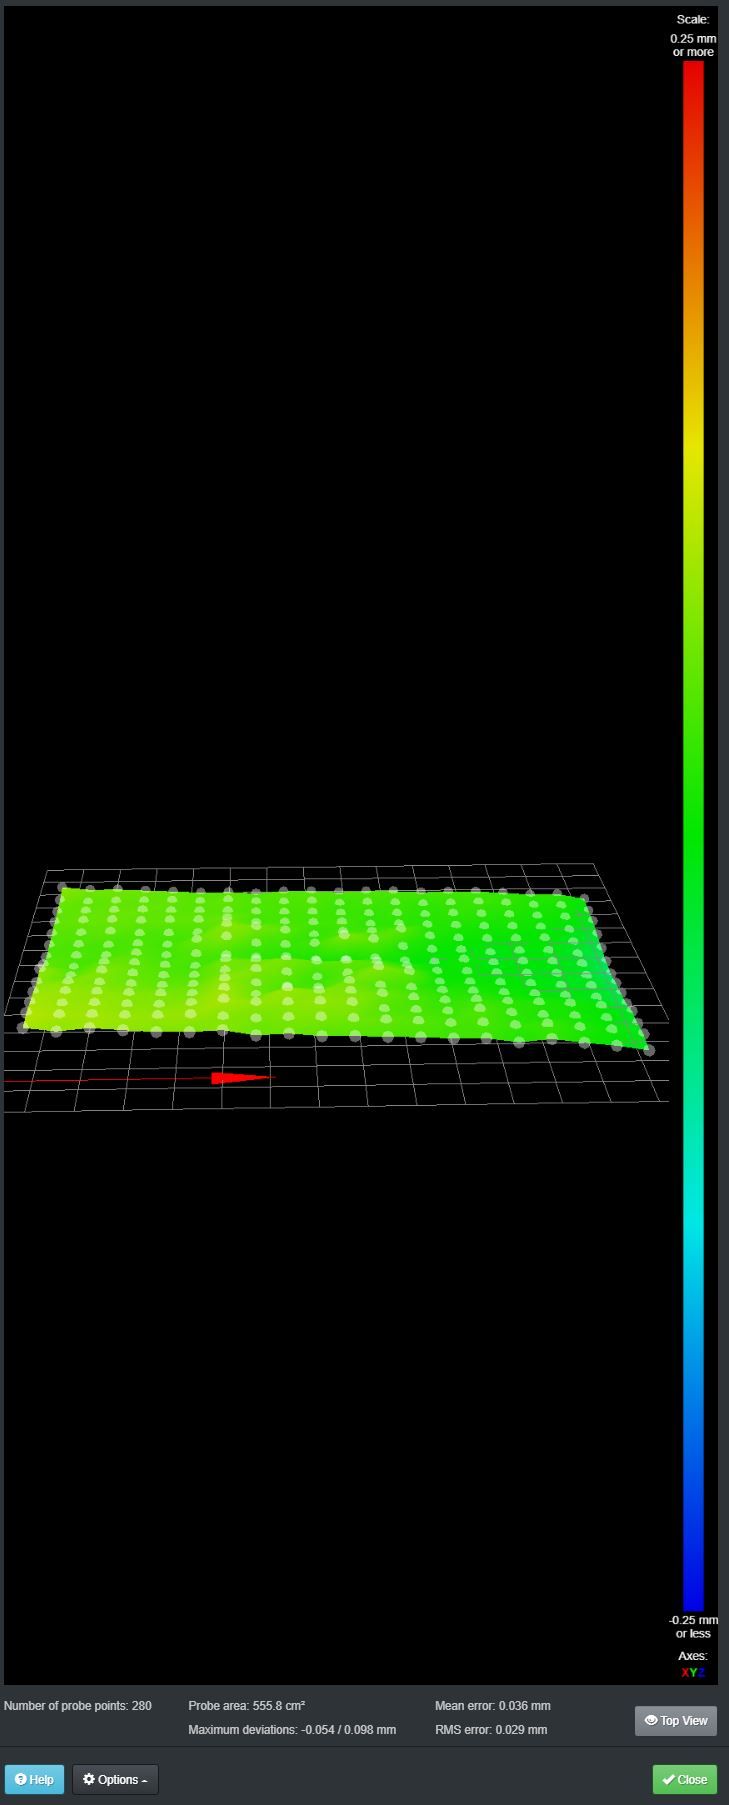
G28 XY                 	; Home XY
M561		; Clear any bed tranfsorm
G1 X155 Y106	; Move probe to the middle
G30		; Probe once
G29 S1   		; Load heightmap
G1 Z20.0 F6000 	; Move Z to 20
G90		; use absolute positioning for the XYZ axes
M564 S0		; ignore limits
G1 X0 Y-20 F6000 	; move nozzle out of the bed
G92 E0    	 	; Reset the extruder's origin
G1 E20 F200		; extrude 30mm
G1 X0 Y0 F6000 	; move nozzle to 0
Height map:

-
Hi,
I used a small magnet to hold a thin 2" nail to my Z axis lead screw.
With the nail as a pointer it was easy to see the movements.
In your case the movements are going to be quite small so you may want a longer pointer to make the movements easier to see.
Frederick
-
@fcwilt Hello,
Good tip!
")
But however, the mesh compensation seems to don't work as I would expect...Industrial 3D printing service in the Netherlands - gagatstudio.com
-
@felt342 said in BL touch seems doesn't adjust:
@fcwilt Hello,
Good tip!
But however, the mesh compensation seems to don't work as I would expect...Have you verified that there is movement on the Z axis while printing any given layer?
Frederick
-
@fcwilt yes I did test with a magnet attached, it does move but only somewhere in the middle of the bed, it doesn't move on the sides at all. Looks like a 10x10cm box in the middle only. Now I did level manually the bed to almost perfect and I can print without the BL touch with no issues. I did BL touch probing this is the latest one, but it seems doesn't represent correct either. The left side shows higher, but the Z-axis doesn't move at all on that side...Thanks
-
Hi,
Perhaps DC42 will jump in here with some feedback.
I've wondered the same thing. I don't see movement on the Z axis where I think I should.
Maybe there are some conditions where there is no compensation.
Did you create the map with the bed hot? My "bed" is a sandwich of aluminum plate, glass and a build surface. I let it heat up at least 15 minutes before creating the map.
Frederick
-
@fcwilt yes seems strange. Moves what I have in the middle of the bed also a bit jerky on the Z-axis, expecting them a bit smoother.
I do probing with all heaters disabled. I didn`t saw big differences in the heightmap with cold and 80C heated, so left with a cold bed for all probings.
-
Please share your homeall as well, though your start script only uses home X and Y and then you manually home Z with a G30, so that should be ok, but still post your homing files so we can see what all is happening.
Do you use G32/bed.g at all? If so, post that as well.
Things to try:
Send
M376 H0to ensure the mesh isn't being tapered off at all. If the bed and mesh is very flat and there is some taper applied, the amount of movement may end up being below the movement resolution of your Z axis.How are you running G29? How are you homing first? Are you doing it with the bed hot? Same goes for measuring the Z probe trigger height.
You may also want to reduce your probing speed. 600mm/min is a bit fast for the Bltouch. Best accuracy and repeatability around 60mm/min.
Make sure your XYZ offsets are correct. https://duet3d.dozuki.com/Wiki/Test_and_calibrate_the_Z_probe#Section_Calibrate_the_Z_probe_trigger_height
Your trigger height seems quite low. When mounted as suggested by Antclabs the BLTouch body should be ~8mm above the nozzle tip which would lead to a trigger height of ~2mm. Also ensure the Bltouch is as vertical as possible and as close to the nozzle as possible, preferably inline with the nozzle in at least one axis, preferably x.

-
Hi @Phaedrux
Homing files:
; homeall.g
; called to home all axes

; Home XY for Z homing
;
G91                     	; relative positioning
M913 X50 Y50	 		; set X Y motors to 50% of their normal current for homing
G1 S1 X-321 Y272.5 F4000   	; course home X or Y
G1 S1 X-321 F4000              	; course home X
G1 S1 Y272.5 F4000              	; course home Y
G1 X2 Y-3 F4000             	; move away from the endstops
G1 S1 X-321 F200           	; fine home X
G1 S1 Y272.5 F200               	; fine home Y
M913 X100 Y100	 		; set X Y motors to 100% of their normal current

; Z homing section follows
;
G90				; absolute positioning
G1 X146 Y106 F4000		; Move x and Y axis over to bed center so probe is on top of bed

; Set lower speeds for homing
M566 Z5			; Set maximum instantaneous speed changes (mm/min) (Jerk)
M203 Z400			; Set maximum speeds (mm/min)
M201 Z100	 		; Set maximum accelerations (mm/s^2)

; Probe the bed
;
M558 A1 F350			; Set single probing at faster feed rate
G30 				; Do a single probe to home our Z axis
M558 A10 F100			; Set tripple probing at slower feed rate
G30				; Probe again to get a more accurate position

; Set normal speeds again
M566 Z400			; Set maximum instantaneous speed changes (mm/min) (Jerk)
M203 Z600			; Set maximum speeds (mm/min)
M201 Z400			; Set maximum accelerations (mm/s^2)

; Move X and Y back Home
;
G1 X0 Y0
; homex.g ; called to home the X axis G91 ; relative positioning M913 X50 ; set X motors to 50% of their normal current for homing G1 S1 X-321 F4000 ; move quickly to X axis endstop and stop there (first pass) G1 X3 F4000 ; go back a few mm G1 S1 X-321 F200 ; move slowly to X axis endstop once more (second pass) M913 X100 ; set X motors to 100% of their normal current; homey.g ; called to home the Y axis G91 ; relative positioning M913 Y50 ; set Y motors to 50% of their normal current for homing G1 S1 Y272.5 F4000 ; move quickly to Y axis endstop and stop there (first pass) G1 Y-3 F4000 ; go back a few mm G1 S1 Y272.5 F200 ; move slowly to Y axis endstop once more (second pass) M913 Y100 ; set Y motors to 100% of their normal current; homez.g ; called to home the Z axis ; ; generated by RepRapFirmware Configuration Tool v2.1.4 on Thu Jan 02 2020 22:17:48 GMT+0100 (Central European Standard Time) G91 ; relative positioning G1 H2 Z0 F8000 ; lift Z relative to current position G90 ; absolute positioning G1 X146 Y106 F15000 ; go to first probe point G30 F180 ; home Z by probing the bed ; Uncomment the following lines to lift Z after probing ;G91 ; relative positioning ;G1 H2 Z0 F250 ; lift Z relative to current position ;G90 ; absolute positioningAnd this how I do probing everything on cold bed, I took it from betruedk blog:
First home XY - position nozzle on the middle of the bed, then issue G30, move bed until its touching the bed, reset Z0, moving a bed down 10mm and last
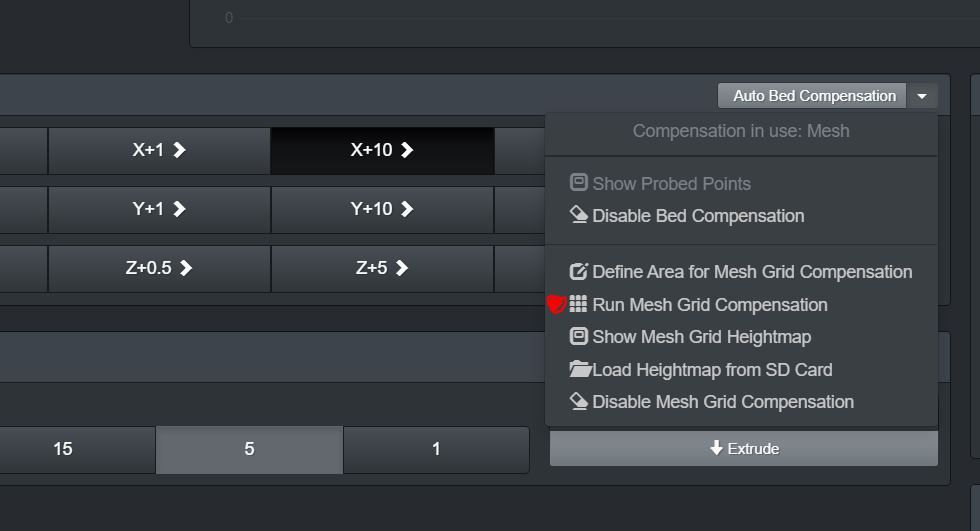
G30 S-1 to get the Z offset. Setting it in config.g > restart > home all and start probing by pressing the button in the dialog:
This is my setup for BL touch I do have 8mm from the casing of BL touch till the tip of the nozzle - that seems correct?

And this is how it's mounted:

Now I start thinking, maybe my 3D model of BL touch is wrong? And from there is wrong height position
Industrial 3D printing service in the Netherlands - gagatstudio.com
-
@felt342 said in BL touch seems doesn't adjust:
Now I start thinking, maybe my 3D model of BL touch is wrong?
There's always a danger of using CAD for real world measurements. Best to verify.
The rest of your homing files look good. I see you're lowering the speed for probing, which is good, but the G29 will still be using your speed from config.g
You should also probably change your start gcode to just use G28 to call homeall instead of G28 XY and manually homing Z.
-
Hm yes, I did check very roughly measurement from BL touch casing till nozzle tip, it looks like 1.1cm... And I did also check the 3D model of BL touch it is shorter than installed one... This is there my measurements got wrong, the model was from Thingiverse downloaded a long time ago, and I just blindly used it...

However, I do have difficulty to measure it precisely how much I need to compensate is there any suggestion here? The nozzle tip and BL touch center is 45mm apart, quite hard to get it precise. -
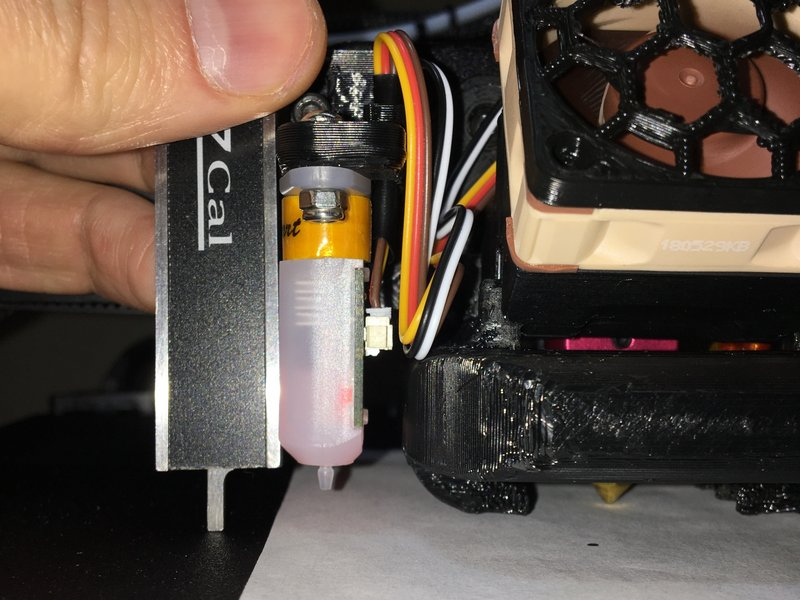
I just measured like this. Maybe with your mount it's not that easy.
It says 8mm +- 0.5mm so there's a bit of range. And even a bit out of that might not matter too much. But I think it's more important than most people realize.
-
Hi,
Yeah that is harder with my way of mounting... But I will figure out something
What do you think is it better to have it a bit lower than a bit higher?Industrial 3D printing service in the Netherlands - gagatstudio.com
-
@felt342 said in BL touch seems doesn't adjust:
What do you think is it better to have it a bit lower than a bit higher?
Well it's a bit of a balancing act. If you go too low, you risk the pin getting caught on the print if it curls. If you go too high, you risk the nozzle hitting the bed before the pin triggers.
-
Well, I did turn off mesh leveling during printing, only keep BL touch for Z homing as I don't have time to play with BL touch now.
And there is a result:BL TOUCH:
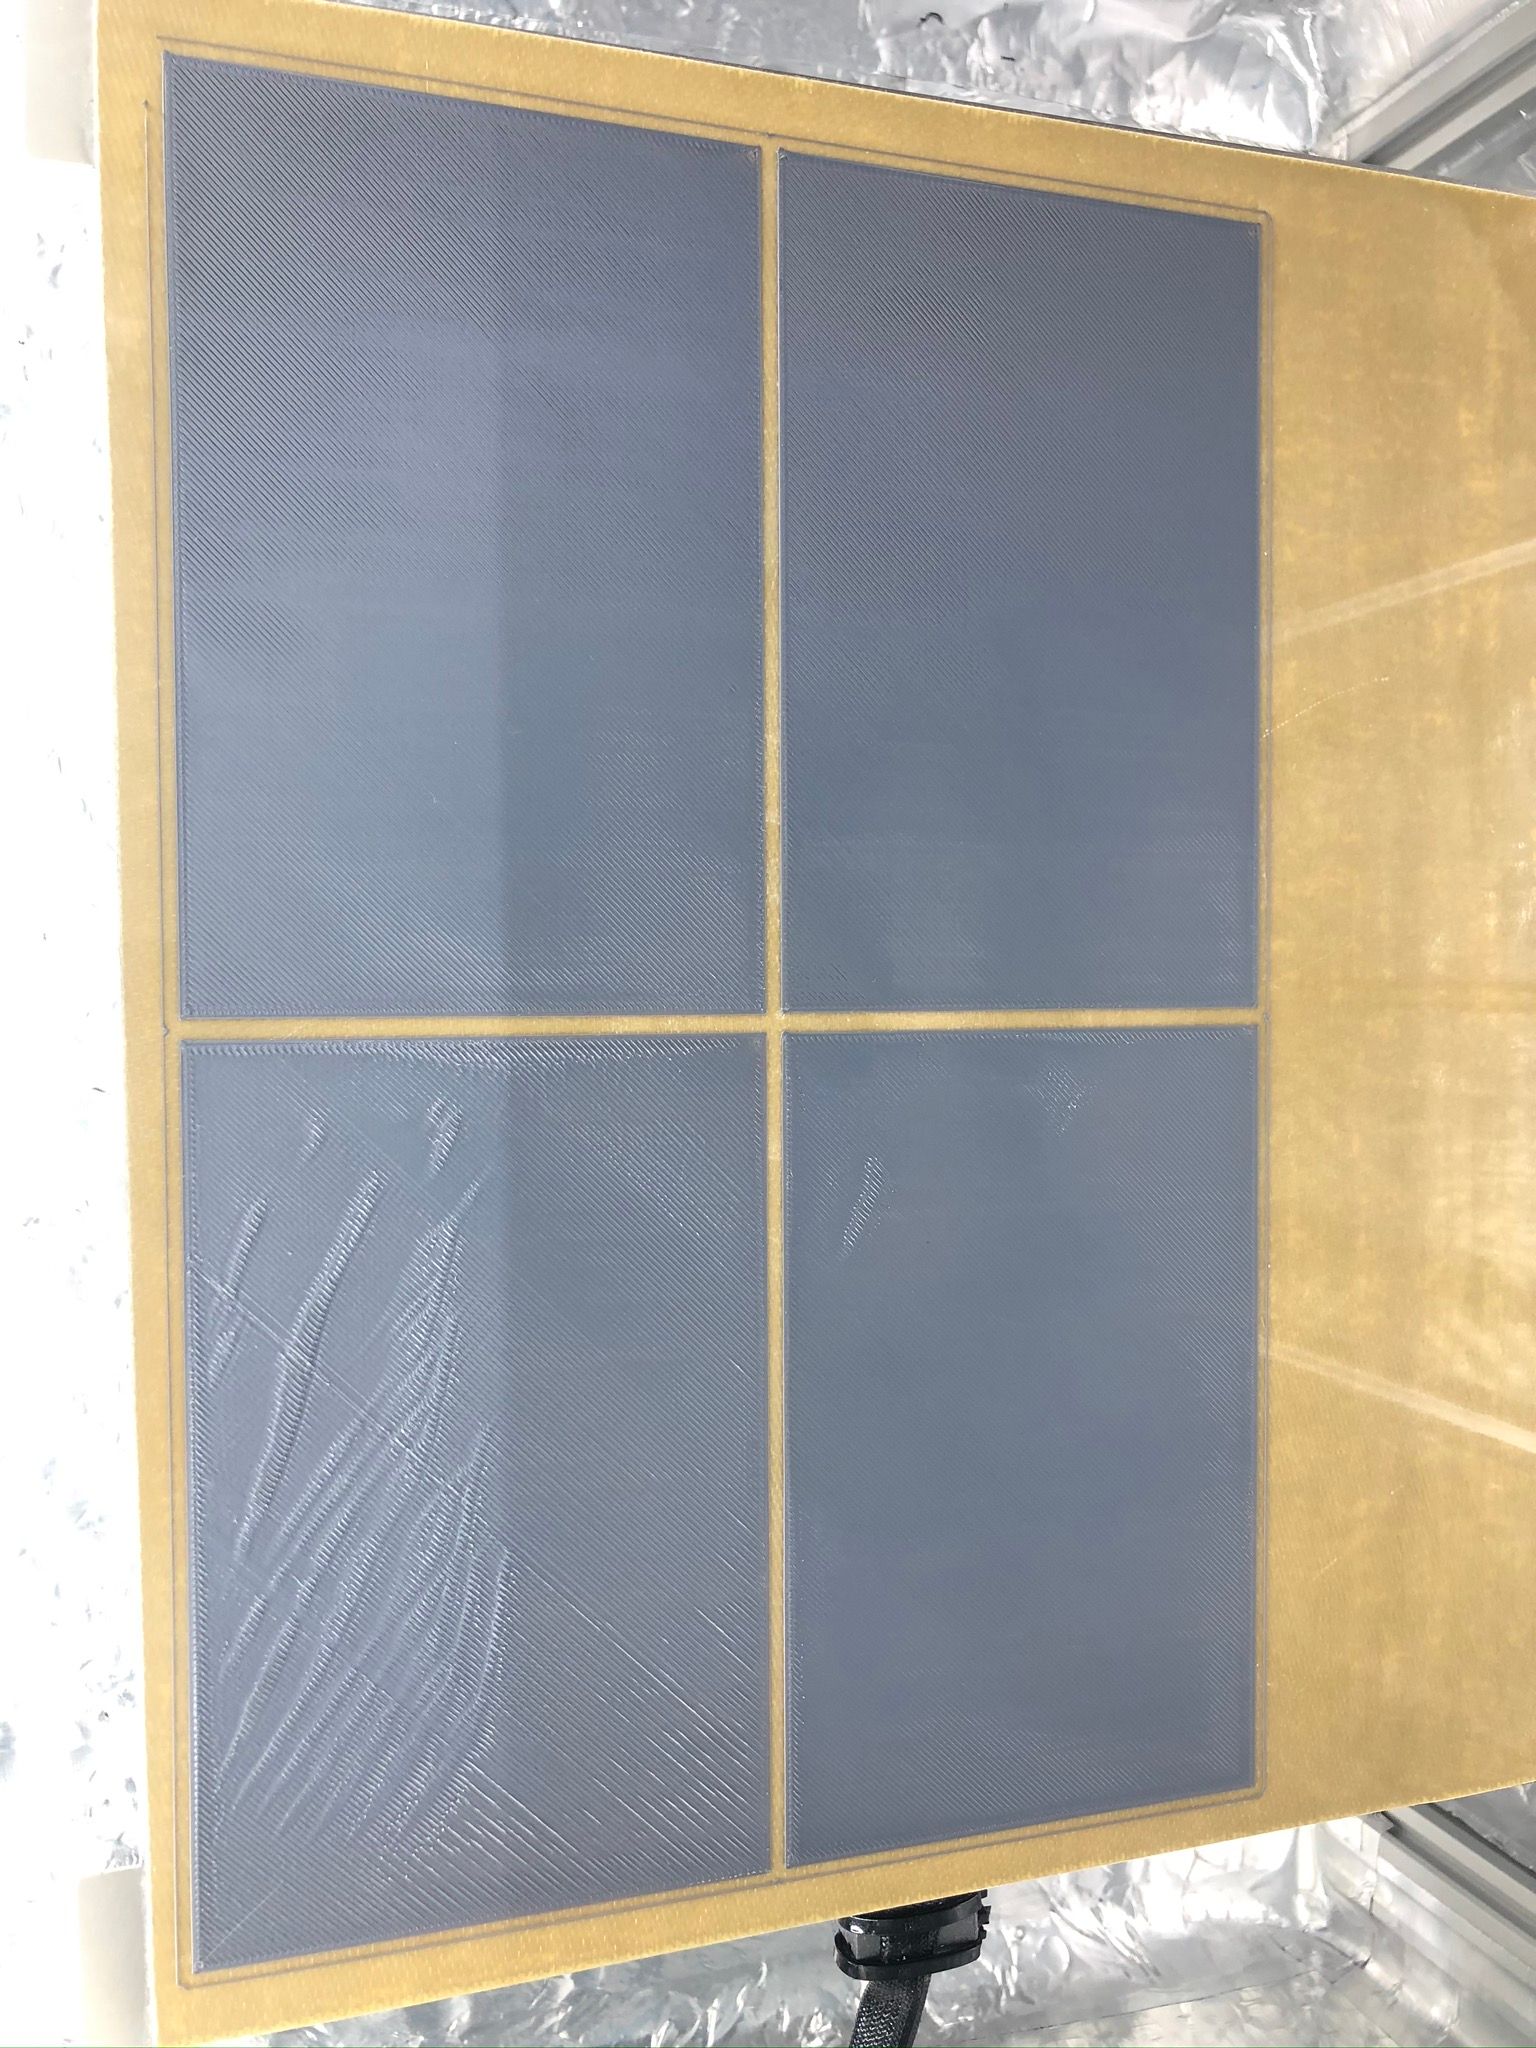
Without:
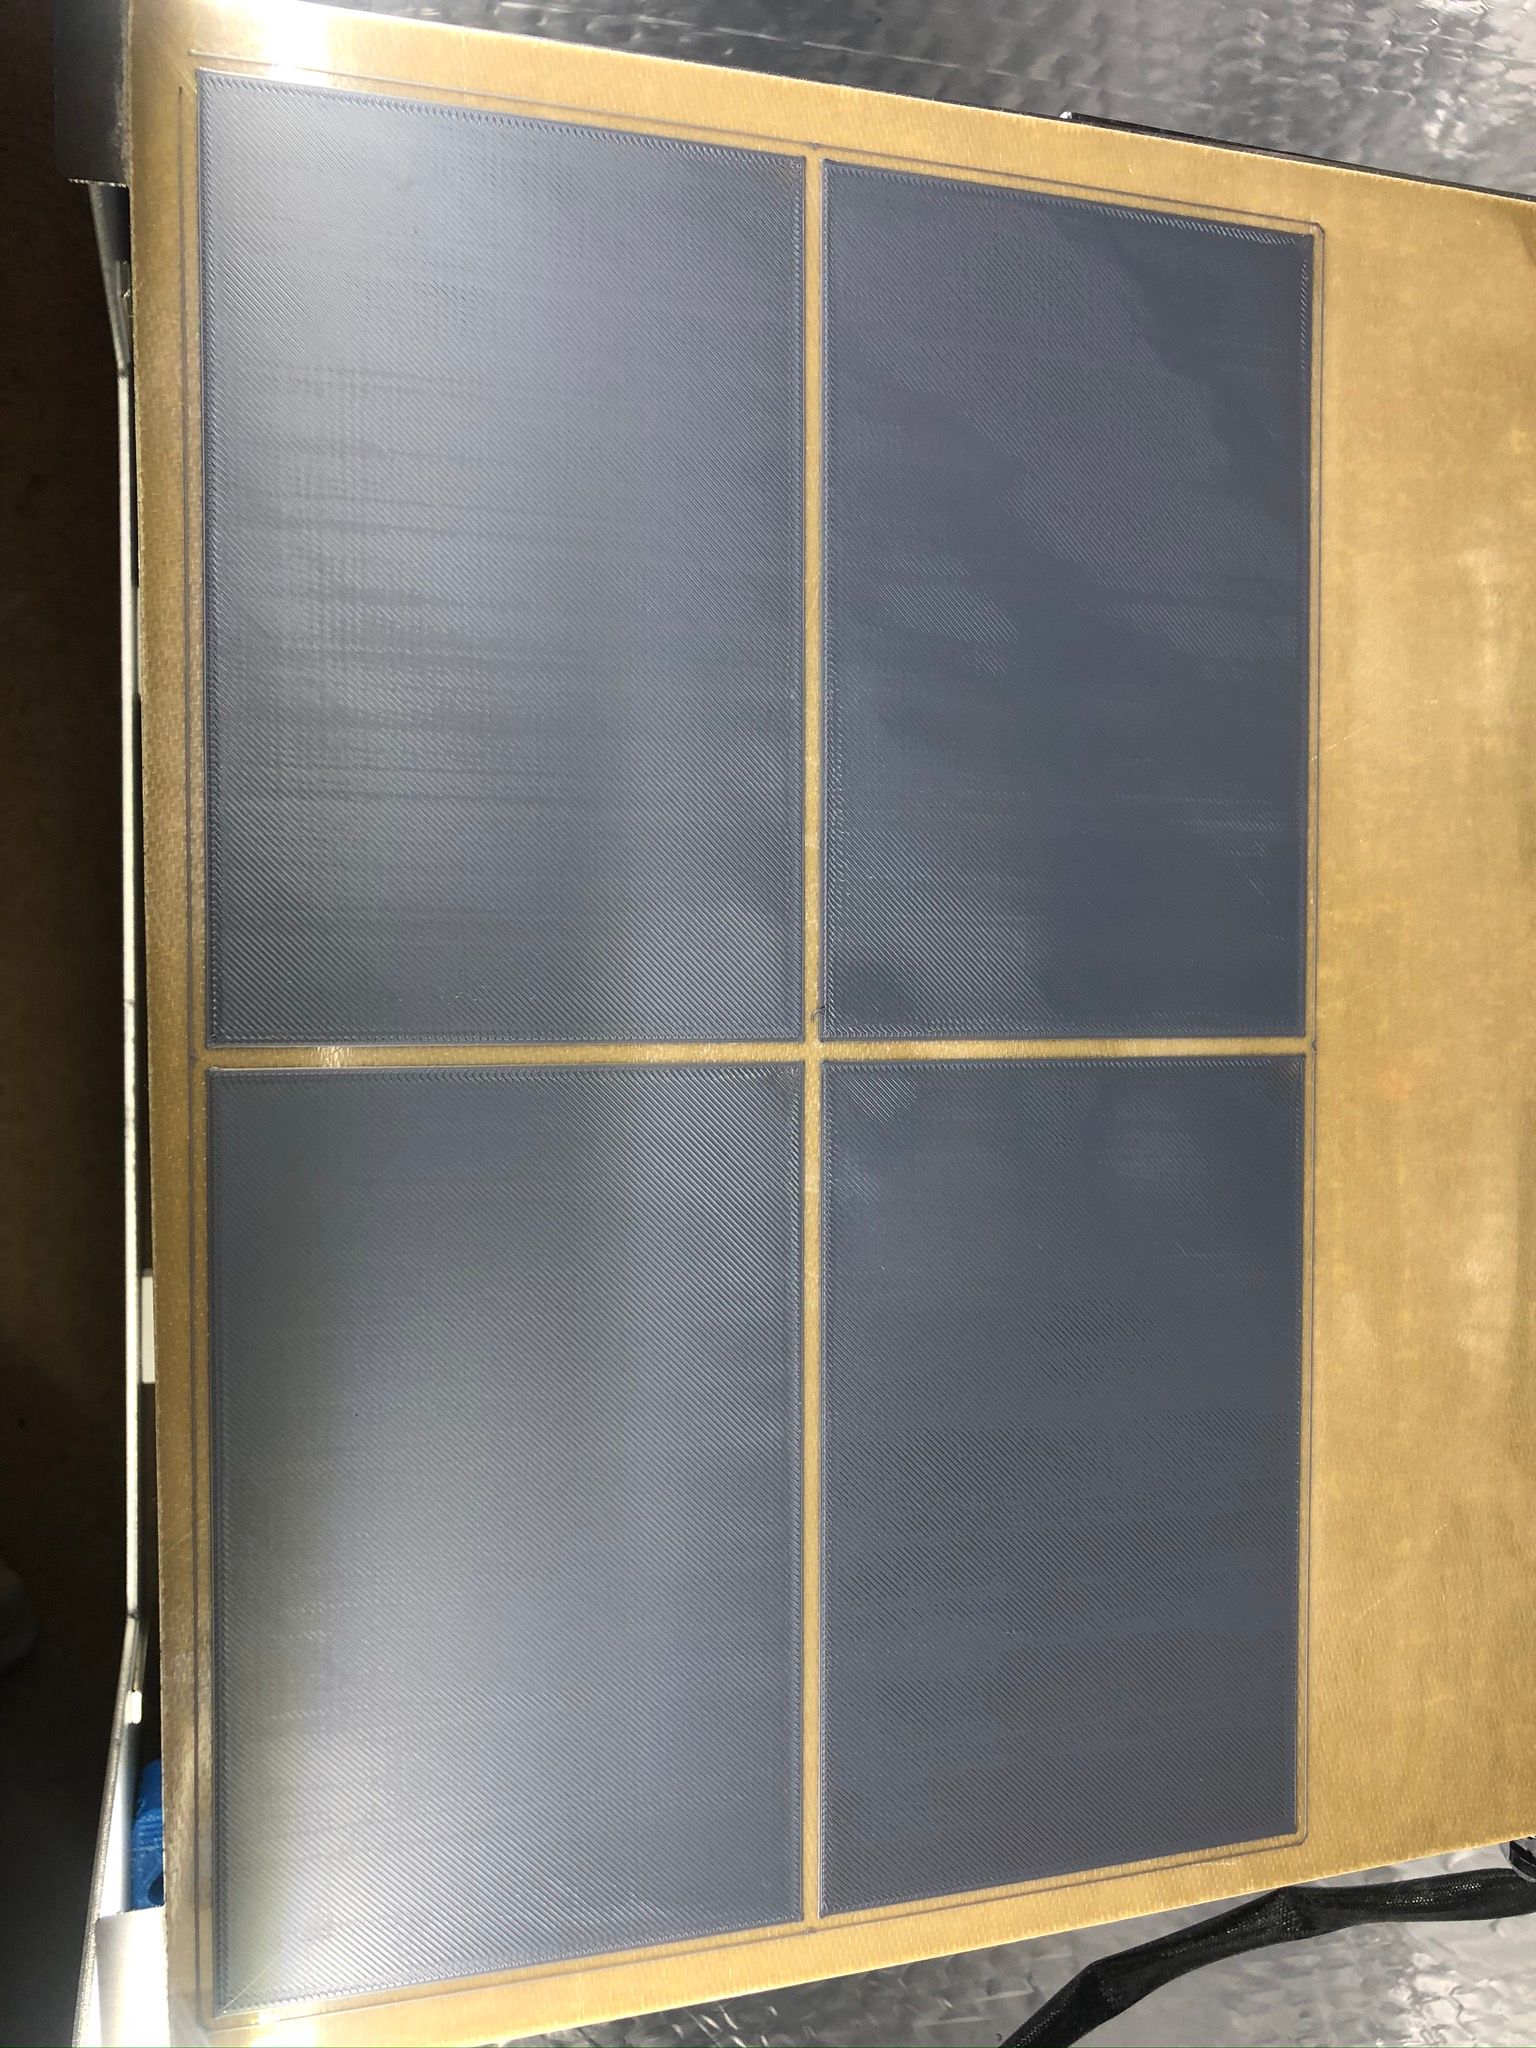
I am quite happy what I am getting without Auto bed leveling, the top box is not squished enough, but I guess 0.050mm shim under right corner should do the job, guess leave it for now and maybe will get back to BL touch different time
I did print ABS with 100C degrees heated bed and 50C chamber, to make sure the bed is properly expanded.
-
If your bed is flat enough that you don't need mesh compensation count that as a win.