Dual Y-axis endstop homing
-
Does the LED change at the board when you press the endstop.
-
Yep, all four led's change status on the board when the switch is triggered.
0 X-axis
1 Y-axis right & Y-axis left
2 n/a
3 U-axis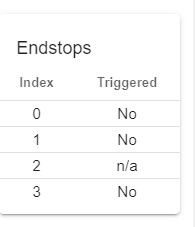
-
@dc42 said in Dual Y-axis endstop homing:
Your configuration looks Ok to me so I don't know why it isn't working. I'll re-test that feature tomorrow.
DC, this is a IDEX printer that uses the dual Mark kinematics. Would this have something to do with the issue? Logically, I could not think of a reason why it would matter but I thought I would bring it up just in case.
-
@3DPrintingWorld, please post your complete config.g file and homing files mso that I can replicate your configuration on my bench test system.
-
@3DPrintingWorld said in Dual Y-axis endstop homing:
@dc42 said in Dual Y-axis endstop homing:
Your configuration looks Ok to me so I don't know why it isn't working. I'll re-test that feature tomorrow.
DC, this is a IDEX printer that uses the dual Mark kinematics. Would this have something to do with the issue? Logically, I could not think of a reason why it would matter but I thought I would bring it up just in case.
Yes, that probably explains it. On a CoreXY printer, if either the X or the Y endstop switch triggers, all motors must be stopped. Your printer isn't CoreXY, but it has a matrix for which some motors affect more than one axis. If I remember correctly, on MarkForged kinematics, movement of the Y motor causes X (and U) movement too. So when one Y endstop switch triggers, if the other Y motor were to continue moving, it's not clear whether the X and U motors should continue to move if the firmware moves just the other one. That's why the firmware stops all motors when an endstop switch is triggered.
Duet WiFi hardware designer and firmware engineer
Please do not ask me for Duet support via PM or email, use the forum
http://www.escher3d.com, https://miscsolutions.wordpress.com -
PS - if you want to square up the Y axis, I think you will need to use a procedure something like this:
- Course home X, U and Y, allowing Y homing to complete when either switch triggers.
- Back off X and U away from the edges, so that a small amount of subsequent movement of them won't hit a hard stop.
- Back off Y from the endstops a small amount.
- Fine home one Y motor and endstop by itself, by issuing M574 Y and M584 Y commands that use just one motor and endstop.
- Repeat step 4 for the other motor.
- Restore Y to using both motors and endstops.
- Back off Y away from the endstops.
- Fine home X and U.
Duet WiFi hardware designer and firmware engineer
Please do not ask me for Duet support via PM or email, use the forum
http://www.escher3d.com, https://miscsolutions.wordpress.com -
Ok, thank for looking into it for me, that makes sense. Do you plan on incorporating the functionality of the dual markforged kinematics into this feature in the future.
-
@3DPrintingWorld said in Dual Y-axis endstop homing:
Ok, thank for looking into it for me, that makes sense. Do you plan on incorporating the functionality of the dual markforged kinematics into this feature in the future.
Unlikely, for three reasons:
- It's undefined whether the X and/or U motors should also be moved when moving just one of the Y motors.
- The code that decides whether to stop all motors or just one in this instance is the same code that decides whether to stop all motors or just one when you are homing several axes simultaneously. If you were to home e.g. X, U and Y all at the same time, it would still be necessary to stop all motors when any endstop switch is triggered.
- The workaround I suggested in my previous post should suffice for this unusual machine configuration.
Duet WiFi hardware designer and firmware engineer
Please do not ask me for Duet support via PM or email, use the forum
http://www.escher3d.com, https://miscsolutions.wordpress.com -
@dc42 Sorry but I will have to disagree with you on your points.
I don't think it's undefined what you should do if only one endstop is triggered. If the y axis is stopped on one side of the gantry, then the corresponding X or U carriage on the opposite end can not move as result of the belt arrangement. The belt can is only pivoting at this point.
As a result if Y(1) is triggered then Y(1) motor and the U axis motor should stop. If Y(2) is triggered then Y(2) and the X axis motor should stop. I will send a video when I get a second so you can better understand, it may not be clear to you if you don't have this arrangement.
In regards to your second point I will have to put more thought into this but why are you homing all the axis's at the same time? Would you not home X and U at the same time, then home Y ?
-
@3DPrintingWorld said in Dual Y-axis endstop homing:
I don't think it's undefined what you should do if only one endstop is triggered. If the y axis is stopped on one side of the gantry, then the corresponding X or U carriage on the opposite end can not move as result of the belt arrangement. The belt can is only pivoting at this point.
The X and U axes could be anywhere (and in unknown positions, because they haven't been homed yet) when you home Y.
In regards to your second point I will have to put more thought into this but why are you homing all the axis's at the same time? Would you not home X and U at the same time, then home Y ?
It's common to home multiple axes concurrently to save time. See https://duet3d.dozuki.com/Wiki/ConfiguringRepRapFirmwareCoreXYPrinter#Section_homeall_g_file for how this is done on a CoreXY machine, which is also relevant to your configuration.
-
Currently I am homing X, U, and Y all at the same time like on the link your provided but after your last comment I realized that this is a mistake. The Y-axis must be homed before the X and U like in your previous instructions. Since the X and U carriage move in the X-axis with the position of the Y axis, the Y axis must be homed first to square it up before the X and U are homed.
-
It works perfectly, and is very slick looking while in action!
Here is my homey.g if anyone else is doing something similar. You can also find the entire configuration on my github, if it helps anyone out. Just give me some time to get it updated.
Up next, giving ends topless homing another try. But first, some multi-material prints as now my nozzles will now stay perfectly aligned.
Thanks for the help but I'll be back....
; homey.g
G91 ; relative positioning
G1 H2 Z5 F6000 ; lift Z relative to current position
G1 H1 X475 U-475 F1800 ;Rough home X and U axis
G1 H1 X475 ; home X axis
G1 H1 U-475 ; home U axis
G1 X-15 U15 F6000 ; go back a few mm
G1 H1 Y500 F1800 ; move quickly to Y axis endstop and stop there (first pass)
G1 Y-5 F6000 ; go back a few mm
M584 Y1 ; Y-axis right side
M574 Y2 S1 P"ystop" ; Y-axis right side endstop Active
G1 H1 Y15 F360 ; move slowly to Y axis endstop once more (second pass)
M584 Y2 ; Y-axis Left side
M574 Y2 S1 P"e1stop" ; Y-axis left side endstop Active
G1 H1 Y15 F360 ; move slowly to Y axis endstop once more (second pass)
M584 Y1:2 ; Combine Y-Axis
M574 Y2 S1 P"ystop+e1stop" ; Y Double max active high endstop switch
G1 Y-5 F6000 ; go back a few mm
G1 H2 Z-5 F6000 ; lower Z again
G90 ; absolute positioning -
@3DPrintingWorld said in Dual Y-axis endstop homing:
It works perfectly, and is very slick looking while in action!
Well let's see it then!
-
@Phaedrux I get it, video or it didn't happen. I should have started the extruders in the middle of the bed for effect.