Polynomial Temp Compensation for Probes?
-
Hey @Kolbi,
That's all of it except the comments. You can find the whole source config on GitHub here, along with the rest of my latest config. You'll note that each Z offset entry starts with
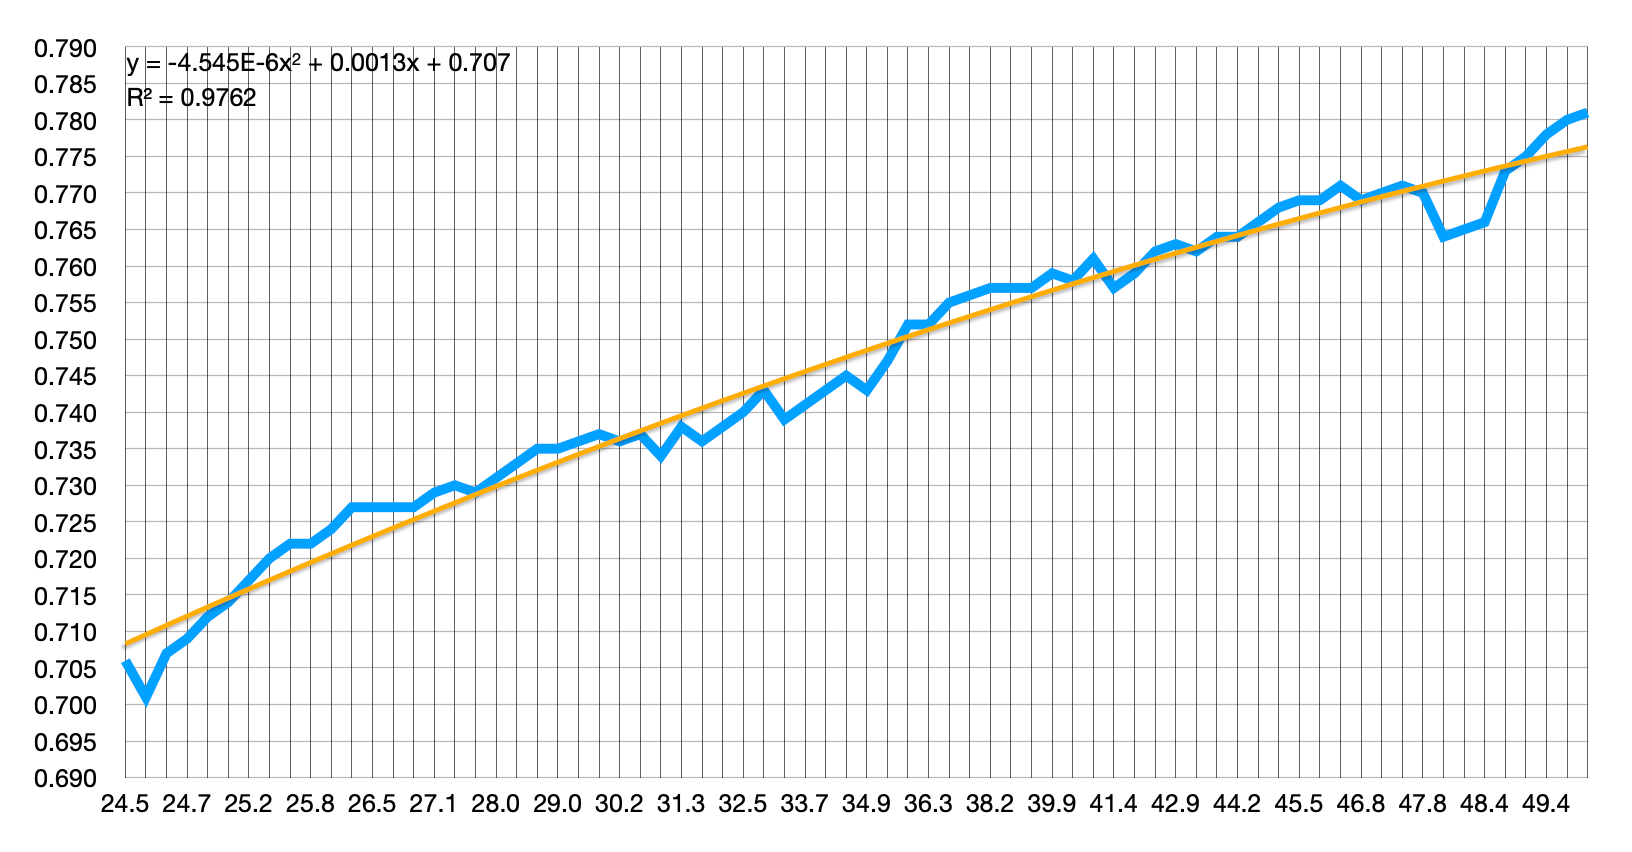
0.65 + ...-- that's because 0.65mm is my offset when cool. Makes it easy to find-and-replace if I ever tweak the printer and have a different Z offset.I have no idea if these specific values are portable to other probes. It may be worth taking some measurements yourself. I started by moving to the center of the bed and homing Z while cool. Next, I measured the height with this ProbePoint.g macro, and plopped the data into a spreadsheet. I then turned on the heater at a low temperature, waited a few minutes for temps to stabilize, and re-probed. I repeated for every degree or so along the appropriate temperature range, bumping up the extruder or bed heater as needed to get to the next temp. The last step was a quick regression in my spreadsheet to determine offsets at each temperature point. If you're not trying to do something fancy, like curve-fitting, you can probably simplify this process by just measuring every 5°C or so and use those offsets directly.
Obviously, you'll need to modify these macros to fit your specific printer and config if you decide to use them.
If you try it, let me know! I'd love to see if this kind of calibration is portable between probes, or if it varies.
Good luck!
-
@evan38109 Thanks much, really appreciate it. I've just shifted over to duet and still feeling my way around it. I'll give it a go once I get some time - hopefully this weekend. It should jive well with my setup, running a MK3s with Zaribo 10mm upgrade and Mosquito - not really anything 'prusa' left over.

My config files are here: https://github.com/rkolbi/RRF-machine-config-files/tree/master/Prusa MK3s -
I've added this to the work list for RRF 3.3. It may possibly appear in 3.2 as it should be quite simple to do.
-
Another benefit I heard about (but not sure if this is used/still used) is it allowed for detection of the magnets in a magnetic bed. If the magnets are precisely placed (i.e by a repeatable CNC manufacturing process) then orthogonal axis compensation could be used to square up a "not square" frame, to a square bed.
-
@dc42 said in Polynomial Temp Compensation for Probes?:
I've added this to the work list for RRF 3.3. It may possibly appear in 3.2 as it should be quite simple to do.
Thanks, @dc42! You made my morning.

-
@evan38109 Quick Q: when you said measured the hights (and subsequently put them in a spreadsheet) were you referring to the 'bed probe height' provided by the G32 output?
"G32 bed probe heights: 0.002, mean 0.002, deviation from mean 0.000Cheers,
Kolbi -
@evan38109 I was looking at your macro I wanted to check where my pindav2 measured up at. I made a quick macro to test the probe and make a file containing the current pinda temp and the trigger, then a downloaded (zip) contents, brought it into my mac, did a ls -1 to get a single row list, copied and saved that to a text file with csv extension, and lastly brought it into numbers.
Here's the script:
while sensors.analog[2].lastReading < 60 G90 ; set true G1 Z2 F2000 M400 G4 P990 G91 ; set rel while sensors.endstops[2].triggered = false G1 Z-0.00625 F300 echo "" ^ sensors.analog[2].lastReading ^ "," ^ move.axes[2].userPosition G60 S0 G90 ; set true G1 Z2 F2000 M400 G4 P990 G91 ; set rel while sensors.endstops[2].triggered = false G1 Z-0.00625 F300 echo "" ^ sensors.analog[2].lastReading ^ "," ^ move.axes[2].userPosition G60 S1 G90 ; set true G1 Z2 F2000 M400 G4 P990 G91 ; set rel while sensors.endstops[2].triggered = false G1 Z-0.00625 F300 echo "" ^ sensors.analog[2].lastReading ^ "," ^ move.axes[2].userPosition G60 S2 G90 ; set true G1 Z2 F2000 M400 G4 P990 G91 ; set rel while sensors.endstops[2].triggered = false G1 Z-0.00625 F300 echo "" ^ sensors.analog[2].lastReading ^ "," ^ move.axes[2].userPosition G60 S3 G90 ; set true G1 Z2 F2000 M400 G4 P990 G91 ; set rel while sensors.endstops[2].triggered = false G1 Z-0.00625 F300 echo "" ^ sensors.analog[2].lastReading ^ "," ^ move.axes[2].userPosition G60 S4 G90 ; set true G1 Z2 F2000 M400 G1 Z{(state.restorePoints[0].coords[2] + state.restorePoints[1].coords[2] + state.restorePoints[2].coords[2] + state.restorePoints[3].coords[2] + state.restorePoints[4].coords[2]) / 5} F100 G60 S5 G90 ; set true G1 Z4 F2000 M400 echo "Pinda at " ^ sensors.analog[2].lastReading ^ " average trigger at " ^ state.restorePoints[5].coords[2] ^ " millimeters." echo "Trigs: "^state.restorePoints[0].coords[2]^", "^state.restorePoints[1].coords[2]^", "^state.restorePoints[2].coords[2]^", "^state.restorePoints[3].coords[2]^", "^state.restorePoints[4].coords[2] M28 {"0:/macros/Probe Comp/"^ sensors.analog[2].lastReading ^","^state.restorePoints[5].coords[2]} M29 -
Hey @Kolbi ,
Hmm...not sure what's going on there, but that doesn't look right at all. It definitely shouldn't be going down as temperatures get higher, and the magnitude also looks off, too. I don't know, but I suspect the probing method is not very accurate:
while sensors.endstops[2].triggered = false
    G1 Z-0.00625 F300
I don't understand the intricacies of RRF, but it feels like there's plenty of room for timing oddities there with the command queue.
I much prefer
G30 S-1 ...:G1 Z3 ; move to first probing height G30 P0 X100 Y102 Z-99999 S-1 ; probe #1 ...It's cleaner, simpler, more accurate, and it also follows your
M558parameters. I love how it will take samples until it reaches the requested tolerance; it means that each of my "samples" is actually a sample group. For instance, when probing like this, I like to set the tolerance tight, with lots of available iterations and a very slow feed rate:M558 ... H1.0 F180 T99999 A20 S0.001For data , I just made a quick Google Doc with columns aligned to make data entry with the keypad easy:
I suppose it would be possible to script that, but...ehh, that's too close to the day job for a hobby.

-
@evan38109 Yeah, I'm not sure on the scripts accuracy either and I had/have a hard time believing the results too.
 Or maybe I have a poopy pinda?
I do find it interesting that the detection height goes back down after 43c - even if the method is deemed not accurate, it still shouldn't be seeing a drop in detection height. I also noticed that once the pinda is triggered, you have to move it up a little to get back to an untriggered state.
Eh, it's a rainy Saturday morning here, will likely toy around with it some more. -
Ok, made some macro changes and I think I had more accurate results.
Take a look:

Macro:
G32 G1 X100 Y100 F2000 M558 P5 C"^zprobe.in" H1.0 F180 T99999 A20 S0.001 ; Set probing to slow and precise M140 S100 M104 S240 while sensors.analog[2].lastReading < 50 G30 Z-99999 S-1 echo "" ^ sensors.analog[2].lastReading ^ "," ^ move.axes[2].userPosition G60 S0 G1 Z2 M400 G30 Z-99999 S-1 echo "" ^ sensors.analog[2].lastReading ^ "," ^ move.axes[2].userPosition G60 S1 G1 Z2 M400 G30 S-1 echo "" ^ sensors.analog[2].lastReading ^ "," ^ move.axes[2].userPosition G60 S2 G1 Z2 M400 G30 S-1 echo "" ^ sensors.analog[2].lastReading ^ "," ^ move.axes[2].userPosition G60 S3 G1 Z2 M400 G30 S-1 echo "" ^ sensors.analog[2].lastReading ^ "," ^ move.axes[2].userPosition G60 S4 G1 Z2 M400 G90 ; set true G1 Z2 F2000 M400 G1 Z{(state.restorePoints[0].coords[2] + state.restorePoints[1].coords[2] + state.restorePoints[2].coords[2] + state.restorePoints[3].coords[2] + state.restorePoints[4].coords[2]) / 5} F100 G60 S5 G90 ; set true G1 Z4 F2000 M400 echo "Pinda at " ^ sensors.analog[2].lastReading ^ " average trigger at " ^ state.restorePoints[5].coords[2] ^ " millimeters." echo "Trigs: "^state.restorePoints[0].coords[2]^", "^state.restorePoints[1].coords[2]^", "^state.restorePoints[2].coords[2]^", "^state.restorePoints[3].coords[2]^", "^state.restorePoints[4].coords[2] M28 {"0:/macros/Probe Comp/"^ sensors.analog[2].lastReading ^","^state.restorePoints[5].coords[2]} M29 -
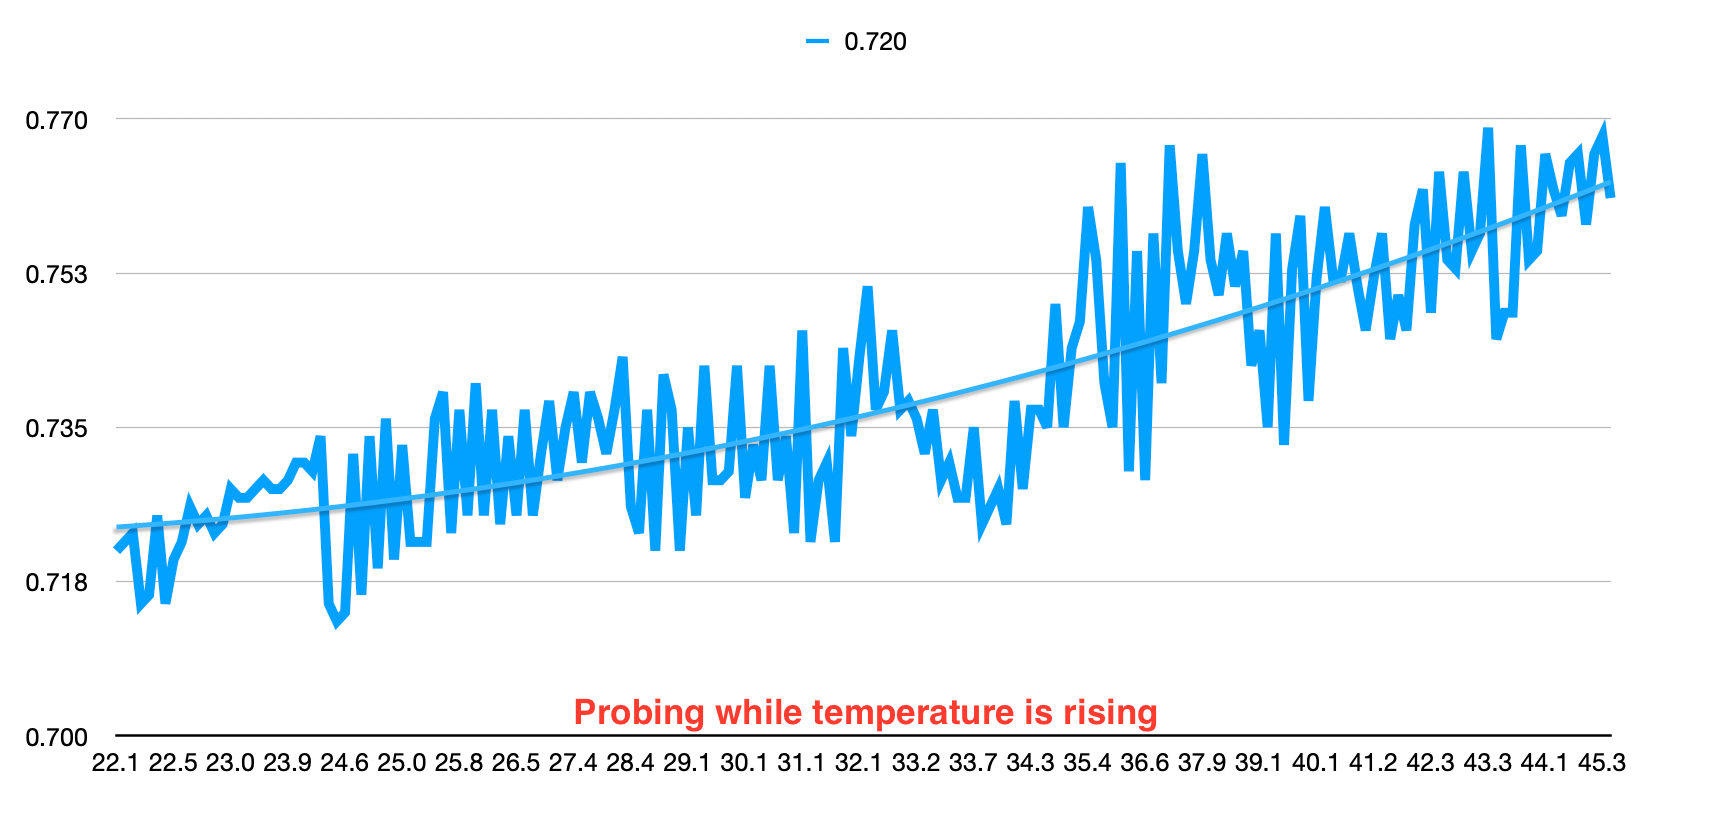
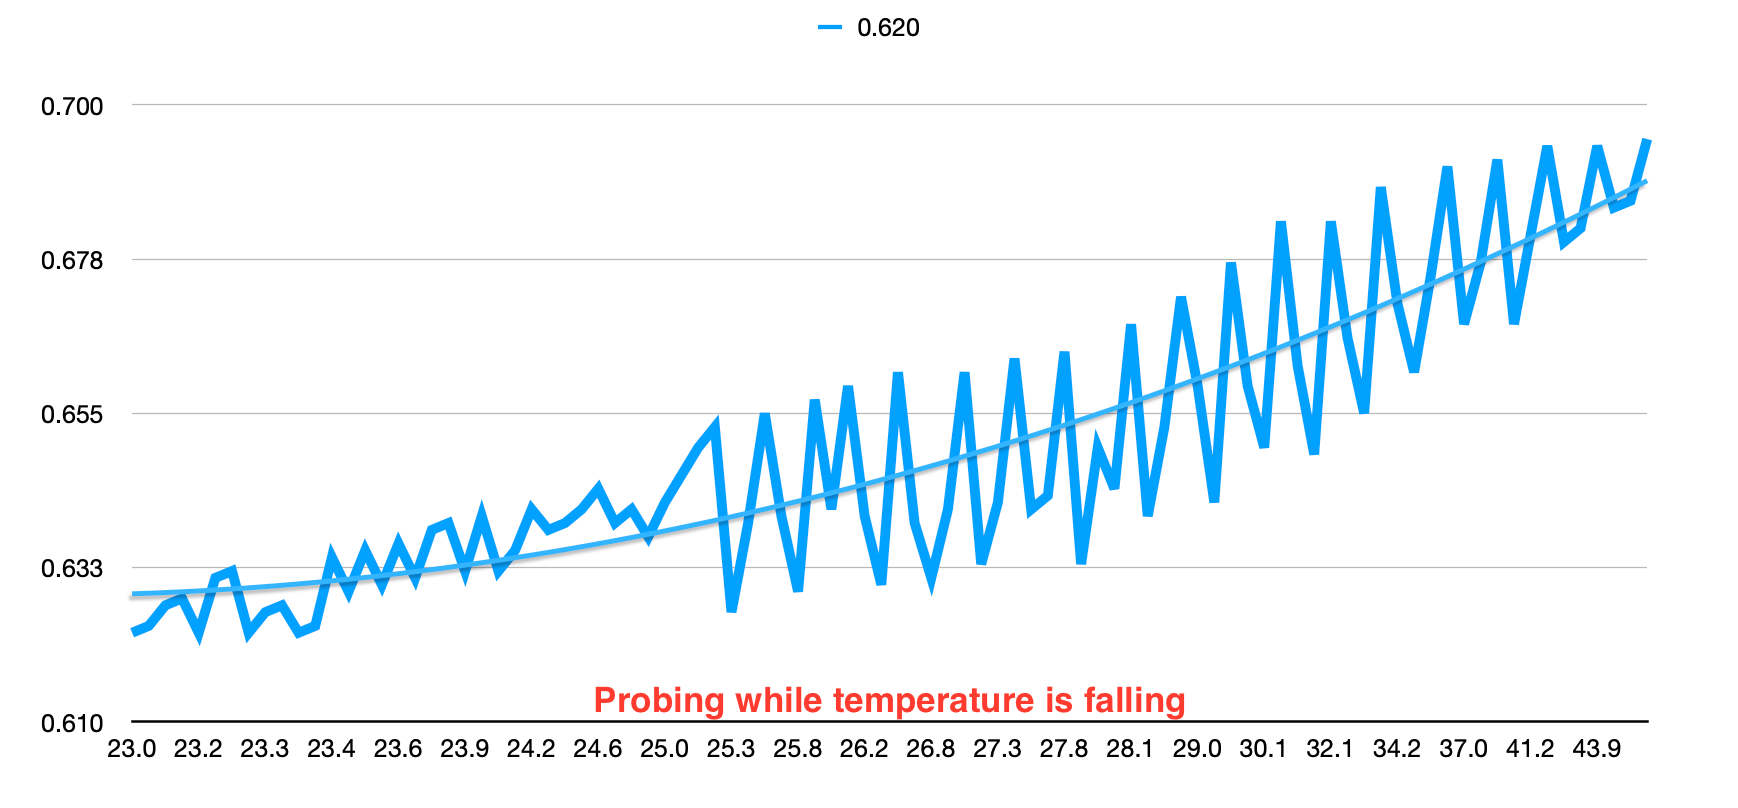
Granted, I am not sure about the accuracy of the macro, but I did make some additions to it where once it finishes probing on heat up, then it probes on the cool down too. I've run it several times to collect a good average, lots of points. Interesting data. Making me think that maybe I should try raising the pinda temp slower, to stabilize it at every few degrees?
@evan38109 I am curious, what variant of pinda-v2 you and I actually have. I read somewhere there are three PindaV2 variants out in the wild. I am fairly certain I have the latest revision with black wire - it's only about 2 months old as I got it for my Zaribo build. Also would be interested if you ran the macro on your machine to see if it comes close to the data you have already gathered, but if not - I don't blame you

G32 G1 X100 Y100 F2000 M558 P5 C"^zprobe.in" H1.0 F180 T99999 A20 S0.001 ; Set probing to slow and precise M140 S100 M104 S240 while sensors.analog[2].lastReading < 45 G30 Z-99999 S-1 echo "" ^ sensors.analog[2].lastReading ^ "," ^ move.axes[2].userPosition G60 S0 G1 Z2 M400 G30 Z-99999 S-1 echo "" ^ sensors.analog[2].lastReading ^ "," ^ move.axes[2].userPosition G60 S1 G1 Z2 M400 G30 S-1 echo "" ^ sensors.analog[2].lastReading ^ "," ^ move.axes[2].userPosition G60 S2 G1 Z2 M400 G30 S-1 echo "" ^ sensors.analog[2].lastReading ^ "," ^ move.axes[2].userPosition G60 S3 G1 Z2 M400 G30 S-1 echo "" ^ sensors.analog[2].lastReading ^ "," ^ move.axes[2].userPosition G60 S4 G1 Z2 M400 G90 ; set true G1 Z2 F2000 M400 G1 Z{(state.restorePoints[0].coords[2] + state.restorePoints[1].coords[2] + state.restorePoints[2].coords[2] + state.restorePoints[3].coords[2] + state.restorePoints[4].coords[2]) / 5} F100 G60 S5 G90 ; set true G1 Z4 F2000 M400 echo "Pinda at " ^ sensors.analog[2].lastReading ^ " average trigger at " ^ state.restorePoints[5].coords[2] ^ " millimeters." echo "Trigs: "^state.restorePoints[0].coords[2]^", "^state.restorePoints[1].coords[2]^", "^state.restorePoints[2].coords[2]^", "^state.restorePoints[3].coords[2]^", "^state.restorePoints[4].coords[2] M28 {"0:/macros/probe-comp-going-up/"^ sensors.analog[2].lastReading ^","^state.restorePoints[5].coords[2]} M29 M140 S0 M104 S0 G4 S60 while sensors.analog[2].lastReading >23 G4 S60 G30 Z-99999 S-1 echo "" ^ sensors.analog[2].lastReading ^ "," ^ move.axes[2].userPosition G60 S0 G1 Z2 M400 G30 Z-99999 S-1 echo "" ^ sensors.analog[2].lastReading ^ "," ^ move.axes[2].userPosition G60 S1 G1 Z2 M400 G30 S-1 echo "" ^ sensors.analog[2].lastReading ^ "," ^ move.axes[2].userPosition G60 S2 G1 Z2 M400 G30 S-1 echo "" ^ sensors.analog[2].lastReading ^ "," ^ move.axes[2].userPosition G60 S3 G1 Z2 M400 G30 S-1 echo "" ^ sensors.analog[2].lastReading ^ "," ^ move.axes[2].userPosition G60 S4 G1 Z2 M400 G90 ; set true G1 Z2 F2000 M400 G1 Z{(state.restorePoints[0].coords[2] + state.restorePoints[1].coords[2] + state.restorePoints[2].coords[2] + state.restorePoints[3].coords[2] + state.restorePoints[4].coords[2]) / 5} F100 G60 S5 G90 ; set true G1 Z4 F2000 M400 echo "Pinda at " ^ sensors.analog[2].lastReading ^ " average trigger at " ^ state.restorePoints[5].coords[2] ^ " millimeters." echo "Trigs: "^state.restorePoints[0].coords[2]^", "^state.restorePoints[1].coords[2]^", "^state.restorePoints[2].coords[2]^", "^state.restorePoints[3].coords[2]^", "^state.restorePoints[4].coords[2] M28 {"0:/macros/probe-comp-going-down/"^ sensors.analog[2].lastReading ^","^state.restorePoints[5].coords[2]} M29 M558 P5 C"^zprobe.in" H0.7 F400 T8000 A20 S0.003 M140 S0 M104 S0 G4 S60 -
Looking at the data for a bit, I believe the curve actually represents the thermal effects on the entire machine and the disparities (saw tooth pattern up/down) represent the probe's ability.
I zip-tied a bltouch3.1 to the extruder and ran the same test, the only problem is that there was no probe temp to base the curve off so I based it off bed temp.

-
@evan38109 I tackled the temp comp issue by changing to a BLTouch - had to modify the BMGm in CAD but it was worth it, very clean and accurate install. I believe you also have a BMGm, so this might interest you:

Cheers,
Kolbi -
Hey @Kolbi,
Sorry, I have email notifications off and missed your latest posts until I came to the forums to check something else!
That BLTouch mount is pretty impressive. How did you print it? Also: are the files available on Thingiverse or elsewhere? I'm pretty happy with my PINDA for now, but I do tend to get itchy for new experiments...

I'm racking my brain for why your measurements wound up so much different than mine. I've found my PINDA to be pretty darn stable. I've never needed more than +-0.10 babystepping for a nice first layer, regardless of the temperature at which I zero the machine. I'll keep turning it over in my brain, but...I've got nothing.

-
@evan38109 No worries at all on posts. The modified BMGm housing with BLTouch is working extremely well, I have a couple tweaks to make to the design files and then I'll post them. Just like the ones purchased through bondtech, mine were printed using MJF / Nylon.
On the Pinda, I never had major issues because I always did a probe warming routine to keep all measurements on an even temp offset. I had random problems with offset because of it - more noticeable with certain build plates then others. What was enlightening to me was the probe measurement disparities between runs - didn't think it would be that bad but the saw-tooth patterns above depict it - those metrics were derived over at least 5 runs.For the BLTouch - it's totally great. No more offsets for different build plates, no temp comp, and reliable repeatability.
Cheers,
Kolbi -
@Kolbi said in Polynomial Temp Compensation for Probes?:
mine were printed using MJF / Nylon.
That's quite the hardware to have access to, or was it printed through a service? It looks quite nice.
-
@Phaedrux Hehe, not mine - it was sent off for mfg. I have to modify it slightly, tighten the pocket where the mosquito sits with a set-screw to make for a no-compromising tightness. Also thinking about adding part cooling ducts into the housing sections with just a replaceable air nozzle/deflector.
-
@Kolbi, the forthcoming 3.2beta firmware supports 2nd order temperature compensation for trigger height.
-
@dc42 Nice! How will the temperature offset/calibration process work?
-
You will have to work out the calibration manually as you have done already. Once you have worked out the first and second order temperature coefficients, you can enter them in the M558 C parameter, e.g.
M558 ... C0.01:0.005


