2 MOTORES INDEPENDENTES NO EIXO Z
-
In 3.1.1 you bind the drivers to the same Z axis, and then in the M574 you define both endstop pins.
But if you have a z probe, this is a better method.
https://duet3d.dozuki.com/Wiki/Bed_levelling_using_multiple_independent_Z_motors
-
@brunowmkt You need to define the endstops correctly. See https://duet3d.dozuki.com/Wiki/Bed_levelling_using_multiple_independent_Z_motors#Section_In_RepRapFirmware_Num_3
Ian
-
Minha placa é uma Duet 2 Wifi ( clone)
config.g
; General preferences
G90 ; send absolute coordinates...
M83 ; ...but relative extruder moves
M550 P"MY3D V2" ; set printer name
M669 K1 ; select CoreXY mode; Network
M552 S1
M552 P192.168.1.1 ; IP address (0 = use DHCP)
M554 P192.168.1.1 ; Gateway
M553 P255.255.255.0 ; enable network
M586 P0 S1 ; enable HTTP
M586 P1 S0 ; disable FTP
M586 P2 S0 ; disable Telnet; Drives
M569 P0 S0 ; physical drive 0 goes forwards
M569 P1 S0 ; physical drive 1 goes forwards
M569 P2 S1 ; physical drive 2 goes forwards
M569 P3 S1 ; physical drive 3 goes forwards
M584 X0 Y1 Z2 E4 ; set drive mapping
M350 X16 Y16 Z16 E16 I1 ; configure microstepping with interpolation
M92 X80.00 Y80.00 Z1600.00 E90.00 ; set steps per mm
M566 X900.00 Y900.00 Z12.00 E420.00 ; set maximum instantaneous speed changes (mm/min)
M203 X6000.00 Y6000.00 Z180.00 E1200.00 ; set maximum speeds (mm/min)
M201 X600.00 Y600.00 Z1600.00 E300.00 ; set accelerations (mm/s^2)
M906 X850 Y850 Z850 E850 I30 ; set motor currents (mA) and motor idle factor in per cent
M84 S30 ; Set idle timeout; Axis Limits
M208 X0 Y0 Z0 S1 ; set axis minima
M208 X300 Y300 Z286 S0 ; set axis maxima; Endstops
M574 X1 S1 P"!xstop" ; configure active-high endstop for high end on X via pin xstop
M574 Y1 S1 P"!ystop" ; configure active-high endstop for high end on Y via pin ystop
M574 Z2 S1 P"!zstop" ; configure active-high endstop for high end on Z via pin zstop; Z-Probe
M558 P0 H5 F120 T6000 ; disable Z probe but set dive height, probe speed and travel speed
M557 X50:270 Y50:250 S30 ; define mesh grid; Heaters
M308 S0 P"bedtemp" Y"thermistor" T100000 B4138 ; configure sensor 0 as thermistor on pin bedtemp
M950 H0 C"bedheat" T0 ; create bed heater output on bedheat and map it to sensor 0
M307 H1 B1 S1.00 ; enable bang-bang mode for the bed heater and set PWM limit
M140 H0 ; map heated bed to heater 0
M143 H0 S120 ; set temperature limit for heater 0 to 120C
M308 S1 P"e0temp" Y"thermistor" T100000 B4138 ; configure sensor 1 as thermistor on pin e0temp
M950 H1 C"e0heat" T1 ; create nozzle heater output on e0heat and map it to sensor 1
M307 H1 B0 S1.00 ; disable bang-bang mode for heater and set PWM limit
M501; Fans
;M950 F0 C"fan0" Q500 ; create fan 0 on pin fan0 and set its frequency
;M106 P0 S0 H-1 ; set fan 0 value. Thermostatic control is turned off
M950 F1 C"fan1" Q500 ; create fan 1 on pin fan1 and set its frequency
M106 P1 S1 H1 T45 ; set fan 1 value. Thermostatic control is turned on; Tools
M563 P0 S"Extrusor" D0 H1 F0 ; define tool 0
G10 P0 X0 Y0 Z0 ; set tool 0 axis offsets
G10 P0 R0 S0 ; set initial tool 0 active and standby temperatures to 0C; Custom settings are not defined
; Miscellaneous
M575 P1 S1 B57600 ; enable support for PanelDue
M911 S10 R11 P"M913 X0 Y0 G91 M83 G1 Z3 E-5 F1000" ; set voltage thresholds and actions to run on power loss
T0 ; select first tool -
@brunowmkt said in 2 MOTORES INDEPENDENTES NO EIXO Z:
M584 X0 Y1 Z2 E4 ; set drive mapping
You only have a single driver assigned to the Z axis. The second Z motor needs to be on it's own driver.
M584 X0 Y1 Z2:3 E4
M574 Z2 S1 P"!zstop"
Then you must update your endstop definition for Z to include both endstop pin names.
M574 Z2 S1 P"!zstop+!e0stop"
-
Quanto a ligação dos cabos, seria dessa forma?
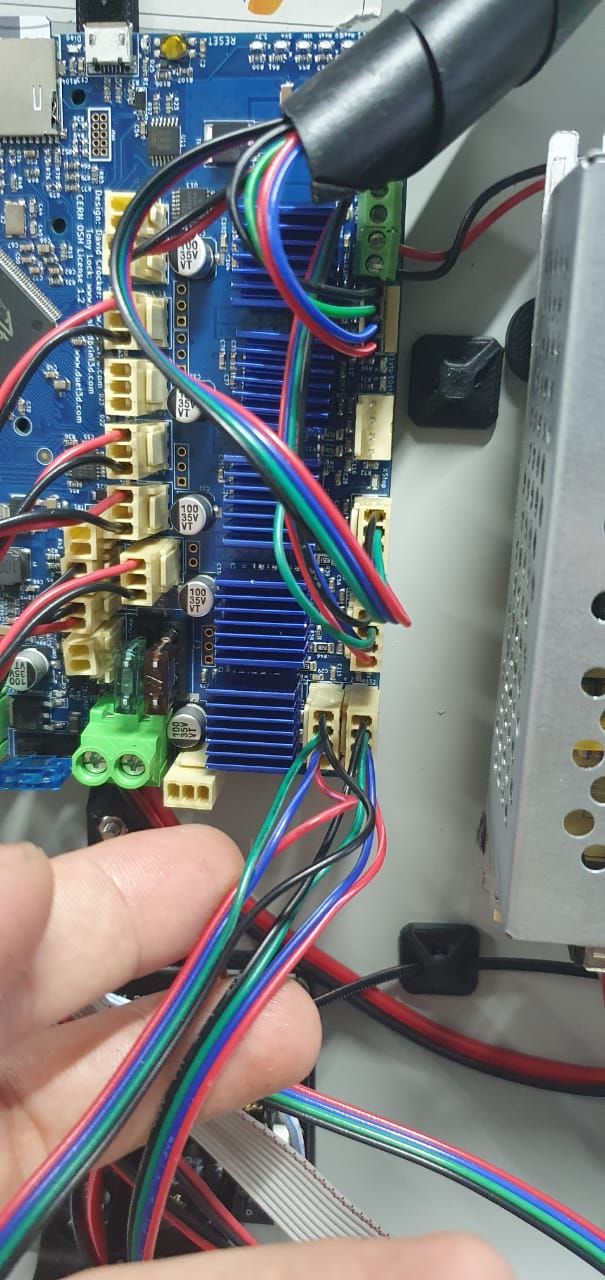
Coloquei em os dois em paralelo
-
The Z connector ports are wired in series to a single driver. So you would need to move one of those motors to your free driver and then install the jumpers on the second Z connector.
Then the config changes above should work.
-
Então o correto é pegar o segundo que está em série, colocar no drive E0. E fazer os Jumpers no local onde ele foi removido. É isso?
-
yes, that is correct.
-
@Phaedrux said in 2 MOTORES INDEPENDENTES NO EIXO Z:
M574 Z2 S1 P "! Zstop +! E0stop"
Fiz o procedimento, e subi a configuração pela web, mas parece que quando subo essa alteração, desconfigura e desconecta a rede, e não consigo nem colocar o comando pelo lcd M552 S1 para ativar novamente.
-
Do you have an endstop connected to e0stop?
-
@Phaedrux Yes!
1 no E0 e outro no Z.
Assim como os cabos dos motores, 1 E0 outro Z. -
Consegui reverter. Tive que retirar o cartão SD, colocar o config anterior a configuração nova. Inserir novamente o SD, voltou a rede. Depois fui no config.g segui suas orientações, e agora subiu sem erro...
-
So it is working now?
-
Voltou a conectar a impressora na rede wifi....os dois motores ainda não fiz o teste!
-
quando subo essa configuração, por algum motivo a placa não conecta mais a rede wifi, alguma explicação para isso?
Tenho que voltar ela para "fabrica" ai sim ela entra na rede.
; Configuration file for Duet WiFi (firmware version 3)
; executed by the firmware on start-up
;
; generated by RepRapFirmware Configuration Tool v3.1.4 on Thu Aug 06 2020 17:16:26 GMT-0300 (Horário Padrão de Brasília); General preferences
G90 ; send absolute coordinates...
M83 ; ...but relative extruder moves
M550 P"MY3D V2" ; set printer name
M669 K1 ; select CoreXY mode; Network
M552 S1
M552 P192.168.1.116 ; IP address (0 = use DHCP)
M554 P192.168.1.1 ; Gateway
M553 P255.255.255.0 ; enable network
M586 P0 S1 ; enable HTTP
M586 P1 S0 ; disable FTP
M586 P2 S0 ; disable Telnet; Drives
M569 P0 S0 ; physical drive 0 goes forwards
M569 P1 S0 ; physical drive 1 goes forwards
M569 P2 S1 ; physical drive 2 goes forwards
M569 P3 S1 ; physical drive 3 goes forwards
M584 X0 Y1 Z2: 3 E4 ; set drive mapping
M350 X16 Y16 Z16 E16 I1 ; configure microstepping with interpolation
M92 X80.00 Y80.00 Z1600.00 E90.00 ; set steps per mm
M566 X900.00 Y900.00 Z12.00 E420.00 ; set maximum instantaneous speed changes (mm/min)
M203 X6000.00 Y6000.00 Z180.00 E1200.00 ; set maximum speeds (mm/min)
M201 X600.00 Y600.00 Z1600.00 E300.00 ; set accelerations (mm/s^2)
M906 X850 Y850 Z850 E850 I30 ; set motor currents (mA) and motor idle factor in per cent
M84 S30 ; Set idle timeout; Axis Limits
M208 X0 Y0 Z0 S1 ; set axis minima
M208 X300 Y300 Z290 S0 ; set axis maxima; Endstops
M574 X1 S1 P"!xstop" ; configure active-high endstop for high end on X via pin xstop
M574 Y1 S1 P"!ystop" ; configure active-high endstop for high end on Y via pin ystop
M574 Z1 S2 P"!zstop + !e0stop" ; configure active-high endstop for high end on Z via pin zstop; Z-Probe
M950 S0 C"exp.heater7" ; create servo pin 0 for BLTouch
M558 P9 C"^zprobe.in" H5 F420 T6000 ; disable Z probe but set dive height, probe speed and travel speed
G31 P500 X0 Y0 Z1.40 ; set Z probe trigger value, offset and trigger height
M557 X30:250 Y30:250 S30 ; define mesh grid; Heaters
M308 S0 P"bedtemp" Y"thermistor" T100000 B4138 ; configure sensor 0 as thermistor on pin bedtemp
M950 H0 C"bedheat" T0 ; create bed heater output on bedheat and map it to sensor 0
M307 H1 B1 S1.00 ; enable bang-bang mode for the bed heater and set PWM limit
M140 H0 ; map heated bed to heater 0
M143 H0 S120 ; set temperature limit for heater 0 to 120C
M308 S1 P"e0temp" Y"thermistor" T100000 B4138 ; configure sensor 1 as thermistor on pin e0temp
M950 H1 C"e0heat" T1 ; create nozzle heater output on e0heat and map it to sensor 1
M307 H1 B0 S1.00 ; disable bang-bang mode for heater and set PWM limit
M501; Fans
;M950 F0 C"fan0" Q500 ; create fan 0 on pin fan0 and set its frequency
;M106 P0 S0 H-1 ; set fan 0 value. Thermostatic control is turned off
M950 F1 C"fan1" Q500 ; create fan 1 on pin fan1 and set its frequency
M106 P1 S1 H1 T45 ; set fan 1 value. Thermostatic control is turned on; Tools
M563 P0 S"Extrusor" D0 H1 F0 ; define tool 0
G10 P0 X0 Y0 Z0 ; set tool 0 axis offsets
G10 P0 R0 S0 ; set initial tool 0 active and standby temperatures to 0C; Custom settings are not defined
; Miscellaneous
M575 P1 S1 B57600 ; enable support for PanelDue
M911 S10 R11 P"M913 X0 Y0 G91 M83 G1 Z3 E-5 F1000" ; set voltage thresholds and actions to run on power loss
T0 ; select first tool -
@brunowmkt said in 2 MOTORES INDEPENDENTES NO EIXO Z:
M552 P192.168.1.116 ; IP address (0 = use DHCP)
M554 P192.168.1.1 ; Gateway
M553 P255.255.255.0 ; enable networkRemove this section so that it uses DHCP to get an address instead.
You may need to check your router to see what IP address has been given to the Duet, or if you have a PanelDue or USB terminal you can send M552 to check the assigned IP. You can use the router to assign that IP to the Duet via DHCP reservation.
-
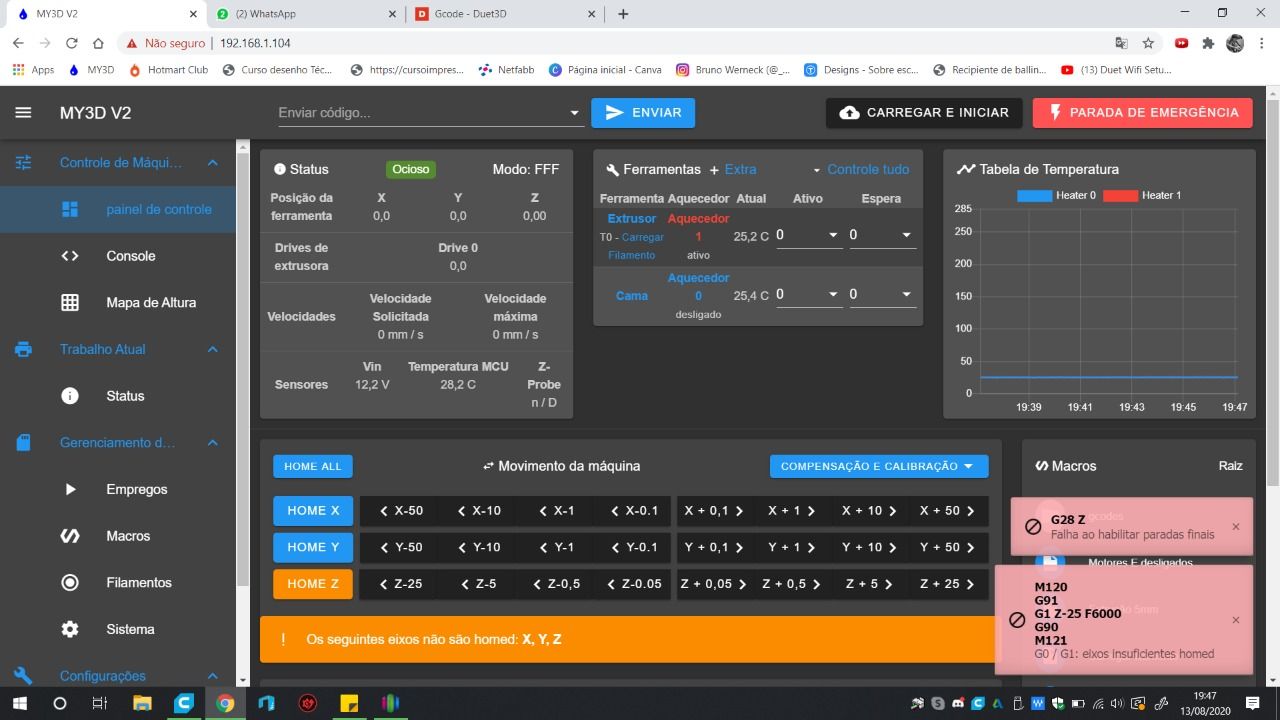
voltou a funcionar....
Mas tenho outro problema, esta dando esses erros, sempre que faço o Home em z
-
além dos dois motores independentes em Z, tenho o Bltouch que também não esta dando certo!
-
Post your homeall.g