Newbie connecting Workbee Duet 2 via Ethernet To MacBook Pro
-
@bearer I think that was to show that the wired gigabit adapter worked correctly.
@kbjpick I'm sorry this isn't working correctly, I'm not sure exactly why it is not. Do you get any lights on the Duet Ethernet port when it's connected to the Mac?
As you can access the SD card, can you edit the config.g (in Text Edit is fine), change the network section to the following (change M552 line and add M553):
; Network
M552 P192.168.2.3 S1                           ; enable network and acquire dynamic address via DHCP
M553 P255.255.255.0                            ; subnet mask
M586 P0 S1                                     ; enable HTTP
M586 P1 S0                                     ; disable FTP
M586 P2 S0                                     ; disable Telnet
Then, at least, you won't have to change the IP address of the Duet every time. I don't think the addition of the M553 subnet mask is important, but you could try it out, and see if the Mac will connect with this set (after changing the Mac's IP address back to 192.168.2.2, of course).
Ian
-
Per discussion, herewith is config.g file on SD card after editing per suggestion above.
; Communication and general
M111 S0 ; Debug off
M550 PDuetTest ; Machine name and Netbios name (can be anything you like)
M551 Preprap ; Machine password (used for FTP)*** Ethernet networking: The following lines are used for factory testing - PLEASE REMOVE THEM
M540 P0xBE:0xEF:0xDE:0xAD:0xFE:0xED ; MAC Address
M552 P192.168.2.3 S1 ; IP address
M553 P255.255.255.0 ; subnet mask
M586 P0 S1 ; enable HTTP
M586 P1 S0 ; disable FTP
M586 P2 S0 ; disable Telnet
M554 P192.168.1.255 ; Gateway
M553 P255.255.255.0 ; Netmask;*** End of factory test lines to be removed
;*** Networking
M552 S1 ; Turn network onM555 P2 ; Set output to look like Marlin
G21 ; Work in millimetres
G90 ; Send absolute coordinates...
M83 ; ...but relative extruder moves; Disable Fan 1 thermostatic mode
M106 P1 H-1; Axis and motor configuration
M569 P0 S1 ; Drive 0 goes forwards
M569 P1 S1 ; Drive 1 goes forwards
M569 P2 S1 ; Drive 2 goes forwards
M569 P3 S1 ; Drive 3 goes forwards
M569 P4 S1 ; Drive 4 goes forwards
M574 X2 Y2 Z2 S1 ; set endstop configuration (all endstops at high end, active high)
;*** The homed height is deliberately set too high in the following - you will adjust it during calibration
M665 R105.6 L215.0 B85 H250 ; set delta radius, diagonal rod length, printable radius and homed height
M666 X0 Y0 Z0 ; put your endstop adjustments here, or let auto calibration find them
M350 X16 Y16 Z16 E16:16 I1 ; Set 16x microstepping with interpolation
M92 X80 Y80 Z80 ; Set axis steps/mm
M906 X1000 Y1000 Z1000 E800 I60 ; Set motor currents (mA) and increase idle current to 60%
M201 X1000 Y1000 Z1000 E1000 ; Accelerations (mm/s^2)
M203 X20000 Y20000 Z20000 E3600 ; Maximum speeds (mm/min)
M566 X1200 Y1200 Z1200 E1200 ; Maximum instant speed changes mm/minute; Thermistors
M305 P0 T100000 B3950 R4700 H30 L0 ; Put your own H and/or L values here to set the bed thermistor ADC correction
M305 P1 T100000 B3974 R4700 H30 L0 ; Put your own H and/or L values here to set first nozzle thermistor ADC correction
M305 P2 T100000 B3974 R4700 H30 L0 ; Put your own H and/or L values here to set 2nd nozzle thermistor ADC correctionM570 S180 ; Hot end may be a little slow to heat up so allow it 180 seconds
; Adjustments for dummy heaters on test rig
M307 H0 A250 C140 D5.5 B1
M307 H1 A250 C140 D5.5 B0
M307 H2 A250 C140 D5.5 B0; Fans
M106 P1 S-1 ; disable thermostatic mode for fan 1; Tool definitions
M563 P0 D0 H1 ; Define tool 0
G10 P0 S0 R0 ; Set tool 0 operating and standby temperatures
;*** If you have a single-nozzle build, comment the next 2 lines
M563 P1 D1 H2 ; Define tool 1
G10 P1 S0 R0 ; Set tool 1 operating and standby temperatures
M92 E80:80 ; Set extruder steps per mm; Z probe and compensation definition
;*** If you have a switch instead of an IR probe, change P1 to P4 in the following M558 command.
M558 P5 F100 T6000 X0 Y0 Z0 H3 ; Z probe is a Smart Effector and is not used for homing any axes R0.4 not used. Reduced F300 to 100
G31 P100 X0 Y0 Z-0.25 ; Set the zprobe height and threshold for Smart Effector;*** If you are using axis compensation, put the figures in the following command
M556 S78 X0 Y0 Z0 ; Axis compensation hereM208 S1 Z-0.2 ; set minimum Z
T0 ; select first hot end
; M117 Use https://configurator.reprapfirmware.org/ to set up your printer config -
M552 P192.168.2.3 S1 ; IP address
Except your Mac is using address 192.168.1.103
So change your Duet address to 192.168.1.3
-
@Phaedrux Forgive my naive question, but where do you see the MBP address is 192.168.1.103?
-
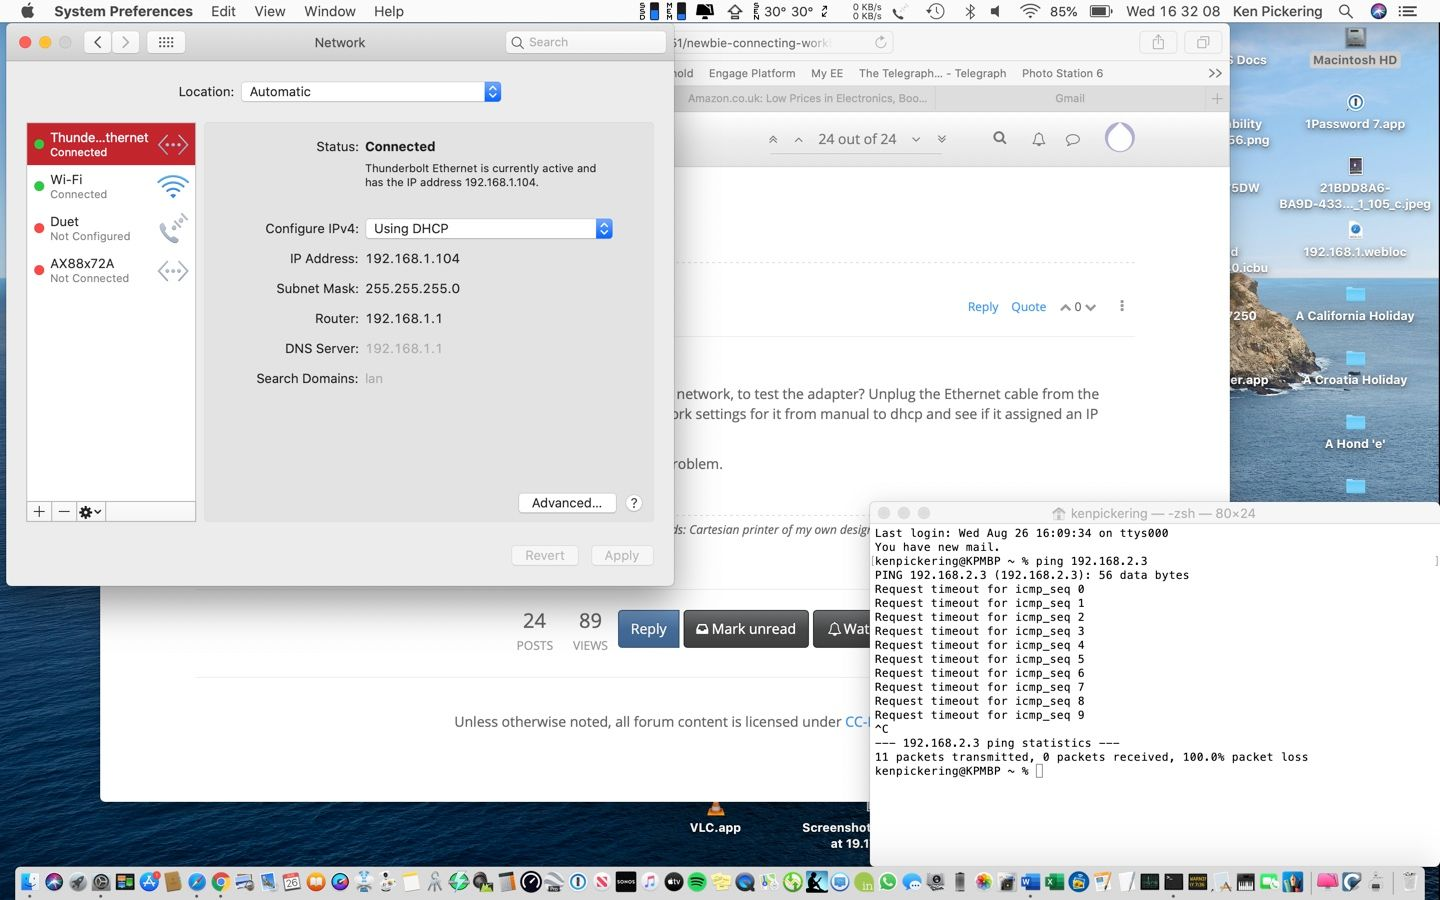
In your image here
-
I typoed 104 to 103 though, sorry about that. But that's not really the important number anyway. It's the that the subnet needs to match.
192.168.1 versus 192.168.2
-
@kbjpick If the orange light on the Ethernet socket on the Duet is on, and the green one is flashing, I think the Ethernet module is working correctly. The Duet seems to be able to communicate with it, so I don't think it's faulty, and this is still most likely a configuration issue, or a hardware incompatibility.
Regarding your config.g. With the above, you said that, when you connect via USB, it's still reporting that the IP address is 192.168.1.14? There's nothing in the above config that specifies that, so it can't be using this config. Can you put the SD card from the Duet back in your Mac and check if you have two config.g files now? Macs often hide the file type (the bit after the '.', eg .txt) and I think it may have saved it as 'config.g.txt' (Text Edit does this if you change the formatting). You can show the file type by going, when in the Finder, to the menu top left of your screen and select Finder > Preferences (opens Finder Preferences) Advanced > Show all filename extensions, and make sure this option is ticked.
The other alternative is that you edited the config.g.bak backup file, but usually the SD card doesn't have this on it as shipped, and there's only a .bak file once you've edited config.g in Duet Web Control (DWC).
Once you have sorted that out, your config above should be okay, except remove these two lines from the end of the networking section:
M554 P192.168.1.255 ; Gateway M553 P255.255.255.0 ; NetmaskIf you have demounted the Duet and it's close enough to you router, perhaps you could plug it in and try connecting, as per instructions here: https://duet3d.dozuki.com/Guide/1.)+Getting+Connected+to+your+Duet/7#s20
It also occurs to me that you probably should have been disabling networking (M552 S0) before changing the IP address in the serial terminal connected to the Duet. Sorry if it's as simple as that!
Ian
-
@Phaedrux said in Newbie connecting Workbee Duet 2 via Ethernet To MacBook Pro:
M552 P192.168.2.3 S1 ; IP address
Except your Mac is using address 192.168.1.103
So change your Duet address to 192.168.1.3
192.168.1.# is what we're trying NOT to use for the Gigabit adaptor! That image was just to show that it did work with his existing network. The Gigabit adaptor and the Duet need to be in the 192.168.2.# range, for a direct point-to-point Ethernet connection, separate from his existing network.
Ian
Bed-slinger - Mini5+ WiFi/1LC | RRP Fisher v1 - D2 WiFi | Polargraph - D2 WiFi | TronXY X5S - 6HC/Roto | CNC router - 6HC | Tractus3D T1250 - D2 Eth
-
@droftarts Ah! In that case, just ignore me.
-
With invaluable assistance from this Forum, in particular @droftarts for which many thanks – I finally have a communication established between my MBP and the Workbee Duet board! Still some way to go in setting it up and calibrating it but…!
I selected Ethernet as the connection method, in belief that with suspect WIFI availability in my garden located workshop, the use of a direct cabled connection would be more robust. However, the 2017 MBP lacks a direct Ethernet port, so I elected to use an USB to Ethernet Fast Ethernet connector. The initial issue was a compounding of my ignorance of the MBP Network Address system and poorly worded instructions (IMHO), together with an uncertainty whether the connections, both USB and Ethernet were working as intended or the Duet board was faulty i.e. when it doesn’t behave per the written instruction – which element is at fault -me, or the ‘bits’?
Notwithstanding, over the next week and with the help of the Forum as above, progress was made in educating me as to the mysteries of Network Addresses. The breakthrough was in discovering how to configure the address for the Ethernet adapter AND finding how to edit the as-delivered SD card config.g file. My son-in-law and a Windows machine provided an easier way to configure the Duet SD card config.g file and then I was able to connect the MBP to prove that either of the computers would jog the Workbee.
@droftarts suggested I post the config.g file which whilst no doubt containing some redundant lines/instructions, DOES work for me and may prove of assistance to those of a similar level of inexperience as myself!
Config.g File below
; Configuration file for factory testing Duet Ethernet and Wifi with V2.03 firmware
FOR TESTING ONLY! USE https://configurator.reprapfirmware.org/ to generate configuration files for your printer!
; Communication and general
M111 S0 ; Debug off
M550 PDuetTest ; Machine name and Netbios name (can be anything you like)
M551 Preprap ; Machine password (used for FTP)*** Ethernet networking: The following lines are used for factory testing - PLEASE REMOVE THEM
M540 P0xBE:0xEF:0xDE:0xAD:0xFE:0xED ; MAC Address
M552 P192.168.2.3 S1 ; IP address
M553 P255.255.255.0 ; subnet mask
M586 P0 S1 ; enable HTTP
M586 P1 S0 ; disable FTP
M586 P2 S0 ; disable Telnet;*** End of factory test lines to be removed
;*** Networking
M552 S1 ; Turn network onM555 P2 ; Set output to look like Marlin
G21 ; Work in millimetres
G90 ; Send absolute coordinates...
M83 ; ...but relative extruder moves; Disable Fan 1 thermostatic mode
M106 P1 H-1; Axis and motor configuration
M569 P0 S1 ; Drive 0 goes forwards
M569 P1 S1 ; Drive 1 goes forwards
M569 P2 S1 ; Drive 2 goes forwards
M569 P3 S1 ; Drive 3 goes forwards
M569 P4 S1 ; Drive 4 goes forwards
M574 X2 Y2 Z2 S1 ; set endstop configuration (all endstops at high end, active high)
;*** The homed height is deliberately set too high in the following - you will adjust it during calibration
M665 R105.6 L215.0 B85 H250 ; set delta radius, diagonal rod length, printable radius and homed height
M666 X0 Y0 Z0 ; put your endstop adjustments here, or let auto calibration find them
M350 X16 Y16 Z16 E16:16 I1 ; Set 16x microstepping with interpolation
M92 X80 Y80 Z80 ; Set axis steps/mm
M906 X1000 Y1000 Z1000 E800 I60 ; Set motor currents (mA) and increase idle current to 60%
M201 X1000 Y1000 Z1000 E1000 ; Accelerations (mm/s^2)
M203 X20000 Y20000 Z20000 E3600 ; Maximum speeds (mm/min)
M566 X1200 Y1200 Z1200 E1200 ; Maximum instant speed changes mm/minute; Thermistors
M305 P0 T100000 B3950 R4700 H30 L0 ; Put your own H and/or L values here to set the bed thermistor ADC correction
M305 P1 T100000 B3974 R4700 H30 L0 ; Put your own H and/or L values here to set first nozzle thermistor ADC correction
M305 P2 T100000 B3974 R4700 H30 L0 ; Put your own H and/or L values here to set 2nd nozzle thermistor ADC correctionM570 S180 ; Hot end may be a little slow to heat up so allow it 180 seconds
; Adjustments for dummy heaters on test rig
M307 H0 A250 C140 D5.5 B1
M307 H1 A250 C140 D5.5 B0
M307 H2 A250 C140 D5.5 B0; Fans
M106 P1 S-1 ; disable thermostatic mode for fan 1; Tool definitions
M563 P0 D0 H1 ; Define tool 0
G10 P0 S0 R0 ; Set tool 0 operating and standby temperatures
;*** If you have a single-nozzle build, comment the next 2 lines
M563 P1 D1 H2 ; Define tool 1
G10 P1 S0 R0 ; Set tool 1 operating and standby temperatures
M92 E80:80 ; Set extruder steps per mm; Z probe and compensation definition
;*** If you have a switch instead of an IR probe, change P1 to P4 in the following M558 command.
M558 P5 F100 T6000 X0 Y0 Z0 H3 ; Z probe is a Smart Effector and is not used for homing any axes R0.4 not used. Reduced F300 to 100
G31 P100 X0 Y0 Z-0.25 ; Set the zprobe height and threshold for Smart Effector;*** If you are using axis compensation, put the figures in the following command
M556 S78 X0 Y0 Z0 ; Axis compensation hereM208 S1 Z-0.2 ; set minimum Z
T0 ; select first hot end
; M117 Use https://configurator.reprapfirmware.org/ to set up your printer configThe MBP Network page, with the USB/Ethernet Adapter identified itself as ‘AX88x72A’ and I selected the ‘Configure IPv4:” to “Manually’
IP address 192.168.2.2 and Subnet Mask to ‘255.255.255.0’
The M552 P192 168.2.3 S1 line entered via the use of the MBP TextEdit app in the config.g file points to the solution for the successful connection! Remember to Save It to the SD Card!Learnt a lot – know how little I know @kbjpick