Improving mesh bed compensation with M558 HX
-
@peter247 the problem is the mesh bed compensation. It seems to not be working correctly or maybe not working at all. I've tried varying the H parameter in the M558 command but I always got the same test print result. No improvement. "A large dive height could tolerate a very uneven bed or poor calibration". But it doesn't work for me.
-
@sykb
M558 command but I always got the same test print result. No improvement.
What do you mean by a print a real physical print with filament or running the mesh bed compensation routine ?
What is wrong with your test print can you show a picture so we can see what your problem is ? ( the first layer )
I've tried varying the H parameter in the M558
The wind direction outside or your house number will do the same affect as the H in the M558 , the H is just the height it will go to after each probe.
Mesh levelling looks at your bed and adjusts while printing , it does not level your bed !!!!
-
@peter247 said in Improving mesh bed compensation with M558 HX:
Mesh levelling looks at your bed and adjusts while printing , it does not level your bed !!!!
given a head with enough force it might be possible to physically level the bed
")
-
Not funny , I've done that once !!!!
o.k more than once .
-
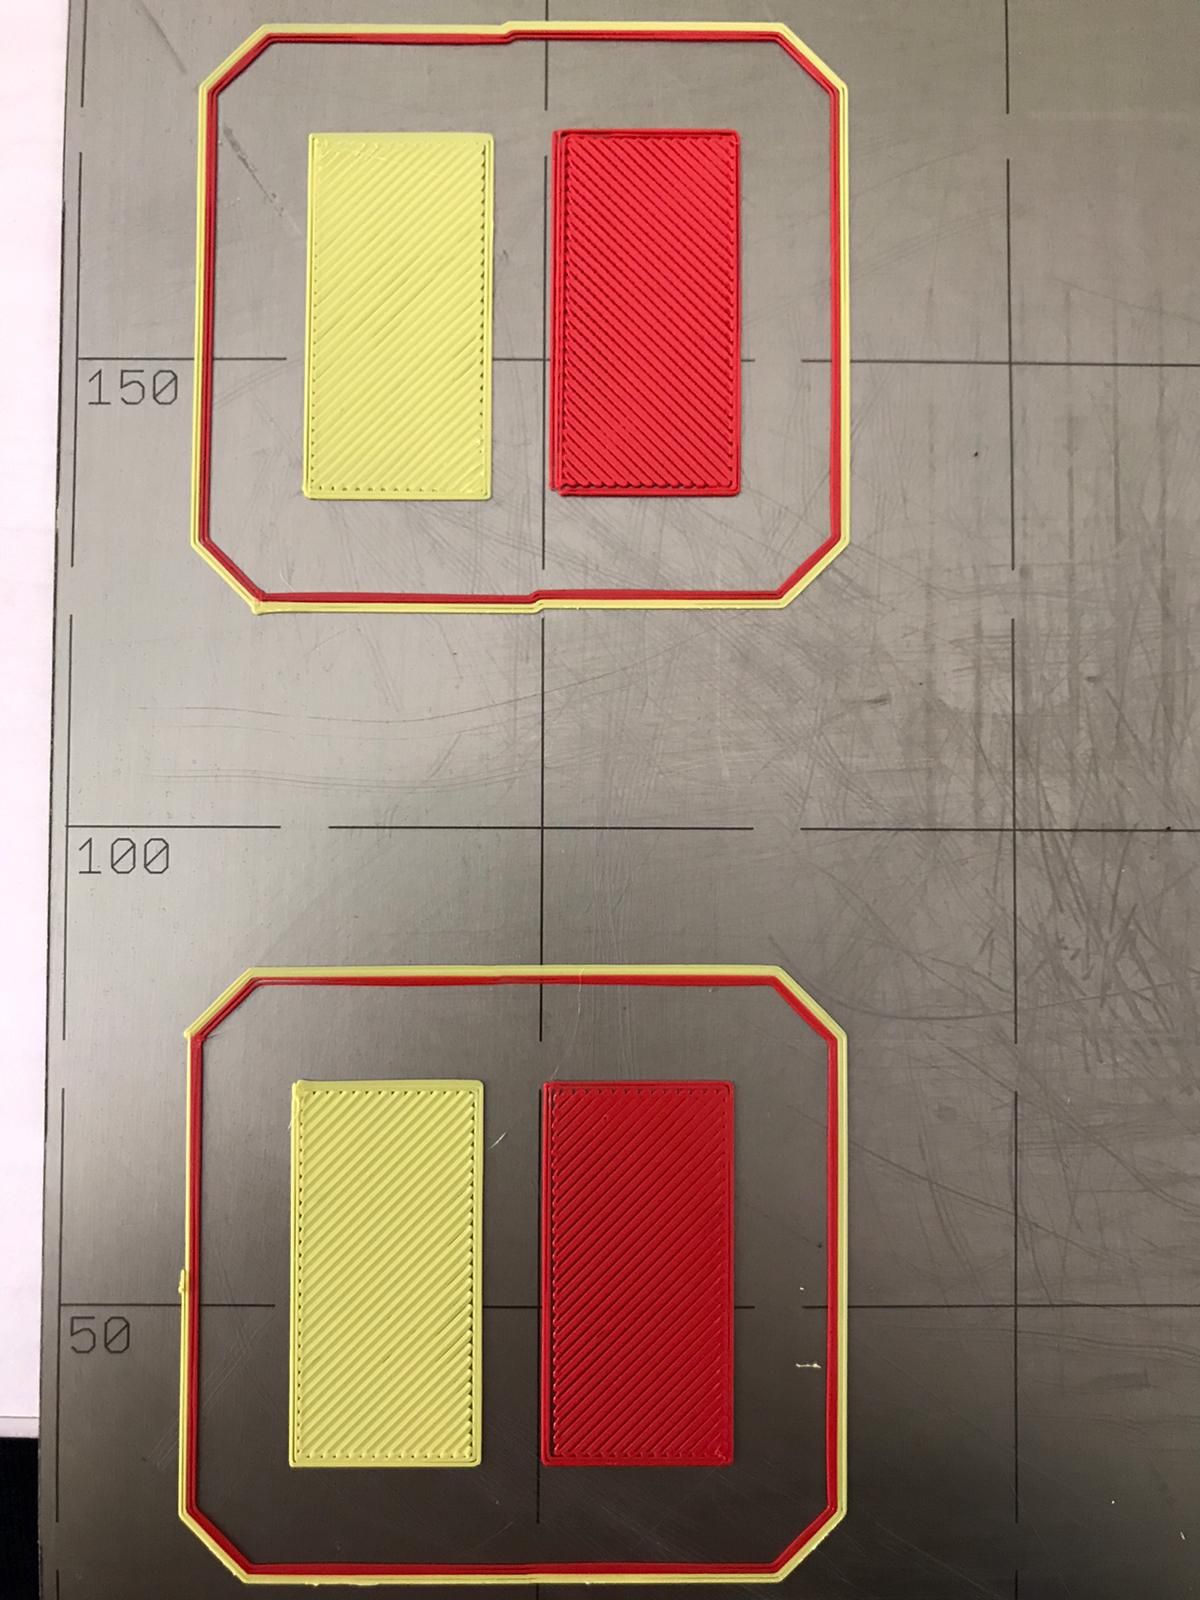
@peter247 yes a real physical print with filament. This is the test print of the first layer. Thank you for your support so far, I really appreciate it
You can see the print quality difference in some position in the pictures below. I did not see any mesh bed compensation applied there that compensated the uneven bed. (please tell me, if I'm wrong)
As you can see in the first picture (right side), there is a huge quality difference between above and below.
Right side:
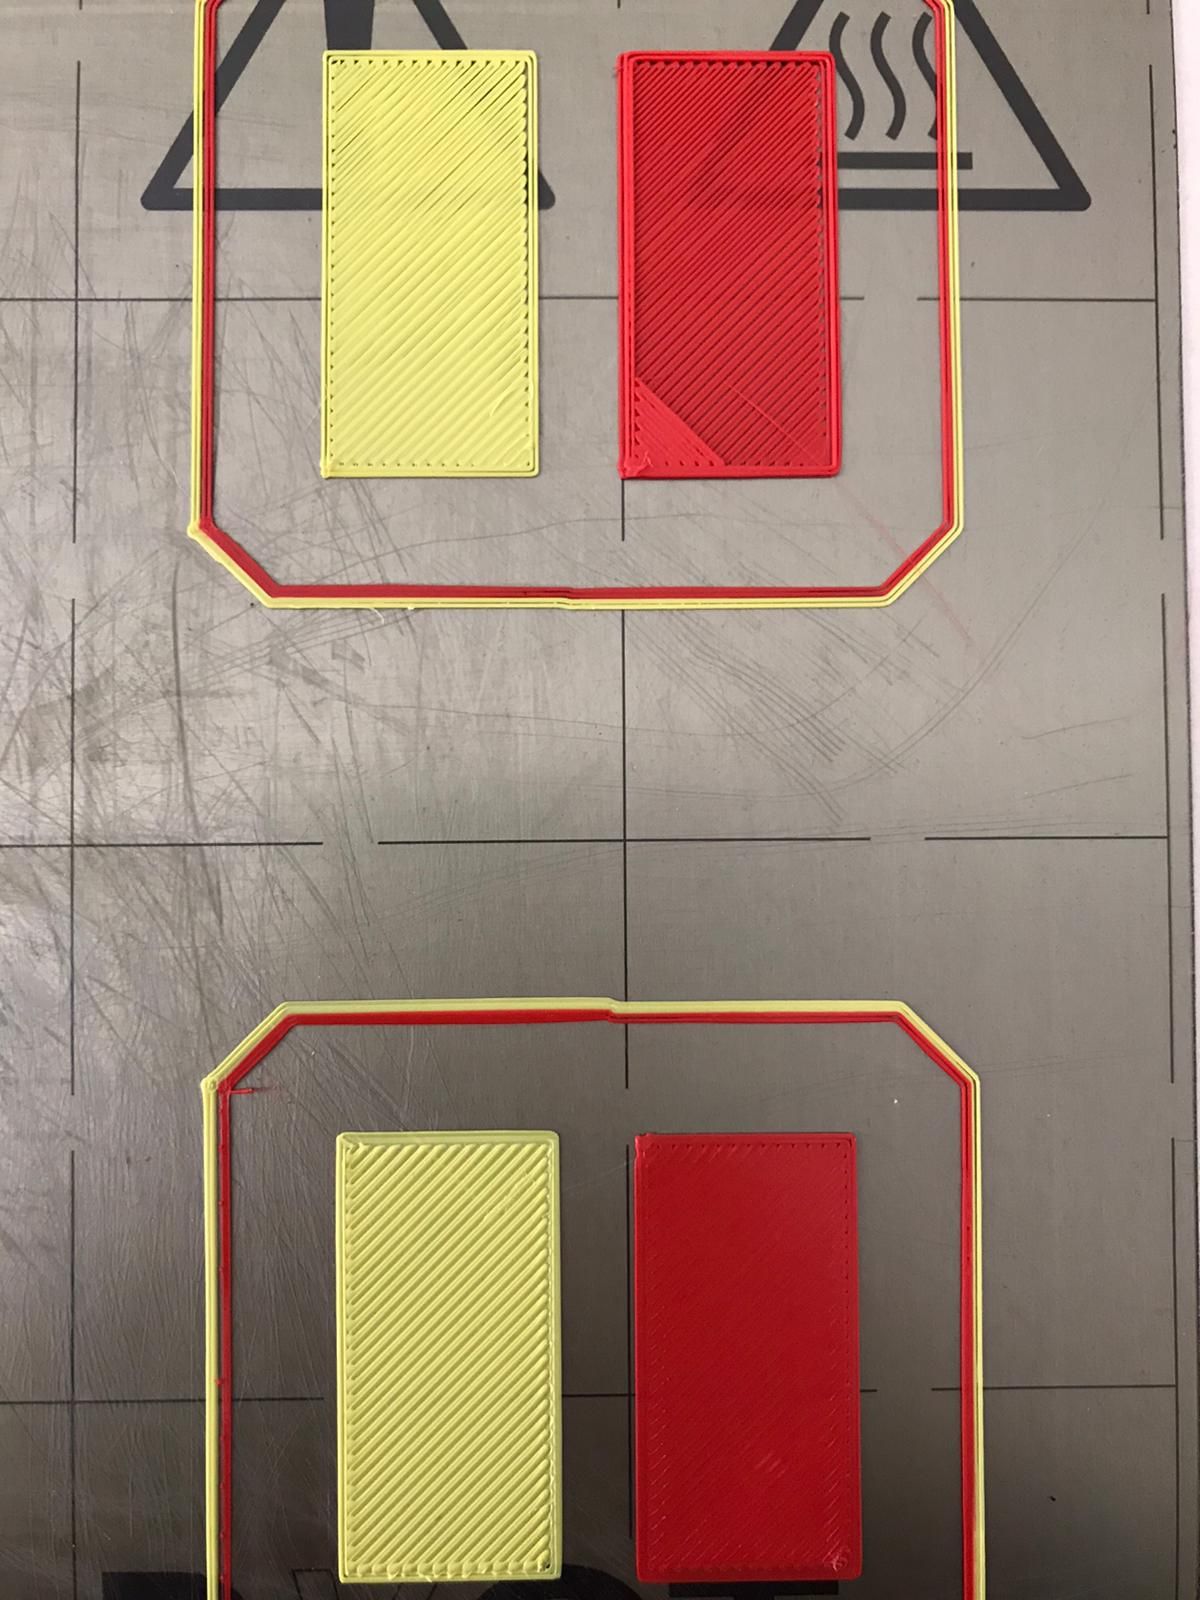
left side:
-
I think it is working due to the stagger in the skirt !!!!
The bigger the stagger the bigger the fault , so it is working but getting it wrong.one point are you running the mesh bed compensation at full working temp eg a bed temperature of 60c
Ender 5 plus linear rail and hemera powered by duet 2 wifi , CR10s pro v1 with bltouch mostly stock , BLV mgn Cube slowly being built powered by duet 3 mini 5+
-
@sykb said in Improving mesh bed compensation with M558 HX:
homeall.g:
G91 ; relative positioning
G1 Z5 F6000 S2 ; lift Z relative to current position
G1 S1 X-382 Y-457 F1800 ; move quickly to X and Y axis endstops and stop there (first pass)
G1 X5 Y5 F6000 ; go back a few mm
G1 S1 X-382 Y-457 F360 ; move slowly to X and Y axis endstops once more (second pass)
G90 ; absolute positioning
M564 S0 H0
G1 X33.5 Y27 Z15 F6000 ; go to first bed probe point and home Z
M564 S0 H1
G30 ; home Z by probing the bed
homez.g:
G91 ; relative positioning
G1 Z5 F6000 S2 ; lift Z relative to current position
G90 ; absolute positioning
M564 S0 H0
G1 X33.5 Y27 Z15 F6000 ; go to first probe point
M564 S0 H1
G30 ; home Z by probing the bed@sykb said in Improving mesh bed compensation with M558 HX:
I've also tried removing the M564 commands in the homing files, as you suggested, but after that I could not home Z at all and got an error report saying: Error: G0/G1: insufficient axes
At what point are you getting the insufficient axes homed error? It's basically telling you that you are trying to move an axis before it is homed. The proper way to do this, is to either home the axis first, or if it's for something like a Z axis lift to clear the nozzle and the bed you can use an S2/H2 switch on the G1 command to allow an unhommed move. Much safer than just a blanket allow unhomed moves with M564.
If the error is happening before that G1 move to place the probe in the center of the bed something is wrong because in homeall the x and Y axis should already be homed. If it's from using homez by itself, then yes, it will give an error if the X and Y aren't already homed. You can't guarantee the position so it's not going to let you move to an absolute position if it doesn't know where it is in absolute coordinate space. Forcing to allow it to move is just asking for a crash.
Also, your homing files are still using S1. Now that you've updated the firmware you should switch to using H1/H2 (S is being used for laser power when in laser mode.)
Can you post your full config.g?
-
@peter247 I always ran G29 S0 at full working temperature. 220c extruder temperature and 60c bed temperature. That's correct, right?
@Phaedrux I tried to home Z with G28 Z command and it reported an error. This is my full config.g:; Communication and general
M575 P1 B57600 S0 ; Baud rate
M111 S0 ; Debug off
M550 PDISCOVERY ; Machine name; Networking
M552 S0
M586 P0 S1 ; Enable HTTP
M586 P1 S0 ; Disable FTP
M551 Preprap ; Machine password
M586 P2 S0 ; Disable Telnet; Ethernet networking: Adjust the IP address and gateway in the following 2 lines to suit your network
M552 P0.0.0.0 ; (0 = DHCP)
M554 P192.168.169.255 ; Gateway
M553 P255.255.255.0 ; Netmask; Basic Settings
M555 P0 ; Set output to look like RepRap_Firmware
G21 ; Work in millimetres
G90 ; Send absolute coordinates
M83 ; but relative extruder movesM208 X-39 Y-10 Z0.0 S1 ; Set axis minima
M208 X300 Y220 Z320 S0 ; Set axis maximaM143 H1 S295 ; Max. Extruder temp
M143 H0 S125 ; Max. Heatbed temp; Endstops
M574 X1 Y1 S1 ; Set endstops at low side, active high endstop input
M574 Z0 S2 ; Z endstop at low end, Z probe is usedM558 P5 X0 Y0 Z1 I0 H5 A3 F120 T6000 ; Set Z probe type
G31 P600 X32.7 Y35 Z0.5 ; Set Z probe trigger NEW
M557 X67:270 Y75:265 S101.5:90 ; Define mesh grid NEW; Axis and motor configuration
M667 S0 ; Set Cartesian Mode; Achsen Motor Richtung
M569 P0 S0 ; Drive 0 goes backwards
M569 P1 S1 ; Drive 1 goes forwards
M569 P2 S1 ; Drive 2 goes forwards; Extruder Motor Richtung
M569 P3 S1 ; Drive 3 goes forwards
M569 P4 S1 ; Drive 4 goes forwardsM350 X256 Y256 Z256 E16:16 I1 ; Set 16x microstepping with interpolation
M92 X1600 Y1600 Z8533 U1600 ; Set axis steps/mm
M92 E2700:2700
;M92 E1800:1800
M906 X1100 Y1100 Z900 E500 I30 ;E855 I30 ; Set motor currents (mA) and motor idle factor to 30%
M201 X2000 Y2000 Z500 E120 ; Accelerations (mm/s^2)
M203 X30000 Y30000 Z1200 E1200;E3000 ; Maximum speeds (mm/min)
M566 X900 Y900 Z12 E40:40 ; Maximum instant speed changes mm/minute; Thermistors
M307 H0 A86.5 C432.2 D6.4 I0 B0 S1.0 V12.0;M140 H-1 ;tells the firmware, there is no bed termistor
; Put your own H and/or L values here to set the bed thermistor ADC correction
M305 P0 T100000 B3950 R4700 H30 L0; Put your own H and/or L values here to set first nozzle thermistor ADC correction
M305 S"Extruder0" P1 T100000 B4725 R4700 H30 L0 C7.06e-8; Put your own H and/or L values here to set 2nd nozzle thermistor ADC correction
M305 S"Extruder1" P2 T100000 B4725 R4700 H30 L0 C7.06e-8; Fans
M106 P0 S1.0 I0 H1 T45 ; Set fan 0 value, PWM signal inversion and frequency. Thermostatic control is turned on; davor 500
M106 P1 S1.0 I0 H2 T45 ; Set fan 1 value, PWM signal inversion and frequency. Thermostatic control is turned onM106 P2 S1.0 I0 F500 H-1 ; Set fan 2 value, PWM signal inversion and frequency. Thermostatic control is turned off
M106 P3 S1.0 I0 F500 H-1 ; Set fan 3 value, PWM signal inversion and frequency. Thermostatic control is turned offM106 P4 S1.0 I0 F500 H-1 ; Set fan 4 value, PWM signal inversion and frequency. Thermostatic control is turned off
M106 P2 S0
M106 P3 S0; Tool definitions
M563 P0 D0 H1 F2 S"Extruder0" ; Define tool 0
G10 P0 R0 S0 ; Set tool 0M563 P1 D1 H2 F3 S"Extruder1" ; Define tool 1
G10 P1 R0 S0 ; Set tool 1; Definiert den X Offset
G10 P0 X-32.7 L1 ; tool 0 offset
G10 P1 X32.7 L1 ; tool 1 offset; Prepare magnet control pins
;M307 H4 A-1 C-1 D-1 ; Heater 4 off for freeing the pin
;M307 H5 A-1 C-1 D-1 ; Heater 4 off for freeing the pin
;M42 P4 S0 ; switch on the magnet
;M42 P5 S0M208 S1 Z-0.2 ; set minimum Z
; Filament Sensor 0
M591 D0 P2 S1 C3; Filament Sensor 1
M591 D1 P2 S1 C4; SERVOS SETUP
M307 H6 A-1 C-1 D-1
M307 H7 A-1 C-1 D-1
M42 P6 S0
M42 P7 S0M570 H1 P3000 T50
M570 H2 P3000 T50M98 P/macros/OVERRIDE_CFG_MACRO ;Run override macro of webinterface
M98 P/macros/OVERRIDE_EXTRUDER_MACRO_0 ;Run override macro of webinterface for tools
M98 P/macros/OVERRIDE_EXTRUDER_MACRO_1 ;Run override macro of webinterface for tools
M572 D0:1 S0.2 ;Pressure advance
G28
M98 P/macros/T_freeAll ;Free all Tools
M98 P/macros/OVERRIDE_NETWORK_MODE ;Run override macro for network
-
@sykb said in Improving mesh bed compensation with M558 HX:
I tried to home Z with G28 Z command and it reported an error.
Yes trying to home just Z without first homing X and Y will lead to an error as I described. Does it give the error if you have X and Y homed prior?
-
@sykb said in Improving mesh bed compensation with M558 HX:
M350 X256 Y256 Z256 E16:16 I1 ; Set 16x microstepping with interpolation
It's not recommended to use x256 microstepping. It has a high load on the CPU for step generation and there's very little reason to use it. Use x16 with interpolation to x256 enabled. Lower cpu load and you still get the benefit of quiet smooth motor movement.
-
@Phaedrux I've just tried it. I commented out all the M564 commands and did not change another commands in the homing files. I homed X and Y first and then G28 Z. It reported the same error as before.
@Phaedrux said in Improving mesh bed compensation with M558 HX:
@sykb said in Improving mesh bed compensation with M558 HX:
M350 X256 Y256 Z256 E16:16 I1 ; Set 16x microstepping with interpolation
It's not recommended to use x256 microstepping. It has a high load on the CPU for step generation and there's very little reason to use it. Use x16 with interpolation to x256 enabled. Lower cpu load and you still get the benefit of quiet smooth motor movement.
I'll try it later, thank you for the support!
-
@Phaedrux said in Improving mesh bed compensation with M558 HX:
Z15
It's because your g1 x y move to position the probe also contains a z move. Z hasn't been homed yet so it's complaining. At the start of the file you're already lifting the z axis with an S2 move so you don't need to move it again afterwards.
-
It's because your g1 x y move to position the probe also contains a z move. Z hasn't been homed yet so it's complaining. At the start of the file you're already lifting the z axis with an S2 move so you don't need to move it again afterwards.
@Phaedrux It's working now. Thank you! But my main problem is not solved yet. The mesh bed compensation does not compensate the uneven bed during printing as you can see in the pictures above. Maybe you also could help me.
-
@sykb said in Improving mesh bed compensation with M558 HX:
G31 P600 X32.7 Y35 Z0.5 ; Set Z probe trigger
its hard to see from the picture, but it looks like the probe is in front of the extruder, so your offset is wrong it would be -Y35
-
@sykb
@peter247 said in Improving mesh bed compensation with M558 HX:@sykb
Is your off set correct ?
G31 P600 X32.7 Y35 Z0.5 ; Set Z probe trigger
So this say your probe is 32.7mm to the right of the nozzle X axis and your probe is 35mm to the back of the nozzle Y axis , Correct ?
Yep , I think I was right ? , it does look like the probe is right front
-
can you make picture that shows the entire bed and carriage?
-
After trying to figure out and finally figuring out(I think) how to input mesh grid for my printer which has center of bed as origin; I have decided to make my origin back to its original place in the corner.
I've decided this because I am not getting a good consistent squish across the various spots on my bed. Plus, I am not confident that the mesh on my bed that I got is correct. (See below)

I'm just about to redo my trigger height, but I have a question. In the guide(https://duet3d.dozuki.com/Wiki/Test_and_calibrate_the_Z_probe), it calls for you to bring your nozzle to the center of the bed and do the paper test. Afterward, it asks you to begin your trigger height routine. BUT, here is my question...
Seeing as my probe offset is so far(x-60 Y-12), isn't it a better idea to bring the probe over the same spot I did the paper check to make sure I have a consistent base height? Or, does the programming for the G29 somehow compensate for this?
Thanks in advance!
-
@Damien said in Improving mesh bed compensation with M558 HX:
Seeing as my probe offset is so far(x-60 Y-12), isn't it a better idea to bring the probe over the same spot I did the paper check to make sure I have a consistent base height?
Yes you can do that. It may help with any tilt inherent between the bed and the nozzle.