E0 Heater Fault problem
-
Have some issues with the heater E0 faulting..
I have tuned the heater 4 or 5 time to 240c and it never errors it finishes and i get the tuned values and enter them in the config.g ...
but when i try to run a print and set the heater to 240 it faults before it reaches 50 to 70C
i re tune the heated it go's right up to 240C i enter the values again into config.g
let it cool down and try setting the heater to 240C and it faults again
i get the message not heating fast enough
It was working good with a pt100 therm, but wire broke and i had to replace with the standard ed3 therm, only thing i had on hand... changed all the config.g settings for the correct therm..
duet2 and firmware 3.1.1
any suggestions
heres my config.g and i put the autotune values at the top just to show what it came up with
code_text
heater tune

9/14/2020, 9:48:15 AM	M307 H1
Heater 1 model: gain 426.3, time constant 274.4, dead time 0.7, max PWM 1.00, calibration voltage 23.0, mode PID
Computed PID parameters for setpoint change: P157.8, I11.161, D80.4
Computed PID parameters for load change: P157.8, I43.139, D80.4
end tune

; Configuration file for Duet WiFi (firmware version 3)
; executed by the firmware on start-up
;
; generated by RepRapFirmware Configuration Tool v3.1.4 on Sun Jul 19 2020 16:48:57 GMT-0400 (Eastern Daylight Time)

; General preferences
G90                                                 ; send absolute coordinates...
M83                                                 ; ...but relative extruder moves
M550 P"My Printer"                                  ; set printer name
M665 R176.402 L288 B85 H317.498 X0.000 Y0.000 Z0.000  ; Set delta radius, diagonal rod length, printable radius and homed height
M666  X-0.06 Y0.07 Z-0.01                           ; put your endstop adjustments here, or let auto calibration find them

; Network
M551 P"gorf"                                        ; set password
M552 S1                                             ; enable network
M586 P0 S1                                          ; enable HTTP
M586 P1 S0                                          ; disable FTP
M586 P2 S0                                          ; disable Telnet

; Drives
M569 P0 S0                                          ; physical drive 0 goes forwards
M569 P1 S0                                          ; physical drive 1 goes forwards
M569 P2 S0                                          ; physical drive 2 goes forwards
M569 P3 S1                                          ; physical drive 3 goes forwards
M584 X0 Y1 Z2 E3                                    ; set drive mapping
M350 X32 Y32 Z32 E32 I0                             ; configure microstepping without interpolation
M92 X200.00 Y200.00 Z200.00 E173.5                  ; set steps per mm
M566 X900.00 Y900.00 Z12.00 E800.00                 ; set maximum instantaneous speed changes (mm/min)
M203 X4000.00 Y4000.00 Z4000.00 E1200.00            ; set maximum speeds (mm/min)
M201 X1000.00 Y1000.00 Z1000.00 E500.00            ; set accelerations (mm/s^2)
M906 X800 Y800 Z800 E800 I30                        ; set motor currents (mA) and motor idle factor in per cent
M84 S30                                             ; Set idle timeout

; Axis Limits
M208 Z0 S1                                          ; set minimum Z

; Endstops
M574 X2 S1 P"!xstop"                                ; configure active-high endstop for high end on X via pin xstop
M574 Y2 S1 P"!ystop"                                ; configure active-high endstop for high end on Y via pin ystop
M574 Z2 S1 P"!zstop"                                ; configure active-high endstop for high end on Z via pin zstop

; Z-Probe
;M558 P8 R0.6 C"!^zprobe.in" H2.5 A10 F400 T4000     ; set Z probe type to effector and the dive height + speeds
;G31 P250 X0 Y0 Z-0.306                                ; set Z probe trigger value, offset and trigger height
M558 P0 C"!zprobe.in" R2 H6 F2800 4000 A4
G31 X0 Y0 Z-0.306 P492
M557 R65 S20                                        ; define mesh grid

; Heaters
M308 S0 P"bedtemp" Y"thermistor" T100000 B4138      ; configure sensor 0 as thermistor on pin bedtemp
M950 H0 C"bedheat" T0                               ; create bed heater output on bedheat and map it to sensor 0
M307 H0 B0 A113.8 C611.3 D0.4 V23.0                 ; Disable bang-bang mode for the bed heater and set PWM
M140 H0                                             ; map heated bed to heater 0
M143 H0 S120                                        ; set temperature limit for heater 0 to 120C
M308 S1 P"e0temp" Y"thermistor" T100000 B4725 C7.06e-8 ; configure sensor 1 as thermocouple via CS pin spi.cs1
M950 H1 C"e0heat" T1                                ; create nozzle heater output on e0heat and map it to sensor 1
M307 H1 B0 A426.3 C274.4 D0.7 V23.0                 ; disable bang-bang mode for heater  and set PWM limit

; Fans
M950 F0 C"fan0" Q500                                ; create fan 0 on pin fan0 and set its frequency
M106 P0 S0.25 H-1                                   ; set fan 0 value. Thermostatic control is turned off
M950 F1 C"fan1" Q35                                 ; create fan 1 on pin fan1 and set its frequency
M106 P1 S1 H-1                                      ; set fan 1 value. Thermostatic control is turned off

; Tools
M563 P0 D0 H1 F0                                    ; define tool 0
G10 P0 X0 Y0 Z0                                     ; set tool 0 axis offsets
G10 P0 R0 S0                                        ; set initial tool 0 active and standby temperatures to 0C

; Custom settings are not defined
Thanks gary
-
can you show a heating curve where its successful and where its not from the web ui.
-
@gorf26 said in E0 Heater Fault problem:
M350 X32 Y32 Z32 E32 I0 ; configure microstepping without interpolation
unrelated. whats your reasoning for not wanting to run interpolation?
-
Here is a pic of the heat chart, i got to heat this time to run with no fault, i set the temp to 245C
and as you can see it is jumping around it over shoots to 251 and then drops to 239 and back up and back down..unrelated. whats your reasoning for not wanting to run interpolation?
never though about it would i be better off using?.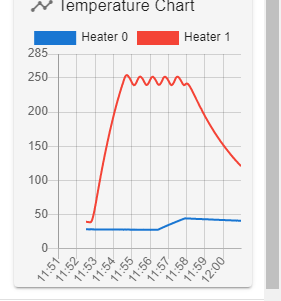
Thanks gary
-
yes x16 with interpolation is preferable and in most cases quieter. dont forget to adjust the steps/mm
the curve looks like one from a hotend without pid tuning
issue M307 H1 to see that the values have actually been applied
-
ran m307 h1 and the values are there..
also tried heatint to 245 a second time and now i get the heater fault it was at 40C.
I tried a third time and got same results, and this time i had my multi meter connected in the temp setting and that read 40C also so seems like the temp is close at least at low temps if i can get it go past 40 again i will see what the meter says at the higher temps..
thanks for the interpolation tip so you think i should drop down from x32 to x16 ok i will give it a shot when i get the heater working...
may try a new wire, don't know where to go from here..
Thanks gary
-
@gorf26 said in E0 Heater Fault problem:
also tried heatint to 245 a second time and now i get the heater fault it was at 40C.
can you share a picture of that?
-
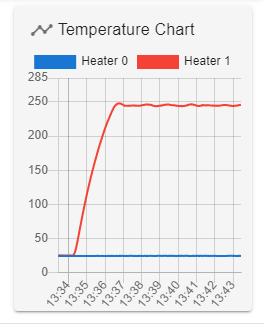
ran tune again got some different values, entered them into the config.g
and this is what i have now for a screen shot at 245C.. looks better, seems to be holding from 243.8 to 246.2 hits 246 drops to 243 then back to 246 keeps repeating that..
but ran 3 times after cooling and no heater fault.. will try a print later and see how that go's.not as good as the pt100 but i guess not bad or is it?.
Thanks gary
-
Seems reasonable.
How it looks during printing is much more important obvs.And while a PT100 is going to be more accurate, there's no reason why a thermistor can't provide a nice stable reading and PID loop.
-
Didn't go so good during print, the layers that were printed look fine, but print made it to layer 6 and then message heater fault, though i had captured the screen also but for some reason didn't get saved... haven't tried a new wire but looks like its next.. guess i go put one together..
Thanks gary
-
The fix for oscillating temperature is to increase the M307 D parameter.
-
Is the hotend assembled correctly? There should be a gap between the block and the heatsink.
Do you have a silicone nozzle sock on the block? They can help a lot with keeping a stable temp.
Does the cooling fan kick on at layer 6? Does it blow on the block more than it should?
Did you start tuning from room temp, or was it already warm?
Did you do the tuning with the part cooling fan on at an average level like you'd have on during a print? That can help it keep up during a print.
-
Is the hotend assembled correctly? There should be a gap between the block and the heatsink.
Yep been using as is for a couple months no problem, as i stated in the first message it was fine with the pt100 thern but the wire broke and only thing i had on hand was the therm that came with ed3 v6 hotend so till i can get a replacement pt100 thats what i'm tring to get working..
Do you have a silicone nozzle sock on the block? They can help a lot with keeping a stable temp.
no sock been printing with PETG and find it was to sticky and messy for the sock.
Does the cooling fan kick on at layer 6? Does it blow on the block more than it should?
No I have found at least for me the PETG sticks and prints better with no fan.
Did you start tuning from room temp, or was it already warm?
start at room temp.
Did you do the tuning with the part cooling fan on at an average level like you'd have on during a print? That can help it keep up during a print.
No cooling fan during tuning, i have the fan running that's cooling the heat sink only..
I did make a new wire and hooked it up, did another tune and added the new values to config.g
let cool down to room temp and the set the temp to 240C, it overshot by around 2%C
and about 20 or 30 seconds seemed to stabilize at 240C was running 239.5 to 240,5.Will try another test print tomorrow and see how that go's.
that's were i will find out if i get the fault, at least that's were i am now, no fault errors when tuning and none setting the temp in DWC..my D is set to 7.6 how high can that go, or should i bother with only about 1% oscillation?
Thanks gary
-
@gorf26 said in E0 Heater Fault problem:
my D is set to 7.6 how high can that go, or should i bother with only about 1% oscillation?
If you're stable within 1c I wouldn't bother trying to adjust any of the tuned parameters.