[HELP] Ender 3 Pro + Duet WiFi 2
-
I increased it to 1.350 and it looks a little bit better.
I followed the steps as I mentioned but I still don't understand the concept of the mesh grid, I don't see the compensation taking place (as we speak, I see that the print is ruined LOL, the second layer is all messed up...) I'm lost
oh.. and the center of the print (it's a grid of squares.. the bed leveling gcode) it looks amazing, but only in the center where I actually did the calibration of the bltouch with the Z offset, but that's obvious that it would be perfect, but the rest of the bed is not..
-
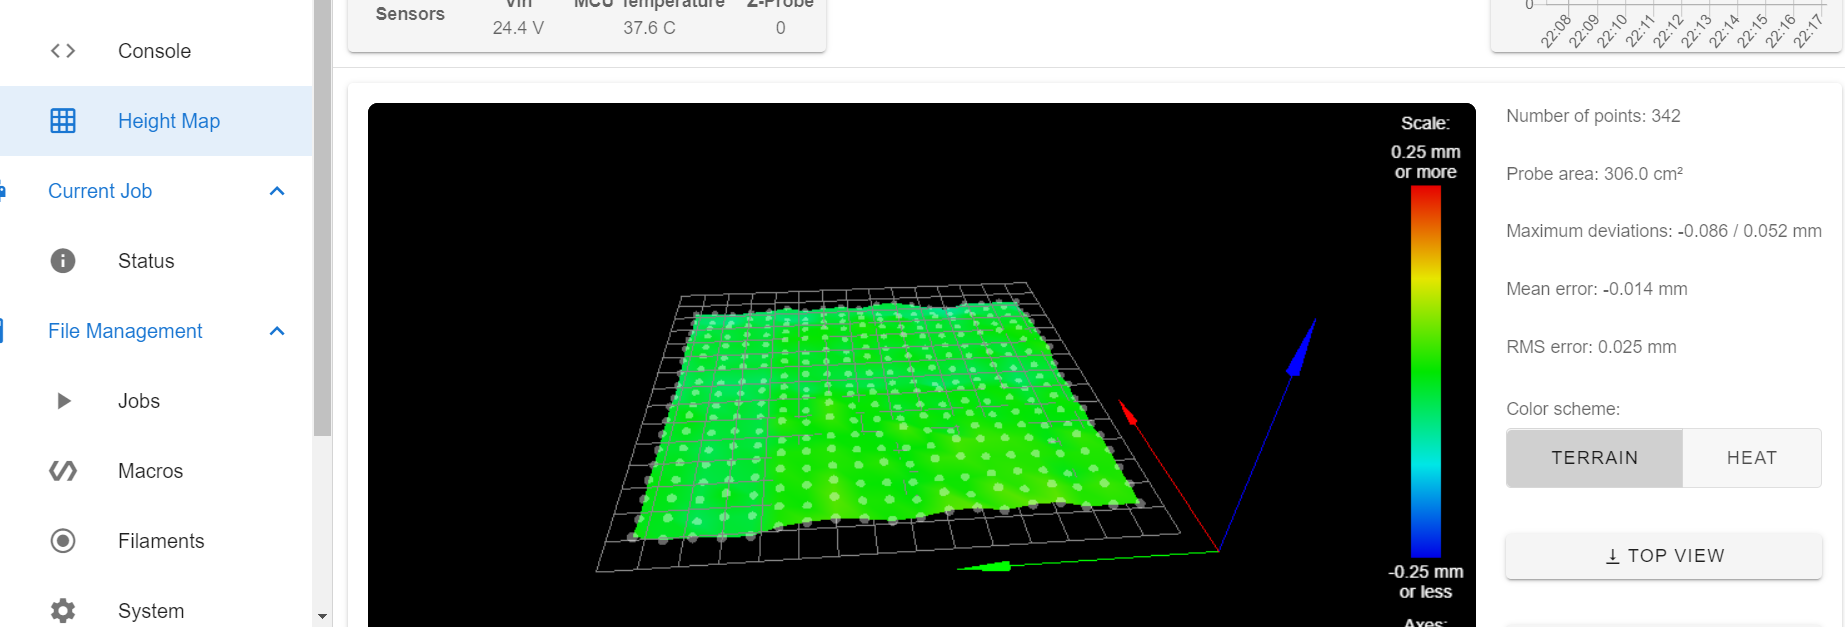
post a picture of your height map.
mesh grid does not compensate for a wrong z offset. it compensates for imperfections in your bed.
there are several reasons possible why the mesh grid might not be working as you would expect.
your probe x y offset is wrong.
gantry twisting, resulting in different trigger heights depending on position. -
After removing the G29 S1 from your homeall, you should probably re-home the printer and create a new heightmap.
Then in your slicer start gcode add the G29 S1 after the G28.
Have you calibrated your extruder yet? The perfect first layer is a combination of flow rate, nozzle distance, temperature, and bed surface.
You may want to go through this entire calibration guide.https://duet3d.dozuki.com/Guide/Ender+3+Pro+and+Duet+Maestro+Guide+Part+4:+Calibration/40
Then do a test print like this bedlevel_nozzle_0.4_200x200-0.3-0.8.stl
Make sure the bed is clean.
While that is printing you can adjust the Z height with baby stepping until the lines are cleanly sticking.
Then you can take that baby stepping value and use it to modify your G31 Z trigger height. A larger trigger height will move the nozzle closer to the bed, and vice versa.
-
 @Phaedrux said in [HELP] Ender 3 Pro + Duet WiFi 2:
G29 S1
Hey guys,
so this is the current config files and the height map
I went to Cura and added the G29 S1 after G28 Like you mentioned @Phaedrux
I went over the calibration again and modified it.
so I got 1.350 for the trigger offset, I'm assuming that I need to add few baby steps to make it lower, right? but can I configure that before the print? like getting the exact value I need to add?
about the STL file, it didn't let me slice it but I can use the other file, it's okay, right?[3_1607667515380_homez.g](Uploading 100%) [2_1607667515380_homeall.g](Uploading 100%) [1_1607667515379_config.g](Uploading 100%) [0_1607667515376_bed.g](Uploading 100%) -
-
-
that bed is quite good.
you might get away with not using mesh bed leveling at all. -
So this is the result of the bed leveing print, It looks okay but I've noticed something... it seems that on the left front corner it doesn't put a great first layer (and at this area the probe doesn't probe the bed since it's not above it, so the mesh bed doesn't reflect that area). does it have to do with that fact? so basically the bltouch is "useless" in my situation?
  -

-

-
So.. I'm not sure if I just realized something crucial.
the bltouch basically reduces the size of my "actual" printing bed? I need to remove the areas where the bltouch can't probe? if so, I thing I didn't configure the area of the mesh grid correctly
I'm using a standard bltouch mounting (on the left side of the hot end). I'm assuming that the smaller the offset the better? (I mean bigger printing area?)(I hope my questions are not silly, and sorry if they are, I'm literally learned about printing two weeks ago)
-
well you could try this probe.
https://de.aliexpress.com/item/32838312776.html
its very cheap( i use it on my delta). and it will turn the nozzle into a probe.
downside is, that you need to manually attach it and on an ender you would need to use the z stop again.
but unless you want to print big things all the time, the bltouch should be good enough.
edit: i am not sure if it fits, if i remember correctly the ender 3 has a thin nozzle.
-
So I was correct? btlouch does "shrink" my bed surface? if so, how can I reflect that on Cura?
I looked at the probe you mentioned and I thought maybe to use an ultrasonic sensor, but then again I just to thought about the hassle of making one to work with the printer too much work.. -
No it doesn't shrink your available area. It just means it can't get a height measurement from the entire surface because of the offset. The firmware will extrapolate the non-probed area though. It's still usable.
Your heightmap looks quite good so the bed is pretty flat and well leveled. Maybe tilted a bit down on the right side.
Your test print looks pretty good.
Your homeall and homez use different points to probe,
homez
G1 X45 Y25 F6000 ; go to first probe point
G30 ; home Z by probing the bedhomeall
G1 X116 Y116 F6000 ; go to first bed probe point
G30 ; home Z by probing the bedYou should change the homez X Y position to match the one from homeall.
You can adjust the G31 Z value up or down to get the nozzle closer or farther away.
-
@Phaedrux done!
Regarding the bed mesh area. so, my "extreme" points are:
start:
x - 43.5
y - 20end:
x - 228
y - 230that the nozzle and probe on bed. I tried to enter those values in the define area for mesh but it didn't start utilizing the whole available surface as I wished for. I did (228-43.5)/5 to get the distance between each probing but it didn't work
another question I had, so the paper thickness I'm doing the manual bed leveling is 0.2mm. do I need to reflect that in Cura? I tired to edit the default profiles there but I didn't see anywhere to enable this option to edit any values (it's grayed out).
at the same momentum (while you're online :))
Is there a way for me to add custom buttons for the web GUI?
Like adding quick buttons to disable all motors, extract and retract probe, go to specific locations on the bed, basically anything else that would be nice and accessible if needed? -
@didi767 said in [HELP] Ender 3 Pro + Duet WiFi 2:
another question I had, so the paper thickness I'm doing the manual bed leveling is 0.2mm. do I need to reflect that in Cura? I tired to edit the default profiles there but I didn't see anywhere to enable this option to edit any values (it's grayed out).
You can take account of that in the G31 value so that it's just applied all the time. Or just adjust the G31 based on how much baby stepping you need. Nothing needs to go in Cura.
@didi767 said in [HELP] Ender 3 Pro + Duet WiFi 2:
Is there a way for me to add custom buttons for the web GUI?
You can create macros for any command you want and they will show up as buttons in the web interface more or less.
For your mesh grid you can use P instead of S, which would specify the number of points to probe rather than the spacing.
M557 X15:215 Y15:195 S20
Getting the largest area probed will require some experimentation. If you're going over the edge on one side, bring it in, if you're not going far enough on a side, remember that you can't go farther than the nozzle.
-
Hey Guys,
So far so good
") I'm able to print in great quality (I'm using fafts in all prints and it's great.
I'm able to print in great quality (I'm using fafts in all prints and it's great.
I would like to add a webcam to the web GUI, is that possible? I heard that I can do that with pi but I'm already using the Duet so is that a capability? -
-
@Veti Bummer.. I thought it would be much more simple.
on the same momentum :), is it possible to integrate the Duet with Cura? so I don't need to manually upload it each time? -
@didi767 yes. theres a cura plugin available in the market place to allow uploading and automatic simulating or printing of a file