Chiron+Duet3+BlTouch
-
As per title I am close to finish installing the Duet3 on my Chiron. I will try to keep this thread updated and upload all my work in case someone else will need , this will include wiring , parts and config files. I am still new to RRP and Duet but learning and hope with your help I will manage to have a full guide for this particular printer.
I managed to set all the initial settings apart the X. Not sure if I am tired and missing something obvious or....
The X end stop is on the left side ( looking at printer)
The commands on the DWC are working properly + moving to right and - to the left but when I pressing homing the tool is going to the right , away from the end stop.
I bet it's something very obvious but can't figure out what
Here is my config.g ( this is still work in progress for now); Configuration file for Duet 3 (firmware version 3) ; executed by the firmware on start-up ; ; generated by RepRapFirmware Configuration Tool v3.1.10 on Wed Dec 16 2020 15:18:40 GMT+0000 (Greenwich Mean Time) ; General preferences G90 ; send absolute coordinates... M83 ; ...but relative extruder moves M550 P"Chiron" ; set printer name ; Drives M569 P0.0 S1 ; physical drive 0.0 goes forwards X M569 P0.1 S1 ; physical drive 0.1 goes forwards Y M569 P0.2 S0 ; physical drive 0.2 goes bacwards ZR M569 P0.3 S0 ; physical drive 0.3 goes backwards ZL M569 P0.4 S1 ; physical drive 0.4 goes forwards E M584 X0 Y1 Z2:3 E4 ; set drive mapping M350 X16 Y16 Z16 E16 I1 ; configure microstepping with interpolation M92 X80.00 Y80.00 Z92.60 E400.00 ; set steps per mm M566 X900.00 Y900.00 Z60.00 E120.00 ; set maximum instantaneous speed changes (mm/min) M203 X6000.00 Y6000.00 Z180.00 E1200.00 ; set maximum speeds (mm/min) M201 X500.00 Y500.00 Z20.00 E250.00 ; set accelerations (mm/s^2) M906 X1000 Y1000 Z1000 E1100 I30 ; set motor currents (mA) and motor idle factor in per cent M84 S30 ; Set idle timeout ; Axis Limits M208 X0 Y0 Z0 S1 ; set axis minima M208 X400 Y400 Z450 S0 ; set axis maxima ; Endstops M574 X1 S1 P"!io0.in" ; configure active-high endstop for high end on X via pin io0.in M574 Y1 S1 P"!io1.in" ; configure active-high endstop for high end on Y via pin io1.in M574 Z1 S1 P"io2.in+io3.in" ; configure active-high endstop for low end on Z via pin io2.in + pin io3.in ; Z-Probe M950 S0 C"io5.out" ; create servo pin 0 for BLTouch M558 P9 C"^io5.in" H5 F120 T6000 ; set Z probe type to bltouch and the dive height + speeds M558 H30 ;*** Remove this line after delta calibration has been done and new delta parameters have been saved G31 P500 X0 Y0 Z2.5 ; set Z probe trigger value, offset and trigger height M557 X15:215 Y15:195 S20 ; define mesh grid ; Heaters M308 S0 P"temp0" Y"thermistor" T100000 B4138 ; configure sensor 0 as thermistor on pin temp0 M950 H0 C"out0" T0 ; create bed heater output on out0 and map it to sensor 0 M307 H0 B1 S1.00 ; enable bang-bang mode for the bed heater and set PWM limit M140 H0 ; map heated bed to heater 0 M143 H0 S120 ; set temperature limit for heater 0 to 120C M308 S1 P"temp1" Y"thermistor" T100000 B4138 ; configure sensor 1 as thermistor on pin temp1 M950 H1 C"out1" T1 ; create nozzle heater output on out1 and map it to sensor 1 M307 H1 B0 S1.00 ; disable bang-bang mode for heater and set PWM limit M143 H1 S260 ; set temperature limit for heater 1 to 260C ; Fans M950 F0 C"out4" Q25000 ; create fan 0 on pin out4 and set its frequency M106 P0 S0 H1 T45 ; set fan 0 value. Thermostatic control is turned on M950 F1 C"out5" Q25000 ; create fan 1 on pin out5 and set its frequency M106 P1 S0 H1 T45 ; set fan 1 value. Thermostatic control is turned on M950 F2 C"out7" Q500 ; create fan 2 on pin out7 and set its frequency M106 P2 S0 H-1 ; set fan 2 value. Thermostatic control is turned off M950 F3 C"out8" Q500 ; create fan 3 on pin out8 and set its frequency M106 P3 S0 H-1 ; set fan 3 value. Thermostatic control is turned off ; Tools M563 P0 D0 H1 F0:2 ; define tool 0 G10 P0 X0 Y0 Z0 ; set tool 0 axis offsets G10 P0 R0 S0 ; set initial tool 0 active and standby temperatures to 0C ; Custom settings are not defined ; Miscellaneous M911 S10 R11 P"M913 X0 Y0 G91 M83 G1 Z3 E-5 F1000" ; set voltage thresholds and actions to run on power loss M564 H0 ; moving axes before homing -
Reserved for wiring and parts
-
Reserved for other info
-
@razrudy said in Chiron+Duet3+BlTouch:
when I pressing homing the tool is going to the right , away from the end stop.
Homing is controlled by the homing macros, homeall, homex, homey, homez. The endstop position is defined in config.g with M574. You have the endstops defined on the low end of travel, so the homing move in the macros should move to the negative/left/front.
@razrudy said in Chiron+Duet3+BlTouch:
M564 H0 ; moving axes before homing
You should also remove that from config.g because it will allow movement when it shouldn't which can make trouble shooting homing confusing.
Post your homing files and where you endstops are located if you want more detailed recomendations.
-
The X end stop is located on the left side ... on the negative side and when I use the dashboard command on DWC to move +10 or -10 is working properly. Negative for the left and positive for the right. But when I want to home X the tool is moving to the positive/right side , away from the end stop.
If I change to M574 X2 S1 is homing the right way but then on the dashboard the negative moves will be to the right and positive moves to the left.
I will remove the M564 H0...needed for testing....
here are the home config; homeall.g G91 ; relative positioning G1 H2 Z5 F6000 ; lift Z relative to current position G1 H1 X405 Y405 F1800 ; move quickly to X and Y axis endstops and stop there (first pass) G1 H2 X-5 Y-5 F6000 ; go back a few mm G1 H1 X405 Y405 F360 ; move slowly to X and Y axis endstops once more (second pass) G1 H1 Z-455 F360 ; move Z down stopping at the endstop G90 ; absolute positioning G92 Z0 ; set Z position to axis minimum (you may want to adjust this) ; Uncomment the following lines to lift Z after probing G91 ; relative positioning G1 Z5 F100 ; lift Z relative to current position G90 ; absolute positioning ; homex.g G91 ; relative positioning G1 H2 Z5 F6000 ; lift Z relative to current position G1 H1 X405 F1800 ; move quickly to X axis endstop and stop there (first pass) G1 H2 X-5 F6000 ; go back a few mm G1 H1 X405 F360 ; move slowly to X axis endstop once more (second pass) G1 H2 Z-5 F6000 ; lower Z again G90 ; absolute positioning ; homey.g G91 ; relative positioning G1 H2 Z5 F6000 ; lift Z relative to current position G1 H1 Y405 F1800 ; move quickly to Y axis endstop and stop there (first pass) G1 H2 Y-5 F6000 ; go back a few mm G1 H1 Y405 F360 ; move slowly to Y axis endstop once more (second pass) G1 H2 Z-5 F6000 ; lower Z again G90 ; absolute positioning ; homez.g G91 ; relative positioning G1 H2 Z5 F6000 ; lift Z relative to current position G1 H1 Z-455 F1800 ; move Z down until the endstop is triggered G92 Z0 ; set Z position to axis minimum (you may want to adjust this) ; Uncomment the following lines to lift Z after probing G91 ; relative positioning G1 Z5 F100 ; lift Z relative to current position G90 ; absolute positioning -
Don't change M574, it's correct as it is.
But look at your homing file. It's doing a positive movement away from the endstop.
G1 H1 X405 Y405 F1800 ; move quickly to X and Y axis endstops and stop there (first pass)
G1 H2 X-5 Y-5 F6000   ; go back a few mm
G1 H1 X405 Y405 F360  ; move slowly to X and Y axis endstops once more (second pass)
Change the X405 Y405 to X-405 and Y-405, reverse the sighs for the rest as well. And remove the H2 from the second line.
-
@Phaedrux said in Chiron+Duet3+BlTouch:
G1 H2
Done. Changed to
 in both homex and homeall and is working properly. Thanks
; homex.g

G91               ; relative positioning
G1 H2 Z5 F6000    ; lift Z relative to current position
G1 H1 X-405 F1800 ; move quickly to X axis endstop and stop there (first pass)
G1 X5 F6000       ; go back a few mm
G1 H1 X-405 F360  ; move slowly to X axis endstop once more (second pass)
G1 H2 Z-5 F6000   ; lower Z again
G90               ; absolute positioning
Why did I needed to remove the H2 in the second line? I am trying to understand the H2 function because on G-code the explanation is not that great
G0 : Rapid Move
G1 : Linear Move
Usage
G0 Xnnn Ynnn Znnn Ennn Fnnn Snnn
G1 Xnnn Ynnn Znnn Ennn Fnnn Snnn
Parameters
Not all parameters need to be used, but at least one has to be used
Xnnn The position to move to on the X axis
Ynnn The position to move to on the Y axis
Znnn The position to move to on the Z axis
Ennn The amount to extrude between the starting point and ending point
Fnnn The feedrate per minute of the move between the starting point and ending point (if supplied)
Hnnn (RepRapFirmware) Flag to check if an endstop was hit (H1 to check, H0 to ignore, other Hnnn see note, default is H0)Notes: Some firmwares allow for the RepRap to enable or disable the "sensing" of endstops during a move. Please check with whatever firmware you are using to see if they support the H parameter in this way, as damage may occur if you assume incorrectly. In RepRapFirmware, using the H1 or H2 parameter on a delta printer causes the XYZ parameters to refer to the individual tower motor positions instead of the head position, and to enable endstop detection as well if the parameter is H1. H3 may be used to measure axis lengths and H4 can be used to stop when an endstop is hit while updating the position only (H4 is supported in 3.2-b4 and later).
-
H2 basically allows you to move an axis even though it hasn't been homed. It's useful for the Z axis which you may want to raise to get the XY axis free to move for it's own homing.
-
Been there done that, its all up and working a long time ago...
-
@CaLviNx can you share your config please ?
-
@razrudy said in Chiron+Duet3+BlTouch:
@CaLviNx can you share your config please ?
Having previously posted config.g files I was vilified for doing things in a very particular way that I do, one bitten twice shy, so I am not willing to share my configuration files at this time sorry.
-
Ok , after holiday break back to my project.
Small problem and not sure if this is the way it should be.
My home position is at the bottom/left of the build plate( moving bed in Y axis). I am assuming that if I move the bed towards me ( let's say top/left corner) this will mean the bed is moving in -Y and hotend in +Y.
My current config for homey is thisG91 ; relative positioning G1 H2 Z5 F6000 ; lift Z relative to current position G90 ; absolute positioning G1 H1 Y415 F1800 ; move quickly to Y axis endstop and stop there (first pass) G91 ; relative positioning P4 P500 ; wait 500ms G1 H2 Y-5 F6000 ; go back a few mm G4 P500 ; wait 500ms G1 H1 Y415 F360 ; move slowly to Y axis endstop once more (second pass) G1 H2 Z-5 F6000 ; lower Z again G90 ; absolute positioningand the motor is M569 P0.1 S1
On DWC Y-10 will move the bed forward ( towards me/ top to bottom) which means hotend is moving Y+10.
Is this the right way to set this?Also my home position is outside the build plate , what's the best way to "tell" the software where the X0Y0 is on the build plate? I think this is called the Z home offset. For me it will be a ZY home offset because of some clips I have on the build plate. I can get a spacer to fix the Z so it will mach the build plate and just modify the Y home offset to avoid the clips.
How you can see on the picture my build plate is a little bigger( blue) then the print area( white) so I assume I need to define the X0Y0 on build plate so the printer will know where the X410Y410 is.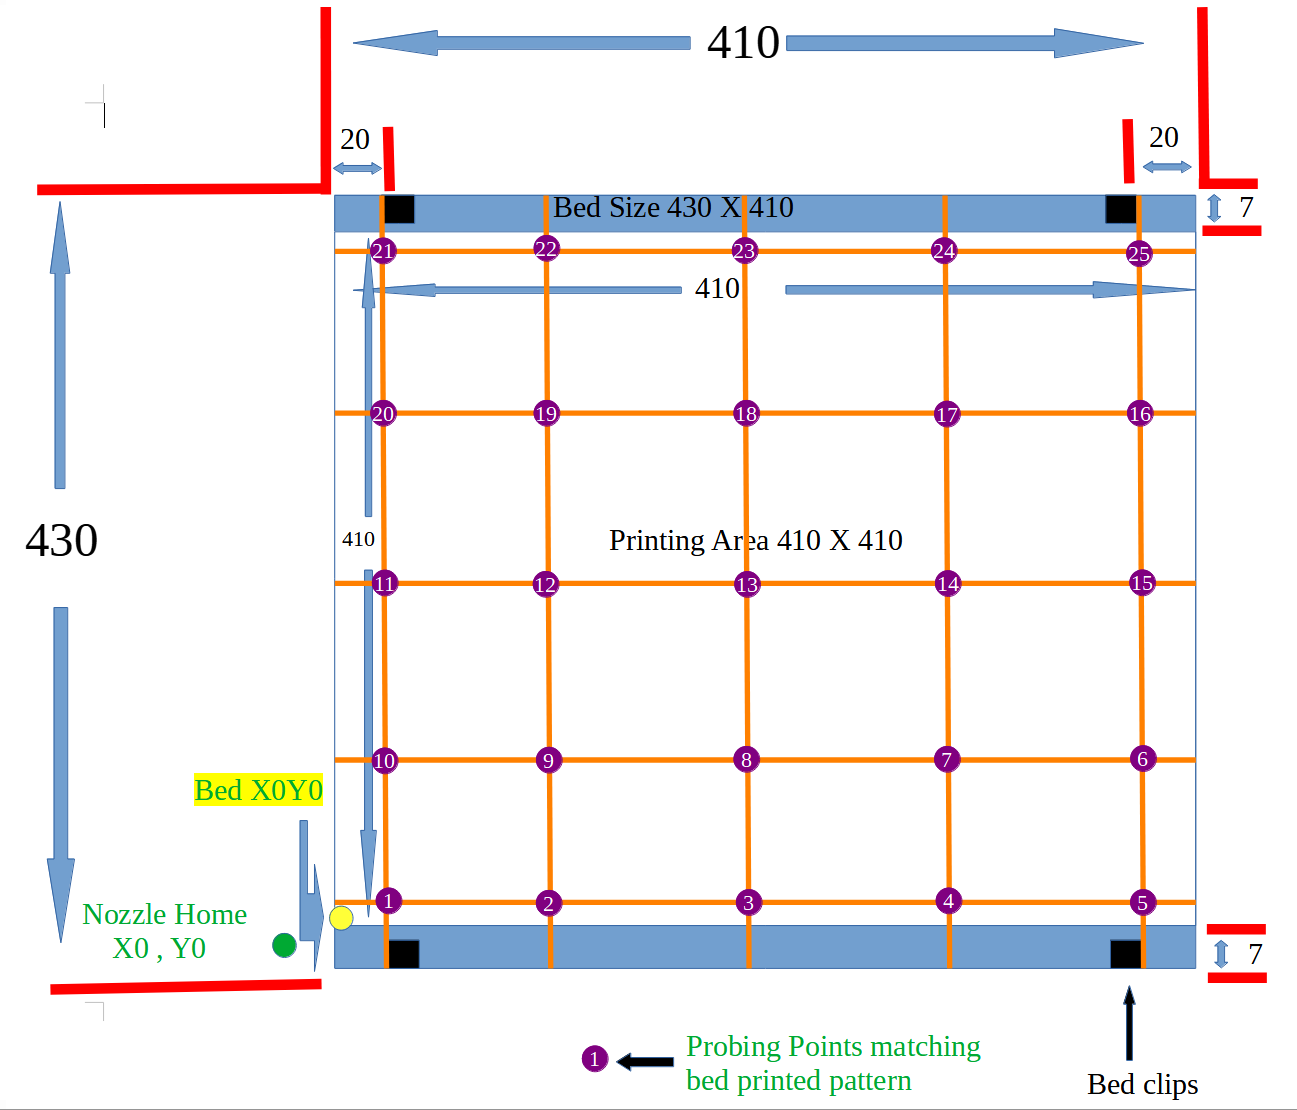
I am asking all this because I also want to learn all the things/logics/settings not just copy/paste some config that will work
-
You can use a negative value for the M208 minima to tell the firmware that the endstops are beyond the edge of the bed.
So for example if x0,y0 is the front left corner, and the endstops are 20mm beyond that set the M208 minima to -20.
@razrudy said in Chiron+Duet3+BlTouch:
G1 H2 Y-5 F6000 ; go back a few mm
Only use H2 for the Z axis in your homing files to allow it to raise and lower without being homed. For the X and Y axis the moves should either be a homing move with H1 or a regular move without any H.
-
@razrudy said in Chiron+Duet3+BlTouch:
On DWC Y-10 will move the bed forward ( towards me/ top to bottom) which means hotend is moving Y+10.
Is this the right way to set this?This sounds backwards.
Rather than thinking of the bed moving, think of the position of the print head on the bed. If the bed is moving back and away from the front, then the print head is moving closer to the front edge of the bed.
-
This post is deleted! -
@Phaedrux sorted...it was indeed reverted.....now Y+10 is "moving" the nozzle in Y+ and bed in Y- direction and is homing the right way.
-
Done with basic config and now moving to small tweaks and tunings....I am wondering how much from the start and end g-code I can move to "DWC" and what/how much should stay in slicer? Not sure if there is any benefit on having start and end g-code on DWC. I am using PrusaSlicer and like many other slicer's I can have profile's for each printer I am using. If I match the speeds, accelerations , retractions and all other between firmware and slicer there should be no problem. Plus the start and end g-code in firmware is only to "complement" the slicer.
Can I use M98 P"mymacro.g" in the slicer? -
Config file at 31/12/2020
This values are just the starting point and some speeds , accelerations , steps/mm , heaters tuning......will need to be adjusted based on your machine; Configuration file for Duet 3 (firmware version 3) ; Configuration for Chiron+Titan Aero+Volcano+BlTouch ; executed by the firmware on start-up ; General preferences G21 ; works in mm G90 ; send absolute coordinates... M83 ; ...but relative extruder moves M550 P"Chiron" ; set printer name ; Drives M569 P0.0 S1 ; physical drive 0.0 goes forwards X M569 P0.1 S0 ; physical drive 0.1 goes backwards Y M569 P0.2 S0 ; physical drive 0.2 goes bacwards ZR M569 P0.3 S0 ; physical drive 0.3 goes backwards ZL M569 P0.4 S1 D2 ; physical drive 0.4 goes forwards E M584 X0 Y1 Z2:3 E4 ; set drive mapping M350 X16 Y16 Z16 E16 I1 ; configure microstepping with interpolation M92 X80 Y100 Z400 E460 ; set steps per mm M566 X1200 Y1200 Z12 E120 ; set maximum instantaneous speed changes (mm/min) M203 X9000 Y9000 Z180 E1200 ; set maximum speeds (mm/min) M201 X1000 Y800 Z250 E250 ; set accelerations (mm/s^2) M906 X1100 Y1100 Z1100 E1100 I30 ; set motor currents (mA) and motor idle factor in per cent M84 S30 ; Set idle timeout ; Axis Limits M208 X-6.0 Y-9.0 Z-20 S1 ; set axis minima M208 X411 Y405 Z445 S0 ; set axis maxima-need to remeasure this M671 X-40:440 Y200:200 ; leadscrews position at right and left of the X axis ; Endstops M574 X1 S1 P"!io0.in" ; configure active-high endstop for low end on X via pin io0.in M574 Y1 S1 P"!io1.in" ; configure active-high endstop for low end on Y via pin io1.in ;M574 Z1 S1 P"io2.in+io3.in" ; configure active-high endstop for low end on Z via pin-for original endstop's M574 Z1 S2 ; endstop set to z-probe ; Z-Probe M950 S0 C"io5.out" ; create servo pin 0 for BLTouch M558 P9 C"^io5.in" H5 F120 T6000 ; set Z probe type to bltouch and the dive height + speeds G31 P500 X41.13 Y2.69 Z1.543 ; set Z probe trigger value, offset and trigger height M557 X42:405 Y0:405 S121:81 ; define mesh grid ; Heaters M308 S0 P"temp0" Y"thermistor" T100000 B4138 ; configure sensor 0 as thermistor on pin temp0 M950 H0 C"out0" T0 ; create bed heater output on out0 and map it to sensor 0 M307 H0 A110.3 C842.7 D1.1 S0.5 V23.8 B0 ; disable bang-bang mode for the bed heater and set PWM limit M140 H0 ; map heated bed to heater 0 M143 H0 S120 ; set temperature limit for heater 0 to 120C M308 S1 P"temp1" Y"thermistor" T100000 B4725 C7.06e-8 ; configure sensor 1 as thermistor on pin temp1 M950 H1 C"out1" T1 ; create nozzle heater output on out1 and map it to sensor 1 M307 H1 A373.1 C420.1 D3.0 S0.5 V24.1 B0 ; disable bang-bang mode for heater and set PWM limit M143 H1 S285 ; set temperature limit for heater 1 to 285C ; Fans M950 F0 C"out4" Q25000 ; create fan 0 on pin out4 and set its frequency M106 P0 S0 H1 T45 ; set fan 0 value. Thermostatic control is turned on M950 F1 C"out5" Q25000 ; create fan 1 on pin out5 and set its frequency M106 P1 S0 H1 T45 ; set fan 1 value. Thermostatic control is turned on M950 F2 C"out7" Q25000 ; create fan 2 on pin out7 and set its frequency M106 P2 S0 H-1 ; set fan 2 value. Thermostatic control is turned off ; Tools M563 P0 D0 H1 F0:2 ; define tool 0 G10 P0 X-6.0 Y-7.0 Z0.0 ; set tool 0 axis offsets G10 P0 R0 S0 ; set initial tool 0 active and standby temperatures to 0C ; Custom settings are not defined ; Miscellaneous M911 S10 R11 P"M913 X0 Y0 G91 M83 G1 Z3 E-5 F1000" ; set voltage thresholds and actions to run on power loss ;M564 H0 ; moving axes before/without homing M591 P1 C"io4.in" S1 D0 ; filament run out sensor - work in progress -
@razrudy said in Chiron+Duet3+BlTouch:
Can I use M98 P"mymacro.g" in the slicer?
Yes you can.
There is also a special macro called
start.gthat will execute when a print is started and will run before any of the sliced gcode file. This can be a good place to do machine prep like homing and preheating.Ultimately, how you split it up is entirely up to you and what makes most sense for your workflow.
-
I am trying to set the Z offset but apparently I have a problem and not sure if it's a mechanic one or I am missing something
Every time I run G30 S-1 in the same spot I get wrong values...always decreasing with 0.005 or something like this...
I am usingG30 ;Manually lower the nozzle close the build plate G92 Z0 G1 Z10 G30 S-1And after each move I get a value with 0.005-0.002 difference
02/01/2021, 16:34:26: G1 XY0
02/01/2021, 16:36:57: G30
02/01/2021, 16:43:21: G92 Z0
02/01/2021, 16:43:46: G30 S-1: Stopped at height 1.435 mm
02/01/2021, 16:43:58: G1 Z10
02/01/2021, 16:44:06: G30 S-1: Stopped at height 1.433 mm
02/01/2021, 16:44:10: G1 Z10
02/01/2021, 16:44:19: G30 S-1: Stopped at height 1.430 mm
02/01/2021, 16:44:24: G1 Z10
02/01/2021, 16:44:32: G30 S-1: Stopped at height 1.425 mm
02/01/2021, 16:44:39: G1 Z10
02/01/2021, 16:44:48: G30 S-1: Stopped at height 1.423 mm
02/01/2021, 16:44:53: G1 Z10
02/01/2021, 16:45:02: G30 S-1: Stopped at height 1.415 mm
02/01/2021, 16:45:09: G1 Z10
I also have problems with mesh bed compensation...it doesn't compensate on the left side. 3/4 of the build plate is coming up nice but the left side the nozzle is always low.
My build plate is crap but until I decide which one to get and replace it I am wondering why the mesh is not applied on the left side.Maybe because the gantry doesn't properly level with the build plate? Or because the probe is at X42 offset and can't get to X0-X5 for probing?
What's the right order for levelling all this?
I am running 4 points G32 without gantry levelling until I get a good level bed and after that I run
G29 X42:400 Y0:400 P5 and M374( map save)
Load map at the start with M375