Endstop wired in series, RRF3
-
Hello all,
I usually find my answers in the previous posts but didn't have any luck with this one.
I run RRF3 (3.2) with a duet Ethernet.
I want to use 2 endstops for Y axis and 2 for Z axis (Big 2d cartesian printer with 2 Y motors, 2 Z motors and independent dual X axis for two head).
Attached is the simple schematic of what I want to achieve with my 2 endstop linked in series. My endstop are mechanical NC switch. In my config, I have the M574 configured like this,
M574 Y1 S1 P"ystop+e1stop"
M574 Z1 S1 P"ystop+e1stop"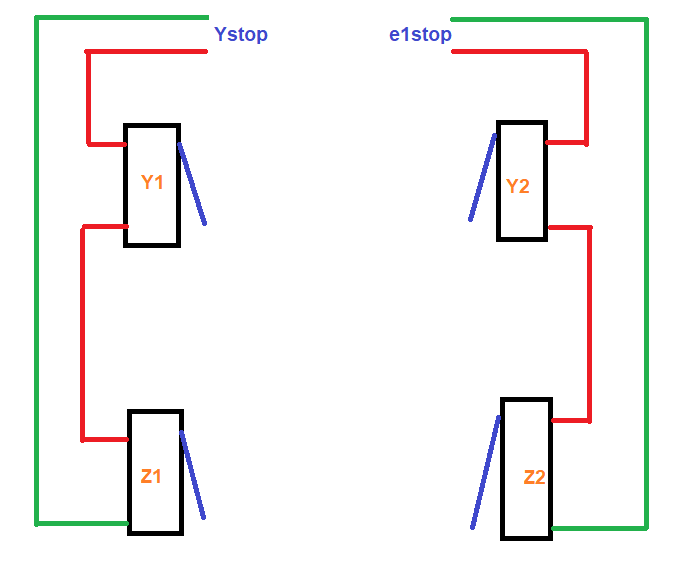
When I perform the homeall, it goes through the X and Y but give me this error on the Z axis :
G28
Error: Failed to enable endstopsWhen I home X and Y, I move away from the endstop so its not an hardware problem (I also check the endstop with the leds and its all good for Z and Y).
homeall.g looks like :
G91                     ; relative positioning
G1 H2 Z5 F6000          ; lift Z relative to current position
G1 H1 X-480 Y-480 F3000 ; move quickly to X and Y axis endstops and stop there (first pass)
G1 H2 X5 Y5 F6000       ; go back a few mm
G1 H1 X-480 Y-480 F360  ; move slowly to X and Y axis endstops once more (second pass)
G90
G0 X-40 Y0              ; move away from the endstop
G91
G1 H1 Z-405 F360        ; move Z down stopping at the endstop
G90                     ; absolute positioning
G92 Z-2.4                  ; Adjust Z offset (if + then substract to this value)
G1 Z20
Can someone help me with this?
Thank you.
A.
-
Because you can't have a pin name used more than once.
If you run M98 P"config.g" you'll see the error.
You'll have you change your wiring.
Or, map the endstops in the homing files. -
I could remap the endstop in the homeall file? Its not elegant but i guess it would do the trick.
How do I do that? If I send M574 Z1 S1 P"ystop+e1stop" it will still give me the error of already having a sensor on the ystop.
thanks.
-
You may have to unbind the pin first by giving it
nilas a pin name.https://duet3d.dozuki.com/Wiki/RepRapFirmware_3_overview#Section_Pin_names_for_Duet_2_WiFi_Ethernet
-
@Phaedrux Wow this is working! I added this before the Z homing lines and everything work properly.
I also added the switch back to initial mapping at the end (so I don't do this trick to the homey.g also)
; homeall.g
; called to home all axes
;
G91                     ; relative positioning
G1 H2 Z5 F6000          ; lift Z relative to current position
G1 H1 X-480 Y-480 F3000 ; move quickly to X and Y axis endstops and stop there (first pass)
G1 H2 X5 Y5 F6000       ; go back a few mm
G1 H1 X-480 Y-480 F360  ; move slowly to X and Y axis endstops once more (second pass)
G90
G0 X-40 Y5
G91
M574 Y1 S1 P"nil"
M574 Z1 S1 P"ystop+e1stop"
G1 H1 Z-405 F360        ; move Z down stopping at the endstop
G90                     ; absolute positioning
G92 Z-2.4               ; Adjust Z offset
G1 Z20
M574 Z1 S1 P"nil"
M574 Y1 S1 P"ystop+e1stop"
Thank you Jay and Phaedrux for your help.
A.
-
Now you've learned the power of on the fly configuration!