When Homing, Not traveling Correct Distance 3.3 beta1
-
I Just Changed over to Nema 23 Closed Loop Stepper Motors. (Core XY Machine)
I have My Duet 3 (with 2- Duet 3 Expansion 1XD Boards For Each X and Y) Set to Go to X130 Y190 During Z Axis Homing. But It goes to X70 Y80. If I Separately Home X and Y and Manually Move the Machine to X130 Y190. It goes there no Problem. The Same Files with Normal Steppers Do not Have this Issue.
M92 X201.6 Y201.6 Z800.00 E840.00:840.00 (Steps Per mm Used)
During Homing Z This is the Line that is used
G90
G1 X130 Y190 F6000Side Note. The Closed Loop Stepper Motors are set to 6400 Pulses Per Revolution, 20 Teeth Pulley and 2GT Belt. I Don't Understand why The Value is not 160 Steps per mm. Took a While with a dial Indicator to Get it Close, And I Believe its Near Perfect.
(( 6400 Pulses / 360 Degrees ) * (360 Degrees / 20 Teeth Pulley)) / 2mm Belt Pitch = 160.
17.77777777777778 * 18 = 320 / 2 = 160.See Config.g Below.
; General preferences G90 ; send absolute coordinates... M83 ; ...but relative extruder moves M550 P"********" ; set printer name M669 K1 ; select CoreXY mode ; Network M552 P0.0.0.0 S1 ; enable network and acquire dynamic address via DHCP M586 P0 S1 ; enable HTTP M586 P1 S0 ; disable FTP M586 P2 S0 ; disable Telnet G4 S1 ; Wait for expansion boards to start ; Drive Configuration M569 P0.0 S1 ; physical drive 0.0 goes forwards FL Z M569 P0.1 S1 ; physical drive 0.1 goes forwards BM Z M569 P0.2 S1 ; physical drive 0.2 goes forwards FR Z M569 P0.3 S1 ; physical drive 0.3 goes forwards BL X M569 P0.4 S1 ; physical drive 0.4 goes forwards BR Y M569 P1.0 S1 ; physical drive 1.0 goes forwards Extruder 0L M569 P1.1 S1 ; physical drive 1.1 goes forwards Extruder 1R M569 P1.2 S1 ; physical drive 1.2 goes forwards Extruder 2HL (Carriage) M569 P0.5 S1 ; physical drive 0.5 goes forwards Extruder 3HR (Carriage) M569 P40.0 S1 R0 T0:0:0:0 ; physical drive 40.0 goes forwards BL X Closed Loop Stepper M569 P41.0 S1 R0 T0:0:0:0 ; physical drive 41.0 goes forwards BR Y Closed Loop Stepper M569.1 P40.0 S1 T2 E0.3125 R0.5 I0.5 D0.5 ; Stepper Driver Closed Loop Control, T=Encoder Type, E=Encoder Counts, R=Proportional, I=Integral, D=Derivative M569.1 P41.0 S1 T2 E0.3125 R0.5 I0.5 D0.5 ; Stepper Driver Closed Loop Control, T=Encoder Type, E=Encoder Counts, R=Proportional, I=Integral, D=Derivative M584 X40.0 Y41.0 Z0.0:0.1:0.2 E1.0:1.1:1.2:0.5 ; set drive mapping ; Leadscrews position M671 X-8.86:192.349:393.558 Y-5.411:367.799:-5.411 S25 ; leadscrews at front left, rear middle and front right See ; https://miragec79.github.io/HevORT/firmwaresettings.html#5-configure-triple-z-axis ; Motor Configuration M350 X00 Y00 Z16 E16:16:16:16 I256 ; configure microstepping with interpolation M92 X201.6 Y201.6 Z800.00 E840.00:840.00:420.00:420.0 ; set steps per mm M566 X500.00 Y500.000 Z250.00 E500:500:250:250 ; set maximum instantaneous speed changes (mm/min) M203 X15000 Y15000 Z2000 E18000:18000:15000:15000 ; set maximum speeds (mm/min) M201 X1500 Y1500 Z250 E3000:3000:2000:2000 ; set accelerations (mm/s^2) M906 X1950 Y1950 Z1900 E1950:1950:1300:1300 I30 ; set motor currents (mA) and motor idle factor in per cent M84 S600 ; Set idle timeout ; Axis Limits M208 X0 Y0 Z0 S1 ; set axis minima M208 X355 Y355 Z360 S0 ; set axis maxima ; Endstops Snnn Endstop type: 0 = active low endstop input, 1 = active high endstop input, 2 = Z probe, 3 = motor load detection M574 X1 P"^io3.in" S1 ; Configure EndStop For Low End on X M574 Y1 P"^io4.in" S1 ; Configure EndStop For Low End on Y M574 Z1 S2 ; configure Z-probe endstop for low end on Z ; Filament Sensor CHANGE BEFORE USE ; Laser Filament Monitor USE 3.3v ONLY ;M591 D0 P5 C"^1.io2.in" R40:120 E3.0 S1 ; Laser Filament Monitor 1 (Left Extruder) ;M591 D1 P5 C"^1.io3.in" R40:120 E3.0 S1 ; Laser Filament Monitor 2 (Right Extruder) ;M591 D2 P5 C"^1.io4.in" R40:120 E3.0 S1 ; Laser Filament Monitor 3 (Hemera) ; Magnetic Filament Monitor USE 3.3v ONLY ;M591 D0 P3 C"^1.io2.in" S1 R70:130 E3.0 L28.4 ; Filament Monitor 1 (Left Extruder) ;M591 D1 P3 C"^1.io3.in" S1 R70:130 E3.0 L28.4 ; Filament Monitor 2 (Right Extruder) ;M591 D2 P3 C"^1.io4.in" S1 R70:130 E3.0 L28.4 ; Filament Monitor 3 (Hemera) ; Z-Probe M950 S0 C"io7.out" ; Create servo pin 0 for BLTouch M558 P9 C"^io7.in" H5 F500 T6000 B1 ; Set Z probe type to bltouch and the dive height + speeds ; ORIGINAL VALUE Below ;G31 P500 X0.113 Y34.687 Z5.00 ; Set Z probe trigger value, offset and trigger height ; Temporary Value Below G31 P500 X12 Y7.5 Z3.00 ; Set Z probe trigger value, offset and trigger height ;M557 X30:355 Y60:355 S50 ; Define mesh grid M557 X72:352 Y90:360 S25 ; Define mesh grid ; Heater Configuration ; Bed Heater M308 S0 P"temp0" Y"thermistor" A"Heated Bed" T100000 B4138 ; configure sensor 0 as thermistor on pin temp0 M950 H0 C"out1" T0 ; create bed heater output on out1 and map it to sensor 0 M307 H0 A222.3 C181.0 D1.8 B0 S1.00 ; Enable bang-bang mode for the bed heater and set PWM limit M304 P87.3 I5.03 D101.7 ; PID Settings from M303 Auto Tune M140 H0 ; map heated bed to heater 0 M143 H0 S200 ; set temperature limit for heater 0 to 200C ; Heater 1 M308 S1 P"1.spi.cs0" Y"thermocouple-max31856" A"Heater #1L/H" T"K" F60 ; configure sensor 1 as thermocouple via CS pin spi.cs0 M950 H1 C"1.out0" T1 ; create nozzle heater output on out2 and map it to sensor 1 M307 H1 B0 S1.00 ; Enable bang-bang mode for heater and set PWM limit M143 H1 S525 ; set temperature limit for heater 0 to 525C ; Heater 2 M308 S2 P"1.spi.cs1" Y"thermocouple-max31856" A"Heater #2R" T"K" F60 ; configure sensor 2 as thermocouple via CS pin spi.cs1 M950 H2 C"1.out1" T2 ; create nozzle heater output on out3 and map it to sensor 2 M307 H2 B0 S1.00 ; Enable bang-bang mode for heater and set PWM limit M143 H2 S525 ; set temperature limit for heater 0 to 325C ; Chamber Heater ;M308 S5 P"temp1" Y"pt1000" A"Chamber Temperature" R2200 ; configure sensor 5 as PT1000 on pin temp1 ;M950 H5 C"1.out2" T5 ; create chamber heater output on 1.out2 and map it to sensor 5 ;M307 H5 B0 S1.00 ; Enable bang-bang mode for the chamber heater and set PWM limit ;M141 H5 ; map chamber to heater 5 ;M143 H5 S200 ; set temperature limit for heater 0 to 200C M308 S6 P"mcu-temp" Y"mcu-temp" A"Main Board Temp" ; Configures Sensor 6 as Main Board Temperature Sensor M308 S7 P"1.mcu-temp" Y"mcu-temp" A"Expansion Board Temp" ; Configures Sensor 7 as Main Board Temperature Sensor ; Main Board Fan Configuration ; PWM Fan-0 Part Cooling Fan-1 ;M950 F0 C"!out4" F25000 ; create fan 0 on pin 0.out4 and set its frequency ;M106 P0 S000 H-1 C"Part Cooling Fan-1" ; set fan 0 value. ; PWM Fan-1 Part Cooling Fan-2 ;M950 F1 C"!out5" F25000 ; create fan 1 on pin 0.out5 and set its frequency ;M106 P1 S000 H-1 H2 C"Part Cooling Fan-2" ; set fan 1 value. ; PWM Fan-2 LED-WHITE Fan-6 M950 F2 C"out6" F25000 ; create fan 2 on pin out6 M106 P2 S0 C"LED-White" ; set fan 2 value. ; Fan-3 Extruder Fan-1 ;M950 F3 C"out7" ; create fan 3 on pin 0.out7 and set its frequency ;M106 P3 S255 H1 T45 C"Extruder Fan-1" ; set fan 3 value On Heater 1 With Thermostatic Control ; Fan-4 Extruder Fan-2 ;M950 F4 C"out8" ; create fan 4 on pin 0.out8 and set its frequency ;M106 P4 S255 H1 T45:300 C"Extruder Fan-2" ; set fan 4 value. ; Fan-5 Unused Fan-1 ;M950 F5 C"out9" ; create fan 5 on pin 0.out9 ;M106 P5 S000 H-1 C"Unused Fan-1" ; set fan 5 value ; Expansion Board Fan Configuration ; PWM Fan-6 Extruder Fan 1.Out.3 M950 F6 C"1.out3" F25000 ; create fan 6 on pin 1.out3 M106 P6 S1 T45 H1 C"Extruder Fan" ; set fan 6 value. ; PWM Fan-7 Cooling Fan-1 Out.4 M950 F7 C"1.out4" F25000 ; create fan 7 on pin 1.out4 M106 P7 S0 C"Cooling Fan-1" ; set fan 7 value. ; PWM Fan-8 Cooling Fan-2 Out.5 M950 F8 C"!1.out5" F25000 ; create fan 8 on pin 1.out5 M106 P8 S0 C"Cooling Fan-2" ; set fan 8 value. ; Fan-10 LED-RED Fan-4 M950 F9 C"1.out6" ; create fan 9 on pin 1.out6 M106 P9 S0 C"LED-Red" ; set fan 9 value. ; Fan-11 LED-GREEN Fan-5 M950 F10 C"1.out7" ; create fan 10 on pin 1.out7 M106 P10 S0 C"LED-Green" ; set fan 10 value. ; Fan-12 LED-BLUE Fan-6 M950 F11 C"1.out8" ; create fan 11 on pin 1.out8 M106 P11 S0 C"LED-Blue" ; set fan 11 value. ; Create IN/OUT IO (RELAY MODULE IS REVERSED: 255=OFF 0=ON ; K1 UNUSED M950 P1 C"!1.io3.out" ; Set 1.Io3.out To P1 (Relay K1) M42 P1 S0 ; Turns P1 Off ; K2 UNUSED M950 P2 C"!1.io0.out" ; Set 1.Io0.out To P2 (Relay K2) M42 P2 S0 ; Turns P2 Off ; K3 UNUSED M950 P3 C"!1.io4.out" ; Set Io4.out To P3 (Relay K3) M42 P3 S0 ; Turns P3 Off ; K4 UNUSED M950 P4 C"!1.io1.out" ; Set 1.Io1.out To P4 (Relay K4) M42 P4 S0 ; Turns P4 Off ; K5 X/Y Closed Loop Motor Reset M950 P5 C"!1.io5.out" ; Set 1.Io5.out To P5 (Relay K5) M42 P5 S1 ; Turns P5 Off ; K6 UNUSED M950 P6 C"!1.io2.out" ; Set 1.Io2.out To P12 (Relay K6) M42 P6 S0 ; Turns P12 Off ; K7 Engraver High Power Relay M950 P7 C"!io6.out" ; Set Io6.out To P7 (Relay K7) M42 P7 S0 ; Turns P7 Off ; K8 Mechanical Timer M950 P8 C"!io8.out" ; Set Io8.out To P8 (Relay K8 - Mechanical Timer) M42 P8 S0 ; Turns P8 Off ; Buzzer PWM M950 P9 C"!io3.out" Q1000 ; Create Output Pin io4.out for Buzzer at 1000Hz M42 P9 S0 ; Set GPIO Pin io4.out to OFF ; Control Panel Buttons ; Pause M950 J1 C"^io8.in" ; Creates IN GPIO on io8.in M581 P1 T1 S0 R0 ; Invokes Trigger1 PAUSE ; Z Bottom M950 J2 C"^io5.in" ; Creates IN GPIO on io5.in M581 P2 T2 S0 R0 ; Invokes Trigger2 ; Home M950 J3 C"^io6.in" ; Creates IN GPIO on io6.in M581 P3 T3 S0 R0 ; Invokes Trigger3 ; BabyStep Up M950 J4 C"^1.io0.in" ; Creates IN GPIO on 1.io0.in M581 P4 T4 S0 R0 ; Invokes Trigger4 ; BabyStep Down M950 J5 C"^1.io1.in" ; Creates IN GPIO on 1.io1.in M581 P5 T5 S0 R0 ; Invokes Trigger5 ; Closed Loop Stepper Alarm Left RESET M950 J15 C"^40.io0.in" ; create input pin 10 on 40.io0.in ;M950 P15 C"!40.io0.out" ; create a GPIO pin 11 on 40.io0.out M581 P15 S0 T6 R0 ;change to R1 ; invoke trigger 6 when an active-to-inactive edge is detected on input 0 and a file is being printed from SD card ; Closed Loop Stepper Alarm Right RESET M950 J13 C"^41.io0.in" ; create input pin 12 on 41.io0.in ;M950 P13 C"41.io0.out" ; create a GPIO pin 13 on 41.io0.out M581 P13 S0 T6 R0 ;Change to R1 ; invoke trigger 6 when an active-to-inactive edge is detected on input 0 and a file is being printed from SD card ; Create Tool Heads ; Tool-0 (Hemera Volcano) M563 P0 S"Hemera Volcano" D2 H1 F6:7:8 ; Sets Tool-0, Names Tool, Defines Extruder D2 Heater H1 Fans Out6:7:8 G10 P0 X0 Y0 Z0 ; Set Tool-0 axis offsets G10 P0 R0 S0 ; Set initial Tool-0 active and standby temperatures to 0C ; Tool-1 (Hemera V6) M563 P1 S"Hemera V6" D0 H1 F6:7:8 ; Sets Tool-1, Names Tool, Defines Extruder D0:1 Heater H1:2 Fans Out6:7:8 G10 P1 X0 Y0 Z0 ; Set Tool-1 axis offsets G10 P1 R0 S0 ; Set initial Tool-1 active and standby temperatures to 0C ; Tool-2 (BMG-2 Dual Extruder) M563 P2 S"BMG-2 Dual" D0:1 H1:2 F6:7:8 ; Sets Tool-2, Names Tool, Defines Extruder D2:3 Heater H1:2 Fans Out6:7:8 G10 P2 X0 Y0 Z0 ; Set Tool-2 axis offsets G10 P2 R0 S0 ; Set initial Tool-2 active and standby temperatures to 0C ; Ringing Dynamic Acceleration Compensation M593 F63.8 ; cancel ringing at 63.8Hz Calibrated using: https://www.thingiverse.com/thing:3209955 ; Automatic power saving M911 S21 R23.5 P"M913 X0 Y0 G91 M83 G1 Z3 E-5 F1000" ; Set voltage thresholds to 23.5V and actions to run on power loss ; Miscellaneous M575 P1 S1 B57600 ; enable support for PanelDue M501 ; load saved parameters from non-volatile memory -
are you on firmware 3.2.2 which contain critical updates regarding steps?
-
@Toastinator said in When Homing, Not traveling Correct Distance:
M350 X00 Y00 Z16 E16:16:16:16 I256 ; configure microstepping with interpolation
Well according to the docs X00 and Y00 are invalid values.
And the I parameter is either 0 (interpolation disabled) or 1 (interpolation enabled).
I don't know if they are causing problems or not.
As to your value of 201.6.
200 is the correct value a 16 tooth pulley so I would suggest you are not using 20 tooth but 16 tooth.
Frederick
-
M115 FIRMWARE_NAME: RepRapFirmware for Duet 3 MB6HC FIRMWARE_VERSION: 3.2-beta4.1 ELECTRONICS: Duet 3 MB6HC v1.01 or later FIRMWARE_DATE: 2020-12-02 Downloaded and uploaded Duet2and3Firmware-3.2.2.zip, Ran M997 and I get this Error, There is a file Similar in the Zip Named "Duet3_SDiap32_MB6HC.bin". I Tried Renaming The File to what its looking for, and it canceled automatically.
Error: M997: In-application programming binary "Duet3_SDiap_MB6HC.bin" not found @fcwilt
Changing those now, ThanksI Double Checked the Pulley's and they are Indeed 20 Tooth 8mm Bore 2GT 6mm Belt
After These changes I Did Another Test. It is still doing the same thing.
I Have Noticed that this Works:
G1 X130 G1 Y195 But This Does not Work:
G1 X130 Y195What would Cause this?
All Boards Updated to 3.2.2 EXCEPT the Main Duet3 MB6HC -
@Toastinator said in When Homing, Not traveling Correct Distance:
". I Tried Renaming The File to what its looking for, and it canceled automatically.
dont just rename files
https://github.com/Duet3D/RepRapFirmware/releases/download/3.0/Duet3iap_sd_MB6HC.bin
-
That File name is Incorrect Aswell.
Duet3iap_sd_MB6HC.binIts Looking for Duet3_SDiap_MB6HC.bin. Thanks I Really Appreciate the Help.
The Github has Duet3_SDiap32_MB6HC.binThe GitHub Said all you need to do is download Duet2and3Firmware-3.2.2.zip And it Auto Runs the Firmware Update. Except it Seams to be Missing the File. Not Sure why it has the Same File name but an additional "32" in the name
-
@Toastinator said in When Homing, Not traveling Correct Distance:
Duet3_SDiap_MB6HC.bin
sorry linked the wrong file from the 3.0 release
https://github.com/Duet3D/RepRapFirmware/releases/download/3.0/Duet3_SDiap_MB6HC.bin
-
Thanks! I was just Searching and Found the same file on a 3.1.1 Release.
Somehow, It seams to be working Now. This was a Firmware Issue with the Duet 3 Expansion 1XD Boards?
When will the duet start looking for Duet3_SDiap32_MB6HC.bin Files?
-
@Toastinator said in When Homing, Not traveling Correct Distance:
When will the duet start looking for Duet3_SDiap32_MB6HC.bin Files?
for firmware update from 3.2
-
@Veti The Github should say Update to 3.2 First, Then to the Newest. The Small Details lol
-
After Further Testing, It still Does the Same thing, But Not Every Time. If you have any other ideas
-
Combined Movement on this CoreXY Duet 3 Expansion 1XD Boards Driving Nema 23 Closed Loop Stepper Motors Seem to be the Issue.
This is Fine:G1 X100 G1 Y100 This Does not work:
G1 X100 Y100 -
In what way doesn't that command work- what does it do?
-
Firmware 3.2.2: G1 X100 Y100 Moves about Half X and Y. While Printing, It Layer Shifts Continuously on the same Layer.
But This Works Fine For some reason:
G1 X100 G1 Y100 Firmware 3.3Beta1 The Machine Refuses to Home. It wont Recognize X or Y on the Expansion 1XD Boards. (Both 1XD Boards were also Upgraded to 3.3Beta1)
-
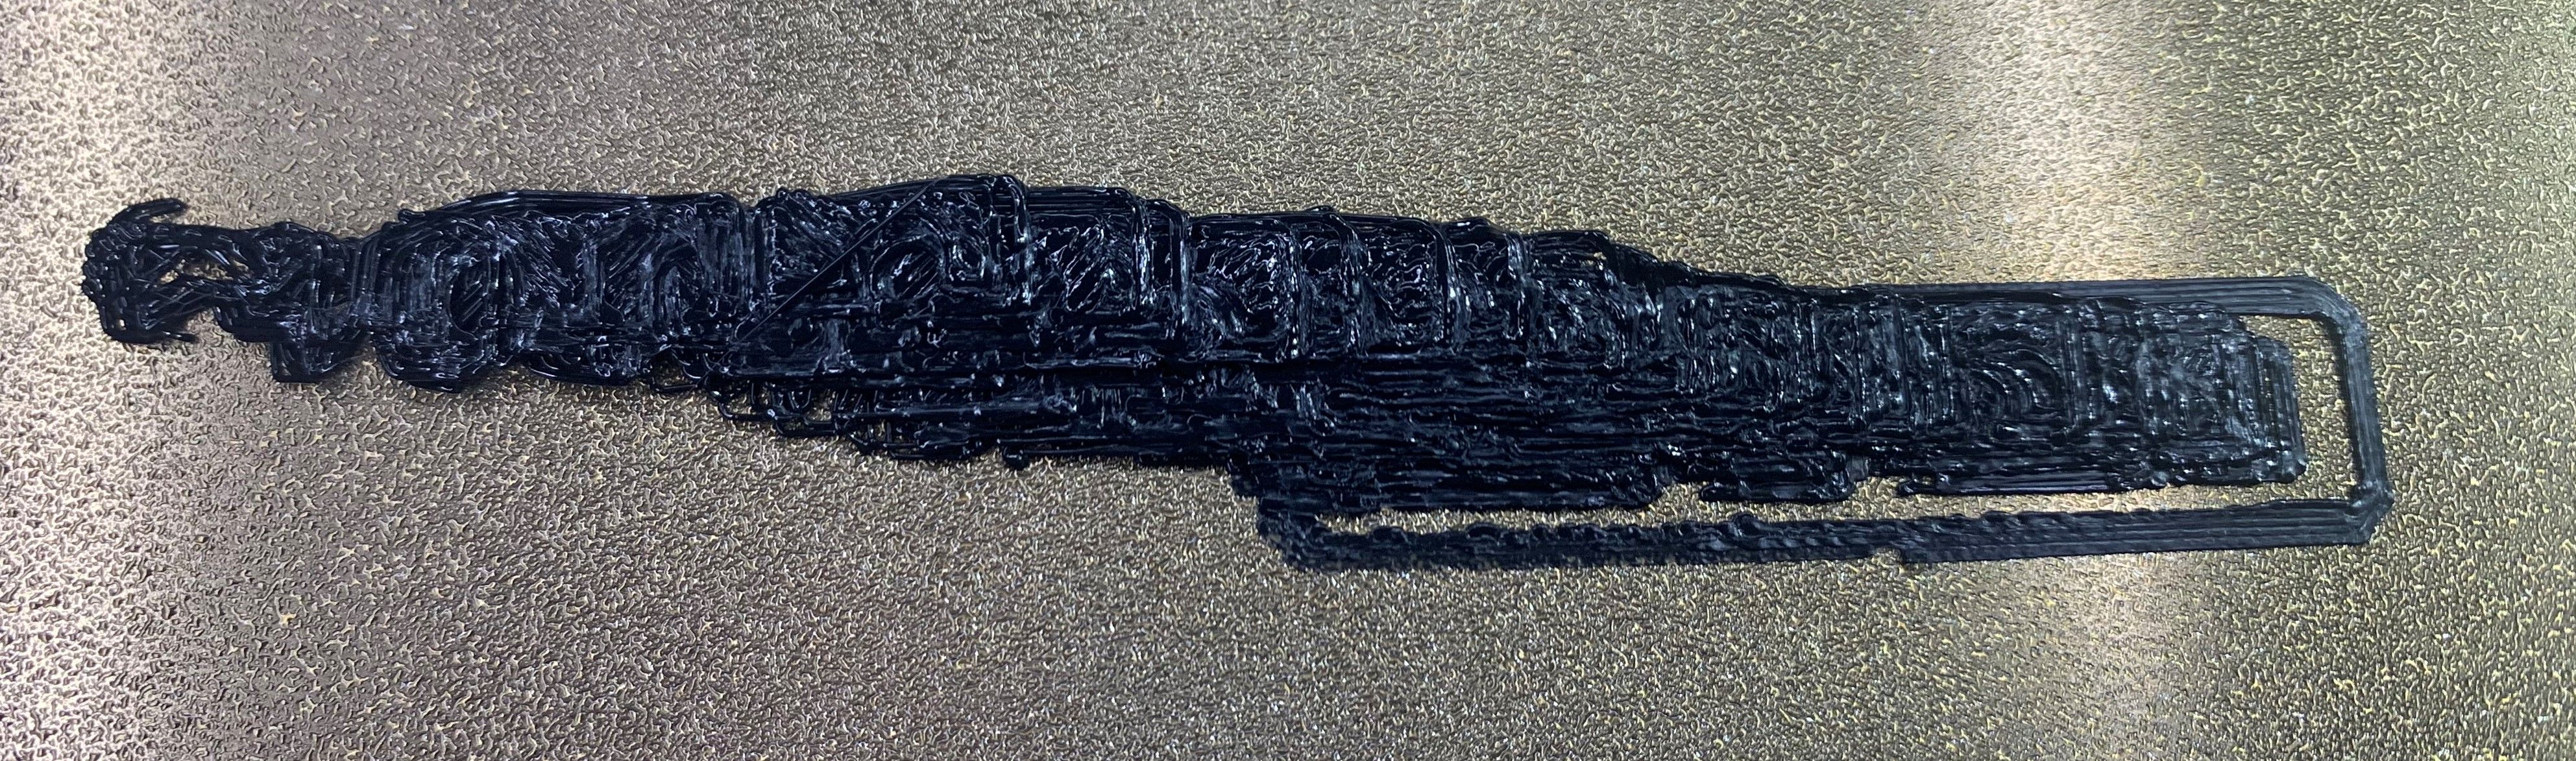
In the Image, The Printer is Continuously Layer Shifting Mid Layer In a Diagonal Fashion. These are Nema 23 Closed Loop Stepper Motors, Driven from 2 Duet 3 Expansion 1XD Boards for X and Y On a CoreXY Machine. Have to Use 3.2.2 Firmware Because 3.3Beta1 Will Not Home.

-
@Toastinator said in When Homing, Not traveling Correct Distance 3.3 beta1:
In the Image, The Printer is Continuously Layer Shifting Mid Layer In a Diagonal Fashion. These are Nema 23 Closed Loop Stepper Motors, Driven from 2 Duet 3 Expansion 1XD Boards for X and Y On a CoreXY Machine. Have to Use 3.2.2 Firmware Because 3.3Beta1 Will Not Home.
Layer shifts when using external drivers are a sign that the M569 T parameters are not right. Don't just guess, get the specifications for minimum step time, minimum step interval, minimum direction-to-step setup time, and minimum direction-to-step hold time needed by the drivers.
I'll reply regarding the homing issue in your other thread.
-
@Toastinator said in When Homing, Not traveling Correct Distance 3.3 beta1:
T0:0:0:0
that sound wrong for timing
-
I took it right from the Wiki Page.
"b This is setting T0:0:0:0 this allows the firmware to generate short pulses. in measurement these where no shorter than 0.7ns."
But I also Tried Removing it aswell, Leaving the Default.
"On the EXP1XD board the default is T2.6:2.6:2.6:2.6"When I get home later tonight, Ill play around with Timing and see what happens.
-
@Toastinator you need to look at the datasheet for your drivers to determine the timing required. I suspect it will be higher than the 1XD defaults as well
-
The Datasheet I was given does not Mention any Required Timing. It just says it accepts from 0-200Khz Pulse Frequency.
After Changing Timing to T5:5:5:5 and T10:10:10:10, It Seams to Move Fine, But there is Some Type Of error Accumulating. (Or somthing else, lol)
Yesterday, I was Getting Homing Errors. Today Without Changing Anything, Its Homing Fine, But Not waiting for the Hotend to Heatup before Moving. And Look at this Picture of a No Infill Cube. The Infill Filled in Slightly Wavy at the Bottom.