Manual Bed Levelling & Mesh Levelling on a corexy printer?
-
@fcwilt Thought about it but only need it for prints that take up the entire bed which for me is rare, and it'll add extra weight the carriage.
Came across a post by @Phaedrux who did something very close to what i want to do so I've altered it to this
; macro to perform manual bed levelling assistance to the centre of the bed only for regular prints
; Preheat PLA
M140 S60;
M104 S180 T0;
M561 ; clear any bed transform
G28 X ; home X
G28 Y ; home Y
G28 Z ; home Z; Move nozzle to leveling points and prompt user to level bed at each point
M291 P"Nozzle will now move to the 4 leveling points RL, RR, FR & FL." S1 T2; Move to Rear Left leveling point P0
G1 Z5 ; move to z5 for travel
G1 X87 Y314 ; Move to rear left corner
G1 Z0 ; move to z0 to level the bedM400
M291 P"Adjust RL using a piece of paper, when set click Confirm to go to RR" R"CONFIRM" S2 Z0; Move to Rear Right leveling point P1
G1 Z5 ; move to z5 for travel
G1 X293 Y314 ; Move to rear right corner
G1 Z0 ; move to z0 to level the bedM400
M291 P"Adjust RR using a piece of paper, when set click Confirm to go to FR" R"CONFIRM" S2 Z0; Move to Front Right leveling point P2
G1 Z5 ; move to z5 for travel
G1 X293 Y110 ; Move to front right corner
G1 Z0 ; move to z0 to level the bedM400
M291 P"Adjust FR using a piece of paper, when set click Confirm to go to FL" R"CONFIRM" S2 Z0; Move to Front Left leveling point P3
G1 Z5 ; move to z5 for travel
G1 X87 Y110 ; Move to front left corner
G1 Z0 ; move to z0 to level the bedM400
M291 P"Adjust FL using a piece of paper, when set click Confirm" R"CONFIRM" S2 Z0; Move Z
G1 Z50 ; Drop bed to z50 for nozzle clearanceM291 P"The bed has been mechanically leveled" S2
-
@natty15d said in Manual Bed Levelling & Mesh Levelling on a corexy printer?:
@fcwilt Thought about it but only need it for prints that take up the entire bed which for me is rare, and it'll add extra weight the carriage.
Came across a post by @Phaedrux who did something very close to what i want to do so I've altered it to this
That might work. You may have to run it more than once.
The actual Manual Bed Leveling Assistant (which works best with a Z probe) takes into account how each adjustment screw will interact with the others and the suggested adjustments reflect that.
Frederick
-
@fcwilt Just created a second one to level the entire bed, then ill follow that up with Mesh Bed Compensation. That's going to be another head scratcher LOL
; macro to perform manual bed levelling assistance to the Entire bed for large prints
; Preheat PLA
M140 S60;
M104 S180 T0;
M561 ; clear any bed transform
G28 X ; home X
G28 Y ; home Y
G28 Z ; home Z; Move nozzle to leveling points and prompt user to level bed at each point
M291 P"Nozzle will now move to the 4 leveling points RL, RR, FR & FL." S1 T2; Move to Rear Left leveling point P0
G1 Z5 ; move to z5 for travel
G1 X40 Y372 ; Move to rear left corner
G1 Z0 ; move to z0 to level the bedM400
M291 P"Adjust RL using a piece of paper, when set click Confirm to go to RR" R"CONFIRM" S2 Z0; Move to Rear Right leveling point P1
G1 Z5 ; move to z5 for travel
G1 X340 Y372 ; Move to rear right corner
G1 Z0 ; move to z0 to level the bedM400
M291 P"Adjust RR using a piece of paper, when set click Confirm to go to FR" R"CONFIRM" S2 Z0; Move to Front Right leveling point P2
G1 Z5 ; move to z5 for travel
G1 X340 Y52 ; Move to front right corner
G1 Z0 ; move to z0 to level the bedM400
M291 P"Adjust FR using a piece of paper, when set click Confirm to go to FL" R"CONFIRM" S2 Z0; Move to Front Left leveling point P3
G1 Z5 ; move to z5 for travel
G1 X40 Y52 ; Move to front left corner
G1 Z0 ; move to z0 to level the bedM400
M291 P"Adjust FL using a piece of paper, when set click Confirm" R"CONFIRM" S2 Z0; Move Z
G1 Z50 ; Drop bed to z50 for nozzle clearanceM291 P"The entire bed has been mechanically leveled, now perform Mesh Bed Compensation" S2
-
That macro worked well for me because I can easily visually see how close the nozzle is to the bed so a tiny adjustment to the screw is needed and it stays put for a long time. I have it do two passes of the 3 screws and it's enough for me. YMMV
-
-
Very glad to hear you got it working.
If you get tired to doing it manually a 8mm inductive sensor like mine only weighs 43 grams. I would imagine your existing extruder assembly weighs a good deal more than that.
Frederick
-
@Phaedrux @fcwilt I used Mesh Bed Compensation for the first time and it worked perfectly. What id like to know is now that I've switched the printer off, when i turn it back on is the MBC still on or do i have activate it with G29 S1.
Is there a way to see if the MBC is active or inactive on the paneldue or web interface?Thanks
Nathan -
@natty15d said in Manual Bed Levelling & Mesh Levelling on a corexy printer?:
@Phaedrux @fcwilt I used Mesh Bed Compensation for the first time and it worked perfectly. What id like to know is now that I've switched the printer off, when i turn it back on is the MBC still on or do i have activate it with G29 S1.
Is there a way to see if the MBC is active or inactive on the paneldue or web interface?The height map you created with G29 or G29 S0 is saved and can be re-loaded at any time with G29 S1.
But you do have to re-load it. I do it at the start of each print and unload it at the end of each print as it really serves no purpose when you are not printing.
All slicers that I have used have a way to execute user created gcode.
My approach is to have a macro called print_begin.g and another called print_end.g.
In the slicer I have M98 P"print_begin.g" and M98 P"print_end.g" in the appropriate places the slicer provides for entering user code.
The macros do everything required to prepare to start a print or finish up at the end of a print.
Frederick
-
-
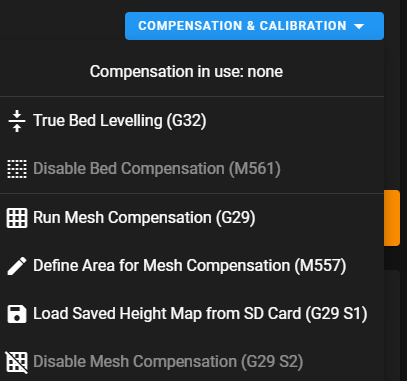
Hi,
I forgot to include this screen shot showing where you can check the state of mesh compensation.
This is from the DWC for v3.2.2
Frederick
-
@fcwilt That's perfect thankyou again
")