Odd striped walls
-
I am printing an aeroplane from 3Dprintlab with transparent PLA. 1 perimeter thin walls.
Only with transparent I get striped walls every 4-5 mm. I tried several transparent filaments but all behaves the same. With black or white I can't see it.
I am running a corexy with 2 rods, pulleys with timing belt and one stepper motor. when printing cubes and walls I have excellent prints without artifacts except for the visible stripes when printing transparent.
I heard from someone that the heatbed and PID could be the problem and got a link to this video.
link textI've re-calibrated both bed and hotend and using PID which is stable and different speeds doesn't make any difference.
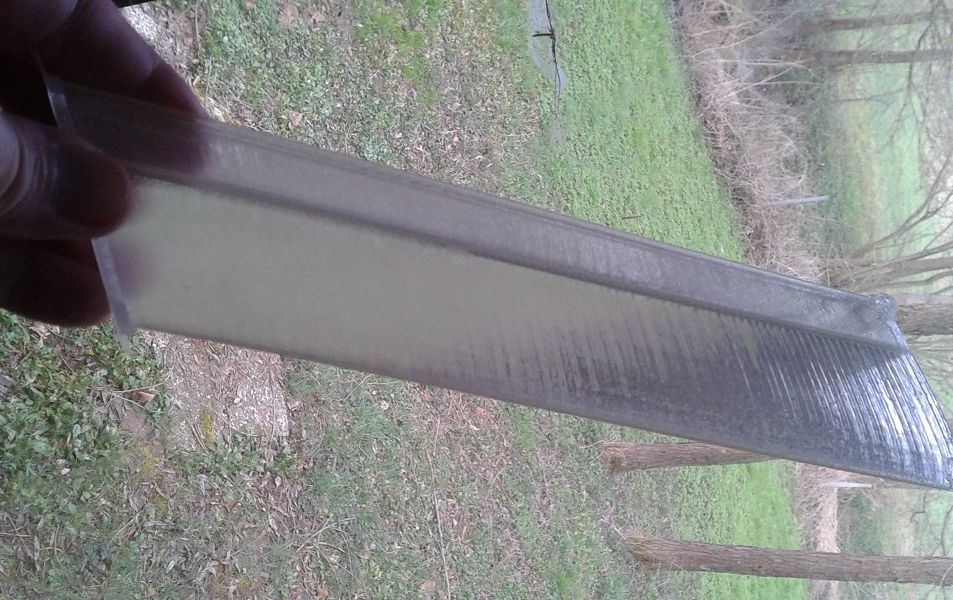
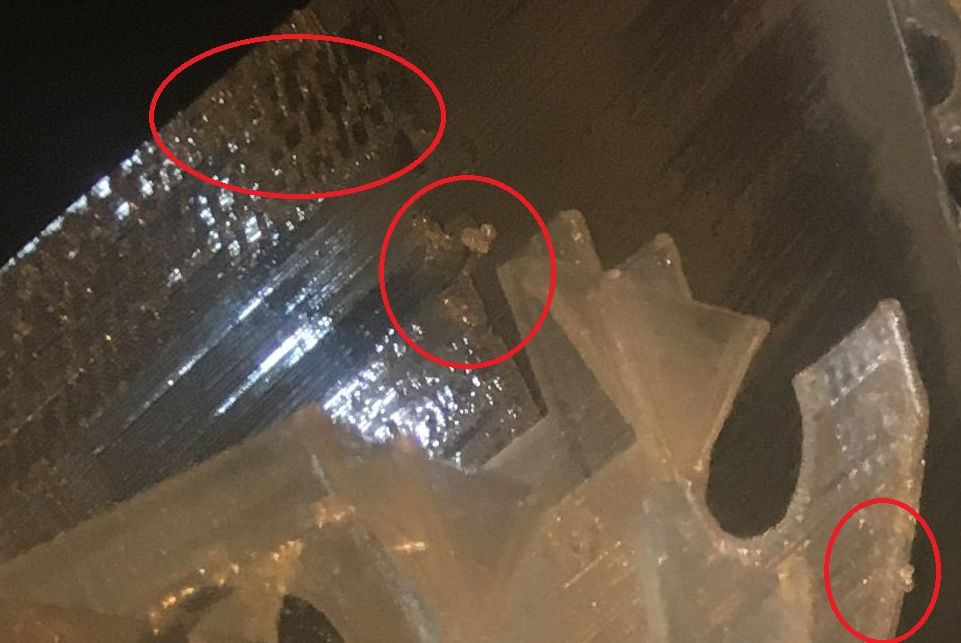
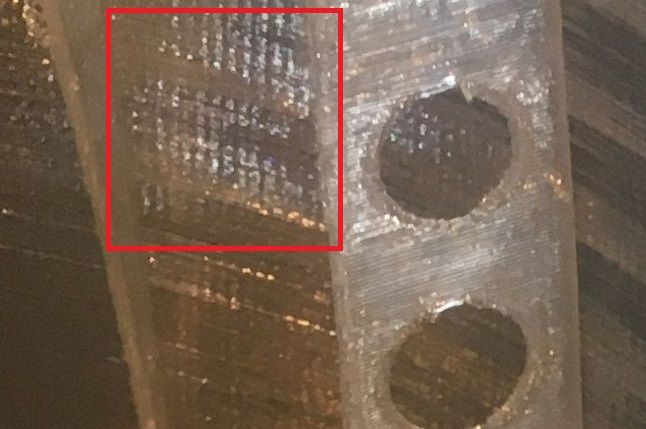
Here are pics on my very problem and I'm at a loss after trying to adjust the z-axle but nothing changes. Anyone has the same problem and know hot to fix it? Is this what's called salmon skin?


-
@stout transparent shows the slightest errors. If the height of each band is 8mm and you run Z on TR8x8 leadscrews, you have an issue with the leadscrew wobbling.
-
-
Normally it's dialed in but with those 3D lab print files with 1 perimeter 0,42 thin wall and plenty of retractions on every single layer anything can happen anytime, so I have to watch the print and dial in manually when it suddenly is getting under extrusion on layer 142 or whatever happens. I don't have these problems with other stl's only the ones from 3DLabPrint which are very large parts(printing a spitfire 1700mm wing span).
I'm using 0.2 PA and about 2 mm retraction, retract speed 100mm/50mm. I have a Capricorn bowden tube that's 650mm. E3D V6 0,4 nozzle and a Bondtech original extruder.
I checked out if it had something to do with the 40A SSR as I'm running a heat bed on 200 volt and the temperature is fluctuating a degree celsius intermittent over a 2-3 minute period. So in the middle of a print I simply turned of the heat and it made no difference over the last 60 layers, still banding or whatever it's called.
The stripes are about 4mm wide and it's even. I use 2 8mm lead screws, 2mm spacing, set to 400 steps/mm in config.g.
I also added an extra grub screw (triangle wise) to the belt pully to get it centered as I saw it was a bit off center when turning a revolution. But it didn't make any difference. I have a 5mm aluminum bed with a 4mm mirror on top which makes the bed heavy.
Could the brass nuts be the pitfall here? They are not very tight. The rods are straight but bought on AliExpress.
-
Here's my config.g
; Configuration file for Duet WiFi (firmware version 3) ; executed by the firmware on start-up ; ; generated by RepRapFirmware Configuration Tool v3.2.3 on Sun Feb 21 2021 14:42:48 GMT+0100 (Central European Standard Time) ; General preferences G90 ; send absolute coordinates... M83 ; ...but relative extruder moves M550 P"Gridbot v2" ; set printer name M669 K1 ; select CoreXY mode ; Network M552 S1 ; enable network M586 P0 S1 ; enable HTTP M586 P1 S0 ; disable FTP M586 P2 S0 ; disable Telnet ; Drives M569 P0 S1 ; x-axis motor (0) goes forwards M569 P1 S1 ; y-axis motor (1) goes forwards M569 P2 S0 ; Z-axis motor (2) goes backwards M569 P3 S0 ; Extruder motor(3) goes backwards M584 X0 Y1 Z2 E3 ; set drive mapping M350 X16 Y16 Z16 E16 I1 ; configure microstepping with interpolation M92 X80.00 Y80.00 Z400.00 E400.00 ; set steps per mm M566 X900.00 Y900.00 Z60.00 E600.00 ; set maximum instantaneous jerk speed changes (mm/min) M201 X2000.00 Y2000.00 Z60.00 E6000.00 ; set accelerations (mm/s^2) M203 X12000.00 Y12000.00 Z600.00 E8000.00 ; set maximum speeds (mm/min) ;M566 X900.00 Y900.00 Z12.00 E1200.00 ; 3DLabPrint ;M201 X9000.00 Y9000.00 Z150.00 E6000.00 ; 3DLabPrint ;M203 X12000.00 Y12000.00 Z375.00 E12000.00 ; 3DLabPrint M906 X950 Y950 Z950 E950 I30 ; set motor currents (mA) and motor idle factor in per cent M84 S30 ; Set idle timeout ; Axis Limits M208 X-5:300 Y-19:300 Z0:280 S0 ; set axis limits ; Endstops M574 X2 S1 P"xstop" ; configure active-high endstop for high end on X via pin xstop M574 Y2 S1 P"ystop" ; configure active-high endstop for high end on Y via pin ystop M574 Z1 S2 ; configure Z-probe endstop for low end on Z ; Z-Probe M950 S0 C"exp.heater3" ; create servo pin 0 for BLTouch M558 P9 C"^zprobe.in" H5 F600 T6000 ; set Z probe type to bltouch and the dive height + speeds G31 P25 X-33.5 Y-1 Z4.15 ; set Z probe trigger value, offset and trigger height M557 X10:300 Y0:290 S50 ; define mesh grid ; Heaters M308 S0 P"bedtemp" Y"thermistor" T100000 B3950 ; configure sensor 0 as thermistor on pin bedtemp M950 H0 C"bedheat" T0 ; create bed heater output on bedheat and map it to sensor 0 M307 H0 R1.005 C407.5 D8.55 S1.00 V24.1 B0 ; Computed PID parameters: setpoint change: P90.9, I4.149, D128.9, load change: P90.9, I11.968, D128.9 M140 H0 ; map heated bed to heater 0 M143 H0 S120 ; set temperature limit for heater 0 to 120C M308 S1 P"e0temp" Y"thermistor" T100000 B4725 ; configure sensor 1 as thermistor on pin e0temp M950 H1 C"e0heat" T1 ; create nozzle heater output on e0heat and map it to sensor 1 M307 H1 R2.496 C184.5 D6.39 S1.00 V24.0 B0 ; Heater 1 Nozzle model: gain 2.496, time constant 184.5, dead time 6.39 max PWM 1.00, calibration voltage 24.0, mode PID M143 H1 S285 ; set temperature limit for heater 1 to 255C ; Fans M950 F0 C"fan0" Q250 ; create fan 0 on pin fan0 and set its frequency M106 P0 S0 H-1 C"Part Cooling Fan" ; set fan 0 value. Thermostatic control is turned off M950 F1 C"fan1" Q75 ; create fan 1 on pin fan1 and set its frequency ;M106 P1 S1 H1 T45 ; set fan 1 value. Thermostatic control is turned on M106 P1 S190 H1 T50 C"Extruder Fan" ; set fan 1 value. Thermostatic control is turned on ; Tools M563 P0 D0 H1 F0 ; define tool 0 G10 P0 X0 Y0 Z0 ; set tool 0 axis offsets G10 P0 R0 S0 ; set initial tool 0 active and standby temperatures to 0C ; Custom settings M572 D0 S0.20 ; Pressure advance M207 S1.3 R0.0 F6000 T3000 Z0.0 ; S=Retraction 3mm, R=Un-retract 3.40mm. Speed 33.33 T=Un-retraction (prime) feedrate 37.50mm Z-lift 0.2mm ;M207 S4.5 R0.2 F2400 T2250 Z0.5 ;Seems to work with 3DPrintLab .stl ; Miscellaneous M575 P1 S1 B57600 ; enable support for PanelDue M501 ; load saved parameters from non-volatile memory -
@stout I wonder if the 4mm banding is a result of out of phase inaccuracies in the 8mm lead screws.
I bought four lead screws last year and found that two of them (A and B) meshed together well, but two others (C and D) did not mesh with A or B, but would mesh with each other, but only when I rotated one or the other until I found a particular meshing alignment. I decided that rods C and D had matching irregularities in pitch and have not used them.
If your lead screws have a similar irregularity then z movement might exhibit an error with a 4mm period.
-
Thanks for your comment. Have not thought of that and that can indeed be the issue. I have to check that.
-
@mjlew
I agree with that. Never trusted those ACME leadscrews and went for ballscrews instead.
@Stout there are a few antiwobble ACME nuts on thingiverse, you might want to add those, before you find out, that the Spitfire puzzle parts don't match each other.I found a windmill airfoil I made from transparent PETG. Although I'm using ballscrews, they show signs of banding.
You only get, what you pay for...
I wouldn't spent too much thinking on the banding, but find a slicer/extruder setting that works well with single wall (over the whole length of the part)
Will you hang the Spitty from the ceiling, or will it fly for real one day?