Mesh Issue
-
Im having a mesh issue with my Duet 2 (WiFi) on my Cartesian Printer.
When printing I can see that the print was squished more on one side than the other even though G32 & G29 S1 is in my slicer start g code
I temporarily changed M557 to just probe the four corners closest to the bed mounting points
The result of G29 (after G32) shows only one point with an actual height and seems to think the bed is flat/level. (see picture below)I manually drove the probe to the same four point and carried out a single dive probe of each point, it was out.
I have since mechanically re-set the bed to be level on the X/Y planes but that does not explain why mesh levelling is saying all is perfect when it’s not, anyone any idea ?
Spec is:
2 Z axis motors levelling the gantry.
Genuine BL Touch
Fixed bed (no springs, but the bed can move on the X/Y planes for heat expansion)Firmware Name: RepRapFirmware for Duet 2 WiFi/Ethernet
Firmware Electronics: Duet WiFi 1.02 or later
Firmware Version: 3.3beta2 (2021-03-10)
WiFi Server Version: 1.23
Web Interface Version: 1.22.6config.g ; Mega-3 Duet-2 RRF-3 config.g ; ; 1. General Preferences --------------------------------------------------------------------------------------------------------------------------------------------------------------- ; G90 ; Machine movement to use absolute coordinates M83 ; Extruder to use relative moves M550 P"Mega-3" ; Machine name ; ; 2. Network --------------------------------------------------------------------------------------------------------------------------------------------------------------------------- ; M552 S1 ; Network is enabled and acquires a dynamic address via DHCP M586 P0 S1 ; HTTP is enabled M586 P1 S0 ; FTP is disabled M586 P2 S0 ; Telnet is disabled ; ; 3. Drives ---------------------------------------------------------------------------------------------------------------------------------------------------------------------------- ; M669 K0 ; Kinematics type (Cartesian) M671 X-25:255 Y0:0 S10 ; The Z axis pivot point locations to allow levelling to be undertaken M569 P0 S1 ; Drive 0 (X Motor) goes forwards M569 P1 S1 ; Drive 1 (Y Motor) goes forwards M569 P2 S1 ; Drive 2 (Z1 Left Motor) goes forwards M569 P3 S1 ; Drive 3 (Extruder Motor) goes forwards M569 P4 S1 ; Drive 4 (Z2 Right Motor) goes forwards M584 X0 Y1 Z2:4 E0.3 ; Drive mapping M350 X16 Y16 Z16 E16 I1 ; Micro-stepping with interpolation M92 X80.00 Y100.00 Z400.00 E505 ; Steps per mm M566 X500.00 Y500.00 Z120.00 E120.00 ; Maximum instantaneous speed changes (mm/min) M203 X3000.00 Y3000.00 Z2000.00 E8000.00 ; Maximum speeds (mm/min) M201 X500.00 Y500.00 Z500.00 E600.00 ; Accelerations (mm/s^2) M906 X800 Y800 Z800 E800 I30 ; Motor currents (mA) & motor idle factor % M84 S30 ; Idle timeout ; ; 4. Axis Limits ------------------------------------------------------------------------------------------------------------------------------------------------------------------------ ; M208 X-25:355 Y-10:355 Z-1:355 S1 ; Axis min ; ; 5. Endstops --------------------------------------------------------------------------------------------------------------------------------------------------------------------------- ; M574 X1 S1 P"xstop" ; X Axis end-stop is at the low end and mapped to pin xstop M574 Y1 S1 P"ystop" ; Y Axis end-stop is at the low end and mapped to pin ystop M574 Z1 S2 ; The Z probe acts as a Z axis end-stop & is located at Z axis's minimum ; ; 6. Z-Probe (BL Touch Code) ------------------------------------------------------------------------------------------------------------------------------------------------------------ ; M950 S0 C"exp.heater3" ; Servo pin for the BL-Touch M558 P9 C"^zprobe.in" H12 F400 T6000 ; Probe type & Signal pin for the BL-Touch G31 P500 X47 Y-40 Z0.493 ; Probe's trigger value, offsets & trigger height M557 X40:330 Y15:295 P2 ; Mesh grid parameters ; ; 7. Heaters, Bed ------------------------------------------------------------------------------------------------------------------------------------------------------------------------ ; M308 S0 P"bedtemp" Y"thermistor" T100000 B4138 ; Sensor 0 is configured as a thermistor and is mapped to the "bedtemp" connector M950 H0 C"bedheat" T0 ; The "Bed heater" is configured to output on the "bedheat" connector and is mapped to use sensor 0 to report its temperature M307 H0 B0 S1.00 ; The "Bed heater" is set to PWM & limited M140 H0 ; The "Bed heater" is mapped to be "H0" M143 H0 S120 ; The temperature limit for "H0" is set to 120C ; ; 7.A Heaters, Hot End ------------------------------------------------------------------------------------------------------------------------------------------------------------------- ; M308 S1 P"e0temp" Y"thermistor" T100000 B4725 C7.06e-8 ; Sensor 1 is configured as a thermistor and is mapped to the "e0temp" connector M950 H1 C"e0heat" T1 ; The "Hot-End" is configured to output on the "e0heat" connector and is mapped to use sensor 1 to report its temperature M307 H2 R2.726 C0.0069:0.0069 D5.67 S1.00 V24.0 ; The "Hot-End" is set to PWM & limited M143 H1 S310 ; The temperature limit for "H1" is set to 310C ; ; 8. Fans -------------------------------------------------------------------------------------------------------------------------------------------------------------------------------- ; M950 F0 C"fan0" Q500 ; The "Hot-End" fan is mapped to the "fan0" connector and its frequency is set to 500 M106 P0 S0 H-1 ; The value of fan0 is set to zero and thermostatic control is set to OFF M950 F1 C"fan1" Q500 ; The "Part-Cooling" fan is mapped to the "fan1" connector and its frequency is set to 500 M106 P1 S1 H1 T45 ; The value of fan1 is set to one and thermostatic control is set to ON ; ; 9. Tools ------------------------------------------------------------------------------------------------------------------------------------------------------------------------------- ; M563 P0 S"Hot-End" D0 H1 F0 ; Define tool 0 G10 P0 X0 Y0 Z0 ; Set tool 0 axis offsets G10 P0 R0 S0 ; Set initial tool 0 active and standby temperatures to 0C ; ; 10. Miscellaneous ---------------------------------------------------------------------------------------------------------------------------------------------------------------------- ; ;T0 ; Select first tool ; ; 11. Custom Settings -------------------------------------------------------------------------------------------------------------------------------------------------------------------- ; M501 ; Read the stored values from the config-override.g file M207 S2.0 F2400 ; Retract before printing ;homeall.g ; homeall.g ; ; Called to home ALL axes ; M280 P0 S160 I1 ; Re-Set the probe G91 ; Switch to relative positioning moves G1 H2 Z10 F3000 ; Lift the head on its Z axis relative to current its position to prevent the head/nozzle hitting the bed G1 H1 X-375 F9000 ; Rapid move the head to the X axis to the end-stop (first pass) G1 X10 F1000 ; Back the head away from the X axis end-stop G1 H1 X-375 F500 ; Slow move the head to the X axis end-stop (second pass) G1 H2 X164 F9000 ; Rapid move the head on the X axis to place the head at the centre of the bed G1 H1 Y-375 F9000 ; Rapid move the head on the Y axis to the end-stop (first pass) G1 Y10 F1000 ; Back the head away from the Y axis end-stop G1 H1 Y-375 F500 ; Slow move the head to the Y axis end-stop (second pass) G1 H2 Y197 F9000 ; Rapid move the head on the Y axis to place the head at the centre of the bed G90 ; Switch back to absolute positioning moves M558 A1 F500 ; Set the speed of as single probe move to a rapid feed rate to get the nozzle close to carry out a rapid probe G30 ; Probe to find the Z axis 0 M558 A1 F100 ; Re-set the probing speed to a slower feed rate to allow for a more accurate second probe result G30 ; Probe a second time to get a more accurate Z 0 position G1 H2 Z35 F1500 ; Raise the head for cleaningbed.g bed.g ; called to perform automatic bed compensation via G32 G28 ; Home all axes G30 P0 X32 Y170 Z-99999 ; Probe near the left lead-screw G30 P1 X340 Y170 Z-99999 S2 ; Probe near the right lead screw G30 P0 X32 Y170 Z-99999 ; Probe near the left lead-screw G30 P1 X340 Y170 Z-99999 S2 ; Probe near the rear lead screw ;G30 P0 X32 Y170 Z-99999 ; Probe near the left lead-screw ;G30 P1 X340 Y170 Z-99999 S2 ; Probe near the right lead screw G1 X140 Y195 F8000 ; Position the probe to the centre of the bed G30 ; Probe and set the height as probed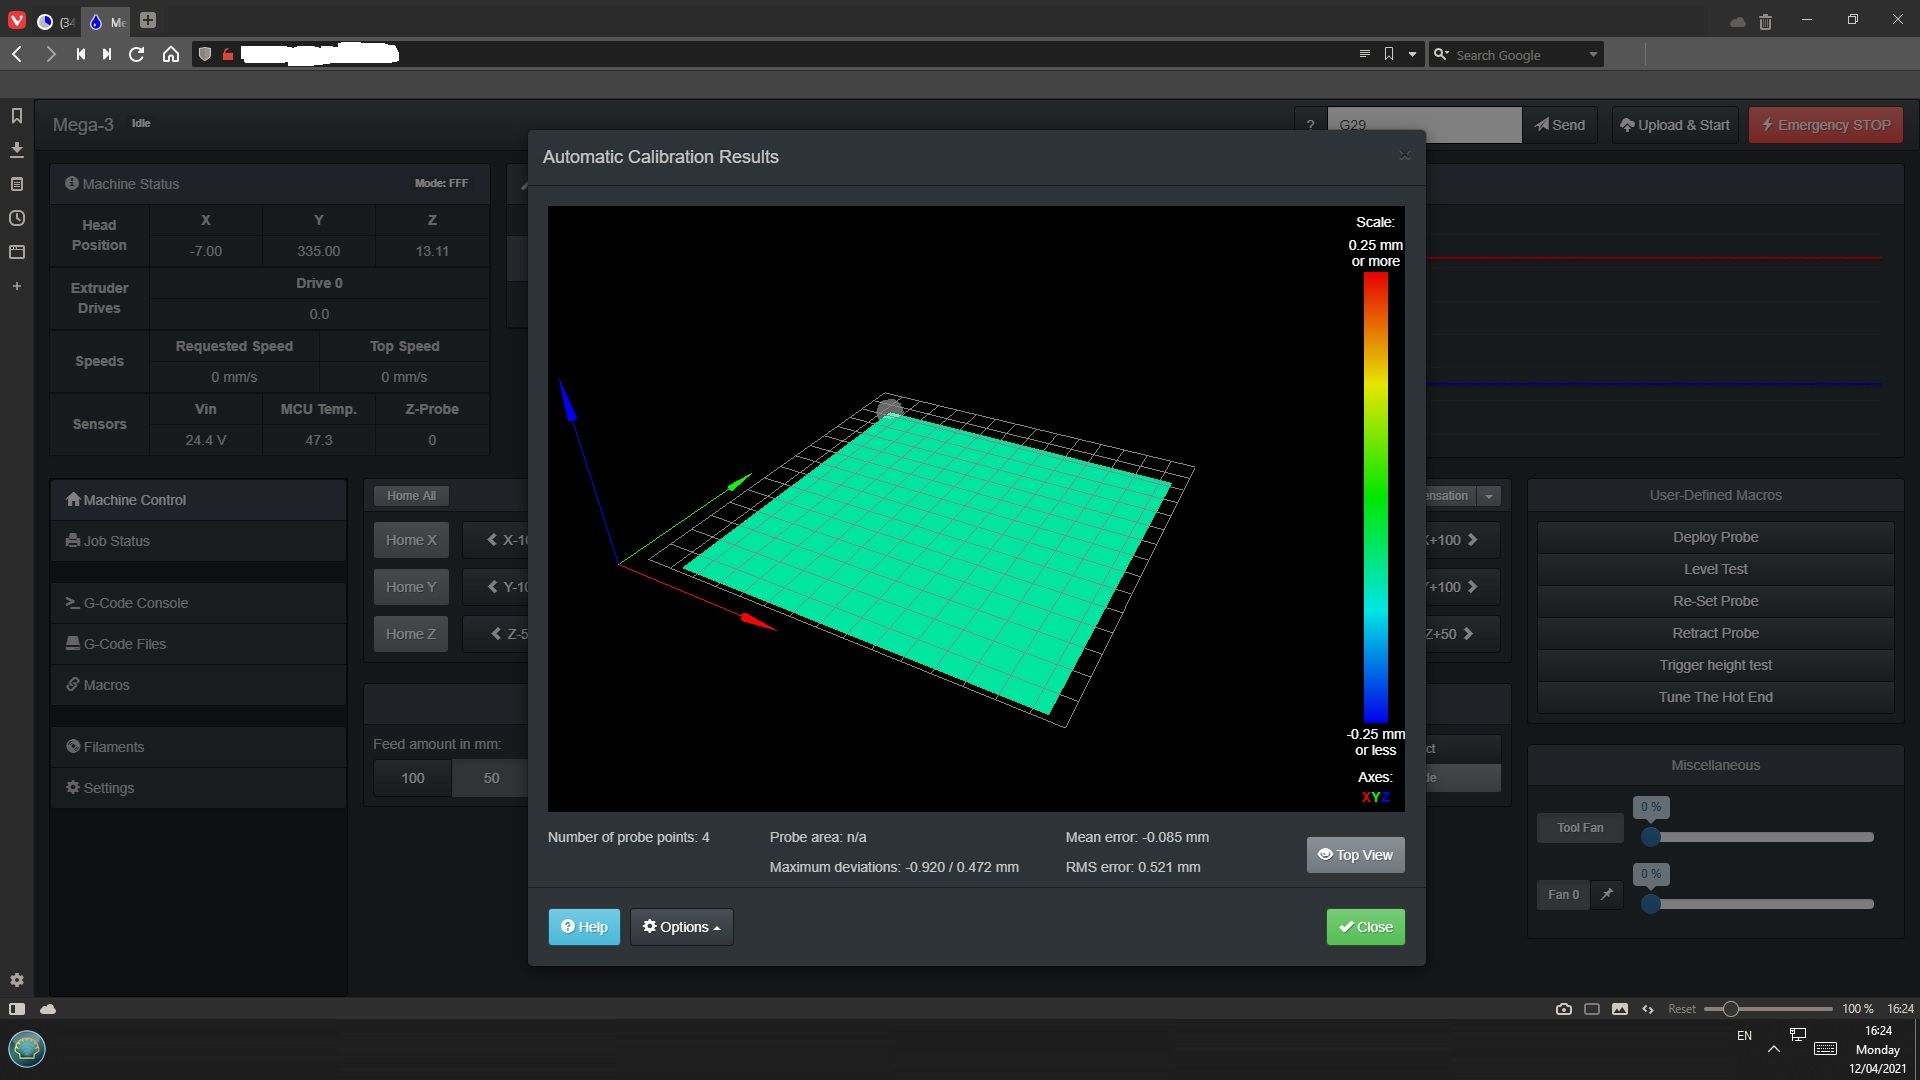
-
@jayjay said in Mesh Issue:
Web Interface Version: 1.22.6
Are you really using DWC 1.22.6? Not sure how compatible it would be with RRF3.3beta2 and it may be a display bug with it showing only a single point. The text on the image still says 4 points and the plane seems fitted to 4.
M671 X-25:255 Y0:0 S10 ; The Z axis pivot point locations to allow levelling to be undertakenIs Y0 actually correct here? -
@phaedrux said in Mesh Issue:
@jayjay said in Mesh Issue:
Web Interface Version: 1.22.6
Are you really using DWC 1.22.6? Not sure how compatible it would be with RRF3.3beta2 and it may be a display bug with it showing only a single point. The text on the image still says 4 points and the plane seems fitted to 4.
M671 X-25:255 Y0:0 S10 ; The Z axis pivot point locations to allow levelling to be undertakenIs Y0 actually correct here?-
Yes I'm using DWC version 1, it looks much more professional, the fonts/skin style & colours for DWC 2 look like they were done by a colour blind 5 year old.
-
Y0 is correct I followed the dozuki
Levelling using multiple Z axis motors
The Dozuki states the following
If you have just 2 Z motors, one at each end of the X axis, then set the Y coordinates of the leadscrews in the M671 command to be equal (the value doesn't matter, So you can use ZERO. Use at least two probe points, one at each end of the X axis. All your probe points should have the same Y coordinate, which should be at or near the middle of the printable range.
with an example of the following code :
M671 X-20:220 Y0:0 S0.5 ; leadscrews at left (connected to Z) and right (connected to E1) of X axisSo if this is wrong it means the dozuki requires to be changed.
I artificially induced a bed tilt, then probed the bed and started a print, it would appear that no compensation is being undertaken as a wider level of squish on the first layer is evident at the high side, and the Z motors are not moving to compensate for the tilt.
-
-
This post is deleted! -
For the sake of due diligence I Installed the latest version of DWC and while I can now see all 4 points on my probed bed, compensation is still not being undertaken.
So still unsolved.
-
So you run G32 and no tilt correction occurs? Is it probing the points 3 times in a row?
-
G32 visually completes with no problem and reports it has applied the compensation.
After carrying out a G29 and saving the height map it does not appear to being run even though i have the following in my slicer start g-code.
G32 ; home & level the gantry M290 R0 S0 ; clear any baby stepping G29 S1 P"heightmap.csv" ; load the height map G1 X30 Y10 ; move nozzle to the start point G92 E0 ; zero the extruder -
It may be a good idea to delete your heightmap.csv and create a new one after running G32.
Next, can you try using just G29 S1 in your start code, removing the P"heightmap.csv" part?
And then during the print can you send M122 and check for the line that indicates what type of compensation is currently in use. If the heightmap is loaded it should say
compensation: mesh.What does your heightmap look like in the display using DWC 3.2? In the image posted above the bed looks basically perfectly flat. If that was the case it wouldn't be doing any compensation because it thinks its flat. You may need to increase the number of points being used. Try a 3x3 grid at minimum.
-
- It may be a good idea to delete your heightmap.csv and create a new one after running G32.
I do that as a matter of course when i run a G29
- Try using just G29 S1 in your start code, removing the P"heightmap.csv" part
Done i will test and report.
-
M122 reports "bed compensation in use: mesh"
-
On a 4 point height map ( with the latest DWC) it showed both front points a dead nuts, both rear points to be Z (Left) -0.025 and Z (Right) -0.033 which is about right, a 6x6 height map look correct, even though it says mesh in use i can see no compensation occurring.
-
Not sure if it was discussed or pertinent, but could this be warping? I have found it best to heat the bed to the operating temp and let it solidify for ~5 minutes before any critical probing.
-
@kolbi said in Mesh Issue:
Not sure if it was discussed or pertinent, but could this be warping? I have found it best to heat the bed to the operating temp and let it solidify for ~5 minutes before any critical probing.
The issue Is that during tests you can physically see the first layer is "squished" more on one side (right) of the test print than the left and that although the system lists mesh as occurring the motors do not appear to be following a height map.
Mechanical issues with lead screws/couplers were the first thing ruled out.
I allow my three printers to sit and heatsoak in my man cave, in fact they are hardly turned off.
Its not warping, I thought about the possibility and started testing with Form Futura CF-PETG which doesn't actually need a heated bed because warp is not a thing it does.
Im also going to test klipper on the board to see if that makes any difference.
-
You must use the M671 command to define the X and Y coordinates of the leadscrews. The M671 command must come after the M584 command and must specify the same number of X and Y coordinates as the number of motors assigned to the Z axis in the M584 command; and these coordinates must be in the same order as the driver numbers of the associated motors in the M584 command. The M671 command must also come after any M667 or M669 command.
https://duet3d.dozuki.com/Wiki/Bed_levelling_using_multiple_independent_Z_motors
Check your config. I think you need to move your M671 below your M584 command.
M671 X-25:255 Y0:0 S10 ; The Z axis pivot point locations to allow levelling to be undertaken M569 P0 S1 ; Drive 0 (X Motor) goes forwards M569 P1 S1 ; Drive 1 (Y Motor) goes forwards M569 P2 S1 ; Drive 2 (Z1 Left Motor) goes forwards M569 P3 S1 ; Drive 3 (Extruder Motor) goes forwards M569 P4 S1 ; Drive 4 (Z2 Right Motor) goes forwards M584 X0 Y1 Z2:4 E0.3 ; Drive mapping -
@jayjay Ok, I do think that klipper is interesting and could make a difference if the configuration is spot on, but the same could be said for RRF.
FWIW I use 3.11 and independent Z motors in my setup and have had zero issues for the longest time, you can browse my files here if it helps: https://github.com/rkolbi/RRF-machine-config-files/tree/master/Prusa MK3s/ -
@kolbi said in Mesh Issue:
@jayjay Ok, I do think that klipper is interesting and could make a difference if the configuration is spot on, but the same could be said for RRF.
FWIW I use 3.11 and independent Z motors in my setup and have had zero issues for the longest time, you can browse my files here if it helps: https://github.com/rkolbi/RRF-machine-config-files/tree/master/Prusa MK3s/This machine just recently started to exhibit this behavior, or at least i just noticed it after i couldn't get a decent first layer on a new material i was testing. before that it has been running perfectly fine in this configuration for years.
One of my other machines is exactly the same as this one and isn't presenting these symptoms
This machine (and the other one) has ran fine with that configuration for years, the only changes being firmware updates, but I did move the M671 command to be the final entry in the drives section.
That along with removing the "heightmap.csv" part from my G29 S1 in the start g code of my slicer(s) has made no difference, I tried it with ideamaker, prusa slicer and simplify3d.
-
@jayjay Ok, that adds a bit of a milestone to the troubleshooting process. Since you have another machine that is exactly the same, have you swapped sd cards between them to see if the problem shifts?
-
At this point could you try switching to fw 3.2 then to see if the problem is related to 3.3 beta2?
https://github.com/Duet3D/RepRapFirmware/releases/download/3.2.2/Duet2and3Firmware-3.2.2.zip
Upload this zip file to the system tab.
-
I have tried multiple new Scandisk industrial i procured through work. formatted in slow mode with the SD association SD card formatting tool.
posting on the forum is a last resort.
I was on 3.2.2 when i noticed the issue , i updated to the beta to see if that would cure it, sadly it didn't, and i just never rolled back
-
@jayjay I was suggesting that since both printers are exactly the same, to power them both off and swap the cards between the two of them. Taking the card from a known-good and putting it in a deranged unit would half-step the issue, or at least prove if it is software/configuration or something else.
-
Can you show what the mesh display looks like now in dwc 3.3?
Can you also share heightmap.csv?
-
I cured the issue, I went back to RRF 2.0.5.1 all my problems went away, so I'm spending time printing instead of diagnosing issues.
And its happy to use DWC 1 again.
So although unorthodox the problem has been "solved"