CoreXY: X is now Y, Y is now X
-
Part of the confusion may also be resulting from the 180 degree rotation with the motors in the rear. That would mean the expected movement from the tests would be inverted as well. Do you get what I mean?
The motors here are in the rear, as they are in your machine. This would be 180 degree rotation from the "normal" corexy where the motors are in the front side. This just means that the direction of X and Y are inverted from the expectation, placing 0,0 in the back right corner. The back right is the same as the front left, just rotated half way round. Does that make sense?
-
@phaedrux Since I built it with the original Duet Wifi and changed to a Duet 3 6HC, X0 Y0 was in the front left corner. X move left/right, Y moved front/back.
Now it doesn't, it swapped X and Y.
-
Yes, I understand.
Where are you endstops located now?
-
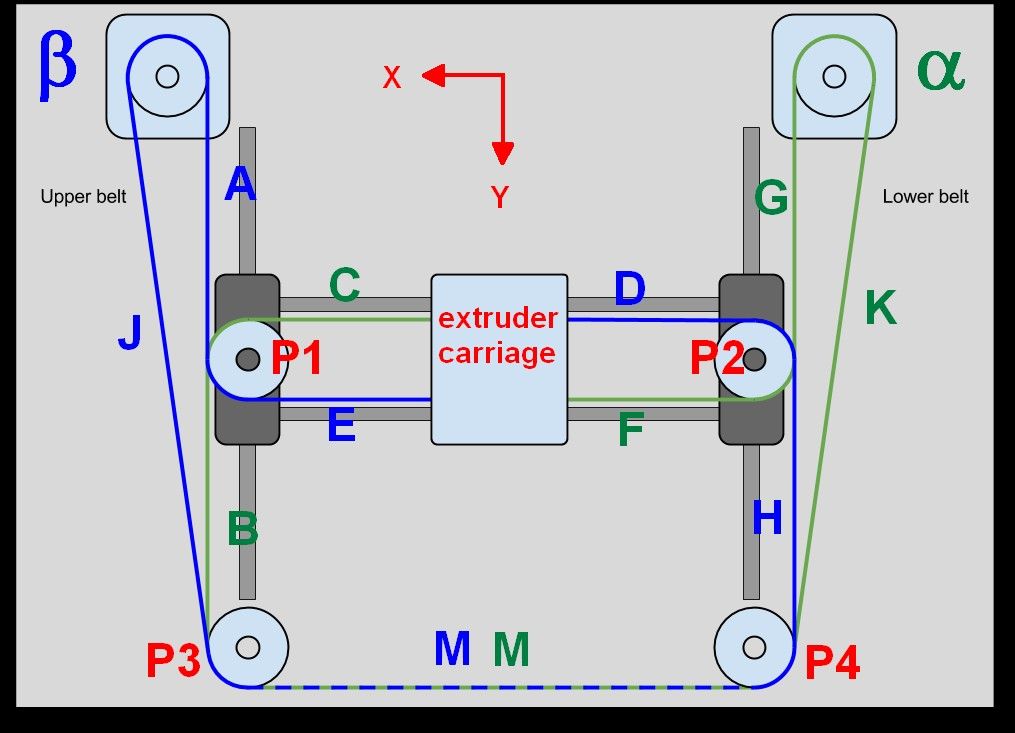
@phaedrux The tests are viewed from the front, where the M M is on your graphic and where the PanelDue is mounted.
One endstop is on the left of the extruder carraige, was the X. It's mount on purple petg to the left of the wirechain bracket in the photo. The other one the front of the right carriage wheel plate of the extruder axis, was the Y. It's mounted on red pla in the photo.
-
@phaedrux Just ran a test print with lettering. I was only expect one reverse axis, but both are reversed. Looks like X0 Y0 needs to change.
-
Ok, so if the X endstop is on the left it's at the low end. So M574 X1 and the homing moves should move in the negative direction.
If Y is triggering when the print head is towards the front, then it's at the low end. M574 Y1 and the homing moves should be negative direction.
Now based on the tests here: https://duet3d.dozuki.com/Wiki/ConfiguringRepRapFirmwareCoreXYPrinter#Section_Testing_motor_movement
Start with
M569 P0 S0 ; X motor runs forwards
M569 P1 S0 ; Y motor runs forwardsThen send
G91
G1 H2 X10 F3000And
G91
G1 H2 Y10 F3000What do you get?
-
@phaedrux said in CoreXY: X is now Y, Y is now X:
M569 P0 S0 ; X motor runs forwards
M569 P1 S0 ; Y motor runs forwards
G91G1 H2 X10 F3000
Move diagonally towards left front corner
G1 H2 Y10 F3000
Move diagonally toward front right coner.
-
@stephen6309 said in CoreXY: X is now Y, Y is now X:
G1 H2 X10 F3000
Move diagonally towards left front corner
Ok so..
If it moves in the -X and -Y directions, change the S parameter to S1 in the M569 P0 command.
@stephen6309 said in CoreXY: X is now Y, Y is now X:
G1 H2 Y10 F3000
Move diagonally toward front right coner.
Ok so...
If the head moves diagonally in the +X and -Y directions, all is well.
Ok, so change to M569 P0 S1 and retest.
-
@phaedrux said in CoreXY: X is now Y, Y is now X:
@stephen6309 said in CoreXY: X is now Y, Y is now X:
Already configured for S1 for 0 and 1.G1 H2 X10 F3000
Moves diagonally to right and rear.
G1 H2 Y10 F3000
Moves diagonally to left and rear.
-
@stephen6309 said in CoreXY: X is now Y, Y is now X:
G1 H2 X10 F3000
Moves diagonally to right and rear.
If the head moves diagonally in the +X and +Y directions, all is well.
@stephen6309 said in CoreXY: X is now Y, Y is now X:
G1 H2 Y10 F3000
Moves diagonally to left and rear.
If it moves in the -X and +Y directions, change the S parameter in the M569 P1 command to S1.
-
@phaedrux
M569 P0.0 S1 ; physical drive 0.0
M569 P0.1 S0 ; physical drive 0.1Fixed it. Set the enstops back to normal. As I recall, my first setup on Duet Wifi took a several days.
One of these days, I'll understand this thing better.
Current config, and fixed a few other things:
; Configuration file for Duet 3 (firmware version 3) ; executed by the firmware on start-up ; ; generated by RepRapFirmware Configuration Tool v3.2.3 on Tue May 04 2021 13:19:51 GMT-0400 (Eastern Daylight Time) ; General preferences G90 ; send absolute coordinates... M83 ; ...but relative extruder moves M550 P"CXY-MSv1" ; set printer name M669 K1 ; select CoreXY mode ; Network M552 P0.0.0.0 S1 ; enable network and acquire dynamic address via DHCP M586 P0 S1 ; enable HTTP M586 P1 S0 ; disable FTP M586 P2 S0 ; disable Telnet ; Drives M569 P0.0 S1 ; physical drive 0.0 M569 P0.1 S0 ; physical drive 0.1 M569 P0.2 S1 ; physical drive 0.2 goes forwards M569 P121.0 S1 ; physical drive 121.0 goes forwards M584 X0.0 Y0.1 Z0.2 E121.0 ; set drive mapping M350 X16 Y16 Z16 E16 I1 ; configure microstepping with interpolation M92 X80.00 Y80.00 Z800.00 E420.00 ; set steps per mm M566 X600.00 Y600.00 Z30.00 E600.00 ; set maximum instantaneous speed changes (mm/min) M203 X15000.00 Y15000.00 Z180.00 E1200.00 ; set maximum speeds (mm/min) M201 X4000.00 Y4000.00 Z50.00 E250.00 ; set accelerations (mm/s^2) M906 X800 Y800 Z800 E800 I30 ; set motor currents (mA) and motor idle factor in per cent M84 S30 ; Set idle timeout ; Axis Limits M208 X0 Y0 Z0 S1 ; set axis minima M208 X300 Y400 Z200 S0 ; set axis maxima ; Endstops M574 X1 S1 P"121.io1.in" ; configure active-high endstop for low end on X via pin io2.in M574 Y1 S1 P"io2.in" ; configure active-high endstop for low end on Y via pin 121.io1.in M574 Z1 S2 ; configure Z-probe endstop for low end on Z ; Z-Probe M950 S0 C"121.io0.out" ; create servo pin 0 for BLTouch M558 P9 C"^121.io0.in" H5 F120 T6000 ; set Z probe type to bltouch and the dive height + speeds G31 P500 X0 Y-60 Z0 ; set Z probe trigger value, offset and trigger height M557 X5:300 Y5:400 S40 ; define mesh grid ; Heaters M308 S0 P"temp0" Y"thermistor" T100000 B4092 ; configure sensor 0 as thermistor on pin temp0 M950 H0 C"out0" T0 ; create bed heater output on out0 and map it to sensor 0 M307 H0 B0 S1.00 ; disable bang-bang mode for the bed heater and set PWM limit M140 H0 ; map heated bed to heater 0 M143 H0 S120 ; set temperature limit for heater 0 to 120C M308 S1 P"121.temp0" Y"thermistor" T100000 B4725 C7.06e-8 ; configure sensor 1 as thermistor on pin 121.temp0 M950 H1 C"121.out0" T1 ; create nozzle heater output on 121.out0 and map it to sensor 1 M307 H1 B0 S1.00 ; disable bang-bang mode for heater and set PWM limit M143 H1 S300 ; set temperature limit for heater 1 to 300C ; Fans M950 F0 C"out4" Q500 ; create fan 0 on pin out4 and set its frequency M106 P0 S0 H-1 ; set fan 0 value. Thermostatic control is turned off M950 F1 C"121.out1" Q500 ; create fan 1 on pin 121.out1 and set its frequency M106 P1 S1 H1 T45 ; set fan 1 value. Thermostatic control is turned on ; Tools M563 P0 D0 H1 F0 ; define tool 0 G10 P0 X0 Y0 Z0 ; set tool 0 axis offsets G10 P0 R0 S0 ; set initial tool 0 active and standby temperatures to 0C ; Custom settings M376 H5 ; taper bed compensation M572 D0 S0.05 ; pressure advance M207 S1.5 F6000 R0 Z0.03 ; firmware retraction M143 H1 S300 ; set temperature limit for heater 1 to 300C ;M566 P1 ; Jerk policy, 1 allows jerk to be applied between any pair of moves. M912 P0 S-9 ; set mcu temp offset G10 P0 S0 R0 ; set T0 heater off M150 B0 U0 R0 P128 S10 F0 ; all neopixels off M912 P0 S4 ; calibrate MPU temp ; Miscellaneous M575 P1 S1 B57600 ; enable support for PanelDue M501 ; load saved parameters from non-volatile memory M911 S23 R24 P"M913 X0 Y0 G91 M83 G1 Z3 E-5 F1000" ; set voltage thresholds and actions to run on power loss T0 ; select first tool -
So everything is back to normal now?
-
@phaedrux Yes, it working normally. X is X and Y is Y.