Upgrading to 3.2, need a once over on code.
-
Here is my new config;
; Configuration file for Duet WiFi (firmware version 3)
; executed by the firmware on start-up
;
; generated by RepRapFirmware Configuration Tool v3.2.3 on Sun May 16 2021 20:01:34 GMT-0500 (Central Daylight Time); General preferences
G90 ; send absolute coordinates...
M83 ; ...but relative extruder moves
M550 P"3DPrinter" ; set printer name; Network
M552 S1 ; enable network
M586 P0 S1 ; enable HTTP
M586 P1 S0 ; disable FTP
M586 P2 S0 ; disable Telnet; Drives
M569 P0 S1 ; physical drive 0 goes forwards
M569 P1 S0 ; physical drive 1 goes backwards
M569 P2 S1 ; physical drive 2 goes forwards
M569 P3 S0 ; physical drive 3 goes backwards
M584 X0 Y1 Z2 E3 ; set drive mapping
M350 X16 Y16 Z16 E16 I1 ; configure microstepping with interpolation
M92 X99.9 Y100.25 Z400.207 E412.70 ; set steps per mm
M566 X900.00 Y900.00 Z12.00 E110.00 ; set maximum instantaneous speed changes (mm/min)
M203 X6000.00 Y6000.00 Z4000.00 E1200.00 ; set maximum speeds (mm/min)
M201 X500.00 Y500.00 Z20.00 E250.00 ; set accelerations (mm/s^2)
M906 X1100 Y1100 Z1100 E850 I30 ; set motor currents (mA) and motor idle factor in per cent
M84 S30 ; Set idle timeout; Axis Limits
M208 X0 Y0 Z0 S1 ; set axis minima
M208 X0:220 Y-15:210 Z200 S0 ; set axis maxima; Endstops
M574 X1 S1 P"xstop" ; configure active-high endstop for low end on X via pin xstop
M574 Y1 S1 P"ystop" ; configure active-high endstop for low end on Y via pin ystop
M574 Z1 S2 ; configure Z-probe endstop for low end on Z; Z-Probe
M950 S0 C"exp.heater3" ; create servo pin 0 for BLTouch
M558 P9 C"^zprobe.in" H5 F120 T6000 ; set Z probe type to bltouch and the dive height + speeds
G31 P25 X29 Y-6.5 Z1.2 ; set Z probe trigger value, offset and trigger height
M557 X20:180 Y20:180 S80 ; define mesh grid; Heaters
M308 S0 P"bedtemp" Y"thermistor" T100000 B4138 ; configure sensor 0 as thermistor on pin bedtemp
M950 H0 C"bedheat" T0 ; create bed heater output on bedheat and map it to sensor 0
M307 H0 B0 S1.00 ; disable bang-bang mode for the bed heater and set PWM limit
M140 H0 ; map heated bed to heater 0
M143 H0 S120 ; set temperature limit for heater 0 to 120C
M308 S1 P"e0temp" Y"thermistor" T100000 B4725 C7.06e-8 ; configure sensor 1 as thermistor on pin e0temp
M950 H1 C"e0heat" T1 ; create nozzle heater output on e0heat and map it to sensor 1
M307 H1 B0 S1.00 ; disable bang-bang mode for heater and set PWM limit
M143 H1 S280 ; set temperature limit for heater 1 to 280C; Fans
M950 F0 C"fan0" Q500 ; create fan 0 on pin fan0 and set its frequency
M106 P0 S0 H T45 ; set fan 0 value. Thermostatic control is turned on
M950 F1 C"fan1" Q500 ; create fan 1 on pin fan1 and set its frequency
M106 P1 S1 H1 T45 ; set fan 1 value. Thermostatic control is turned on; Tools
M563 P0 D0 H1 F0 ; define tool 0
G10 P0 X0 Y0 Z0 ; set tool 0 axis offsets
G10 P0 R0 S0 ; set initial tool 0 active and standby temperatures to 0C; Custom settings are not defined
; Miscellaneous
M501 ; load saved parameters from non-volatile memoryOld Config;
; Configuration file for Duet WiFi (firmware version 1.21)
; executed by the firmware on start-up
;
; generated by RepRapFirmware Configuration Tool v2 on Fri May 24 2019 20:44:40 GMT-0500 (Central Daylight Time); General preferences
G90 ; Send absolute coordinates...
M83 ; ...but relative extruder moves; Network
M550 P"3DPrinter" ; Set machine name
M552 S1 ; Enable network
M586 P0 S1 ; Enable HTTP
M586 P1 S0 ; Disable FTP
M586 P2 S0 ; Disable Telnet; Drives
M569 P0 S1 ; Physical drive 0 goes forward X Drive
M569 P1 S0 ; Physical drive 1 goes Backwards
M569 P2 S1 ; Physical drive 2 goes forwards
M569 P3 S0 ; Physical drive 3 goes forwards;current settings
M584 X0 Y1 Z2:4 E3; two Z motors connected to driver outputs Z and E1
M671 X-81.5:291.5 Y110:110 S2 ; leadscrews at left (connected to Z) and right (connected to E1) of X axisM350 X16 Y16 Z16 E16 I1 ; Configure microstepping with interpolation
M92 X99.9 Y100.25 Z400.207 E412.70 ; Set steps per mm (E100.7-bowden)
M566 X900.00 Y900.00 Z12.00 E110.00 ; Set maximum instantaneous speed changes (mm/min)
M203 X6000.00 Y6000.00 Z4000.00 E1200.00 ; Set maximum speeds (mm/min)
M201 X500.00 Y500.00 Z20.00 E250.00 ; Set accelerations (mm/s^2)
M906 X1100.00 Y1100.00 Z1100.00 E850.00 I30 ; Set motor currents (mA) and motor idle factor in per cent
M84 S30 ; Set idle timeout; Axis Limits old
;M208 X20 Y0 Z0 S1 ; Set axis minima
;M208 X230 Y210 Z200 S0 ; Set axis maxima;New Settings
M208 X0:220 Y-15:205 ; X carriage moves from 0 to 220, Y bed goes from 0 to 220; Endstops
M574 X1 Y1 S1 ; Set active high endstops; Z-Probe
M574 Z1 S2 ; Set endstops controlled by probe
M307 H3 A-1 C-1 D-1 ; Disable heater on PWM channel for BLTouch
M307 H1 A309.8 C176.8 D3.7 S1.00 V12.0 B0 ; New PID Settings 08/25/2020; new suggested settings
M558 P9 H5 F120 T6000 A5 T0.0 ; Set Z probe type to bltouch and the dive height + speeds (F100 T2000 original settings)
;M558 P9 H10 F500 T4000 X0 Y0 Z1 ; Set Z probe type to bltouch and the dive height + speeds (F100 T2000 original settings)
G31 P25 X29 Y-6.5 Z1.2 ; Set Z probe trigger value, offset and trigger height (+=down -=Up) (.75 bowden)(x34.82)(y=-8)---------------------------
M557 X0:200 Y20:200 S50 ; Define mesh grid
M564 H0; Heaters
M305 P0 T100000 B4138 R4700 ; Set thermistor + ADC parameters for heater 0
M143 H0 S120 ; Set temperature limit for heater 0 to 120C
M305 P1 T100000 B4725 C7.060000e-8 R4700 ; Set thermistor + ADC parameters for heater 1
M143 H1 S280 ; Set temperature limit for heater 1 to 280C; Fans
M106 P0 S0 I0 F500 H T45 ; Set fan 0 value, PWM signal inversion and frequency. Thermostatic control is turned on
M106 P1 S1 I0 F500 H1 T45 ; Set fan 1 value, PWM signal inversion and frequency. Thermostatic control is turned on; Tools
M563 P0 D0 H1 ; Define tool 0
G10 P0 X0 Y0 Z0 ; Set tool 0 axis offsets
G10 P0 R0 S0 ; Set initial tool 0 active and standby temperatures to 0C; Automatic saving after power loss is not enabled
; Custom settings are not configured
; Miscellaneous
M501 ; Load saved parameters from non-volatile memoryNew Bed.g
; bed.g
; called to perform automatic bed compensation via G32
;
; generated by RepRapFirmware Configuration Tool v3.2.3 on Sun May 16 2021 20:01:34 GMT-0500 (Central Daylight Time)
;M561 ; clear any bed transform
;G29 ; probe the bed and enable compensation
;Dual Z bed.g
G28 ; home
;M401 ; deploy Z probe (omit if using bltouch)
G30 P0 35Y105 Z-99999 ; probe near a leadscrew, half way along Y axis
G30 P1 X205 Y105 Z-99999 S2 ; probe near a leadscrew and calibrate 2 motors
;M402 ; retract probe (omit if using bltouch)Old bed.g
;Suggested settings from the Duete3D Dozuki.com
G28 ; home
;M401 ; deploy Z probe (omit if using bltouch)
G30 P0 X35 Y105 Z-99999 ; probe near a leadscrew, half way along Y axis
G30 P1 X205 Y105 Z-99999 S2 ; probe near a leadscrew and calibrate 2 motors
;M402 ; retract probe (omit if using bltouch) -
@hbrownell
I set my PWM to heater 3 and here's where the pin is so I'm hoping I'm right.
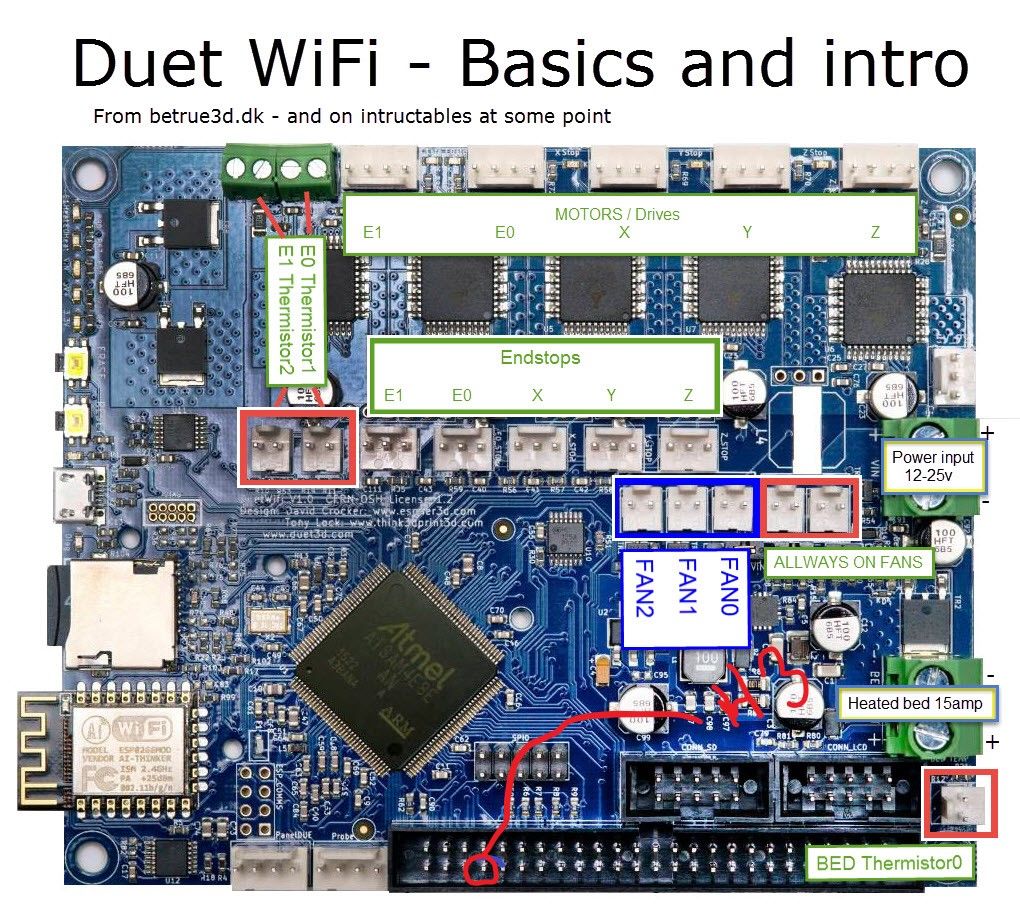 image url)
 -
I don't see anything off in the config, but you can check it for syntax errors by booting up and then sending
M98 P"config.g"in the gcode console. See if you get any errors or warnings.The pin you've highlighted is not heater3. I think you may be looking at it the wrong way round.

-
@hbrownell I can see a few syntax errors in your new config. I guess these would pop up if you ran
M98 P"config.g"as Phaedrux suggests.; Axis Limits
M208 X0 Y0 Z0 S1 ; set axis minima
M208 X0:220 Y-15:210 Z200 S0 ; set axis maximaSecond M208 is wrong - you should only have the maxima values for X & Y
M557 X20:180 Y20:180 S80 ; define mesh grid
it's not wrong, but is there any reason you're only doing a 9-point grid? You might get better results if you do more points (max is 441-points)
; Fans
M950 F0 C"fan0" Q500 ; create fan 0 on pin fan0 and set its frequency
M106 P0 S0 H T45 ; set fan 0 value. Thermostatic control is turned on
M950 F1 C"fan1" Q500 ; create fan 1 on pin fan1 and set its frequency
M106 P1 S1 H1 T45 ; set fan 1 value. Thermostatic control is turned onIs there any reason you want Fan0 (I presume your part cooling fan) to be thermostatically controlled (but not mapped to a heater...)? This seems to be how you had your old config but seems weird to me.
I'd have thought you want this to just be controlled by the cooling fan commands from your slicer. In which case, just remove the first M106 command.In your bed.g:
G30 P0 35Y105 Z-99999 ; probe near a leadscrew, half way along Y axis
G30 P1 X205 Y105 Z-99999 S2 ; probe near a leadscrew and calibrate 2 motorsThe first G30 is missing an X for the x-coordinate.
I would recommend adding a command right at the end of bed.g to rehome Z (e.g. G28 Z) as auto-bed-leveling can alter the bed height. Make sure that your homez.g and homeall.g are probing in the same place (or simply calling homez from within homeall works!)
I would also uncomment out the M561 at the start of bed.g (and add it in to your homing files too). That way you know for sure that mesh compensation is deactivated whilst homing and running bed leveling. You definitely don't want to call G29 before running the bed leveling in youe bed.g file! If mesh compensation was to be active, you'd find the two would fight/counteract each other and you get some odd results (spoken as someone who lost quite a few hairs before I realised that...
 )
) -
" I would also uncomment out the M561 at the start of bed.g (and add it in to your homing files too). That way you know for sure that mesh compensation is deactivated whilst homing and running bed leveling. "
So, to be clear add this to homeall, homex, homey, homez files?
M561 ; clear any bed transform -
@hbrownell said in Upgrading to 3.2, need a once over on code.:
So, to be clear add this to homeall, homex, homey, homez files?
M561 ; clear any bed transformYes.
-
@phaedrux Awesome! I'll plug this in right away! Out of curiosity, what command SHOULD I run to do the dual z leveling? I've just been using G29 and leveling the bed from the data. I also have to manually level the x gantry which is a headache and I'd like to be done doing that.
-
@hbrownell See here for automatic leveling options.
https://duet3d.dozuki.com/Wiki/Bed_levelling_using_multiple_independent_Z_motors
-
@phaedrux Got it, but I think I caught another error. I'm missing M671 no? and M584 should be ;
M584 X0 Y1 Z2:4 E3 yes? Because Z is running 2 and 4? -
@hbrownell correct.
-
@phaedrux Last question (Hopefully) I erased the old drive but there were several folders and one zip file on it. The new build has but 2 folders sys and www. Do I need any other files to make this work or just plug it in and go?
-
You'll likely need to create a
gcodesmacrosfolders at minimum. Though it may be smart enough now to create those if they are missing.