Height map fine tuning
-
I am totally new to 3d printing and am building a Rat Rig V-Core 3 500x500x500, quite a big challenge to me :-)...
I would appreciate if somebody would give me some advice to fine tune the settings.I think all is already configured, but I am not sure if there is any errors or settings that need improving.
Duet 3 Mini 5+ + Expansion Mini 2+
Duet Web Control 3.3.0-rc3
Extruder LGX
Mosquito Magnum w/ HightTemp 450C SliceEng thermistor.
BL Touch 3.1
Keenovo AC 1500w bedThis is my config.g
code_text ```; General preferences G90 ; send absolute coordinates... M83 ; ...but relative extruder moves M550 P"duet3" ; set printer name M669 K1 ; CoreXY G29 S1 ; Set Units to Millimeters ; Network ;M552 P0.0.0.0 S1 ; enable network and acquire dynamic address via DHCP M586 P0 S1 ; enable HTTP M586 P1 S0 ; disable FTP M586 P2 S0 ; disable Telnet ; Drives M569 P0.0 S0 D3 ; physical drive 0.0 goes forwards M569 P0.1 S0 D3 ; physical drive 0.1 goes forwards M569 P0.2 S0 D3 ; physical drive 0.2 goes forwards M569 P0.3 S1 D3 ; physical drive 0.3 goes forwards M569 P0.4 S1 D3 ; physical drive 0.4 goes forwards M569 P0.5 S1 D3 ; physical drive 0.5 goes forwards M584 X0.4 Y0.3 Z0.0:0.1:0.2 E0.5 ; set drive mapping M350 X16 Y16 Z16 E16 I1 ; configure microstepping with interpolation M92 X80.00 Y80.00 Z800.00 ; set steps per mm M906 X1000 Y1000 Z800 I30 ; set motor currents (mA) and motor idle factor in per cent M84 S30 ; Set idle timeout M566 X400.00 Y400.00 Z6.00 E120.00 P1 ; set maximum instantaneous speed changes (mm/min) M203 X10800.00 Y10800.00 Z1000.00 E3600.00 ; set maximum speeds (mm/min) M201 X3000.00 Y3000.00 Z100.00 E3600.00 ; set accelerations (mm/s^2) M84 S30 ; Set idle timeout ; Axis Limits M208 X0 Y0 Z0 S1 ; set axis minima M208 X510 Y500 Z500 S0 ; set axis maxima ; Endstops M574 X1 S1 P"io2.in" ; configure active high endstops M574 Y2 S1 P"io1.in" ; configure active high endstops M574 Z1 S2 ; configure Z-probe endstop for low end on Z ; Z-Probe ;; BLTouch M950 S0 C"io3.out" ; Create a servo pin on io3 M558 P9 C"io3.in" H3 F500 T12000 ; set Z probe type to unmodulated and the dive height + speeds ;M558 H30 ;*** Remove this line after delta calibration has been done and new delta parameters have been saved G31 P25 X-28.00 Y-13.00 Z0.90 ; set Z probe trigger value, offset and trigger height, more Z means closer to the bed ;;M671 X-4.5:150:304.5 Y-4.52:305:-4.52 S5 ; define positions of Z leadscrews or bed levelling screws M671 X-4.5:250:504.5 Y-4.52:505:-4.52 S5 ; Define positions of Z leadscrews or bed levelling screws M557 X30:300 Y15:300 P5 ; define 5x5 mesh grid ; BED HEATER M308 S0 P"temp0" Y"thermistor" T100000 B3950 A"Bed" ; configure sensor 0 as thermistor on pin temp0 M950 H0 C"out0" T0 ; create bed heater output on out5 and map it to sensor 0 M307 H0 B0 S1.00 ; disable bang-bang mode for the bed heater and set PWM limit M140 H0 ; map heated bed to heater 0 M143 H0 S120 ; set temperature limit for heater 0 to 110C ;; BED Heater PID Tune JEN M307 H0 B0 R0.795 C325.9 D3.08 S1.00 V23.9 ; Fans M950 F0 C"out3" Q500 ; create fan 0 on pin out3 and set its frequency M106 P0 C"Hotend Fan" S0 H1 T45 L255 ; set fan 0 name and value. Thermostatic control turned on for Hotend M950 F1 C"out4" Q500 ; create fan 1 on pin out4 and set its frequency M106 P1 C"Layer Fan" S0 H-1 L255 ; set fan 1 name and value. Thermostatic control is turned off ; Lights ;M950 P2 C"out8" ; create output for lighning via DC DC SSR ; Tools M563 P0 D0 H1 F1 ; define tool 0 G10 P0 X0 Y0 Z0 ; set tool 0 axis offsets G10 P0 R0 S0 ; set initial tool 0 active and standby temperatures to 0C M308 S1 P"temp1" Y"thermistor" T500000 B4723 C1.196220e-7 ; PARA SLICE ENGINNERING HIGH TEMP M950 H1 C"out1" T1 ; create nozzle heater output on out2 and map it to sensor 1 M307 H1 B0 S1.00 ; disable bang-bang mode for heater and set PWM limit M143 H1 S250 ; set the maximum temperature in C for heater ;;M307 H1 B0 R2.539 C213.7:208.8 D8.22 S1.00 V23.9 ; JEN 12V M307 H1 B0 R2.856 C126.3 D6.76 S1.00 V23.9 ;JEN 24V ; EVA 2 / BMG / E3D V6 M92 E400 ; set extruder steps per mm, 1.8 angle/step M906 E800 ; set extruder motor current (mA) and idle factor in per cent ; Miscellaneous M575 P1 B57600 S1;enable panelDue UART M501 ; load saved parameters from non-volatile memory M911 S10 R11 P"M913 X0 Y0 G91 M83 G1 Z3 E-5 F1000" ; set tension thresholds and actions to run on power loss M404 N1.75 D0.4 ; Filament width and nozzle diameter ;DHT Sensor on IO4 M308 S10 P"io4.out+io4.in" Y"dht22" A"Chbr Temp[C]" M308 S11 P"S10.1" Y"dhthumidity" A"Chbr Hum[%]" ;M591 P3 C"e0_stop" S1 ; filament monitor connected to E0_stop M591 D0 P3 C"io5.in" S1 ; R85:115 L24.15 E3.0 ; Duet3D rotating magnet sensor for extruder drive 0 is connected to E0 endstop input, enabled, sensitivity 24.8mm.rev, 70% to 130% tolerance, 3mm detection length T0``` code_text Bed.g
code_text ```M561 ; clear any bed transform ;G30 P0 X25 Y25 Z-99999 ; probe near a leadscrew ;G30 P1 X250 Y475 Z-99999 ; probe near a leadscrew ;G30 P2 X475 Y25 Z-99999 S3 ; probe near a leadscrew and calibrate 3 motors G30 P0 X30 Y30 Z-99999 ; probe near a leadscrew G30 P1 X250 Y479 Z-99999 ; probe near a leadscrew G30 P2 X470 Y30 Z-99999 S3 ; probe near a leadscrew and calibrate 3 motors G29 ; probe the bed and enable compensation``` code_text Thanks in advance!
Regards
Julián. -
I almost forgot, I have the Duet Magnetic filament monitor as well.
Thanks! -
@juliann Not sure if you need the extra 0. on the drives if you are not using cam expansion broad.
you have missed E , M906 X1000 Y1000 Z800 I30 - seen it's, in its own section !!! -
Thank you I will double check that.
-
@juliann said in Height map fine tuning:
G29 S1 ; Set Units to Millimeters
The command doesn't match the comment. G29 S1 loads the heightmap, which shouldn't be done in config.g.
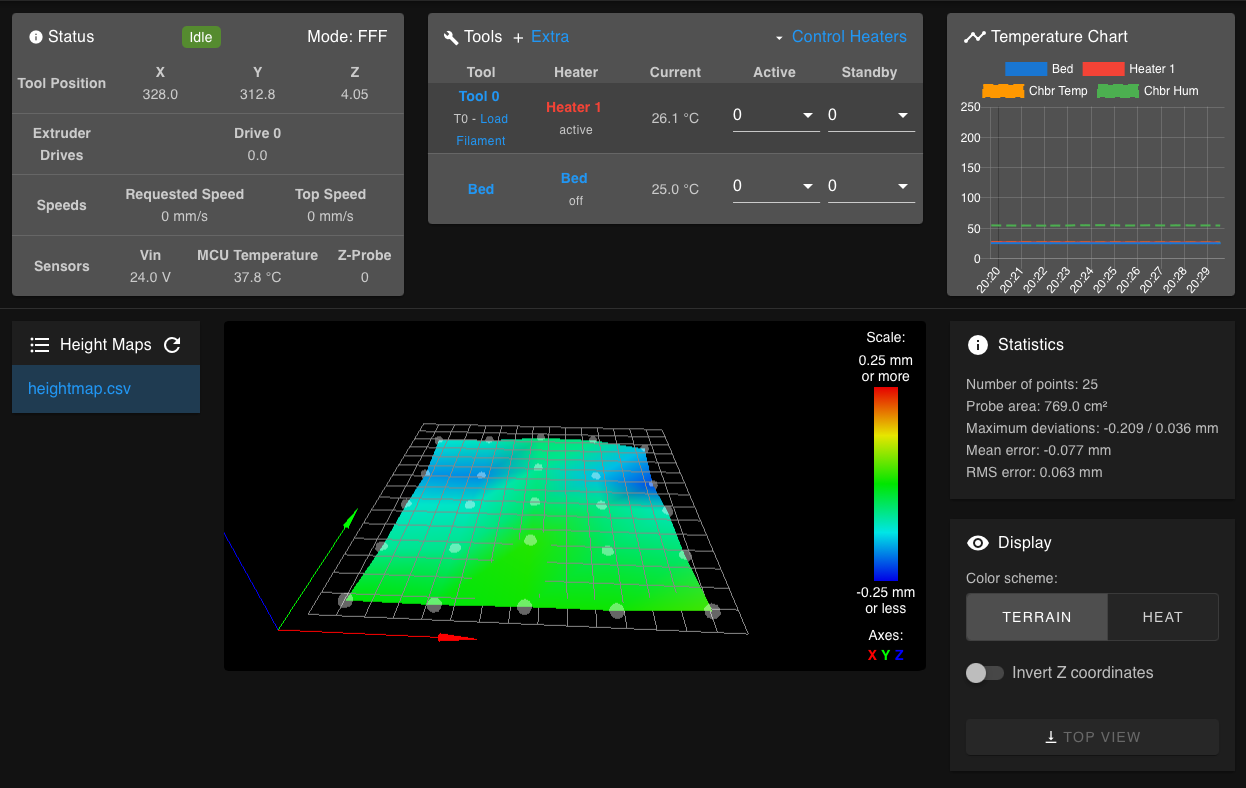
Otherwise that bed looks quite flat. Maybe a slight dip to the back?
-
@phaedrux said in Height map fine tuning:
G29 S1 loads the heightmap, which shouldn't be done in config.g.
What is best practice for location of "G29 S1"? To put that in the slicer start code?
-
Yes, slicer start gcode is a good spot, or the end of homeall if you want to have it active for jogging around before a print or something.