Duet 3 wifi on Caribou
-
Hello, i have problems with mit Caribou upgraded to duet 3 wifi
I am heating up to extrude some Filament and get this message:
-
Can you post your config.g?
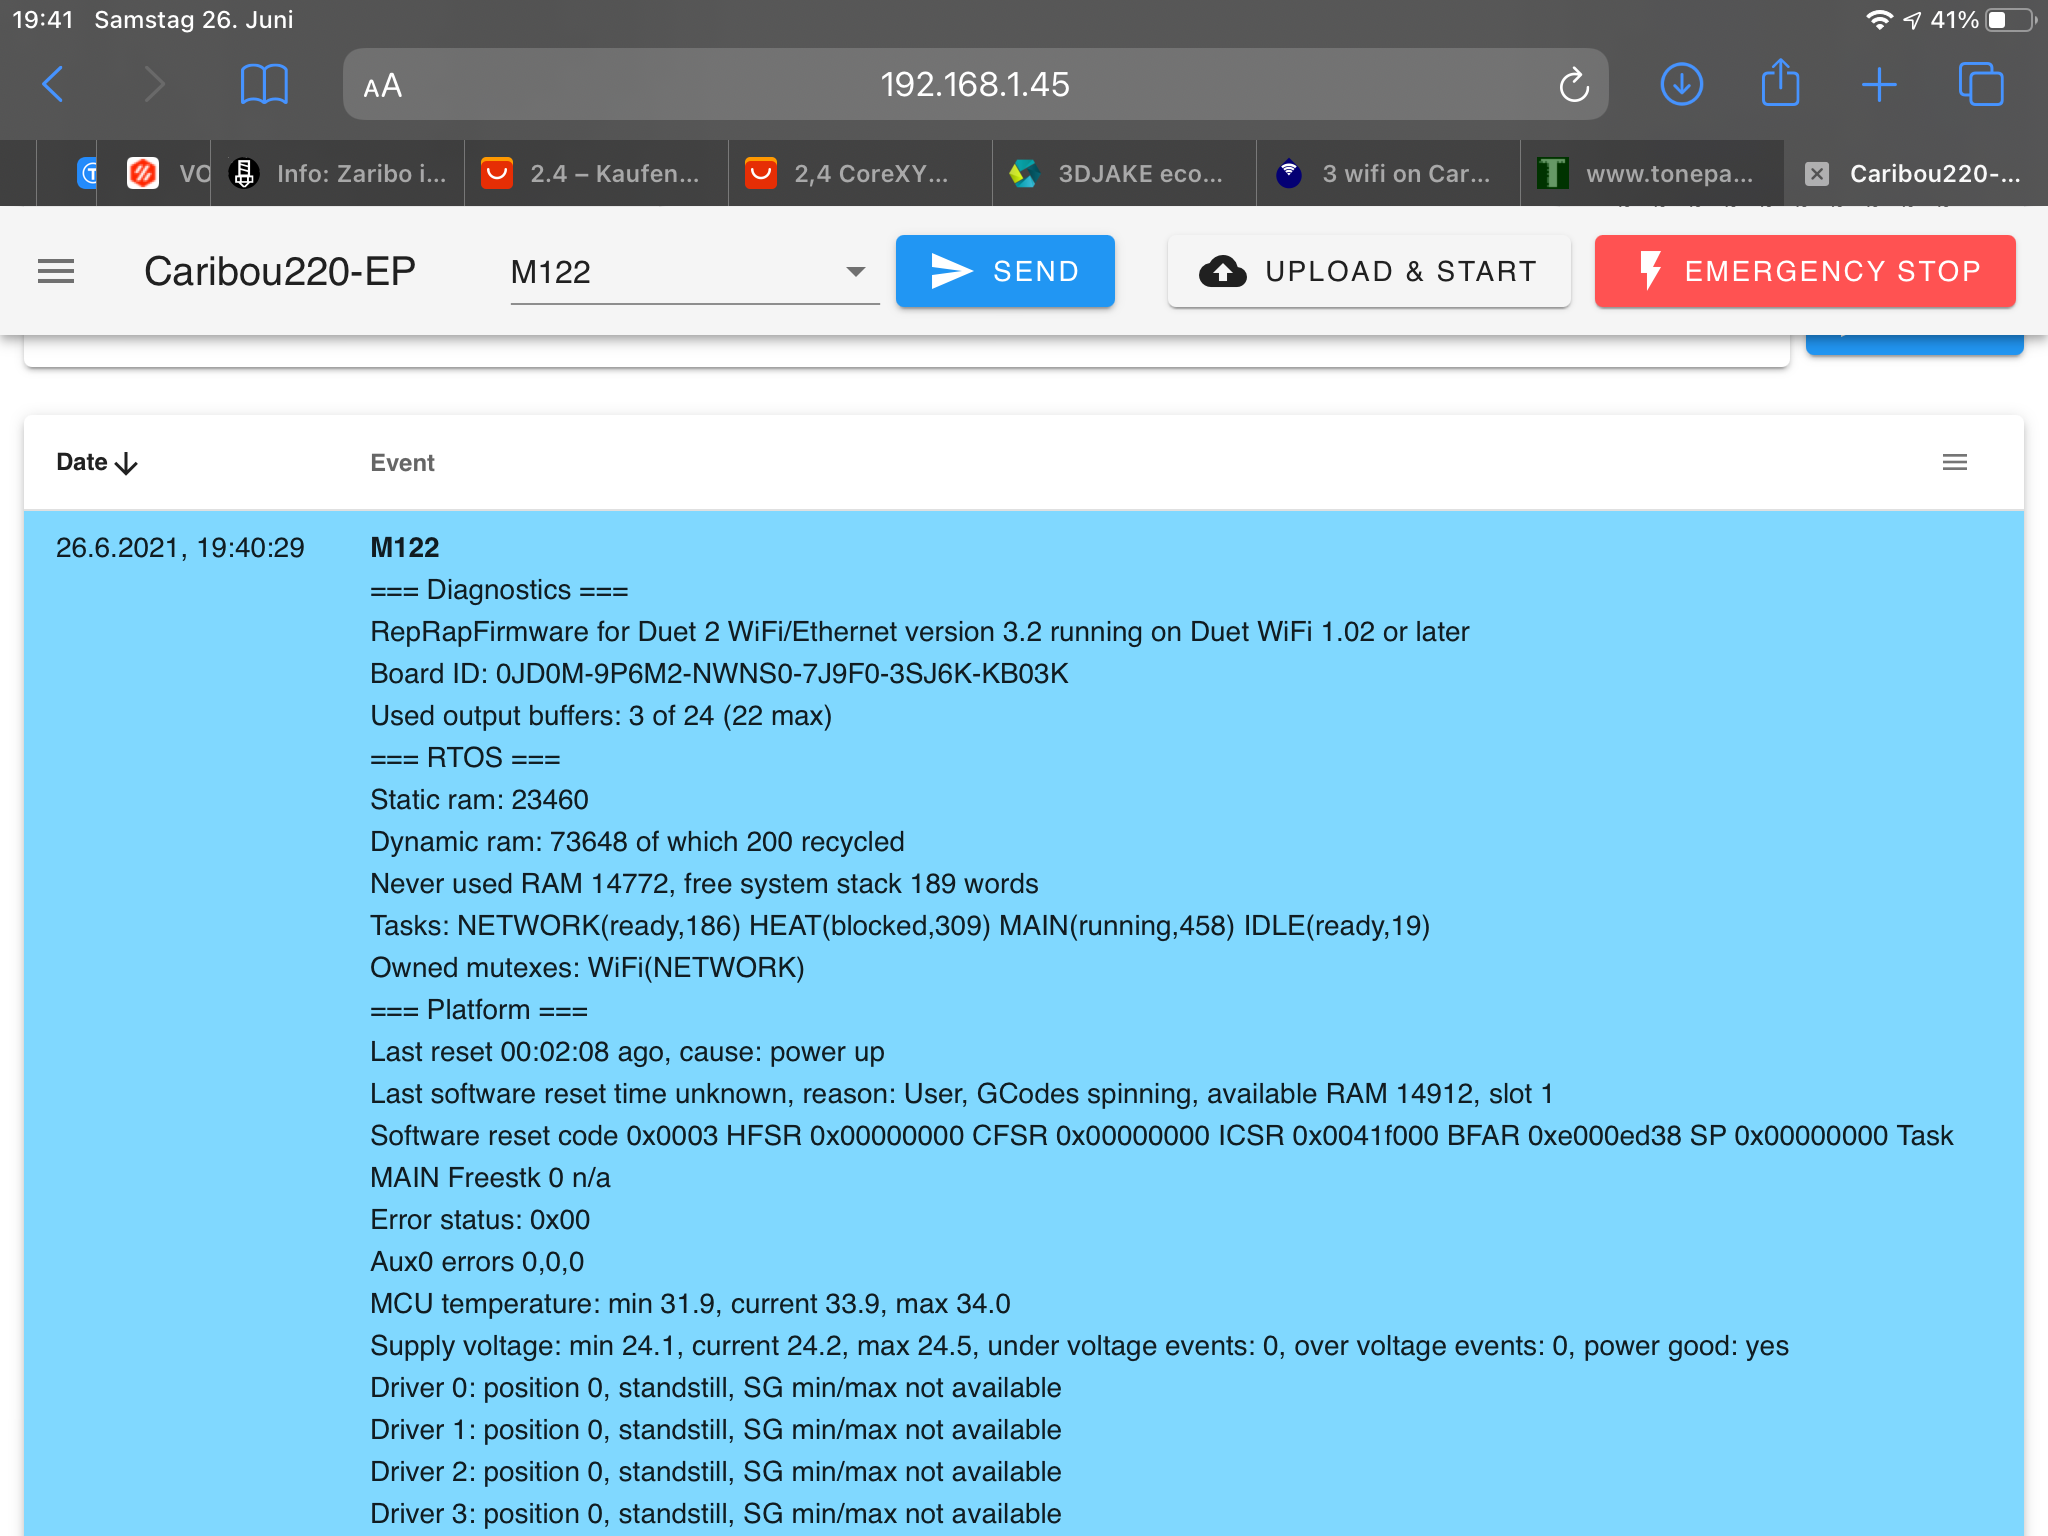
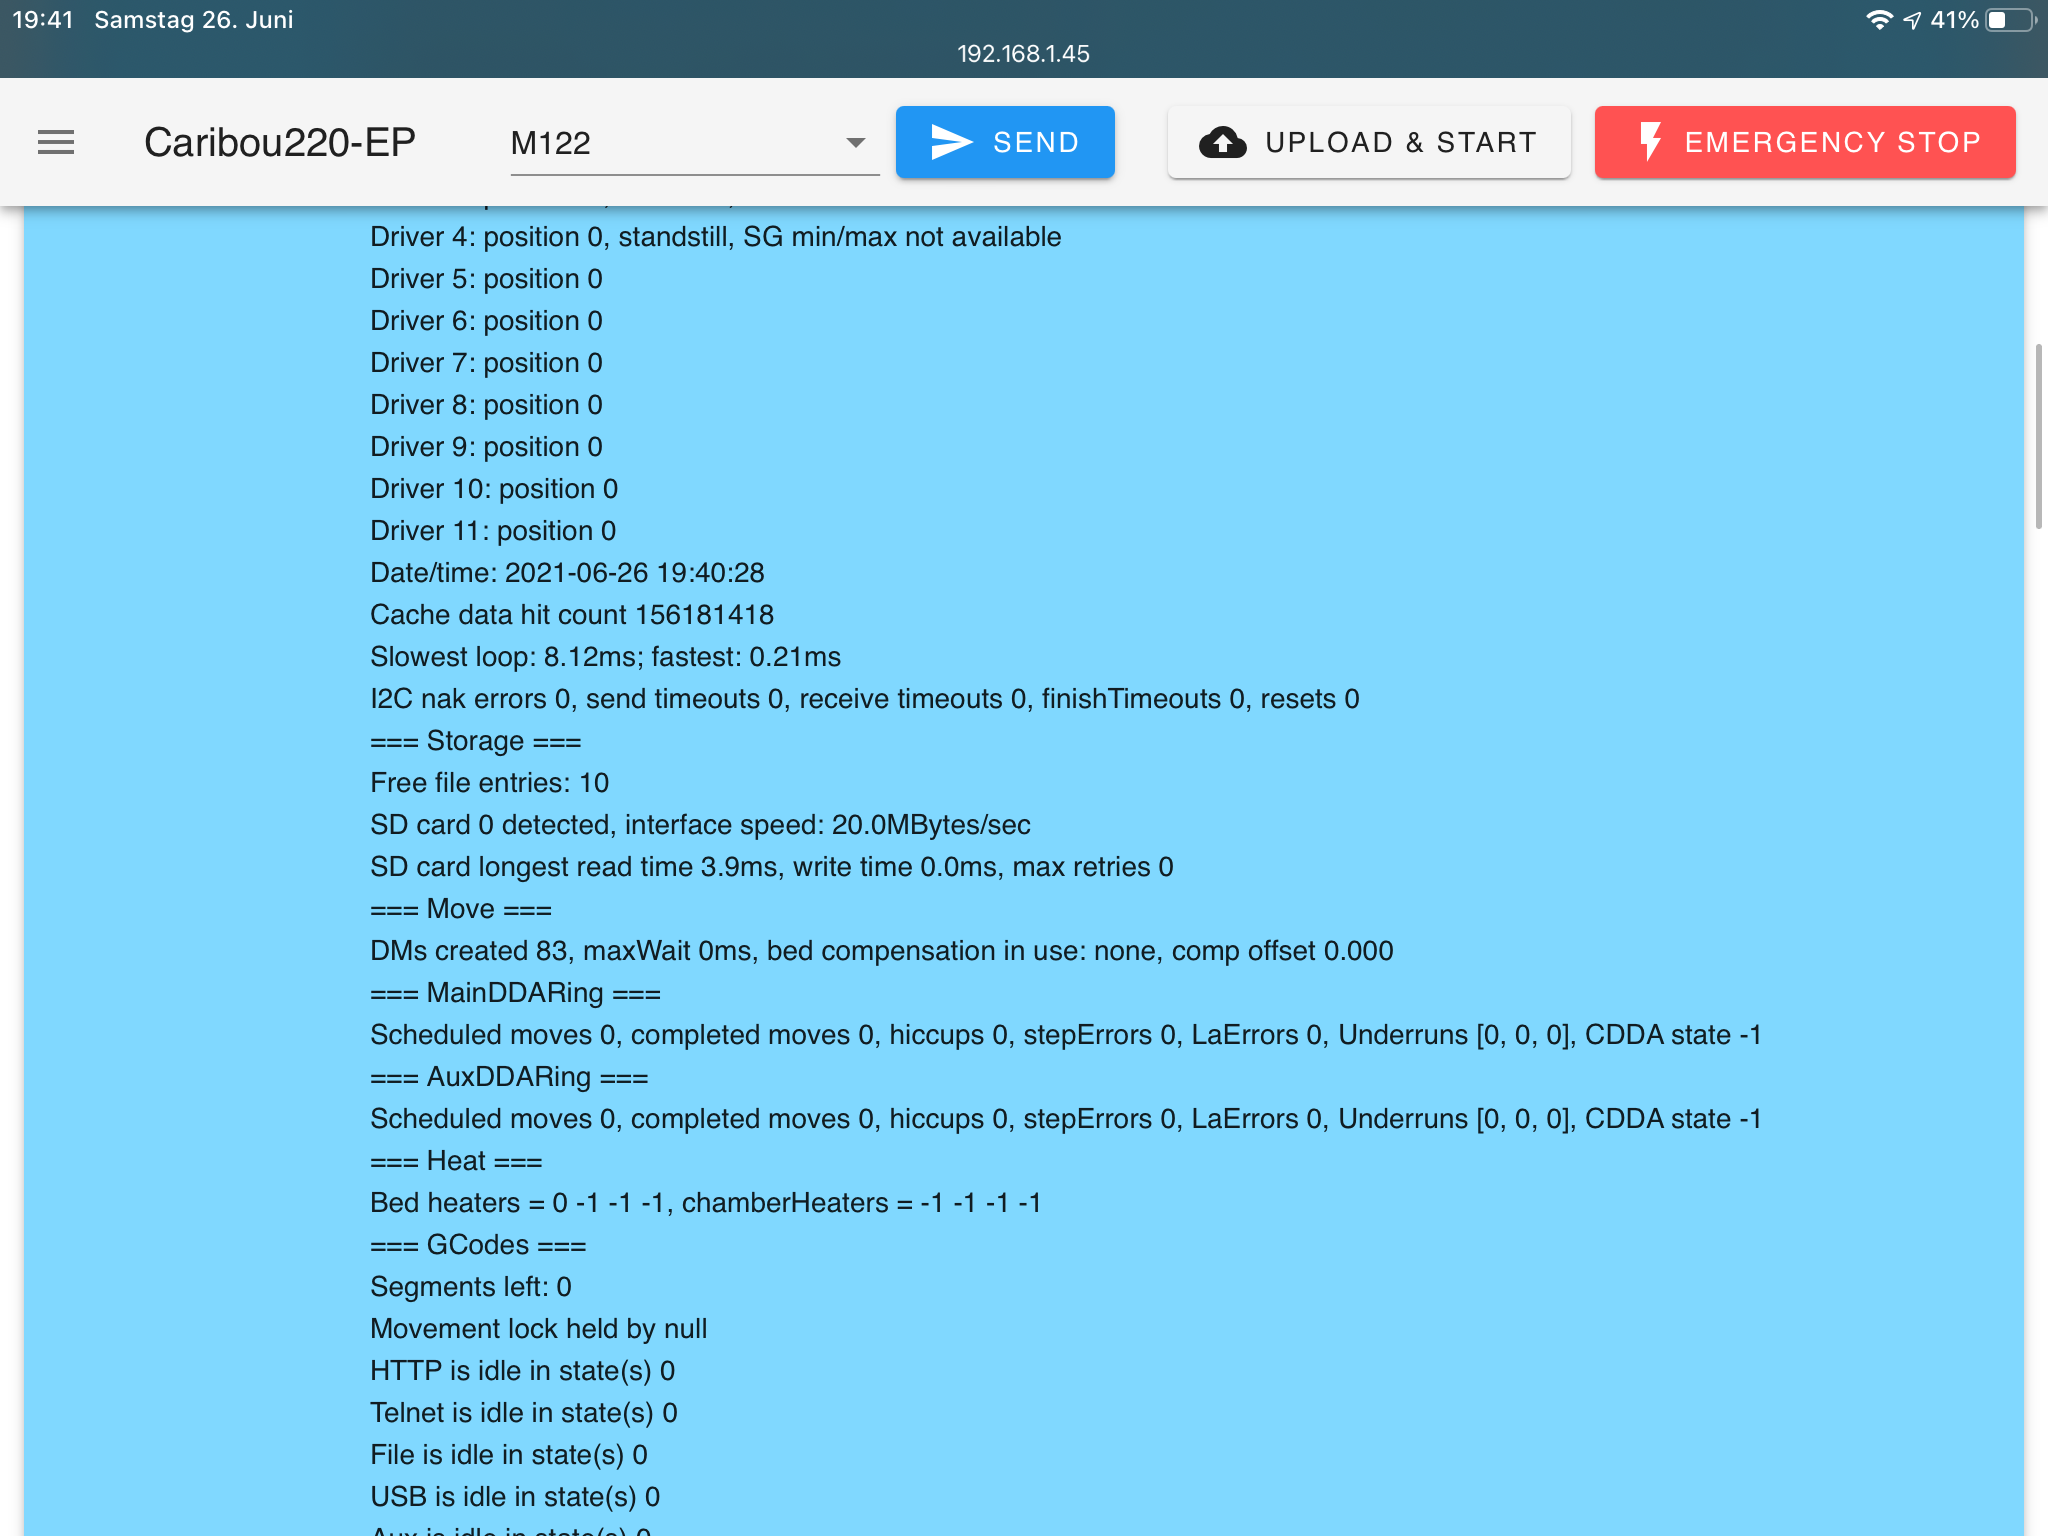
Can you send M122 and M98 P"config.g" in the Gcode console in DWC and post the results?
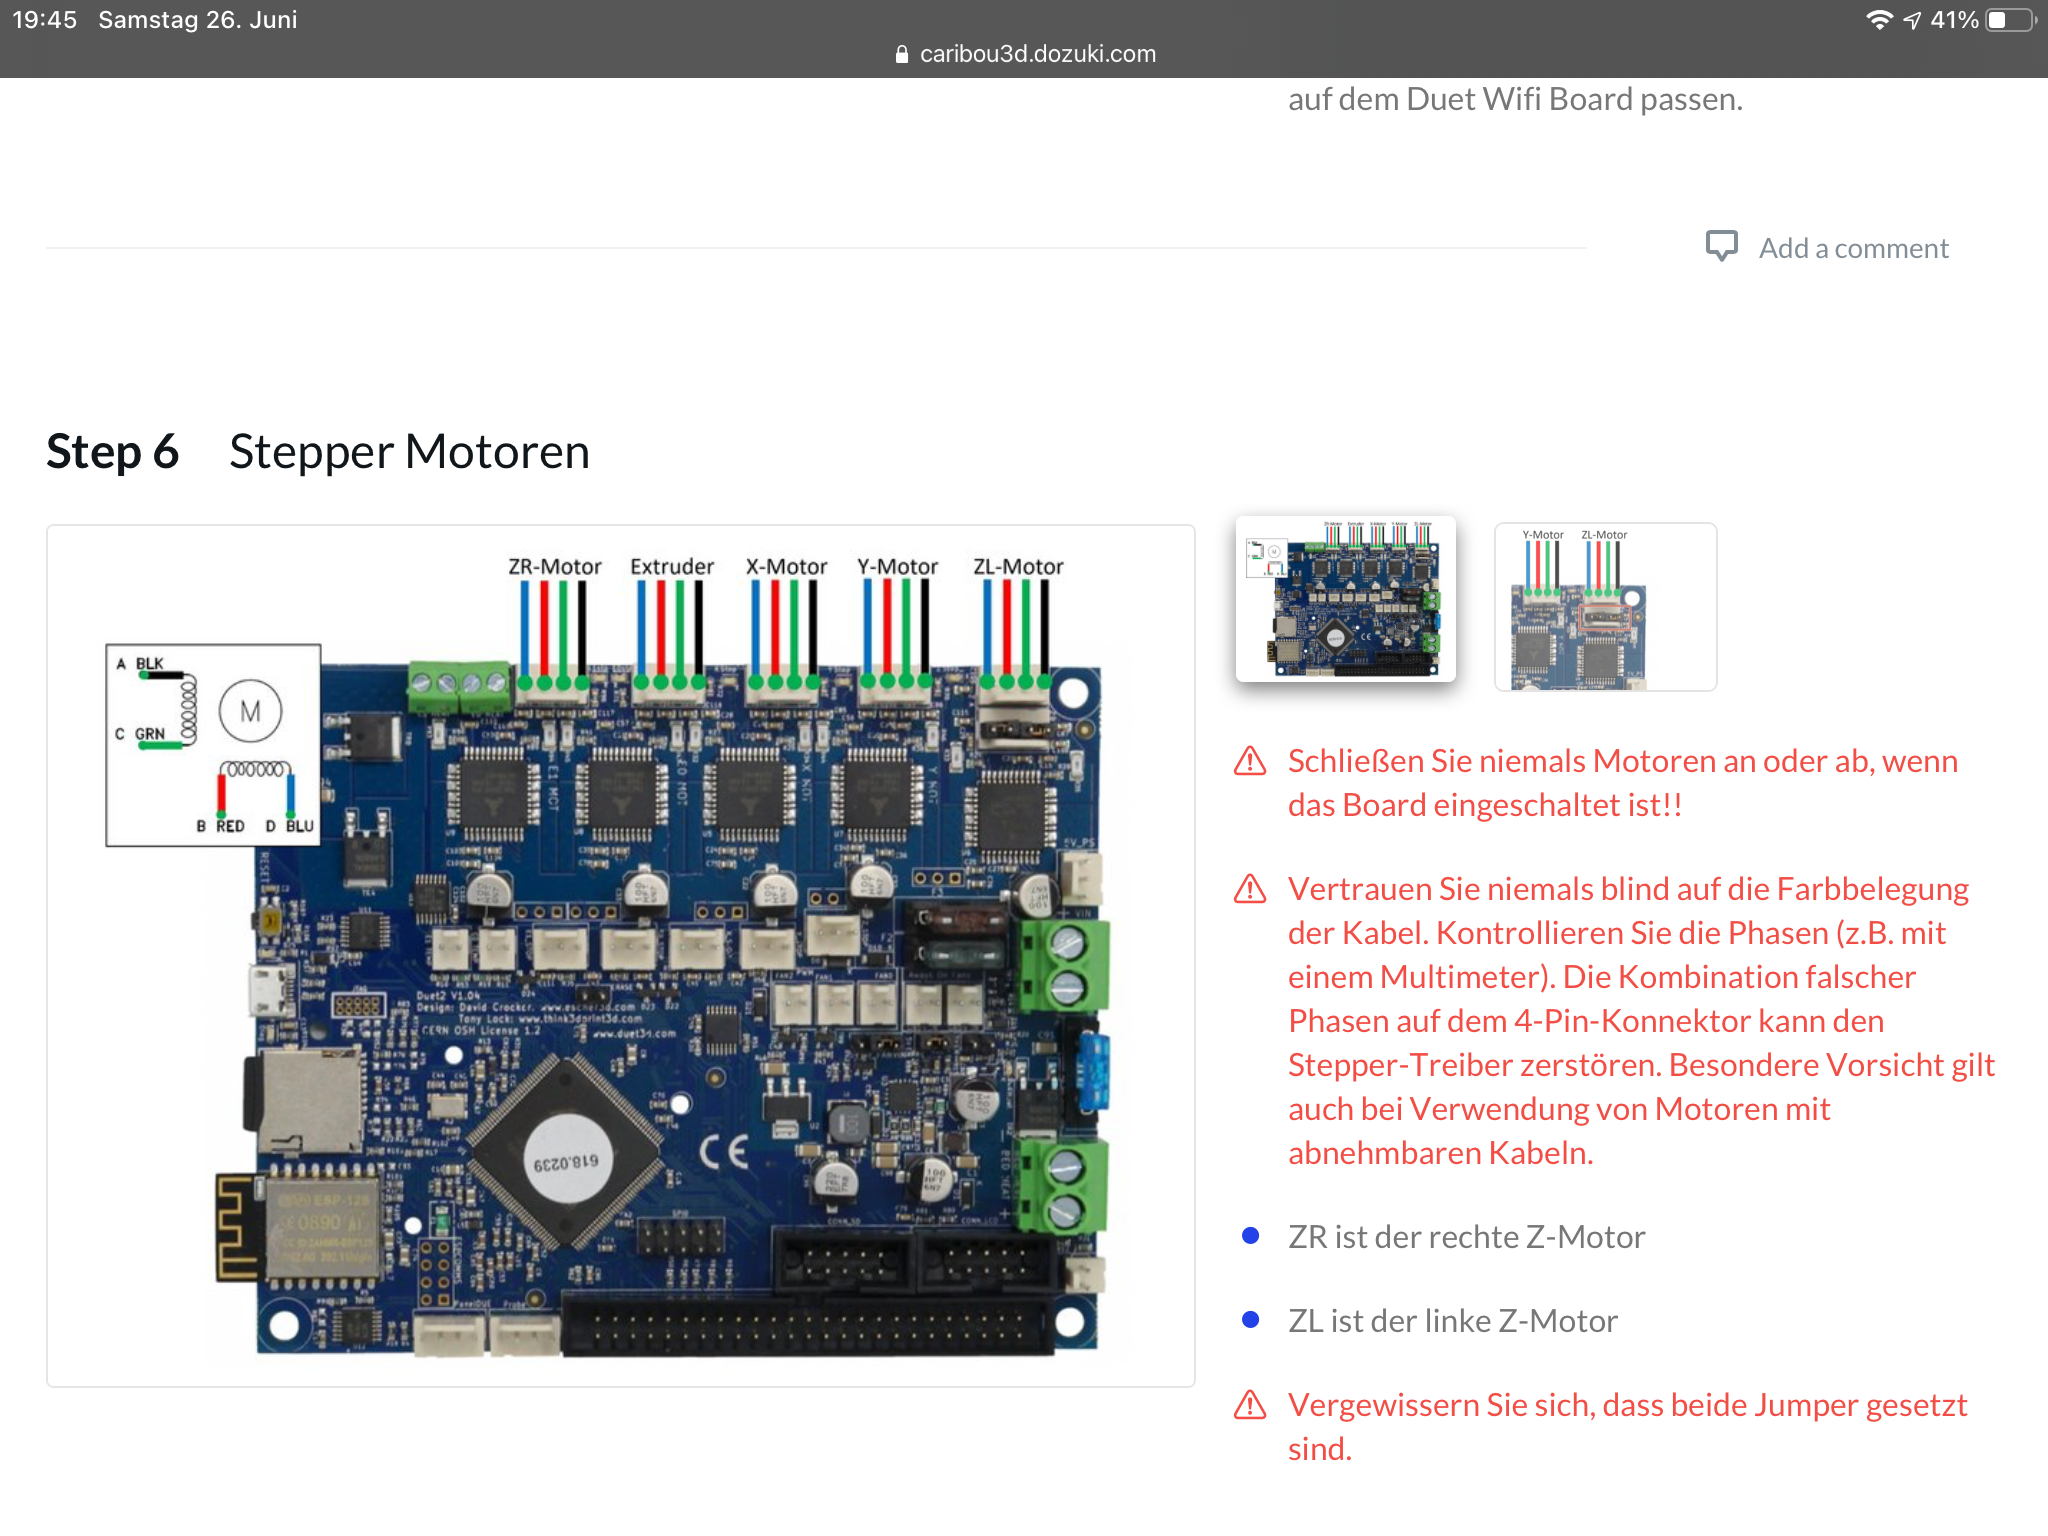
What axis do you have connected to driver 3? -
@phaedrux
Thx for your response


I don‘t no wich is driver 3 on the Board?

Sry its duet 2 wifi…… -
@revolution I had this happen to me. One of my driver connector pins were not pushed all the way into the connector plug. Check all of your electrical connections from the stepper motors to the driver connectors.
-
@tinken
Hi, you have it on an caribou too? -
There must be a space between M98 and the P"config.g"
Also please copy and paste the text if possible rather than screen shots in future.
And the contents of config.g please so we can see which driver is bound to which axis.
-
@phaedrux
Hi,
27.6.2021, 12:51:42 M98 P"config.g"
HTTP is enabled on port 80
FTP is enabled on port 21
TELNET is disabled
Warning: Heater 0 appears to be over-powered. If left on at full power, its temperature is predicted to reach 365Cconfig.g:
; =========================================================================================================
;
; Configuration file for Duet WiFi (firmware version 3.2)
;
; for 0.9° motors on xye
;
; for Caribou220- E3d Thermistor - PINDA2
;
; CariboDuetConfiguration Release : "1.2.0"
; Build : 80
;;
;
; Copyright Caribou Research & Development 2021. Licensed under GPL3.
; Source code and release notes are available on github: https://github.com/Caribou3d/CaribouDuet-Configuration-and-Macros
;
; =========================================================================================================
; Network settings
; =========================================================================================================
;
M550 P"Caribou220-EP" ; set printer name
;
M552 S1 ; enable network
M586 P0 S1 ; enable HTTP
M586 P1 S1 ; enable FTP
M586 P2 S0 ; disable Telnet
M575 P1 S1 B57600 ; Enable support for PanelDue
;
; =========================================================================================================
; Drives
; =========================================================================================================
;
M569 P0 S0 F11 ; physical drive 0 goes backwards - x-axis
M569 P1 S0 F8 Y3:2 ; physical drive 1 goes backwards - y-axis
M569 P2 S0 F10 ; physical drive 2 goes backwards - z - left
M569 P3 S1 F14 ; physical drive 3 goes forwards - Extruder
M569 P4 S0 F10 ; physical drive 4 goes backwards - z right
;
; Motor Configuration
;
M584 X0 Y1 Z2:4 E3 ; set drive mapping
M671 X-36.5:293.5 Y0:0 S0.35 ; leadscrews at left (connected to Z) and right (connected to E1) of X axis
;
; set Microsteps and steps / mm
;
M350 X16 Y16 Z16 E16 I1 ; configure microstepping with interpolation
M92 X200.00 Y200.00 Z400.00 E830.00 ; set steps per mm
;
; set motor currents
;
M906 X800 Y850 Z450 E550 I40 ; set motor currents (mA) and motor idle factor in per cent
;
M84 S60 ; Set idle timeout
;
; set speeds
;
M201 X500.00 Y500.00 Z100.00 E500.00 ; set accelerations (mm/s^2)
M203 X9000.00 Y9000.00 Z1000.00 E3600.00 ; set maximum speeds (mm/min)
M204 P500.0 T500.0 ; set print and travel accelerations (mm(s^2)
M566 X480.00 Y480.00 Z48.00 E300.00 ; set maximum instantaneous speed changes (mm/min)
;
M564 H0 ; Allow unhomed movement
;
; =========================================================================================================
; Axis Limits
; =========================================================================================================
;
M208 X-2 Y-7.5 Z0 S1 ; set axis minima
M208 X256.9 Y214 Z216.50 S0 ; set axis maxima
;
; =========================================================================================================
; Endstops
; =========================================================================================================
;
M574 X1 S3 ; configure sensorless endstop for low end on X
M574 Y1 S3 ; configure sensorless endstop for low end on Y
M574 Z1 S2 ; configure Z-probe endstop for low end on Z
M574 Z2 S3 ; configure sensorless endstop for high end on Z
M591 D0 P2 C"e0_stop" S1 ; configure extruder endtstop (filament sensor)
;
;
; =========================================================================================================
;
; PINDA2
;
M558 P5 C"zprobe.in" H1.5 F1000 T12000 A3 ; set Z probe to PINDA2
M308 S2 P"e1temp" A"Pinda V2" Y"thermistor" T100000 B3950 ; temperature of PINDA2
M557 X23:235 Y5:186 S30.25:30 ; define mesh grid
;
; =========================================================================================================
;
M574 Z1 S2 ; Set endstops controlled by probe
;
; Stallguard Sensitivy
;
M915 X S2 F0 H400 R0 ; Set X axis Sensitivity
M915 Y S1 F0 H400 R0 ; Set Y axis Sensitivity
M915 Z S0 F0 H200 R0 ; Set Z axis Sensitivity
;
;
; =========================================================================================================
; Heater & Fans
; =========================================================================================================
;
; heated bed
; =========================================================================================================
;
M308 S0 P"bedtemp" Y"thermistor" T100000 B4138 R4700 A"Bed" ; configure sensor 0 as thermistor on pin bedtemp
M950 H0 C"bedheat" Q50 T0 ; create bed heater output on bedheat and map it to sensor 0
M143 H0 S110 ; set temperature limit for heater 0 to 110C
M307 H0 B0 S1.00 ; disable bang-bang mode for the bed heater and set PWM limit
M140 H0 ; map heated bed to heater 0
;
; extruder
; =========================================================================================================
;
; Hotend (Mosquito or Mosquito Magnum with E3d Thermistor)
;
M308 S1 P"e0temp" Y"thermistor" T100000 B4725 C7.060000e-8 R4700 A"Nozzle E1" ; E3d configure sensor 0 as thermistor on pin e0temp
;
M950 H1 C"e0heat" T1 ; create nozzle heater output on e0heat and map it to sensor 2
M307 H1 B0 S1.00 ; disable bang-bang mode for heater and set PWM limit
M143 H1 S280 ; set temperature limit for heater 1 to 280C
;
; =========================================================================================================
;
M308 S4 P"mcu-temp" Y"mcu-temp" A"MCU" ; set virtual heater for MCU
M308 S5 P"drivers" Y"drivers" A"Driver" ; set virtual heater for stepper drivers
;
; =========================================================================================================
; Fans
; =========================================================================================================
;
; extruder fan (temerature controlled)
;
M950 F1 C"fan1" Q500 ; create fan 1 on pin fan0 and set its frequency
M106 P1 H1 T45
;
; radial fan
;
M950 F0 C"fan0" Q160 ; create fan 0 on pin fan1 and set its frequency
M106 P0 S0 H-1 ; set fan 0 value. Thermostatic control is turned off
;
; ========================================================================================================
; Tools
; =========================================================================================================
;
M563 P0 D0 H1 F0 ; define tool 0
G10 P0 X0 Y0 Z0 ; set tool 0 axis offsets
G10 P0 R0 S0 ; set initial tool 0 active and standby temperatures to 0C
M302 S190 R190 ; allow extrusion starting from 190°C and retractions already from 190°C
;
; =========================================================================================================
; other settings
; =========================================================================================================
;
M18 XYE ; release / unlock X, Y, and E axis
M501 ; use config-override (for Thermistor Parameters and other settings)
G90 ; send absolute coordinates...
M83 ; ... but relative extruder moves
;
; =========================================================================================================
;
; Offsets - place off-sets for x and y here. z-offsets are handled in the print sheet macros
;
G31 P1000 X23 Y5
;
; ========================================================================================================= -
@phaedrux
Hi, the extruder is now working
I have made the first layer calibration- came out very good
But when i will start a print came this message:28.6.2021, 17:04:24 Warning: M73: Command is not supported
Warning: M73: Command is not supported
Maximum jerk rates (mm/sec): X: 8.0, Y: 8.0, Z: 0.4, E: 1.5
FIRMWARE_NAME: RepRapFirmware for Duet 2 WiFi/Ethernet FIRMWARE_VERSION: 3.2 ELECTRONICS: Duet WiFi 1.02 or later FIRMWARE_DATE: 2021-01-05 -
@revolution, either ignore that warning; or configure your slicer not to generate M73 commands; or upgrade to firmware 3.3.
-
@dc42
Hi, now i have upgraded to 3.3
When i will print something i get this message28.6.2021, 18:06:15 Cancelled printing file 0:/gcodes/gearr_0.2mm_PLA_MK3S_18m.gcode, print time was 0h 2m
Emergency Stop! Reset the controller to continue.
Error: Homing failed
Can i Post videos? -
Yes you can post videos.
When do you get that error?
Please post your homing macros as well as your slicer start gcode so we can see what is going on when you start a print.
-
@phaedrux
Looks like this
https://vimeo.com/568524469Start.g:
========================================================================================================
;
; for Caribou220- E3d Thermistor - PINDA2
;
; Executed before each print - BEFORE ANY SLICER CODE IS RAN
; This also loads the heightmap
;
; =========================================================================================================
;
M122 ; Clear diagnostic data to cleanly capture print evolution statistics.
T0 ; Ensure the tool is selected
;
M572 D0 S0.0 ; Clear pressure advance.
M220 S100 ; Set speed factor back to 100% in case it was changed
M221 S100 ; Set extrusion factor back to 100% in case it was changed
M290 R0 S0 ; Clear any baby-stepping
M106 S0 ; Turn part cooling blower off if it is on
M703 ; Execute loaded filament's config.g
G32 ; execute bed.g (level gantry)
G29 S1 ; Load bed mesh for the system's set filament type
M400 ; Finish all moves, clear the buffer
G90 ; Absolute Positioning
M83 ; Extruder relative mode
M98 P"0:/sys/current-sense-normal.g" ; Ensure that motor currents and sense are set for printing
;
; Slicer generated gcode takes it away from here ....
; -
@revolution said in Duet 3 wifi on Caribou:
G32 ; execute bed.g (level gantry)
What do you have in bed.g and homeall.g?
Can you please also post the slicer start gcode section?
Can you describe what I'm seeing in that video?
-
@phaedrux
Hi,
; =========================================================================================================
;
; bed.g
; called to perform automatic bed compensation via G32
;
; =========================================================================================================
;
M561 ; clear any bed transform
G28 W ; home
;
G30 P0 X25 Y100 Z-99999 ; probe near a leadscrew, half way along Y axis
G30 P1 X235 Y100 Z-99999 S2 ; probe near a leadscrew and calibrate 2 motors
G90 ; back to absolute mode
;
G30 P0 X25 Y100 Z-99999 ; probe near a leadscrew, half way along Y axis
G30 P1 X235 Y100 Z-99999 S2 ; probe near a leadscrew and calibrate 2 motors
G90 ; back to absolute mode
;
G30 P0 X25 Y100 Z-99999 ; probe near a leadscrew, half way along Y axis
G30 P1 X235 Y100 Z-99999 S2 ; probe near a leadscrew and calibrate 2 motors
G1 H2 Z8 F2600 ; raise head 4mm to ensure it is above the Z probe trigger height
G90 ; back to absolute mode
;
G1 X104 Y100 F6000 ; put head over the centre of the bed, or wherever you want to probe
G30 ; lower head, stop when probe triggered and set Z to trigger height
;
; =========================================================================================================; =========================================================================================================
;
; Home XYZ Axis
;
; for Caribou220- E3d Thermistor - PINDA2
;
; =========================================================================================================
;
M98 P"homez.g" ; homeall is the same as homez
;
; =========================================================================================================
In the Video you see starting a Print, the leveling and Then the Print should starting but then the extruder goes only on the Home of x and nothing happens
I Hope you know what i mean? -
@revolution said in Duet 3 wifi on Caribou:
M98 P"homez.g" ; homeall is the same as homez
Ok, what's in homez.g then?
It looks like you get through the leveling portion. Then the print should be starting, but it moves very slowly to the left. If that is from the sliced gcode section please share either the slicer start gcode section or share the first 50 lines or so of a sliced gcode file.
Everything the printer is doing is just gcode commands. So being able to see what those commands are is important for understanding what's actually happening.
-
@phaedrux
homez.g:=========================================================================================================
;
; Home XYZ Axis
;
; for Caribou220- E3d Thermistor - PINDA2
;
; =========================================================================================================
;
G91 ; relative positioning
M98 P"current-sense-homing.g" ; Ensure the current and sensitivity is set for homing routines.
;
G1 H2 X0.5 Y-0.5 F10000 ; energise motors to ensure they are not stalled
M400 ; wait for current moves to finish
M913 X40 Y40 ; drop motor current to 40%/40%
G4 P200 ; wait 200ms
;
G1 H2 Z5 F6000 ; lift Z relative to current position
M400 ; wait for current moves to finish
;
; =========================================================================================================
; Home X Axis
; =========================================================================================================
;
G1 H1 X5 F1000 ; move slowly away
G1 H1 X-260 F3000 ; move quickly to X axis endstop and stop there (first pass)
G1 H2 X5 F1000 ; go back a few mm
G1 H1 X-10 F3000 ; move slowly to X axis endstop once more (second pass)
;
; =========================================================================================================
; Home Y Axis
; =========================================================================================================
;
M400 ; wait for current moves to finish
G1 H1 Y5 F1000 ; move slowly away
G1 H1 Y-260 F3000 ; move quickly to X axis endstop and stop there (first pass)
G1 H2 Y5 F1000 ; go back a few mm
G1 H1 Y-10 F3000 ; move slowly to X axis endstop once more (second pass)
;
M400 ; wait for current moves to finish
M913 X100 Y100 ; return X & Y motor
G4 P200 ; wait 200ms
;
G90 ; absolute positioning
;
; =========================================================================================================
; Home Z Axis
; =========================================================================================================
;
G90 ; absolute positioning
G1 X11.5 Y4.5 F6000 ; go to first probe point
G30 ; home Z by probing the bed
G1 Z0.15 F100 ; move Z to origin
G91 ; relative positioning
G1 Z1 F100 ; lift Z relative to current position
G90 ; absolute positioning
M400 ; Wait for current moves to finish
;
; =========================================================================================================
;
G90 ; absolute positioning
;
M98 P"current-sense-normal.g" ; Ensure the current and sensitivity is set for homing routines.
;
; =========================================================================================================Start G-code/ Prusaslicer from the object in the Video:
M115 U3.9.3 ; tell printer latest fw version
G90 ; use absolute coordinates
M83 ; extruder relative mode
M104 S[first_layer_temperature] ; set extruder temp
M140 S[first_layer_bed_temperature] ; set bed temp
M190 S[first_layer_bed_temperature] ; wait for bed temp
M109 S[first_layer_temperature] ; wait for extruder temp
G28 W ; home all without mesh bed level
G80 ; mesh bed leveling
G1 Y-3.0 F1000.0 ; go outside print area
G92 E0.0
G1 X60.0 E9.0 F1000.0 ; intro line
G1 X100.0 E12.5 F1000.0 ; intro line
G92 E0.0
M221 S{if layer_height<0.075}100{else}95{endif} -
@revolution said in Duet 3 wifi on Caribou:
G1 Y-3.0 F1000.0 ; go outside print area
Would you say that the slow movement occurs here? F1000 is about 16mm/s so quite slow. F6000 would be more appropriate for a travel move.
There are a few things in your slicer start gcode that aren't compatible with reprapfirmware. What gcode flavor do you have set for PrusaSlicer?
M115 for instance just reports the current firmware version.
G28 W would likely just run homeall.g with no changes.
G80 isn't a supported gcode at all. To do mesh compensation in RRF you use G29.@revolution said in Duet 3 wifi on Caribou:
M98 P"current-sense-homing.g" ; Ensure the current and sensitivity is set for homing routines.
M98 P"current-sense-normal.g" ; Ensure the current and sensitivity is set for homing routines.Can you post those two macros as well for full disclosure?
Also, at what point in your video are you getting the short to ground error on driver 3? Driver 3 appears to be your extruder.
Are you able to extrude into free air by heating the hotend and commanding extrusion from DWC or paneldue?
-
@phaedrux
Now i have solve the problem:
i have changed in Prusaslicer the Firmware G-Code Typ to "RepRap/Sprinter"
Then i add this customised Start G-code;
; start script for PrusaSlicer for CaribouDuet
;
; =========================================================================================================
;
G0 X60 Y-3 Z80 ; move extruder above bed, keep extruder in front for cleaning and checking
;
M104 S160 T0 ; pre-heat extruder to 160°C
M140 S[first_layer_bed_temperature] ; this will take the layer 1 temperature for bed 0
M190 S[first_layer_bed_temperature] ; wait for bed temp
;
G29 ; mesh bed leveling using defined mesh grid
G0 X0 Y-3 Z0.6 ; go outside print area
;
M104 S[first_layer_temperature] ; set extruder temperature
M109 S[first_layer_temperature] ; wait for extruder temp
;
; =========================================================================================================
;
;
M98 P"0:/sys/primeLine.g" ; execute primeline macro
;
G92 E0.0 ; set extruder position
;
M572 D0 S0.07 ; set pressure advance
;
; =========================================================================================================
Now it works!