different milling results dispite same G10 Offset
-
Hi everyone,
my printer with a Duet 3 6HC Board has a stange behavoir. When I print the exact same part and mill it afterwards I get diffrent results every time. I'm printing a rectangle with a cube on top of it and then milling that cube. I measured the distance from the edge of the rectangle to the cube in every direction. Here are my results.
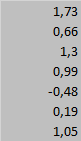
deviation Y-Axis [mm]:

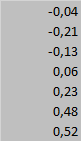
deviation X-Axis [mm]:

I noticed this behavior bevor measuring these parts, so prior to these test I removed my removeable glasbed and checked if every bolt is tight.
When changing the tools and milling the same part again there is no noticeable offset. But when I print the part again the problem appears. So the toolchanger is not the problem but the printer seems to place the part "randomly" on the printbed.Any Advice on how to fix that problem?
-
Hi,
I don't even understand the problem.
Let's start with why you are using a mill.
")
Seriously, what do you mean by "milling the part" and what exactly are those dimensions the measurement of?
Thanks.
Frederick
-
I'm using something similar to this: https://e3d-online.com/blogs/news/asmbl
The goal is to get increase the accuracy of the dimensions of the printed part and also to improve the quality of the surface.To adjust to offset between the printhead and the milling tool I printed this part:

After milling it I me measured X1, X2, Y1 and Y2 (see drawing below)

The dimensions in my first post are the difference between X1/X2 and Y1/Y2. According to the constrution of the part and the milling programm the difference should be close to 0. But it keeps changing (especially in the Y-direction).
I hope you can understand my problem better now.
-
@cmp Do you have endstop switches or are you using stall detection when you home x and y?
-
@generisi i have endstops. But those should impact the tool offset.
-
@cmp I am confused about the sequence of events because you said in your first post "When changing the tools and milling the same part again there is no noticeable offset. But when I print the part again the problem appears." Would you please state step by step when homing and tool changing (and to which tool) occurs for both the repeatable and non-repeatable results? Also, ASMBL is not meant to remove alot of material in any given pass, as I understand it, a few layers are printed, then milling occurs, then a few more layers are printed, then milling occurs, etc.
One more thing. How repeatable is the homing? If you printed a 20mmx20mm square in the middle of your print bed, swapped to the milling tool and touched the mill down in the exact center of the bed just enough to leave a mark in the plastic, then re-homed the machine and gently touched the mill at the same location and did this several times, do you only see a single touch mark because they all are touching the exact same spot?
There are so many possible combinations of gcode and machine tolerance it's hard to know where to start.... but this is what came to my mind.
-
I know that the ASMBL is not meant for milling the whole part, thats why I'm milling very slowly.
My steps are:
- Homing with the print head connected and an selected (Tool 1 in dwc)
- printing the part
- swapping to the milling tool/Tool 4 in dwc (without homing)
- milling the part
I did this a few times. The gcodes for milling and printing stayed the same. I didn't copy those codes together but used them individually, as they came out of Cura and Fusion360.
The reason I did this is to dial in the offset for the milling tool. The printhead/Tool 1 has no Offset in X/Y (G10 P1 X0 Y0 Z-0.50). The offset for the milling tool right now is G10 P4 X-14.49 Y4.14 Z-17.00At first I thought the problem was the gcode from Fusion360. So I wrote the milling-gcode by myself. But the problems stayed the same.
So my next step was to check if the toolchanging system had a problem. I printed and milled the part and then changed to the printhead again. I moved the printhead a few mm in every direction and then switched to the milling tool again. I milled the exact same part, that I milled before, again and noticed no deviation. This should mean, that my toolchanging system has no significant tolerance.
Thats when I started the tests as described above. Since my first post I have got more test/measuring results:
deviation in Y [mm]:
deviation in X [mm]:
I will try the test you proposed and report back with the results. But I'll still thing that homing should not matter.
-
This is my result after homing+milling 5 times the same spot. I could't spot any difference.

I know, that this is not the center of my part, this is due to the problem with the offset of the milling tool
-
@cmp I wish I had better insight to help you out... what firmware version are you running? If the experiments below don't provide insight, would you please post the Tool1 and Tool4 pre,.g , post.g and free.g macros?
Please try typing M999 (this will force the firmware to do a reset) just before you start your print. Make sure that you don't execute any additional gcode before starting your print. See if running the normal "print, then mill" sequence a couple of times give the same offsets or different offsets.
Another variation of this experiment is to home the machine, then pick up the milling tool, then put it back, then pick up the print tool, then print the object, then return the print tool, pick up the milling tool and then mill the object. Try this sequence at least twice to see if the offsets are the same or different.
One more variation: Print the object, then pick up the milling tool but don't use it, then put the milling tool back, then pick up the printing tool and add layers on top. Do the additional layers line up with the original layers?
-
@generisi
Thanks for trying to help me out!I'm running RFF 3.2.2 (2021-02-11).
Your first Idea seems to be the same as powering the printer down and restarting it. I do this every day and still get different results.
I'll try these 3 variations next Wednesday since I don't have access to the printer up till then.
Hopefully some of these test will reveal the reasons I'm having these problems -
@cmp said in different milling results dispite same G10 Offset:
I'm running RFF 3.2.2 (2021-02-11).
I don't know if it will help, but 3.3 is available now as well.
Download this zip file and upload to the system tab in DWC.
https://github.com/Duet3D/RepRapFirmware/releases/download/3.3/Duet2and3Firmware-3.3.zip -
Since I manually cool my hotend and swap it with the milling tool, I only have a post.g for tool 4:
- tpost4.g
; called after tool 4 has been selected
M280 P7 S40 ;start ESC
G4 P2000
M280 P7 S1150 ;Start Motor with 10% speed
G4 P1000
M280 P7 S2000 ; 100% Motorspeed
I didn't have time to the test yet, but updating the firmware to 3.3 hasn't changed anything.
- tpost4.g