A bit confused about Tools positioning
-
@engikeneer said in A bit confused about Tools positioning:
@the_dragonlord I had standard V6's. I've got a volcano on my delta and it oozes a bit so never bothered putting it on the chimera. Somewhat ironic as the delta is the smaller build volume and can't print fast because the frame is c**p

I know some people have run volcanoes on chimeras but no idea how successful they've been.If everything else had been working properly on my corexy (I got the nozzle levels spot on, extrusion dialed in perfectly, better cooling arrangement to avoid overhang curling etc) then I could have kept with both nozzles all the time. But I was lazy and it is my better printer so I wanted to be able to 'just print' simple stuff on it with minimal faffing.
I've also had a play with the cyclops which is good fun!")
I've considered Cyclops insted of Chimera but I gave up because for me is a total nonsense to always leave the second filament on even when you print in a single color....are you using Chimera in Bowden mode or direct mode using the Bondtech XM2? In your slicer have you inserted a tool change GCODE?
Sorry for the large number of questions but you are the first person I met with almost the same printer configuration than mine...Thanks
-
@the_dragonlord keep em coming - I'm sure you'll have a few things to teach me too!
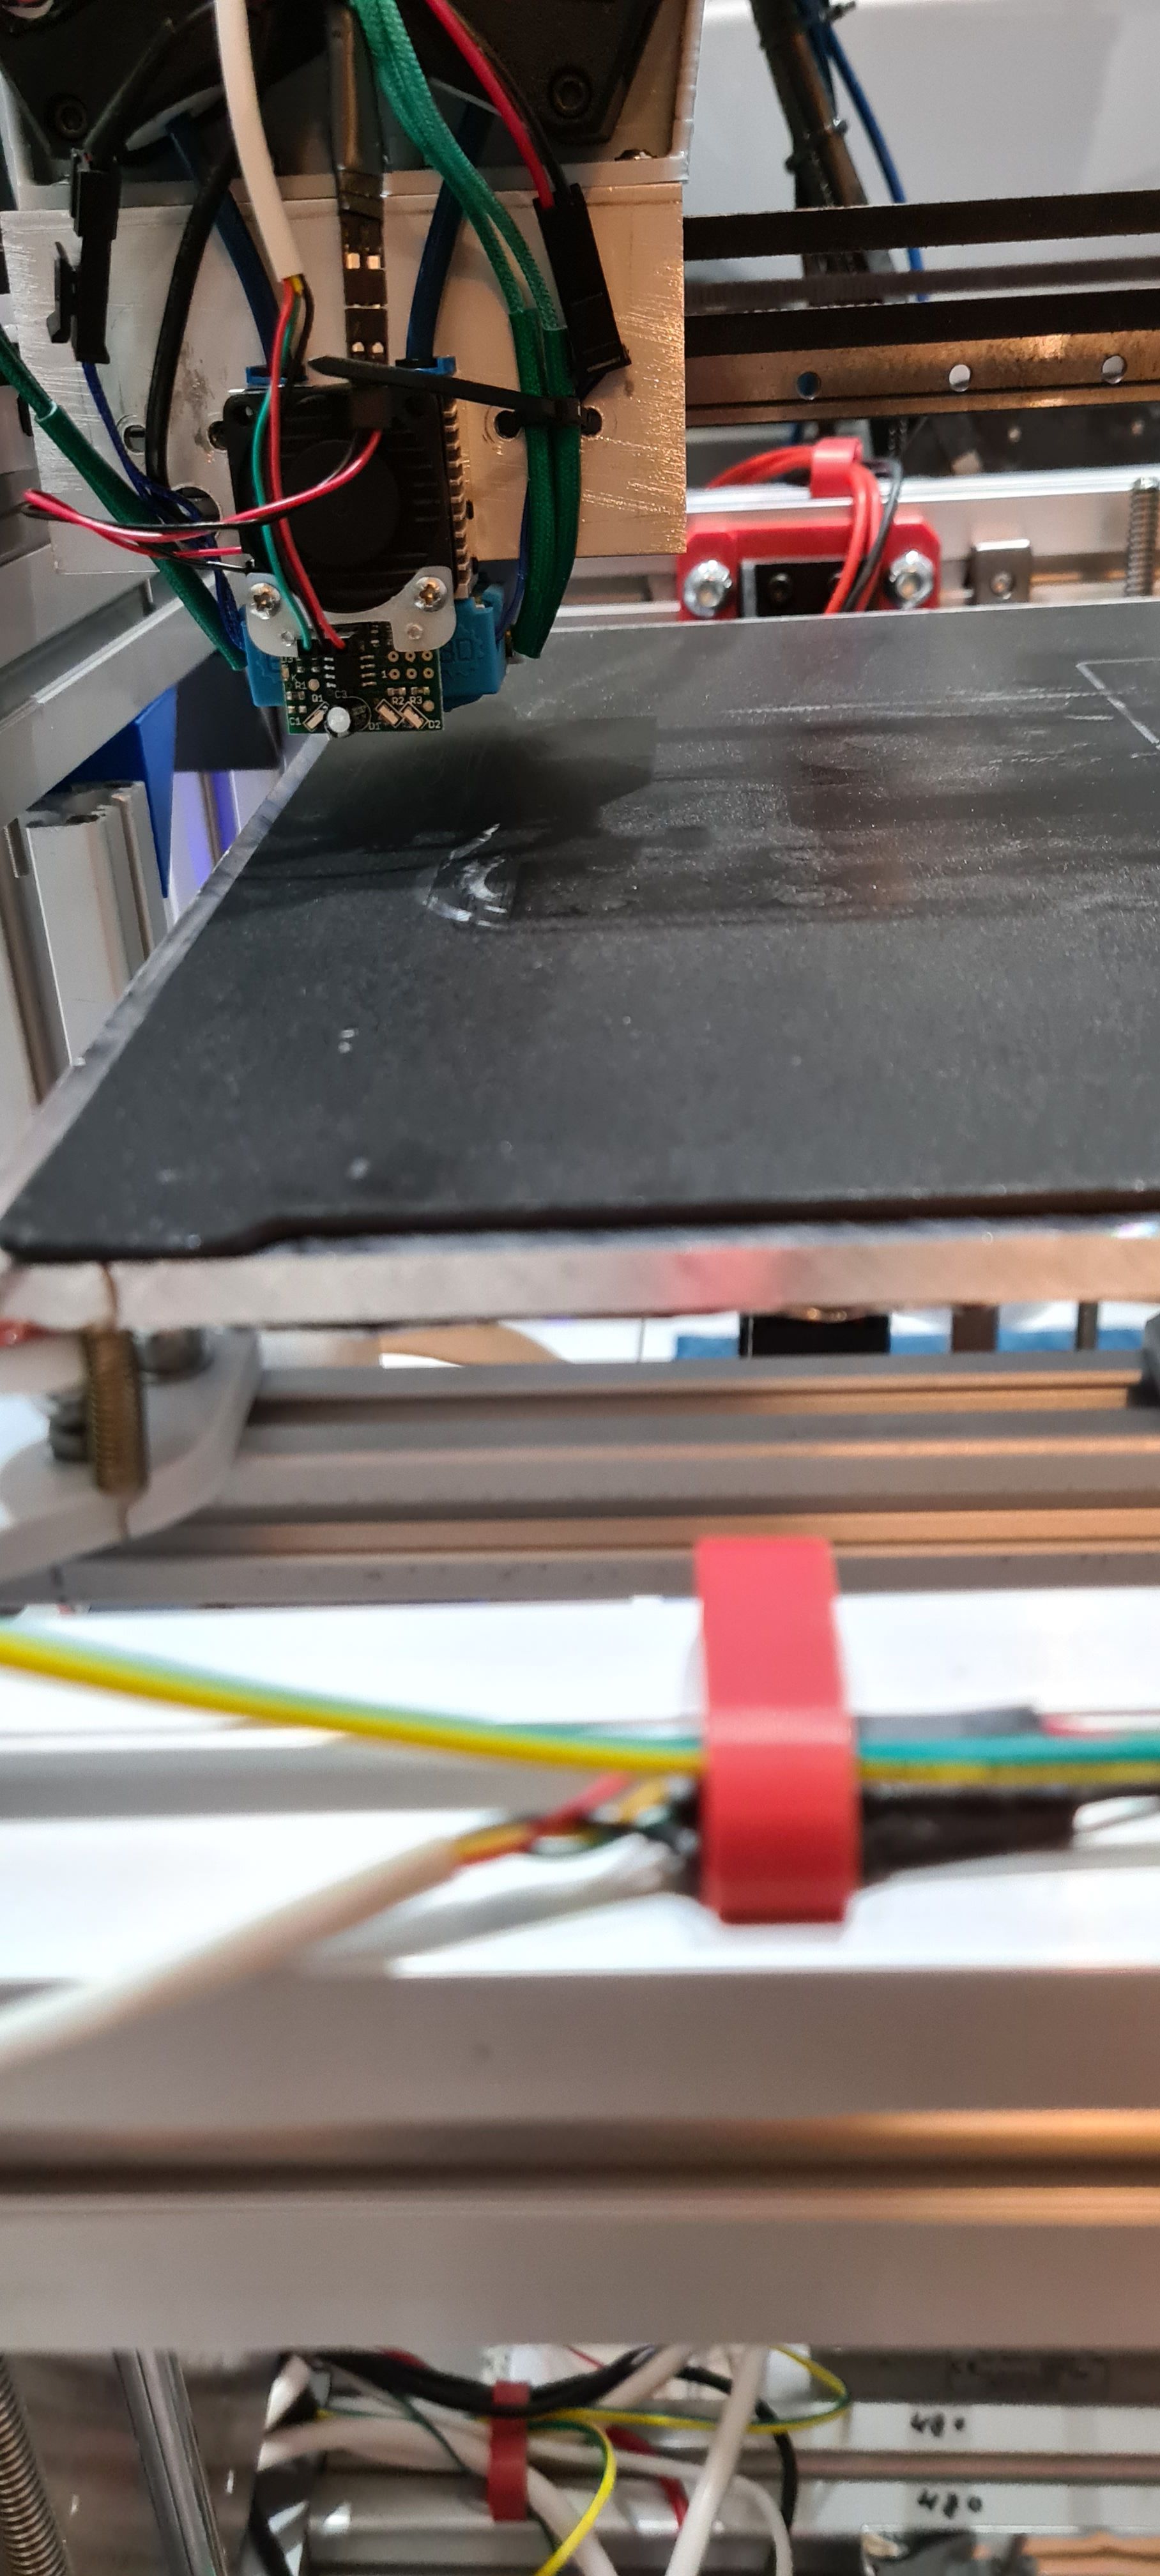
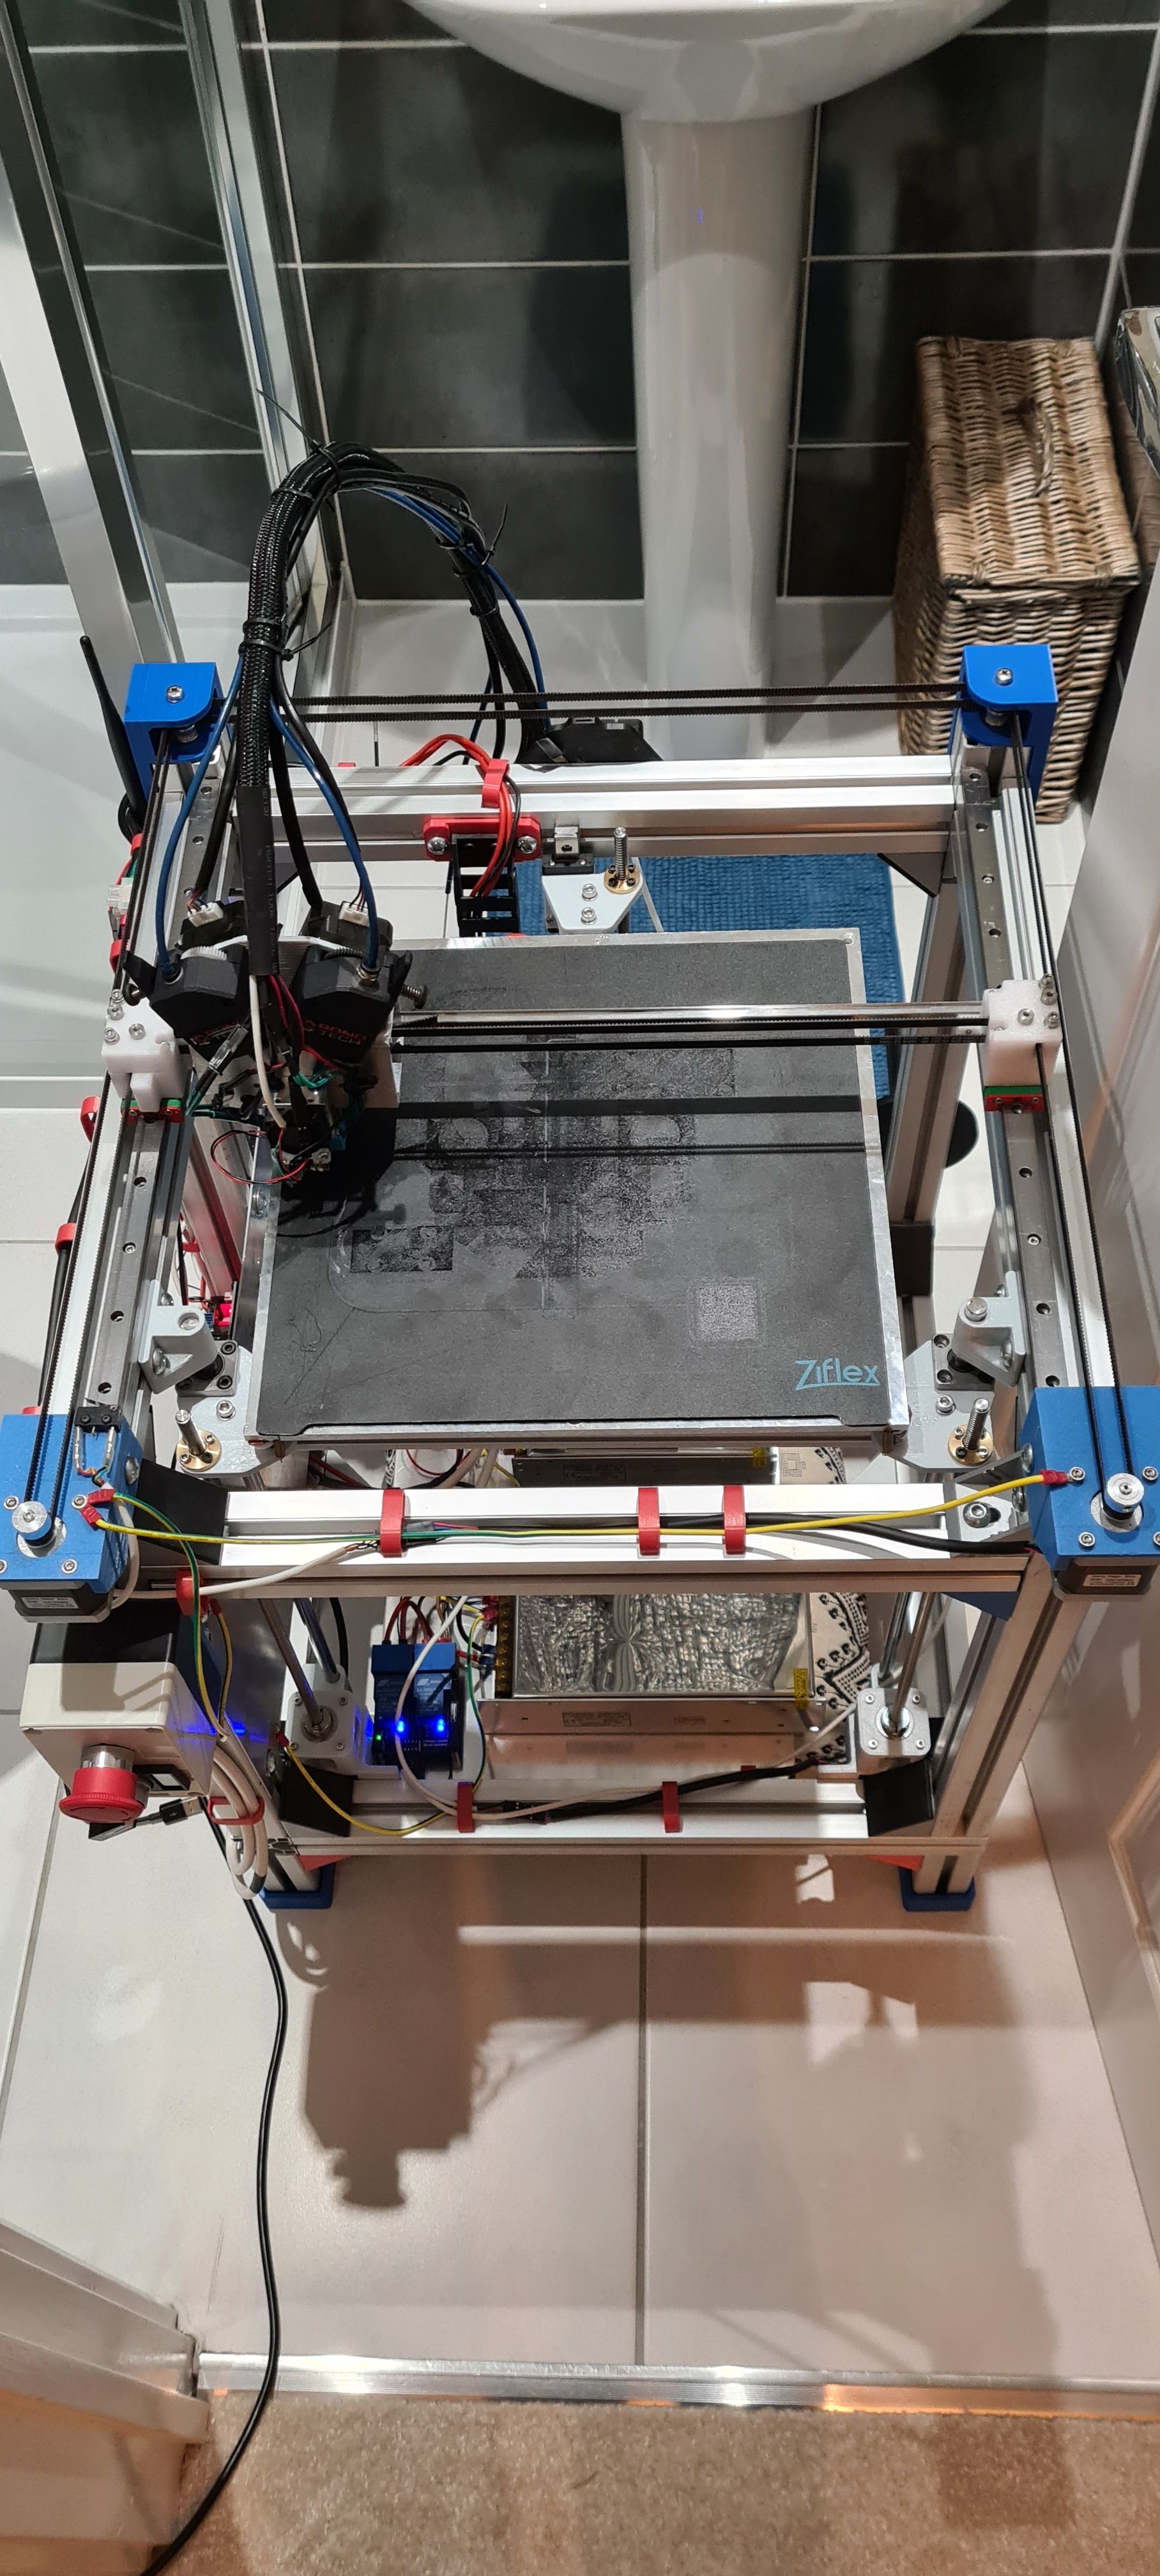
Ive attached a few old pictures of my setup below. Theses are from when I was playing with a DC42 IR sensor (now got a BLTouch).
Using a direct drive arrangement with a pair of BMGs (so similar to the X2). Originally I had a normal v6 hotend with a single BMG so didn't want to splash out for the full X2 when I got the chimera.I just call T0 or T1 from the slicer then have the toolchange macros on the Duet. They're pretty simple, just retract a bit and wait for temps. I'll post the actual files when I get home tonight to show you
-
@engikeneer said in A bit confused about Tools positioning:
@the_dragonlord keep em coming - I'm sure you'll have a few things to teach me too!
Ive attached a few old pictures of my setup below. Theses are from when I was playing with a DC42 IR sensor (now got a BLTouch).
Using a direct drive arrangement with a pair of BMGs (so similar to the X2). Originally I had a normal v6 hotend with a single BMG so didn't want to splash out for the full X2 when I got the chimera.I just call T0 or T1 from the slicer then have the toolchange macros on the Duet. They're pretty simple, just retract a bit and wait for temps. I'll post the actual files when I get home tonight to show you
thanks! So you don't leave the unactive tool at its working temperature? Why? To avoid oozing?
-
@the_dragonlord exactly. Depends on the material, but usually I use a 15-20deg difference, but only wait for the new tool to heat, not the old one to cool
-
@engikeneer said in A bit confused about Tools positioning:
@the_dragonlord exactly. Depends on the material, but usually I use a 15-20deg difference, but only wait for the new tool to heat, not the old one to cool
excellent I'll give it a try
-
@the_dragonlord Sorry didn't get a chance to get my tool change macro's yesterday, but here they are for T0 (T1 is the same, just reversed)
Tfree0.g - empty
Tpost0.g:
; tpost0.g
; called after tool 0 has been selected
;
; generated by RepRapFirmware Configuration Tool v2 on Sat May 04 2019 23:30:24 GMT+0100 (British Summer Time)
; Wait for set temperatures to be reached
M116 P0; wait fot T0 to get up to active temperature
Tpre0.g:
; tpre0.g
; called before tool 0 is selected
;
; generated by RepRapFirmware Configuration Tool v2 on Sat May 04 2019 23:30:24 GMT+0100 (British Summer Time)

M116 P1 S10 ;wait till tool 1 has got within 10deg of it's standby temp
So I wait for T1 to cool down to within 10deg of it's standby temp (typically 15-20deg lower than active). That's because I find it take a lot longer for the old tool to cool down enough than it does for the new one to heat up.
Then it switches over and waits for T0 to get up to active temperature before continuing.
I though I had extra retraactions in there, but it seems I took them out.One thing to think about is what happens at the start of the print (you want both tools to be up to temp before you start), but also what happens when you restart a print.
Also, there are probably much better & more clever things you can do than I have!
-
@engikeneer said in A bit confused about Tools positioning:
@the_dragonlord Sorry didn't get a chance to get my tool change macro's yesterday, but here they are for T0 (T1 is the same, just reversed)
Tfree0.g - empty
Tpost0.g:
; tpost0.g
; called after tool 0 has been selected
;
; generated by RepRapFirmware Configuration Tool v2 on Sat May 04 2019 23:30:24 GMT+0100 (British Summer Time)
; Wait for set temperatures to be reached
M116 P0; wait fot T0 to get up to active temperature
Tpre0.g:
; tpre0.g
; called before tool 0 is selected
;
; generated by RepRapFirmware Configuration Tool v2 on Sat May 04 2019 23:30:24 GMT+0100 (British Summer Time)

M116 P1 S10 ;wait till tool 1 has got within 10deg of it's standby temp
So I wait for T1 to cool down to within 10deg of it's standby temp (typically 15-20deg lower than active). That's because I find it take a lot longer for the old tool to cool down enough than it does for the new one to heat up.
Then it switches over and waits for T0 to get up to active temperature before continuing.
I though I had extra retraactions in there, but it seems I took them out.One thing to think about is what happens at the start of the print (you want both tools to be up to temp before you start), but also what happens when you restart a print.
Also, there are probably much better & more clever things you can do than I have!
excellent, thanks but where do you set the Tool's stand by temperature?
May I ask you how can you add "formatted" parts of g file here? (line nunbers, colors etc.) -
@the_dragonlord I put a line in my start code that uses
G10 P__ S__to set them. I then have a python script that comments out all the other temp setting commands that PrusaSlicer puts out.For the code snippets, there's an option on the forum called code snippet. The button looks like this </> and is next to the Bold, Italics bullet points etc. You can then either put it inline like I have in this post, or as a block like I did in the others
Home-built CoreXY, Duet Wifi, Chimera direct drive, 2x BMG, 300x300x300 build volume
i3 clone with a bunch of mods -
@engikeneer said in A bit confused about Tools positioning:
@the_dragonlord I put a line in my start code that uses
G10 P__ S__to set them. I then have a python script that comments out all the other temp setting commands that PrusaSlicer puts out.For the code snippets, there's an option on the forum called code snippet. The button looks like this </> and is next to the Bold, Italics bullet points etc. You can then either put it inline like I have in this post, or as a block like I did in the others
great! thanks again for everything!
-
@engikeneer said in A bit confused about Tools positioning:
@the_dragonlord I put a line in my start code that uses
G10 P__ S__to set them. I then have a python script that comments out all the other temp setting commands that PrusaSlicer puts out.For the code snippets, there's an option on the forum called code snippet. The button looks like this </> and is next to the Bold, Italics bullet points etc. You can then either put it inline like I have in this post, or as a block like I did in the others
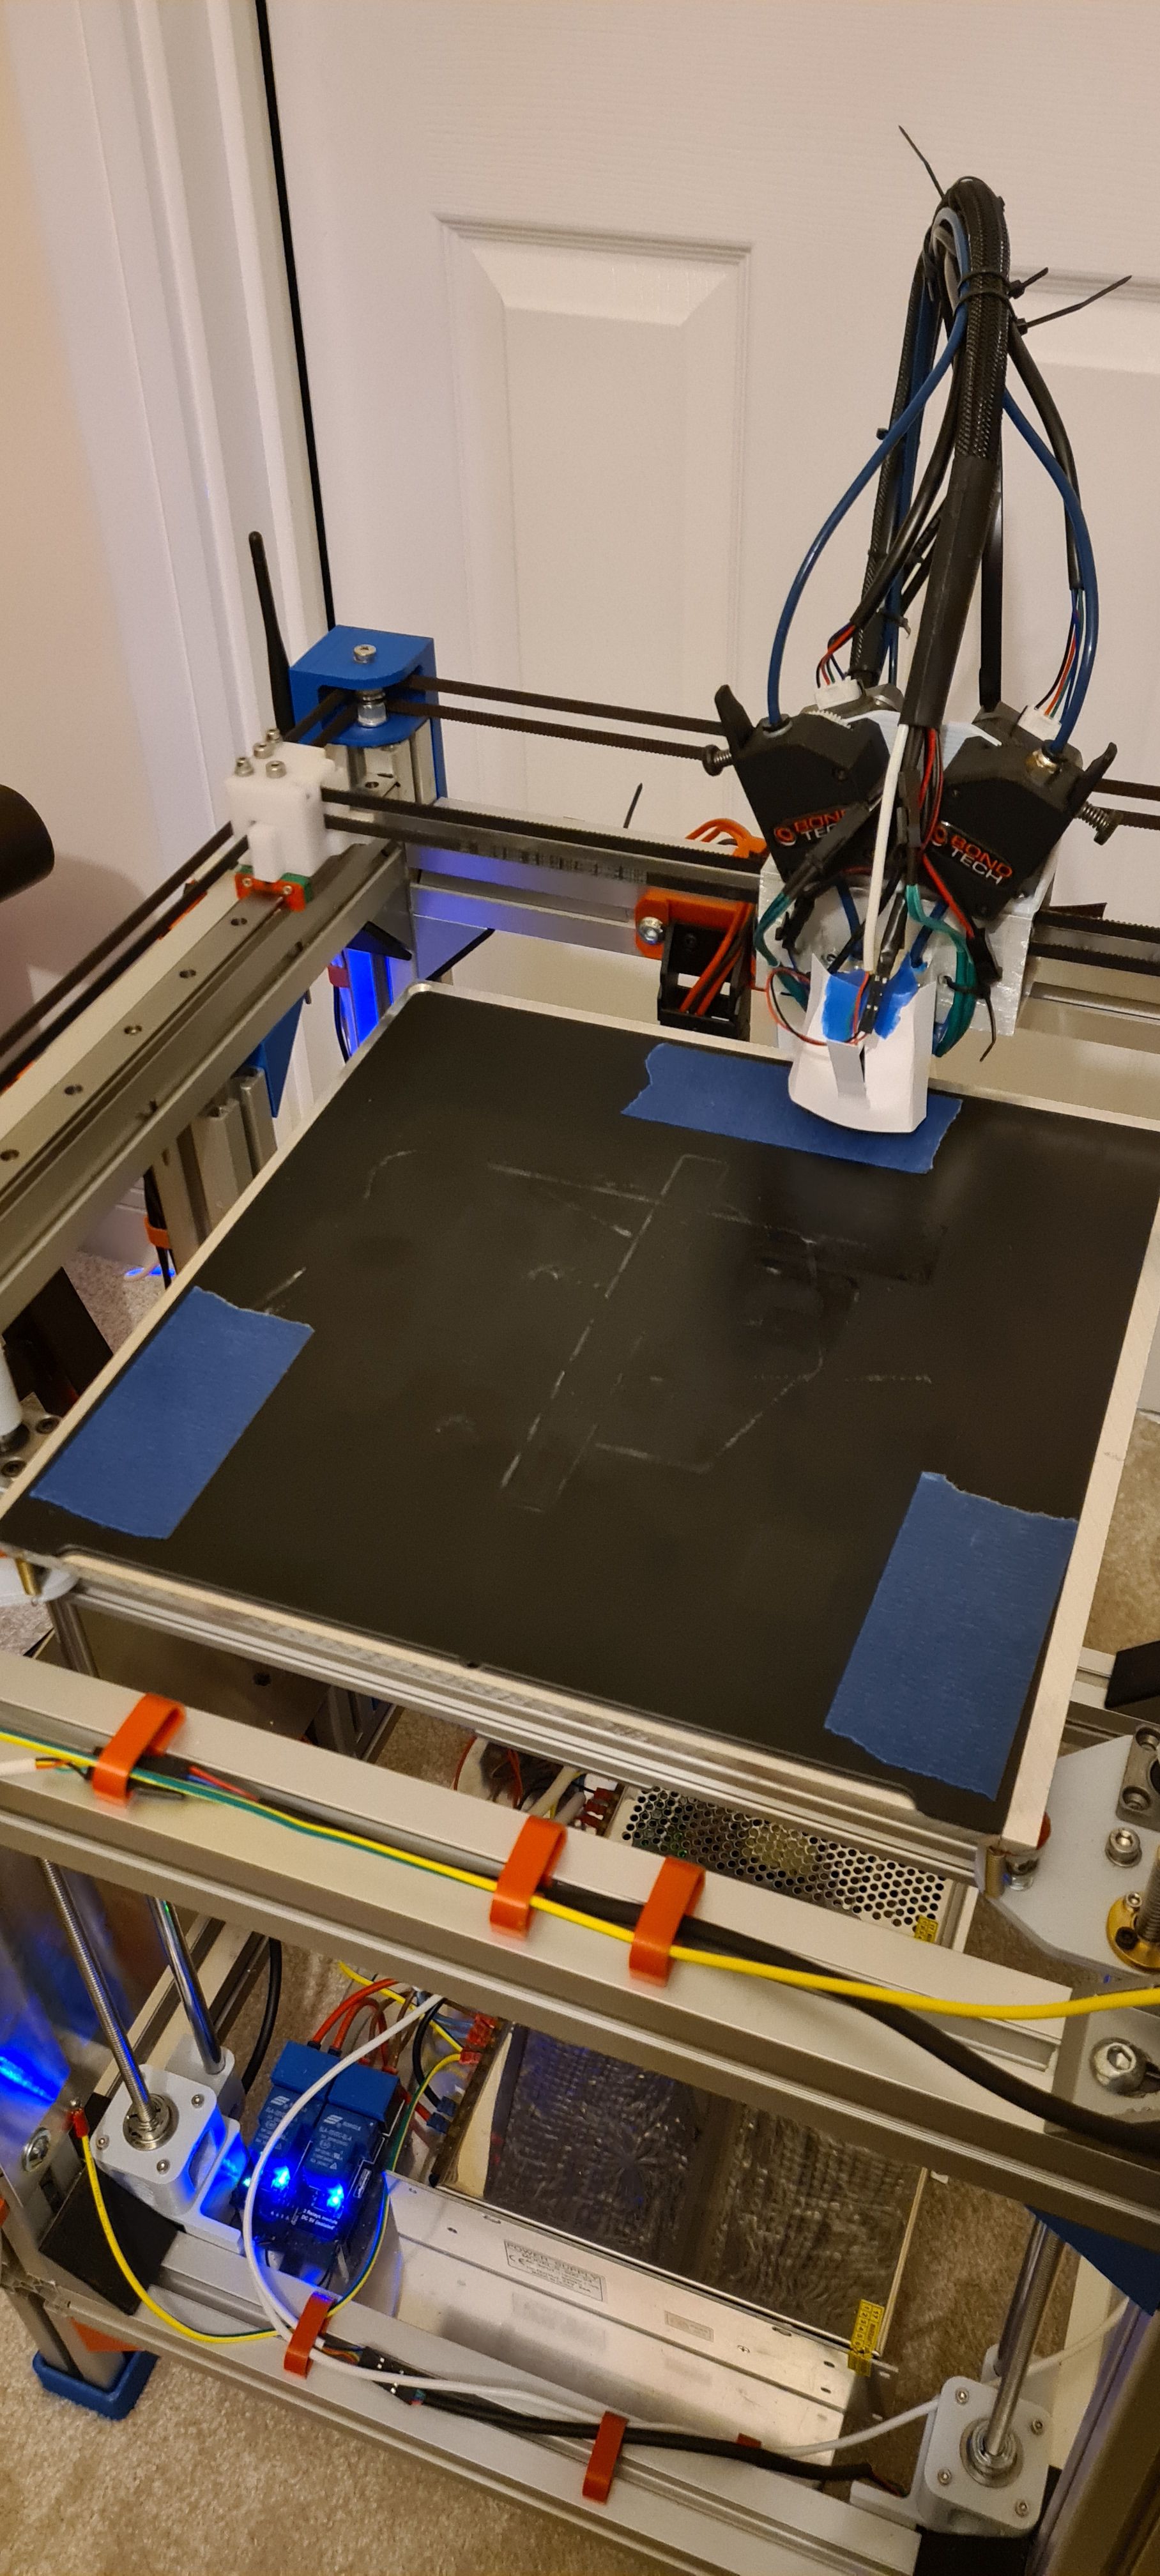
Hi, if I could I would like to ask you some advices...I'm starting to print with PLA, at now I want to male the thin wall test to calibrate the extrusion width....I'm experiencing a lot of problems....I'm starting with only one extruder and as you can see the print shows a lot of artifacts wich are very awful....as I told I'm printong PLA...I've started the first time at a temperature of 200°C, now I'm trying at 220°C but the result dosn't look beeter at now (I'm finishing the print). Have you evere noticed something like this? Have you suggestions for me?
Edit: even at 220°C the result is awful....I've printed using the other extruder and the print is perfect....I'm starting to print to have a failed throat in the left extruder...what do you think?
-
@the_dragonlord it's hard to tell from the photo, but I'd be tempted to say that you're printing too hot, rather than too cold. With a single walled box, there's not a lot of time for the plastic to cool down before the next time the nozzle comes round. Might be that your cooling fans are directed a bit better at your right extruder? Or is it a different filament? I typically print PLA at 190-200 and 45deg bed, but have sometimes gone down to 180deg depending on the filament.
Personally, I think you're better off tuning extrusion by setting your e-steps correctly (doing the mark 110mm then extrude 100mm test), then accurately measuring your filament diameter and putting that into your slicer for that filament (it will change a bit brand to brand, reel to reel).
In general for single walled prints, I tend to bump up the extrusion width a bit (e.g. 0.6mm or more for a 0.4mm nozzle) so they're a bit more stable. Might also help to slow it down a bit to help cooling
Looking at your picture I think one of your next steps might be pressure advance. That will help a bit with the bulge at the corners.
https://duet3d.dozuki.com/Wiki/Pressure_advance -
@engikeneer said in A bit confused about Tools positioning:
@the_dragonlord it's hard to tell from the photo, but I'd be tempted to say that you're printing too hot, rather than too cold. With a single walled box, there's not a lot of time for the plastic to cool down before the next time the nozzle comes round. Might be that your cooling fans are directed a bit better at your right extruder? Or is it a different filament? I typically print PLA at 190-200 and 45deg bed, but have sometimes gone down to 180deg depending on the filament.
Personally, I think you're better off tuning extrusion by setting your e-steps correctly (doing the mark 110mm then extrude 100mm test), then accurately measuring your filament diameter and putting that into your slicer for that filament (it will change a bit brand to brand, reel to reel).
In general for single walled prints, I tend to bump up the extrusion width a bit (e.g. 0.6mm or more for a 0.4mm nozzle) so they're a bit more stable. Might also help to slow it down a bit to help cooling
Looking at your picture I think one of your next steps might be pressure advance. That will help a bit with the bulge at the corners.
https://duet3d.dozuki.com/Wiki/Pressure_advanceHi, esteps are perfectly tuned for both the extruders, I'd like to tune the pressure advance but i don't know how to use the python script to generate the GCODE...is a runtime necessary? What method have you used to set the pressure advance?
-
@the_dragonlord said in A bit confused about Tools positioning:
esteps are perfectly tuned for both the extruders,
In that case, just measure your filament diameter with calipers and run with that. As you print with both heads you'll probably find you want to set the extrusion multiplier a bit below 1 to prevent any exccess material on the top which the other noxxle will scrape and leave a mark. I prefer to tune that by just printing objects and seeing though so not very scientific...
RE pressure advance, the script in the PA wiki page isn't a python script you run, you put it straight into your slicer. I use PrusaSlicer and there's an option for 'Custom G-code' to be inserted at various points (start/end of print, before/after layer change, before/after tool change etc).
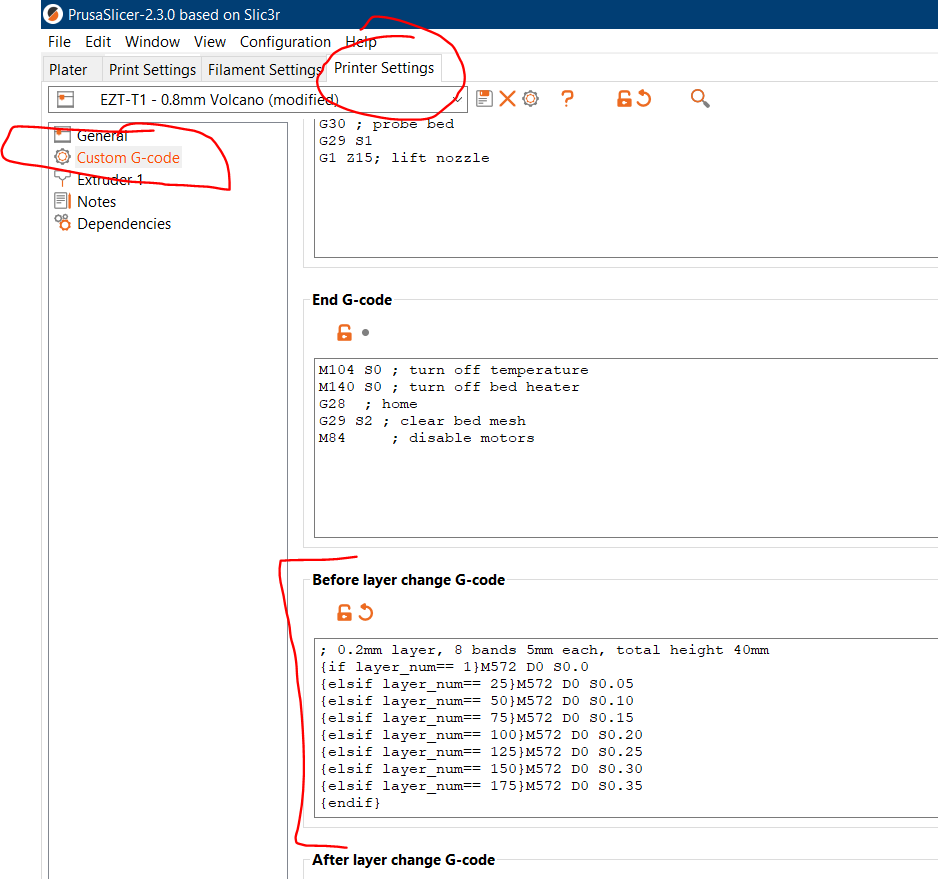
It has built-in place-holder names which you can call to do things with (there's some documentation on their website, but I've found it's a bit of trial and error at times to get the syntax right if you try developing your own...)
Anyways, that will put the PA commands into the print file at the right points. Other slicers will probably have something similar though I've not tried
Alternatively, just set the cube going without that and change the PA on the fly be sending
M572 D0 Sxxxvia the console in DWC, let it run a few layers and adjust again. TBH, this is how I've gone about adjusting/tuning most parameters on my printers because it means you can keep running the same file and tweaking things, rather than having to readjust the slicer, reslice, reupload etc...In this post: https://forum.duet3d.com/topic/6181/tuning-macros-menus-accel-jerk-retraction-pressure-advance, Phaedrux shared some macros that can be quite useful when tuning accel, jerk, retraction and PA. They basically just call the relevant gcode to change the machine parameters (like
M571 D0 Sxxx). They made my life a lot easier when doing this! -
@engikeneer said in A bit confused about Tools positioning:
@the_dragonlord said in A bit confused about Tools positioning:
esteps are perfectly tuned for both the extruders,
In that case, just measure your filament diameter with calipers and run with that. As you print with both heads you'll probably find you want to set the extrusion multiplier a bit below 1 to prevent any exccess material on the top which the other noxxle will scrape and leave a mark. I prefer to tune that by just printing objects and seeing though so not very scientific...
RE pressure advance, the script in the PA wiki page isn't a python script you run, you put it straight into your slicer. I use PrusaSlicer and there's an option for 'Custom G-code' to be inserted at various points (start/end of print, before/after layer change, before/after tool change etc).
It has built-in place-holder names which you can call to do things with (there's some documentation on their website, but I've found it's a bit of trial and error at times to get the syntax right if you try developing your own...)
Anyways, that will put the PA commands into the print file at the right points. Other slicers will probably have something similar though I've not tried
Alternatively, just set the cube going without that and change the PA on the fly be sending
M572 D0 Sxxxvia the console in DWC, let it run a few layers and adjust again. TBH, this is how I've gone about adjusting/tuning most parameters on my printers because it means you can keep running the same file and tweaking things, rather than having to readjust the slicer, reslice, reupload etc...In this post: https://forum.duet3d.com/topic/6181/tuning-macros-menus-accel-jerk-retraction-pressure-advance, Phaedrux shared some macros that can be quite useful when tuning accel, jerk, retraction and PA. They basically just call the relevant gcode to change the machine parameters (like
M571 D0 Sxxx). They made my life a lot easier when doing this!I use Ideamaker as slicer and it doesn't accept conditional expressions unfortunately....I copied and adapted the macros you suggested me...