Every time I print, I need to increase baby steps
-
@fcwilt & @Phaedrux thanks for the explanations!
I've tried this previously, but I wasn't doing it right and I've now put them in the right file, but when select
True Bed Levelling (G32)within DWC, I get the below message after it homes z, but the hotend doesn't move anywhere:G32 Manual corrections required: 0.00 turn up (0.00mm) 0.00 turn down (0.00mm) 0.00 turn down (0.00mm) 0.00 turn down (0.00mm)This is at the very bottom of my config.g file
; Setup Manual Bed Levelling Assistant
M671 X55:338:338:55 Y311:311:51:51 P0.5			   ; Back-left:Back-Right:Front-Right:Front-Left
And this is in bed.g
; bed.g
; called to perform automatic bed compensation via G32
;
; generated by RepRapFirmware Configuration Tool v3.3.0 on Sun Aug 08 2021 21:27:11 GMT+1000 (Australian Eastern Standard Time)
M561 ; clear any bed transform
G28 Z ; home z
G30 P0 X55 Y311 Z-500 ; Back-Left
G30 P1 X338 Y311 Z-500 ; Back-Right
G30 P2 X338 Y51 Z-500 ; Front-Right
G30 P3 X55 Y51 Z-500 S4; Front-Left
G29  ; probe the bed and enable compensation
I'm going to look around the forums and Google, but wanted to post this here
-
@infidelprops
Hi,
You recall that I said I put all commands needed into each file so the will execute successfully without any other steps being taken first?
Now having the M671 in config.g works. But you may find you need to change those values because they are not quite right. If you put the M671 in bed.g then anytime bed.g is executed the current values in the M671 command will be used.
Now as to why it is not working for you. In your G30 command you are using Z-500.
Read this from the G30 documentation:
G30 with a P parameter
This is used for operations that are performed after the printer has been homed and that require the height error at more than one probe point to be measured. These operations are typically performed in the bed.g file. With a Z parameter of -9999 or less, the head moves to the specified XY coordinates and the dive height (set using the H parameter in the M558 command), and probes the bed.
Also since bed.g is intended for bed leveling (auto or manual) and mesh.g is intended for creating the height map needed for mesh bed compensation I would not include the G29 in bed.g. They do not need to be done together and if you included G29 in bed.g you cannot do them separately.
For example I implemented auto bed leveling on one of my printers. I level the bed when I home it. But I only create the height map manually using a DWC Macro as the height map can usually be created once and used over and over. I load the height map use G29 S1 in the code which is executed at the start of a print.
One thing you do need to add to your bed.g file is the code to set the Z=0 Datum using a G30 command. I always set the Z=0 Datum using the center of the bed for the XY position that you must always set before executing the G30. You use a normal G1 command but you have to compute the X and Y parameters so the probe is positioned at the center of the bed and not the nozzle. This means you have to take into account the X and Y offsets of your Z probe.
Frederick
-
@fcwilt thanks for the details!
I've updated bed.g with the following, but not sure if I'm setting Z=0 correctly. Based on reading the documentation for G30, what I'm doing is:
- Move Probe to centre of bed
- Use G30 to probe the current location
- Then move and probe the screw locations and probe
; bed.g ; called to perform automatic bed compensation via G32 ; ; generated by RepRapFirmware Configuration Tool v3.3.0 on Sun Aug 08 2021 21:27:11 GMT+1000 (Australian Eastern Standard Time) ; Setup Manual Bed Levelling Assistant M671 X55:338:338:55 Y311:311:51:51 P0.5 ; Back-left:Back-Right:Front-Right:Front-Left M561 ; clear any bed transform G28 Z; home ; Center of the bed G1 X220 Y175 F6000 G30 S1 Z-9999 ; Centre ; 4 Screw Points G30 P0 X55 Y311 Z-9999 ; Back-Left G30 P1 X338 Y311 Z-9999 ; Back-Right G30 P2 X338 Y51 Z-9999 ; Front-Right G30 P3 X55 Y51 Z-9999 S4; Front-Left -
@infidelprops
I made a mistake.
It's quite late here and I overlooked the fact that you are doing manual bed leveling so setting the Z=0 datum would have to be done after you completed the manual process.
Sorry about that.
Frederick
-
@fcwilt no worries mate, I appreciate you sticking with it!
Here's my bed.g file
; bed.g
; called to perform automatic bed compensation via G32
;
; generated by RepRapFirmware Configuration Tool v3.3.0 on Sun Aug 08 2021 21:27:11 GMT+1000 (Australian Eastern Standard Time)

; Setup Manual Bed Levelling Assistant
M671 X69:338:69:338 Y51:51:308:308 P0.5			   ; Front-Left:Front-Right:Back-Left:Back-Right

M561 ; clear any bed transform
G28 Z; home

; Probe near bed screws
G30 P0 X127 Y58 Z-9999 ; Front-Left
G30 P1 X380 Y58 Z-9999 ; Front-Right
G30 P3 X127 Y318 Z-9999; Back-Left
G30 P2 X380 Y318 Z-9999 S4; Back-Right
And this is what is shown in the console after the 4th point is finished
G32
Manual corrections required: 0.00 turn up (0.00mm) 0.25 turn down (0.13mm) 0.14 turn up (-0.07mm) 0.27 turn down (0.14mm)
Now that I know how much to adjust it... what's the best way to adjust the knobs given they're a manual turn? And do I still need to run a G29 as well to get a height map or this a 1 or the other situation?
-
@infidelprops said in Every time I print, I need to increase baby steps:
Now that I know how much to adjust it... what's the best way to adjust the knobs given they're a manual turn? And do I still need to run a G29 as well to get a height map or this a 1 or the other situation?
I find it difficult to turn the adjustment screws the amounts specified - like 0.14 of a turn. After awhile you just get a feel for it but it can still take many tries. I strive for perfect but I'll settle for being off by 0.01mm.
Now I may just be inept but I find my printer with just 3 adjustment screws much easier to get right than the one that as 4 adjustment screws.
With my manual adjust beds I check them periodically with G32 to see if they have changed.
With my auto adjust beds I do that as part of homing Z.
I create the height map periodically if I think something may have changed. If you implement mesh.g you can create the height map via the DWC pull down menu, via a DWC Macro or just by executing G29.
I load the existing height map in my print start code.
the basic steps related to leveling and mesh compensation are:
- home the printer
- level the bed if auto bed leveling is implemented
- set the Z=0 Datum
- load the height map
Of course I do others things in my print start code like set the bed/extruder temps, wait for them to reach temp, prime the extruder, etc.
Frederick
-
@fcwilt thanks! I actually got some sleep last night and this morning I realised that I just need to turn the knob slightly, then re-run the test again... so the coffee did it's work this morning.
For the G29, I have an empty Mesh file now, and when I run G29 it does nothing... should I put the following in my mesh.g file?
mesh.g
M561 ; clear any bed transform G28 Z; home M557 X90:400 Y15:360 P20 G28 Z; home -
@infidelprops said in Every time I print, I need to increase baby steps:
@fcwilt thanks! I actually got some sleep last night and this morning I realised that I just need to turn the knob slightly, then re-run the test again... so the coffee did it's work this morning.
For the G29, I have an empty Mesh file now, and when I run G29 it does nothing... should I put the following in my mesh.g file?
Below are the essential commands from my mesh.g file.
Now I make use of many separate files dedicated to a specific function.
Below you can see M98 invocations of probe_config.g and probe_set_z.g. The comments below say what they do.
You can of course configure the probe in config.g as many folks do and you can set the Z=0 Datum using a G1 command and a G30 command.
But since these two processes (configuring the probe and setting the Z=0 Datum) need to be done in several other places I create dedicated files for such processes to be invoked with M98 as needed.
M98 P"probe_config.g"             ; configure Z probe

M98 P"probe_set_z.g"              ; set Z=0 datum

M557 X-140:140 Y-125:140 P20:20   ; define 400 point mesh

G29 S0                            ; do probing and save height map
If you have questions please ask.
Frederick
-
@fcwilt Thanks man, really appreciate it!
I've got the manual adjustments done now and reporting back 0.00 for all but one screw, so I'm OK with that for now. I've updated mesh.g to include the below and it's creating the height map now.
;mesh g - manually configured

M98 P"probe_config.g"

M561 ; clear any bed transform
G28 Z; home

M557 X90:400 Y15:360 P20 ; define probe area and points
G29 S0 ; probe and save height map
I've also setup a probe_config.g file as I do like the seperation of files, and in here I have:
; probe_config.g

; Z-Probe
M558 P5 C"!zprobe.in" H3 F650 T12000 	; setup my EZABL
G31 P500 X47 Y10 Z1.750  		; set Z probe trigger value, offset and trigger height
Can I see what you have in your probe_set_z.g file? I've seen multiple post from you around setting Z=0 Datum, and would like to see what you have in there so I can read the gcode doco and figure out what's going on. Question: Will setting this help me to stop having to re-do my babysteps every time I turn my printer back ok? (IE: When I print, as indicated above, I'm constantly updating baby steps, even for the same layer height, but when I turn off my printer and back on... my baby steps go back to 0.00 and i need to reset it as when my first print starts, it's a good .5 mm off the bed)
Ender 5 Plus - E3D Hemera Hotend - Duet 2 Wifi
-
@infidelprops Height calibration just finished and I am very pleased to say this is the best height map I've seen since I started this journey... thanks @fcwilt
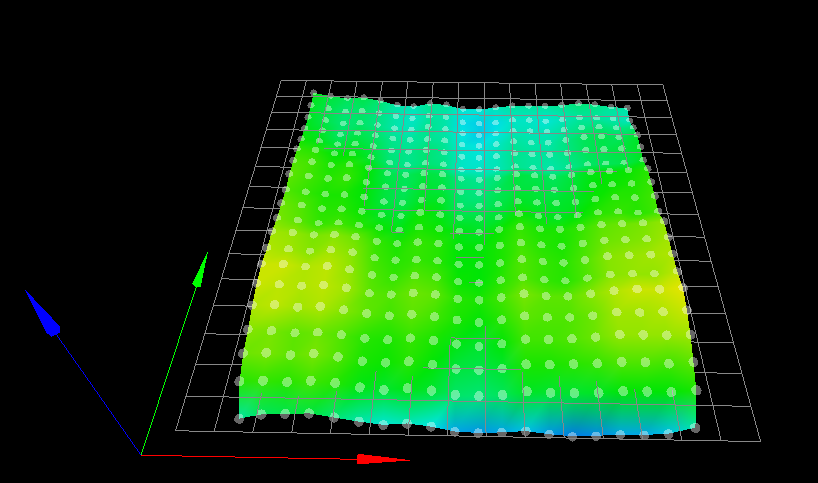
Ender 5 Plus - E3D Hemera Hotend - Duet 2 Wifi
-
@infidelprops said in Every time I print, I need to increase baby steps:
Can I see what you have in your probe_set_z.g file?
Glad to do it.
If you want to see the M98 invoked files let me know.
I hope you don't get confused by my approach of using many separate files.
M98 P"homeALL_verify.g"    ; verify printer is homed - abort if not

M98 P"probe_config.g"      ; configure probe

M98 P"center_probe.g"      ; position on XY for probing

G29 S2                     ; cancel mesh bed compensation
M290 R0 S0                 ; cancel baby stepping

G1 Z{global.g_z_home} F600 ; move Z to "homed" height - insures probe is not too close to the bed - value is set into a global variable in config.g

G30                        ; do single probe - sets Z to probe trigger height - if trigger height is wrong Z position will be wrong - see probe_config.g

G1 Z{global.g_z_home} F600 ; move Z back again to "homed" height
Printers: a E3D MS/TC setup and a RatRig Hybrid. Using Duet 3 hardware running 3.4.6
-
@infidelprops
Forgot.
Once you set the Z Trigger Height correct (and it seems you have) setting baby stepping will not be needed every time you print.
I still find myself tweaking the starting Z height when printing if it looks like the first layer is not quite right.
Frederick
-
@fcwilt said in Every time I print, I need to increase baby steps:
@infidelprops said in Every time I print, I need to increase baby steps:
Can I see what you have in your probe_set_z.g file?
Glad to do it.
If you want to see the M98 invoked files let me know.
I hope you don't get confused by my approach of using many separate files.
M98 P"homeALL_verify.g"    ; verify printer is homed - abort if not

M98 P"probe_config.g"      ; configure probe

M98 P"center_probe.g"      ; position on XY for probing

G29 S2                     ; cancel mesh bed compensation
M290 R0 S0                 ; cancel baby stepping

G1 Z{global.g_z_home} F600 ; move Z to "homed" height - insures probe is not too close to the bed - value is set into a global variable in config.g

G30                        ; do single probe - sets Z to probe trigger height - if trigger height is wrong Z position will be wrong - see probe_config.g

G1 Z{global.g_z_home} F600 ; move Z back again to "homed" height
Thanks, making more sense and I will take you up on the offer to see the homeALL_verify.g, center_probe.g and your config.g file?
And nah, I don't get confused... it makes more sense to me as a developer. (more on the JS/Node side than this/perl)
-
@infidelprops
Here are the files. I cleaned them up a bit removing experimental stuff. I hope I didn't break anything doing that.
; homeALL_verify.g

if !move.axes[0].homed || !move.axes[1].homed || !move.axes[2].homed
  M291 R"Printer has not been homed" P"Cannot continue" S2 T0
  abort "Action aborted - printer not homed"
; center_probe.g M98 P"homeALL_verify.g" M98 P"z_position_adjust.g" ; adjust Z position as needed - insures probe is far enough away from bed to work ; move probe to center of bed G90 ; absolute moves ; this mess computes the center of the bed based on axes min/max values and probe XY offsets G1 X{((move.axis[0].max + move.axis[0].min) / 2) - sensors.probes[0].offsets[0]}, Y{((move.axis[1].max + move.axis[1].min) / 2) - sensors.probes[0].offsets[1]}, F1800; z_position_adjust.g ; adjust Z if it is not in a good position for probing if {move.axes[2].machinePosition} < 5 || {move.axes[2].machinePosition} > 20 G90 ; absolute moves G1 Z{global.g_z_home} F1200 ; move Z to "home" position; ---------------------------------------------------------------------------------------------------- ; start of file - printer FT5 - hardware Duet 2 WiFi/Duex 5 - firmware 3.3.0 ; ---------------------------------------------------------------------------------------------------- ; **************************************************************************************************** ; prologue ; **************************************************************************************************** M111 S0 ; debug off M550 P"FT5" ; machine name (can be anything you like) M555 P2 ; set output to look like Marlin M575 P0 B57600 S2 ; communication parameters for USB serial M575 P1 B115200 S1 ; communication parameters for PanelDue M552 S1 ; enable WiFi (S1) M586 S1 P1 T0 ; enable (S1) FTP (P1) Disable TLS (T0) M586 S1 P2 T0 ; enable (S1) Telnet (P2) Disable TLS (T0) G21 ; dimensions in mm G90 ; for X,Y,Z use absolute coordinate values M83 ; for E0,E1,etc use relative coordinate values ; **************************************************************************************************** ; mode control variables ; **************************************************************************************************** global g_z_home = 5 ; can be used to always move Z to known height global g_print_beg_prime = 30 ; default - set desired in filament config.g global g_print_beg_retract = 0 ; default - set desired in filament config.g global g_print_pause_retract = 0 ; default - set desired in filament config.g global g_print_end_retract = 0 ; default - set desired in filament config.g global g_print_end_mode = "HEAT OFF" ; determines if heaters are turned off when print is done global g_map_mode = "FULL" ; determines which kind of height map is created/loaded global g_probe_mode = "TWO" ; determines if z proving used consecutive or averaging global g_level_mode = "3PT" ; determines if 3 or 4 points are used for leveling global g_pa_setting = 0 ; used for pressure advance testing global g_pa_increment = 0 ; used for pressure advance testing global g_pa_layer_count = 0 ; used for pressure advance testing global g_pa_layer_counter = 0 ; used for pressure advance testing ; **************************************************************************************************** ; kinematics - K0 = Cartesian (X is -left/+right, Y is -front/+back, Z is bed -up/+down) ; **************************************************************************************************** M669 K0 ; defaults = X1:0:0 Y0:1:0 Z0:0:1 ; **************************************************************************************************** ; motors ; **************************************************************************************************** ; motor direction - drive (P), direction (S1 = normal, S0 = reverse) M569 P0 S1 ; drive 0 - normal - X M569 P1 S0 ; drive 1 - reverse - YL M569 P2 S1 ; drive 2 - normal - YR M569 P3 S0 ; drive 3 - reverse - E M569 P5 S0 ; drive 5 - reverse - Z ; motor assignment M584 X0 Y1:2 Z5 E3 ; set what motors do what ; motor performance settings ; X Y Z M92 X80 Y80 Z400 ; steps per mm (Z1600 for 2mm lead - Z400 for 8mm lead - Z400 for belt drive using stepper with gearbox of 5-to-1) M203 X12000 Y12000 Z1200 ; max speed (mm/min) M566 X900 Y900 Z120 ; max instant speed change (jerk) (mm/min) (defaults 900 900 12) (120 z value from phaedrux) M201 X500 Y500 Z240 ; acceleration (mm/s^2) (defaults 500 500 20) (240 z value from phaedrux) M906 X1000 Y1000 Z1000 I30 ; motor current (mA) and idle current (30%) ; E (Zesty Nimble) M92 E2750 ; steps per mm (suggested 2750) M203 E3600 ; max speed (mm/min) (suggested 3600) M566 E40 ; max instant speed change (jerk) (mm/min) (suggested 40) M201 E120 ; acceleration (mm/s^2) (suggested 120) M906 E500 ; motor current (mA) (suggested 500) ; if M92 above is set for the default 16x microstepping then putting M350 here ; will result in the needed adjustments to the initial values set by M92 M350 X16 Y16 Z16 E16 I1 ; 16x microstepping with interpolation ; ============================================================ ; axis dimensions and coordinate value modes for 0,0 in center ; ============================================================ M208 X-150:150 Y-150:150 Z0:350 ; set axes min/max values M579 X1.0 Y1.0 Z1.0 ; scaling (values are determined by measuring test object) M564 H1 S1 ; H1 = dont allow moving non-homed axes S1 = limit movement to axis min/max ; **************************************************************************************************** ; end stops ; -- X,Y,Z,etc = location of endstop (0 = none, 1 = low end, 2 = high end) ; -- S = type (1 = switch, 2 = probe, 3 = motor stall (one), 4 = motor stall (multiple) ; -- ! = invert ^ = enable pull-up ; **************************************************************************************************** M574 X2 S1 P"xstop" ; configure active-high endstop for max end on X M574 Y2 S1 P"ystop" ; configure active-high endstop for max end on Y M574 Z1 S1 P"zstop" ; configure active-high endstop for min end on Z ; **************************************************************************************************** ; heaters ; **************************************************************************************************** M308 S0 P"bedtemp" Y"thermistor" T100000 B4138 ; configure sensor 0 as thermistor M950 H0 C"bedheat" T0 Q10 ; create bed heater output on bedheat and map it to sensor 0 M307 H0 B0 S1.00 A107.3 C136.0 D2.8 V12.0 ; values A, C, D, V determined by running heater tuning M140 P0 H0 ; map heated bed to heater 0 M143 H0 S115 ; set temperature limit for heater 0 M308 S1 P"e0temp" Y"thermistor" T500000 B4723 C1.196220e-7 ; configure sensor 1 as thermistor (SLICE) M950 H1 C"e0heat" T1 Q250 ; create nozzle heater output on e0heat and map it to sensor 1 M307 H1 B0 S1.00 A362.4 C121.7 D4.4 V11.8 ; values A, C, D, V determined by running heater tuning M143 H1 S250 ; set temperature limit for heater 1 ; other heater settings M570 P300 ; heater fault timeout - increase to allow extra heating time ; **************************************************************************************************** ; cooling fans ; -- P# is fan, S# is speed (0 to 255 or 0.0 to 1.0) H# means turn on fan when heater H# temp hits T# ; -- H-1 means no thermostatic control ; **************************************************************************************************** M950 F0 C"fan0" Q500 ; create fan (F), pin name (C), frequency (Q) M106 P0 C"Part" S0 H-1 ; set fan (P), name (C), speed (S), thermostatic control off (H) M950 F1 C"fan1" Q500 ; create fan (F), pin name (C), frequency (Q) M106 P1 C"Hotend" S1 H1 T45 ; set fan (P), name (C), speed (S), thermostatic control on (H & T) ; **************************************************************************************************** ; LED light strips ; -- P# is fan, S# is speed (0 to 255 or 0.0 to 1.0) H# means turn on fan when heater H# temp hits T# ; -- H-1 means no thermostatic control ; **************************************************************************************************** M950 F2 C"fan2" Q500 ; create fan 2 (F), pin name (C), frequency (Q) (lights center) M106 P2 C"Lights C" H-1 L0 ; set fan 2 (P), name (C), thermostatic control off (H) M950 F3 C"duex.fan6" Q500 ; create fan 3 (F), pin name (C), frequency (Q) (lights left) M106 P3 C"Lights L" H-1 L0 ; set fan 3 (P), name (C), thermostatic control off (H) M950 F4 C"duex.fan7" Q500 ; create fan 4 (F), pin name (C), frequency (Q) (lights right) M106 P4 C"Lights R" H-1 L0 ; set fan 4 (P), name (C), thermostatic control off (H) ; **************************************************************************************************** ; tools ; --- M563 --- ; P is tool number ; S is tool name (optional) ; D is extruder drive (0 or 1) ; H is associated heater number ; F is associated fan number ; --- G10 --- ; P is tool number ; X, Y, Z are axis offsets ; R, S are initial standby & active temperatures ; **************************************************************************************************** ; tool 0 M563 P0 S"T0" D0 H1 F0 ; define tool 0 to use extruder drive 0, heater 1, fan 0 G10 P0 X0 Y0 Z0 ; set tool 0 axis offsets G10 P0 R0 S0 ; set initial tool 0 active/standby temperatures ; **************************************************************************************************** ; external buttons (T trigger #, E end-stop #, C when to trigger (0 = always), S = edge (rising = 1, falling = 0) ; external buttons (P = pin #, T = trigger #, R = when to trigger (0 = always, 1 = printing), S = what edge (I->A = 1, A->I = 0, -1 = ignored) ; --- T0 does emergency stop ; --- T1 does pause (see M25) ; --- T# runs macro trigger#.g ; **************************************************************************************************** M950 J1 C"^duex.e2stop" M581 P1 T2 R0 S0 ; little button runs trigger2.g which does M999 reset M950 J2 C"^duex.e3stop" M581 P2 T0 R0 S0 ; big button does emergency stop ; **************************************************************************************************** ; filament sensor ; Pnn = sensor type ; - 0 = none ; - 1 = simple sensor (high signal when filament present) ; - 2 = simple sensor (low signal when filament present) (TriangleLabs) ; - 3 = Duet3D rotating magnet sensor ; - 4 = Duet3D rotating magnet sensor with microswitch ; - 5 = Duet3D laser sensor ; - 6 = Duet3D laser sensor with microswitch ; - 7 = pulse-generating sensor ; C"xx" = input pin name ; Dnn = extruder drive (0,1,2,...) ; Snn = enable/disable monitoring (0 = disable, 1 = enable) ; --- for types 3 to 7 --- ; Ann = when to check (0 = printing motion only, 1 = all motion) ; Enn = min extrusion to trigger check (mm, default 3) ; Lnn = movement per sensor wheel rotation (in mm, default 28.4) ; Raa:bb = extrusion error range (percent) ; **************************************************************************************************** M591 D0 P2 C"e1stop" S1 ; TriangleLabs ;M591 D0 P3 C"e1stop" S1 A0 E3.0 L25.72 R40:115 ; E3D Magnetic ; **************************************************************************************************** ; epilogue ; **************************************************************************************************** ; ---------------------------------------------------------------------------------------------------- ; workplace coordinates ; Ln Mode (L1 L2 or L20 - see below) ; Pnnn tool number if L=1 or coordinate system number if L=2 or L=20 ; X,Y,Z,U,V... Offsets ; ; L= 1: this sets the tool offset, as if the L parameter was not present ; L= 2: this sets the origin of the coordinate system number specified by the P parameter (1 to 9) to the specified X, Y, X... values ; L=20: this is similar to L=2 except that the origin is specified relative to the current position of the tool ; ---------------------------------------------------------------------------------------------------- G10 L2 P1 X0.00 Y0.00 Z0.00 G10 L2 P2 X0.00 Y0.00 Z0.00 G10 L2 P3 X0.00 Y0.00 Z0.00 G10 L2 P4 X0.00 Y0.00 Z0.00 G10 L2 P5 X0.00 Y0.00 Z0.00 G10 L2 P6 X0.00 Y0.00 Z0.00 G10 L2 P7 X0.00 Y0.00 Z0.00 G10 L2 P8 X0.00 Y0.00 Z0.00 G10 L2 P9 X0.00 Y0.00 Z0.00 ; ---------------------------------------------------------------------------------------------------- ; Z probe configuration ; ---------------------------------------------------------------------------------------------------- M98 P"probe_config.g" ; ---------------------------------------------------------------------------------------------------- ; end of file ; ---------------------------------------------------------------------------------------------------- -
@fcwilt very clean setup mate, very clean.
Thank you, I'm going to digest and reverse engineer some of this and do some level testing on my printer...
And with that, I've done two test already using the file @Phaedrux mentioned and both times I still had to adjust the baby steps... First print was set to -0.25, second print was -0.38. I decided to re-run the manual bed levelling and mesh, at which point I think I will re-do my probe z-offset calibration and then the MBL and ABL again.
-
@fcwilt So I'm doing the Z-Probe config again and running into the same problem I always have been, and wondering if this is why I'm always having to adjust my baby steps, for every print.
According to the article, I should run
G30 S-12-3 times until I get a consistent reading, and then use that as my offset in theG31setting. BUT my problem is, I never get a consistent reading and in fact, it increases every time I jog the Z by 5mm in rapid succession.... but if I wait a minute or 90 seconds, it decreased or sometimes has a larger/smaller increment.
Is this indicative of a different problem?Here's what I've gotten to far (read bottom to top):
01/09/2021, 09:08:39 G30 S-1 Stopped at height 1.339 mm 01/09/2021, 09:08:22 G30 S-1 Stopped at height 1.327 mm 01/09/2021, 09:08:02 G30 S-1 Stopped at height 1.326 mm 01/09/2021, 09:07:42 G30 S-1 Stopped at height 1.325 mm 01/09/2021, 09:06:51 G30 S-1 Stopped at height 1.364 mm 01/09/2021, 09:06:42 G30 S-1 Stopped at height 1.383 mm 01/09/2021, 09:06:21 G30 S-1 Stopped at height 1.381 mm 01/09/2021, 09:05:52 G30 S-1 Stopped at height 1.370 mm 01/09/2021, 09:05:32 G30 S-1 Stopped at height 1.369 mm 01/09/2021, 09:05:05 G30 S-1 Stopped at height 1.367 mm 01/09/2021, 09:04:54 G30 S-1 Stopped at height 1.356 mm 01/09/2021, 09:04:29 G30 S-1 Stopped at height 1.355 mm 01/09/2021, 09:03:29 G30 S-1 Stopped at height 1.364 mm 01/09/2021, 09:02:34 G30 S-1 Stopped at height 1.383 mm 01/09/2021, 09:01:07 G30 S-1 Stopped at height 1.441 mm 01/09/2021, 08:58:29 G30 S-1 Stopped at height 1.410 mm 01/09/2021, 08:57:51 G30 S-1 Stopped at height 1.409 mm 01/09/2021, 08:57:16 G30 S-1 Stopped at height 1.398 mm 01/09/2021, 08:56:44 G30 S-1 Stopped at height 1.396 mm 01/09/2021, 08:56:10 G30 S-1 Stopped at height 1.375 mm 01/09/2021, 08:55:30 G30 S-1 Stopped at height 1.374 mm 01/09/2021, 08:55:19 G30 S-1 Stopped at height 1.352 mm 01/09/2021, 08:55:05 G30 S-1 Stopped at height 1.341 mm -
It looks like your probe isn't very consistent. Could try reducing dive speed and adding A10 S0.03 to the M558 command.
If you need to baby step down by approximately 0.3 each time, just increase your G31 Z by that amount and see how that goes.
-
@phaedrux thanks. I've updated M558 to
M558 P5 C"!zprobe.in" H2 A10 S0.03 F650 T12000and getting smaller changes when I run the commands in rapid succession, but still inconsistent. But when I wait 60 - 90 seconds, the trigger height has a large change...01/09/2021, 09:21:48 G30 S-1 Stopped at height 1.305 mm 01/09/2021, 09:19:58 G30 S-1 Stopped at height 1.344 mm 01/09/2021, 09:19:48 G30 S-1 Stopped at height 1.342 mm 01/09/2021, 09:19:41 G30 S-1 Stopped at height 1.351 mm 01/09/2021, 09:19:34 G30 S-1 Stopped at height 1.350 mm 01/09/2021, 09:19:25 G30 S-1 Stopped at height 1.349 mm 01/09/2021, 09:19:16 G30 S-1 Stopped at height 1.347 mm 01/09/2021, 09:19:09 G30 S-1 Stopped at height 1.336 mm 01/09/2021, 09:18:58 G30 S-1 Stopped at height 1.335 mm -
@infidelprops said in Every time I print, I need to increase baby steps:
F650
Try half that speed and see if it's better.
-
@phaedrux yeah, I've been playing with that and have tried numbers between 325 and 585 and when done in rapid succession, it increments by 0.001 - when I wait 30+ seconds, it decreases by roughly 0.008
Just waited 7 minutes and it was a decrease of .03