MakerGear M2 Marline to RepRap Z offset help
-
Hey folks, rather frustrated but probably just lack of understanding as to what I need to do.
With the stock old Marline and Rambo board, I would set my Z offset with M206 command to get staring height perfect.I have my machine running with Duet 2 Firmware is 3.3.
Homeing works, extruder works, extruder heater works, fans work. Trying to set up the Z offset.
My assumptions were I set the max axis to 218 which with the hot end removed the bed is 5mm below the gantry. I would then enter M206 Z12.60; M500 and reboot.
Once homed I send it G1 F1000 X100 Y125 Z0 and the build plate should stop 17.60 from the gantry, but that does not happen, it is still 5mm below not 17.60. Below are the config.g config-orverfied. and home all, really need to get this figure out so I can sleep tonight.
Please explain like I am your mom, I am really burnt and don't really know what I am doing..:-)Thanks
DougConfig-overide.g
; config-override.g file generated in response to M500 at 2021-11-28 20:43
; This is a system-generated file - do not edit
; Heater model parameters
M307 H0 R2.429 C140.000:140.000 D5.50 S1.00 V0.0 B1 I0
M307 H1 R2.429 C140.000:140.000 D5.50 S1.00 V0.0 B0 I0
; Workplace coordinates
G10 L2 P1 X0.00 Y0.00 Z-12.60
G10 L2 P2 X0.00 Y0.00 Z0.00
G10 L2 P3 X0.00 Y0.00 Z0.00
G10 L2 P4 X0.00 Y0.00 Z0.00
G10 L2 P5 X0.00 Y0.00 Z0.00
G10 L2 P6 X0.00 Y0.00 Z0.00
G10 L2 P7 X0.00 Y0.00 Z0.00
G10 L2 P8 X0.00 Y0.00 Z0.00
G10 L2 P9 X0.00 Y0.00 Z0.00Config.g
Configuration file for Duet WiFi (firmware version 3.3)
; executed by the firmware on start-up
;
; generated by RepRapFirmware Configuration Tool v3.3.10 on Sun Nov 28 2021 16:12:33 GMT-0500 (Eastern Standard Time); General preferences
G90 ; send absolute coordinates...
M83 ; ...but relative extruder moves
M550 P"M2 Rev-E V1" ; set printer name; Network
M552 S1 ; enable network
M586 P0 S1 ; enable HTTP
M586 P1 S1 ; enable FTP
M586 P2 S0 ; disable Telnet; Drives
M569 P0 S1 ; physical drive 0 goes forwards
M569 P1 S1 ; physical drive 1 goes forwards
M569 P2 S1 ; physical drive 2 goes forwards
M569 P3 S0 ; physical drive 3 goes forwards
M584 X0 Y1 Z2 E3 ; set drive mapping
M350 X16 Y16 Z16 E16 I1 ; configure microstepping with interpolation
M92 X88.89 Y88.89 Z1007.7 E471.50 ; set steps per mm
M566 X900.00 Y960.00 Z30.00 E960.00 ; set maximum instantaneous speed changes (mm/min)
M203 X12000.00 Y12000.00 Z1500.00 E1500.00 ; set maximum speeds (mm/min)
M201 X2000.00 Y2000.00 Z2000.00 E2000.00 ; set accelerations (mm/s^2)
M906 X800 Y800 Z800 E500 I30 ; set motor currents (mA) and motor idle factor in per cent
M84 S30 ; Set idle timeout; Axis Limits
M208 X0 Y0 Z0 S1 ; set axis minima
M208 X205 Y255 Z218 S0 ; set axis maxima; Endstops
M574 X1 S1 P"!xstop" ; configure switch-type (e.g. microswitch) endstop for low end on X via pin !xstop
M574 Y1 S1 P"!ystop" ; configure switch-type (e.g. microswitch) endstop for low end on Y via pin !ystop
M574 Z1 S1 P"!zstop" ; configure switch-type (e.g. microswitch) endstop for low end on Z via pin !zstop; Z-Probe
M558 P0 H5 F120 T6000 ; disable Z probe but set dive height, probe speed and travel speed
M557 X15:199 Y15:195 S20 ; define mesh grid; Heaters
M308 S0 P"bedtemp" Y"thermistor" T100000 B4072 ; configure sensor 0 as thermistor on pin bedtemp
M950 H0 C"bedheat" T0 ; create bed heater output on bedheat and map it to sensor 0
M307 H0 B1 S1.00 ; enable bang-bang mode for the bed heater and set PWM limit
M140 H0 ; map heated bed to heater 0
M143 H0 S125 ; set temperature limit for heater 0 to 125C
M308 S1 P"e0temp" Y"thermistor" T100000 B4072 ; configure sensor 1 as thermistor on pin e0temp
M950 H1 C"e0heat" T1 ; create nozzle heater output on e0heat and map it to sensor 1
M307 H1 B0 S1.00 ; disable bang-bang mode for heater and set PWM limit
M143 H1 S300 ; set temperature limit for heater 1 to 300C; Fans
M950 F0 C"fan0" Q500 ; create fan 0 on pin fan0 and set its frequency
M106 P0 S0 H-1 ; set fan 0 value. Thermostatic control is turned off
M950 F1 C"fan1" Q500 ; create fan 1 on pin fan1 and set its frequency
M106 P1 S1 H1 T55 ; set fan 1 value. Thermostatic control is turned on
M950 F2 C"fan2" Q500 ; create fan 1 on pin fan1 and set its frequency
M106 P2 S1 H1 T55 ; set fan 1 value. Thermostatic control is turned on; Tools
M563 P0 S"hotend" D0 H1 F0 ; define tool 0
G10 P0 X0 Y0 Z0 ; set tool 0 axis offsets
G10 P0 R0 S0 ; set initial tool 0 active and standby temperatures to 0C; Custom settings are not defined
; Miscellaneous
M501 ; load saved parameters from non-volatile memoryHomeall
; homeall.g
; called to home all axes
;
; generated by RepRapFirmware Configuration Tool v3.3.10 on Sun Nov 28 2021 16:12:33 GMT-0500 (Eastern Standard Time)
G91 ; relative positioning
;G1 H2 Z5 F6000 ; lift Z relative to current position
G1 H1 X-215 Y-260 F1800 ; move quickly to X and Y axis endstops and stop there (first pass)
G1 H2 X5 Y5 F6000 ; go back a few mm
G1 H1 X-215 Y-260 F360 ; move slowly to X and Y axis endstops once more (second pass)G1 H1 Z215 F3600 ; move quickly to z axis endstop and stop there (first pass)
G1 H2 Z-5 F6000 ; go back a few mm
G1 H1 Z10 F360 ; move slowly to z axis endstop once more (second pass)
G92 Z218 ; set Z position to axis maximum (you may want to adjust this
G90 ; absolute positioning -
@airscapes as you are homing to a Z max endstop, the usual way to adjust the Z offset would be to remove the G92 Z218 command from homeall.g (and from homez.g if it is in there too), then tweak the Z value in your M208 S0 command in config.g. For example, if the nozzle is 0.2mm too high then reduce Z218 to Z217.8.
An issue with homing to Z max is that the distance betweeen Z=0 and the endstop trigger point may be affected by thermal expansion. If in future you add a Z probe then you can use it to get a more accurate Z=0 reference before printing by using the G30 command.
There is also the M290 babystepping command, which can be used to make fine adjustments.
Duet WiFi hardware designer and firmware engineer
Please do not ask me for Duet support via PM or email, use the forum
http://www.escher3d.com, https://miscsolutions.wordpress.com -
I think I have something else wrong as well because if I remove G92 from the homez.g and homeall.g, home the machine, then the build plate does not move.
The endstop is at the bottom of travel for Z at 218mm and the nozzle hangs off the X. Please keep in have no experience with reprap. The M2 is my only machine and I really want it working as it did before .. or the hope was better than before.If what you said works which it does not atm, then every time I print a test and need to alter Z by .04mm or an addition .02 to sneak up on perfect, I would need to edit config.g and reboot the machine, reconnect, reload the model, reheat the bed ot 110C
That hardly seems like an upgrade.
M206 Zxx.xx ; m500; G28, done. I had read that worked so that was why I went with this.. How about 3.1, any chance this is just broken in 3.3 ? -
@airscapes said in MakerGear M2 Marline to RepRap Z offset help:
I would need to edit config.g and reboot the machine, reconnect, reload the model, reheat the bed ot 110C
Why do you think that would be the case?
Frederick
Printers: a small Utilmaker style, a small CoreXY and a E3D MS/TC setup. Various hotends. Using Duet 3 hardware running 3.4.6
-
@airscapes said in MakerGear M2 Marline to RepRap Z offset help:
M574 Z1 S1 P"!zstop" ; configure switch-type (e.g. microswitch) endstop for low end on Z via pin !zstop
If your endstop is at the high end of travel you need M574 Z2, not Z1.
What's happening now, is that you're telling it to move to the max end of travel and then trigger the endstop which is defined for low end, so once you home it there it thinks it's at the low end. Forcing the Z position with G92 was overriding that.
Changing to M574 Z2 should make things behave correctly and you'll be able to use M208 to tweak the Z0 position.
If you want to measure the exact distance between Z0 and Zmax, try this.
Move the nozzle to just touch the bed, ideally when both bed and nozzle are at printing temps for a while. When they are touching send G92 Z0. Now send
G1 H3 Z400 F600which will move to the z max endstop and when it triggers it will set M208 Z max to whatever the actual distance from Z0 is. You can send M208 by itself to see what that value is. Then you can use it in the M208 command in your config.g to make it permanent. -
@fcwilt I think I have 2 problems. Zhome without the G92 disables the use of Z.
But since this is about Z offset it may just be my lack of RepRap knowledge.
Let me explain the process to set Z offset that I have been using in Marlin 1.x
X has hotend top of gantry, X end stop at 0 (right side if sitting in the drivers seat)
Y end stop at 255 (back
Z end stop at bottom 215
Front right X0 Y0 build plate up all the way Z0Not sure above data matters.
When I change a hotend (have a hot end for every nozzle size)
install hotend and push all the way up and snug
Set Z0 with M206 Z12.60 (known location same every time)
;M500; G28
send bed up to 0 centered
G1 F1000 X100 Y125 Z0
Slide a .003mm feeler under the clean nozzle
Loosen screw and let the nozzle drop on feeler and snug
I have a spread sheet of offset I have set after calibration prints for different layer height and bed temp to get really close
So set that, for instance M206 Z12.45
M500
Print the test square with 3mm walls, measure and make changes to Z if walls not 3.00 +- .02 For instance if the wall measures 3.05mm I would enter
M206 Z12.50 (larger the offset the closer to the nozzle)
M500
Print again
That will remain until I change it again.
So how would I go about this with Reprap 3.3 if M206 does not work as it does in Marlin
So basically M206 is moving 0 to -12.xx from max if I understand what is going on. If I put a thicker bed on, I change it to 9.xx to give it more room
Again there seems to be something else that is not correct, should I start a new thread for the homing and control issue?
Thanks and sorry for the long winded post but apparently this type of printer design is not all that popular. -
Since you have a Z endstop sensor this would allow you to establish a repeatable Z=0 position.
Having that why can you not simply adjust the nozzle for the desired gap when at Z=0?
Frederick
-
@airscapes see this response from @Phaedrux:
If your endstop is at the high end of travel you need M574 Z2, not Z1.
That explains why Z would not move down without the G92.
-
@airscapes said in MakerGear M2 Marline to RepRap Z offset help:
X has hotend top of gantry, X end stop at 0 (right side if sitting in the drivers seat)
Y end stop at 255 (backOnce again, the position you describe has the endstops at the high end of travel. Right for X and rear for Y.
M574 Y1 S1 P"!ystop" ; configure switch-type (e.g. microswitch) endstop for low end on Y via pin !ystop
That would mean you should be using M574 X2 and Y2.
In your case, since both X and Y are flipped, the parts would just come out rotated 180 degrees from your slicer preview. No big deal. If you had only 1 axis flipped, you'd get mirrored parts.
-
@phaedrux Ah, I get it.. I did not understand the high and low part, got it..
So this should be correct now.; Endstops M574 X1 S1 P"!xstop" ; configure switch-type (e.g. microswitch) endstop for low end on X via pin !xstop M574 Y2 S1 P"!ystop" ; configure switch-type (e.g. microswitch) endstop for high end on Y via pin !ystop M574 Z2 S1 P"!zstop" ; configure switch-type (e.g. microswitch) endstop for high end on Z via pin !zstopEdit.. something still not right
I apologize for my lack of understanding.. should have spent a few weeks studying before jumping in. -
Yes motor direction will likely need to change as well.
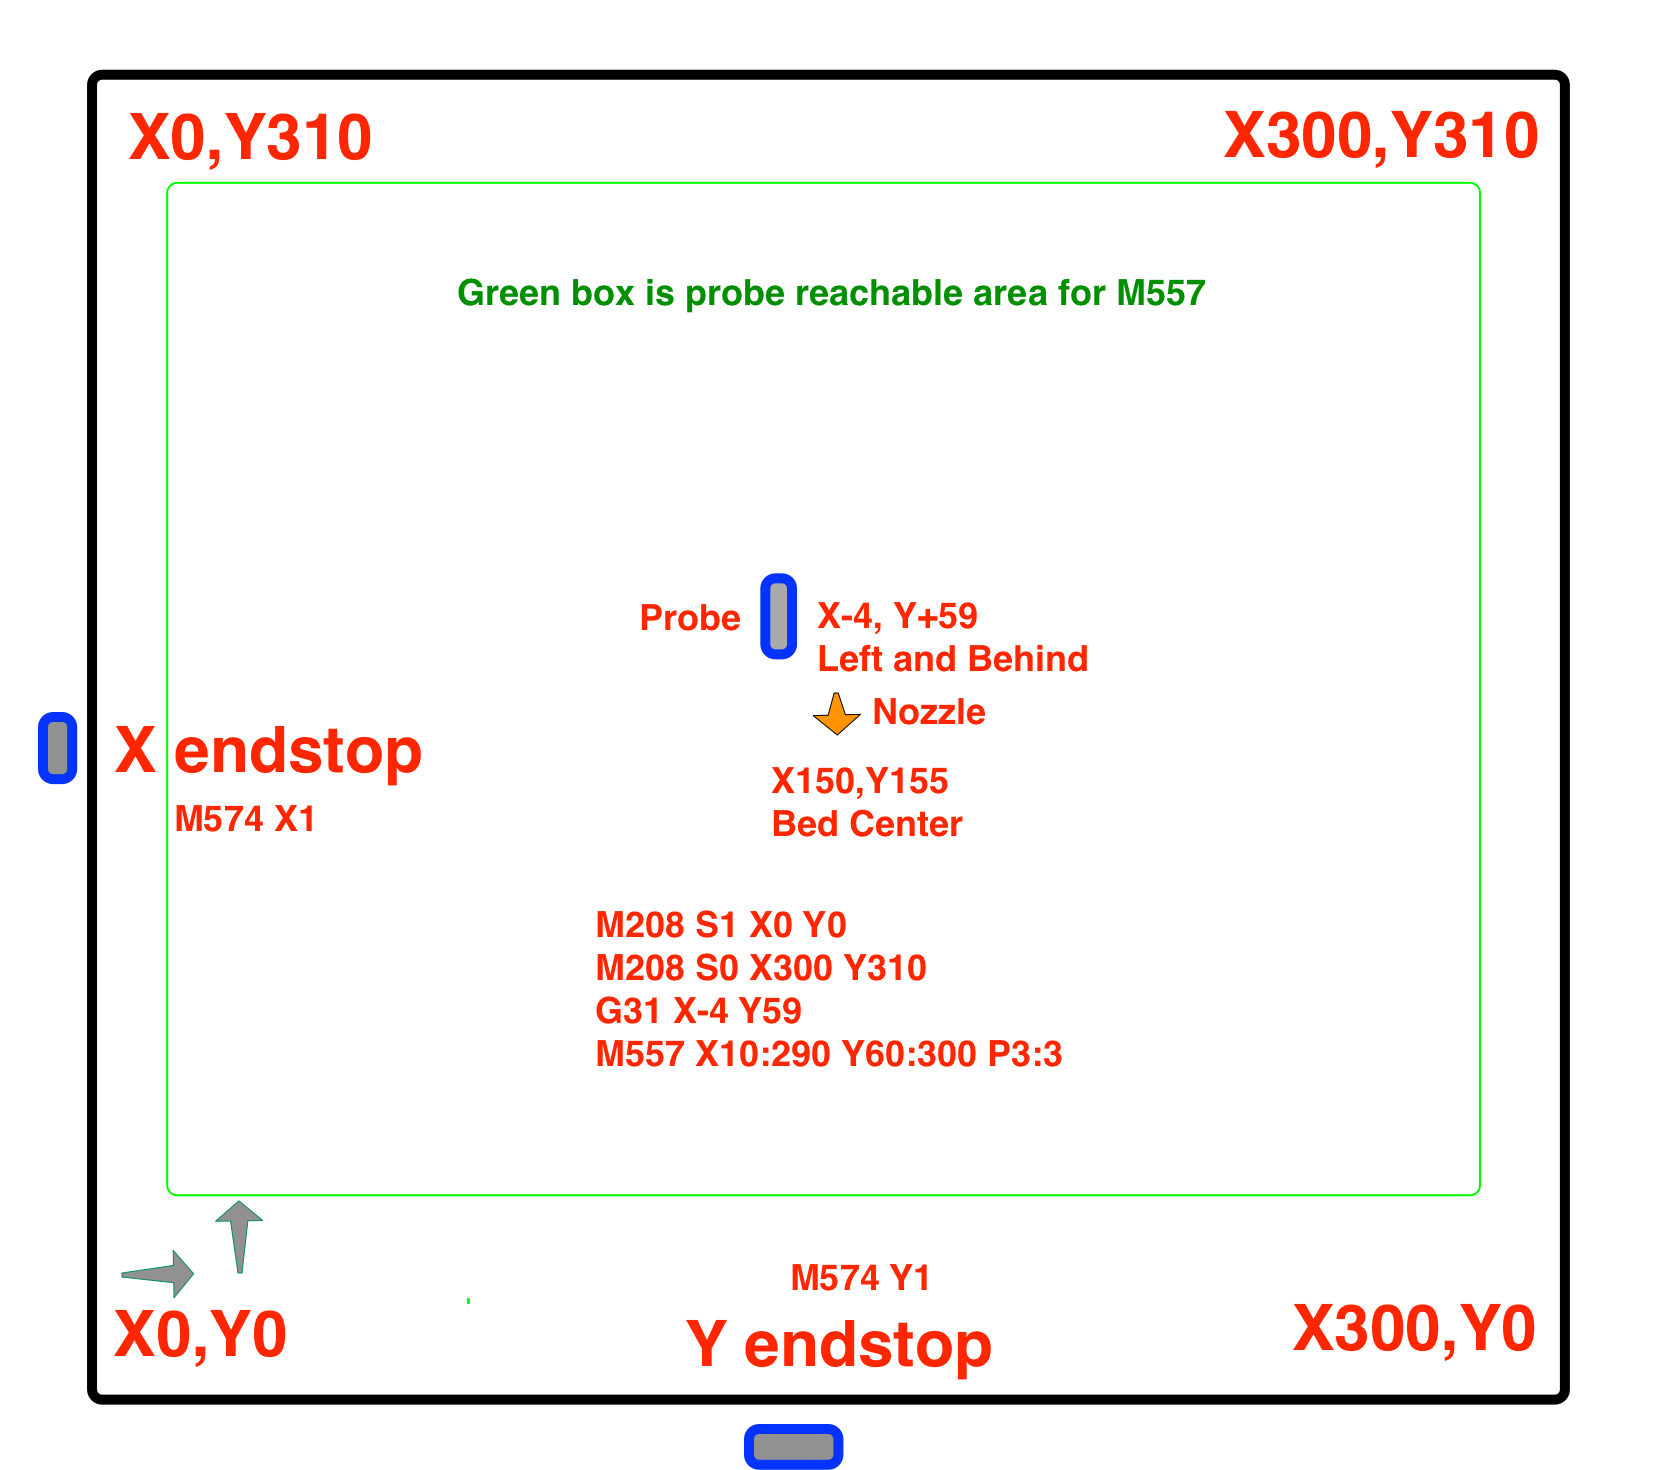
Start with the fact that the 0,0 position is in the front left corner. -X moves to the left, +X moves to the right. -Y moves to the front, +Y moves to the back.
If the endstop is at the high end of travel (right side for x, or back side for Y) then the M574 will be X2 Y2.
Homing move directions would be in the positive direction in the homing macros and the direction of motor rotation will need to match as well so that + moves go right or back, and - moves go left or to the front.
I hope that helps.
-
@phaedrux said in MakerGear M2 Marline to RepRap Z offset help:
Yes motor direction will likely need to change as well.
Start with the fact that the 0,0 position is in the front left corner. -X moves to the left, +X moves to the right. -Y moves to the front, +Y moves to the back.
If the endstop is at the high end of travel (right side for x, or back side for Y) then the M574 will be X2 Y2.
Homing move directions would be in the positive direction in the homing macros and the direction of motor rotation will need to match as well so that + moves go right or back, and - moves go left or to the front.
I hope that helps.
When speaking or front left, is that my left when looking at the machine or the machines left looking at me.. still in the auto repair mindset.. left& right from drivers seat . 0,0,0, is right front with bed up ..
I keep thinking I have this correct and then read something that confuses me.
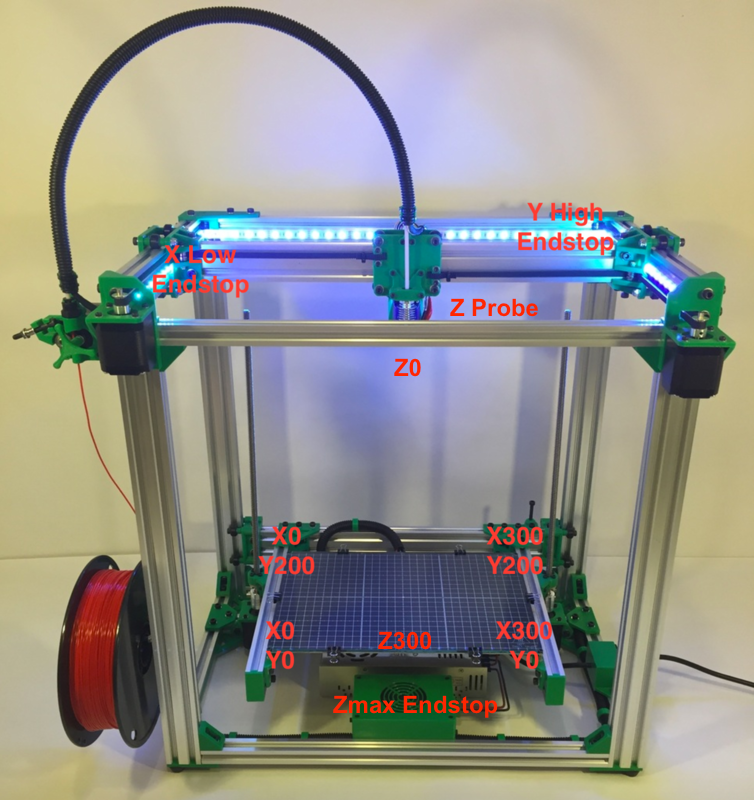
Looking at the Marlin config it says this about end stops which makes sense I think because I was wrong about Y.. when the build plate move towards the Y end stop, it is actually moving to position 0. kind of confusing since it is the bed that is moving once homed the nozzle is at Y0, same as X, so would that not make them both Y1 and Z which is farthest from the nozzle 0 when homed be Y2??? Then set motor direction to achieve the proper moves?Here is a pic of all 3 end stops you can see Z between the bed and frame on the left.. Finger is at XY 0
// ENDSTOP SETTINGS:
// Sets direction of endstops when homing; 1=MAX, -1=MIN
#define X_HOME_DIR -1
#define Y_HOME_DIR -1
#define Z_HOME_DIR 1
-
@airscapes said in MakerGear M2 Marline to RepRap Z offset help:
When speaking or front left, is that my left when looking at the machine
Yes, your left when looking at the machine. This matches the way that CAD and slicer software orients the part view.
Now there is no hard rule that says this is the way things must be. There are many printers that have the endstops on the opposite side and still home to the low end with all endstops. As I said, if you do both X and Y it just has the effect or rotating the part 180 degrees compared to the slicer preview.
In the olden days the endstop and the 0 point were synonymous, but now days the origin and the endstop locations are not necessarily the same.
I would ignore the marlin setup entirely and focus on the printer itself and how it's oriented and how reprapfirmware is configured to reflect that.
Here are some photos that might help clarify.
-
@phaedrux I think I have the motion and end stops all figured out.
Homing works correctly and all the jog buttons move the axis in the proper direction .
I have even figured out the M206 thing .. sort of. Was going to print a cal square but got a heater fault on the bed as it was just starting to heat up and has always been slow. So new thread on that issue, as searching did not help much at all.
Will update this once I can print something... assuming it prints..")
-
I don't think M206 would be needed at all. It's far easier to just adjust position of the reachable area with the M208 min and max values.
If the nozzle is off the edge of the printable bed when the endstop is hit, you can treat the corner of the bed as 0,0 and then use a negative value for M208 min to place the endstops as far as they need to be away from the bed.
In the case of a setup using max endstops such as this, if the endstop is off the edge of the reachable bed you can just limit the print area in the slicer.
-
@phaedrux I have made good progress and to your point the, M206 does not work the same in RepRap as it does in marlin. In marlin it is added to max_pos . So I did as you said and used the M208 to alter the gap between the build plate and the nozzle. I would normally do this within octoprint using m206 but since I will now have to edit the config I will have to use both interfaces as I do prefer octoprint over the web interface of the Duet. Still have to do some more testing and probably tweaking of Accelerations and such.
Thanks for your patients with me, I am sure I will be back with more questions I can't find answers for. -
 undefined Phaedrux marked this topic as a question
-
undefined Phaedrux has marked this topic as solved
-
@airscapes Heya, did you ever finish your M2 conversion? I'm considering taking the plunge too. Would you be willing to share your config files and any build gotchas either here or in the makergear forums?
-
@andyk Sure but I am not sure I would do it again since I am adding nothing to the M2. Not sure it is really an upgrade other than noise reduction. I am finding issues with using Octoprint where the duet 2 Gui crashes and the manual extrude/retract buttons of octoprint don't work. I could give up octoprint.. but old habits die hard.
-
@airscapes said in MakerGear M2 Marline to RepRap Z offset help:
Octoprint
Octoprint isn't really recommended with the Duet. It kind of defeats half the features of the Duet.
-
@phaedrux
I am going to give the Web Gui a run and see if I like it. Have a job running now without Octoprint connected, waiting to see if the Gui Still crashes.. Started the last job with the Gui, octoprint was connected, and the gui died so had to power off the machine to stop the job...second time without octoprint connected .. so far so good