Workbee Y axis auto-square setup
-
Hi all,
for a long time I wanted to add some kind of auto-squaring function to the Workbee. So much so, that I already routed the cable for the Endstop on the Left-Side Y axis.
I assumed it was just a matter of plugging the Endstop, set some sort of Endstop offset and be done with it. However, I stumble upon this post here where it is explain that there are no Endstop offsets but there is a workaround, because of course there is one.
I contacted the people at Ooznest and they sent me come code another user was using successfully and, as far as my ignorance can realize, looks like this user is doing what @dc42 explains on the other post. The code they sent me is as follows:
Homeall.g
; homeall.g
; called to home all axes
G91 ; relative positioning
G21 ; Set units to mm
G1 H1 Z{move.axes[2].max*2} F900 ; move quickly to Z axis endstop and stop there (first pass)
G1 H1 X{move.axes[0].max*2} F2400 ; move quickly to X axis endstops and stop there (first pass)
G1 H1 Y{move.axes[1].max*2} F2400 ; move quickly to Y axis endstops and stop there (first pass)
G92 X{move.axes[0].max} Y{move.axes[1].max} Z{move.axes[2].max} ; Set Home Position
M584 P4 ; set 4 axis CNC
M669 K0 X1:0:0:0 Y0:1:0:0 U0:0:0:1 Z0:0:1:0 ; enable speed for U axis
G1 X-3 Y-5 U-5 F2400 ; go back a few mm in X Y and U
G1 Z-3 F900 ; go back a few mm in Z
G1 H1 Y{move.axes[1].max*2} U{move.axes[3].max*2}F300 ; move slowly both Y and U axis enstops and stop there (second pass)
G1 U0.0 F150 ; fully align gantry IMPORTANT move only in negative direction (select Y or U and change accordingly)
G92 Y{move.axes[1].max} U{move.axes[3].max} ; set Y and U home Position
M584 P3 ; set 3 axis CNC
M669 K0 X1:0:0:0 Y0:1:0:1 Z0:0:1:0 ; enable Y speed for U axis
G1 H1 X{move.axes[0].max*2} F300 ; move slowly to X axis endstops once more (second pass)
G1 H1 Z{move.axes[2].max*2} F300 ; move slowly to Z axis endstop once more (second pass)
G92 X{move.axes[0].max} Y{move.axes[1].max} Z{move.axes[2].max} ; Set Home Position
G90 ; absolute positioning


config-axes-calibration.g
; Axes Calibration configuration executed by config.g
M92 X400 Y400 U400 Z400 ; Set steps per mm


config-axes-endstops.g
; Endstop configuration executed by config.g
M574 X2 P"!xstop" S1 ; Set active low X endstop
M574 Y2 P"ystop" S1 ; Set active low Y endstop
M574 U2 P"e1stop" S1 ; Set active low U endstop
M574 Z2 P"!zstop" S1 ; Set active low Z endstop


config-axes-limits.g
; Axes Limits configuration executed by config.g
M208 X0 Y0 U0 Z0 S1 ; Set axis minima (ADDED U Axis 211225)
M208 X1311 Y1245 U1245 Z120 ; Set axis maxima (ADDED U Axis 211225)
however, when I try to use it, the CNC is stuck with the U axis as well, because it appears on the web interface. It does the first Y-axis homing and only stops when the "old" Endstop is triggered. Then it switches to 4 axis (line 10 of the code above, I guess). However then the console throws the errors (paraphrasing here):
- G0/G1: insufficient axis homed
- G28 Y Warning: motor phase A may be siconnected reported by driver(s) 1 3
I am guessing I have some errors with the M669 command, as the other Ooznest user might not have wired the motors as I've done. I looked into the documentation on M669, but it wasn't clear for me.
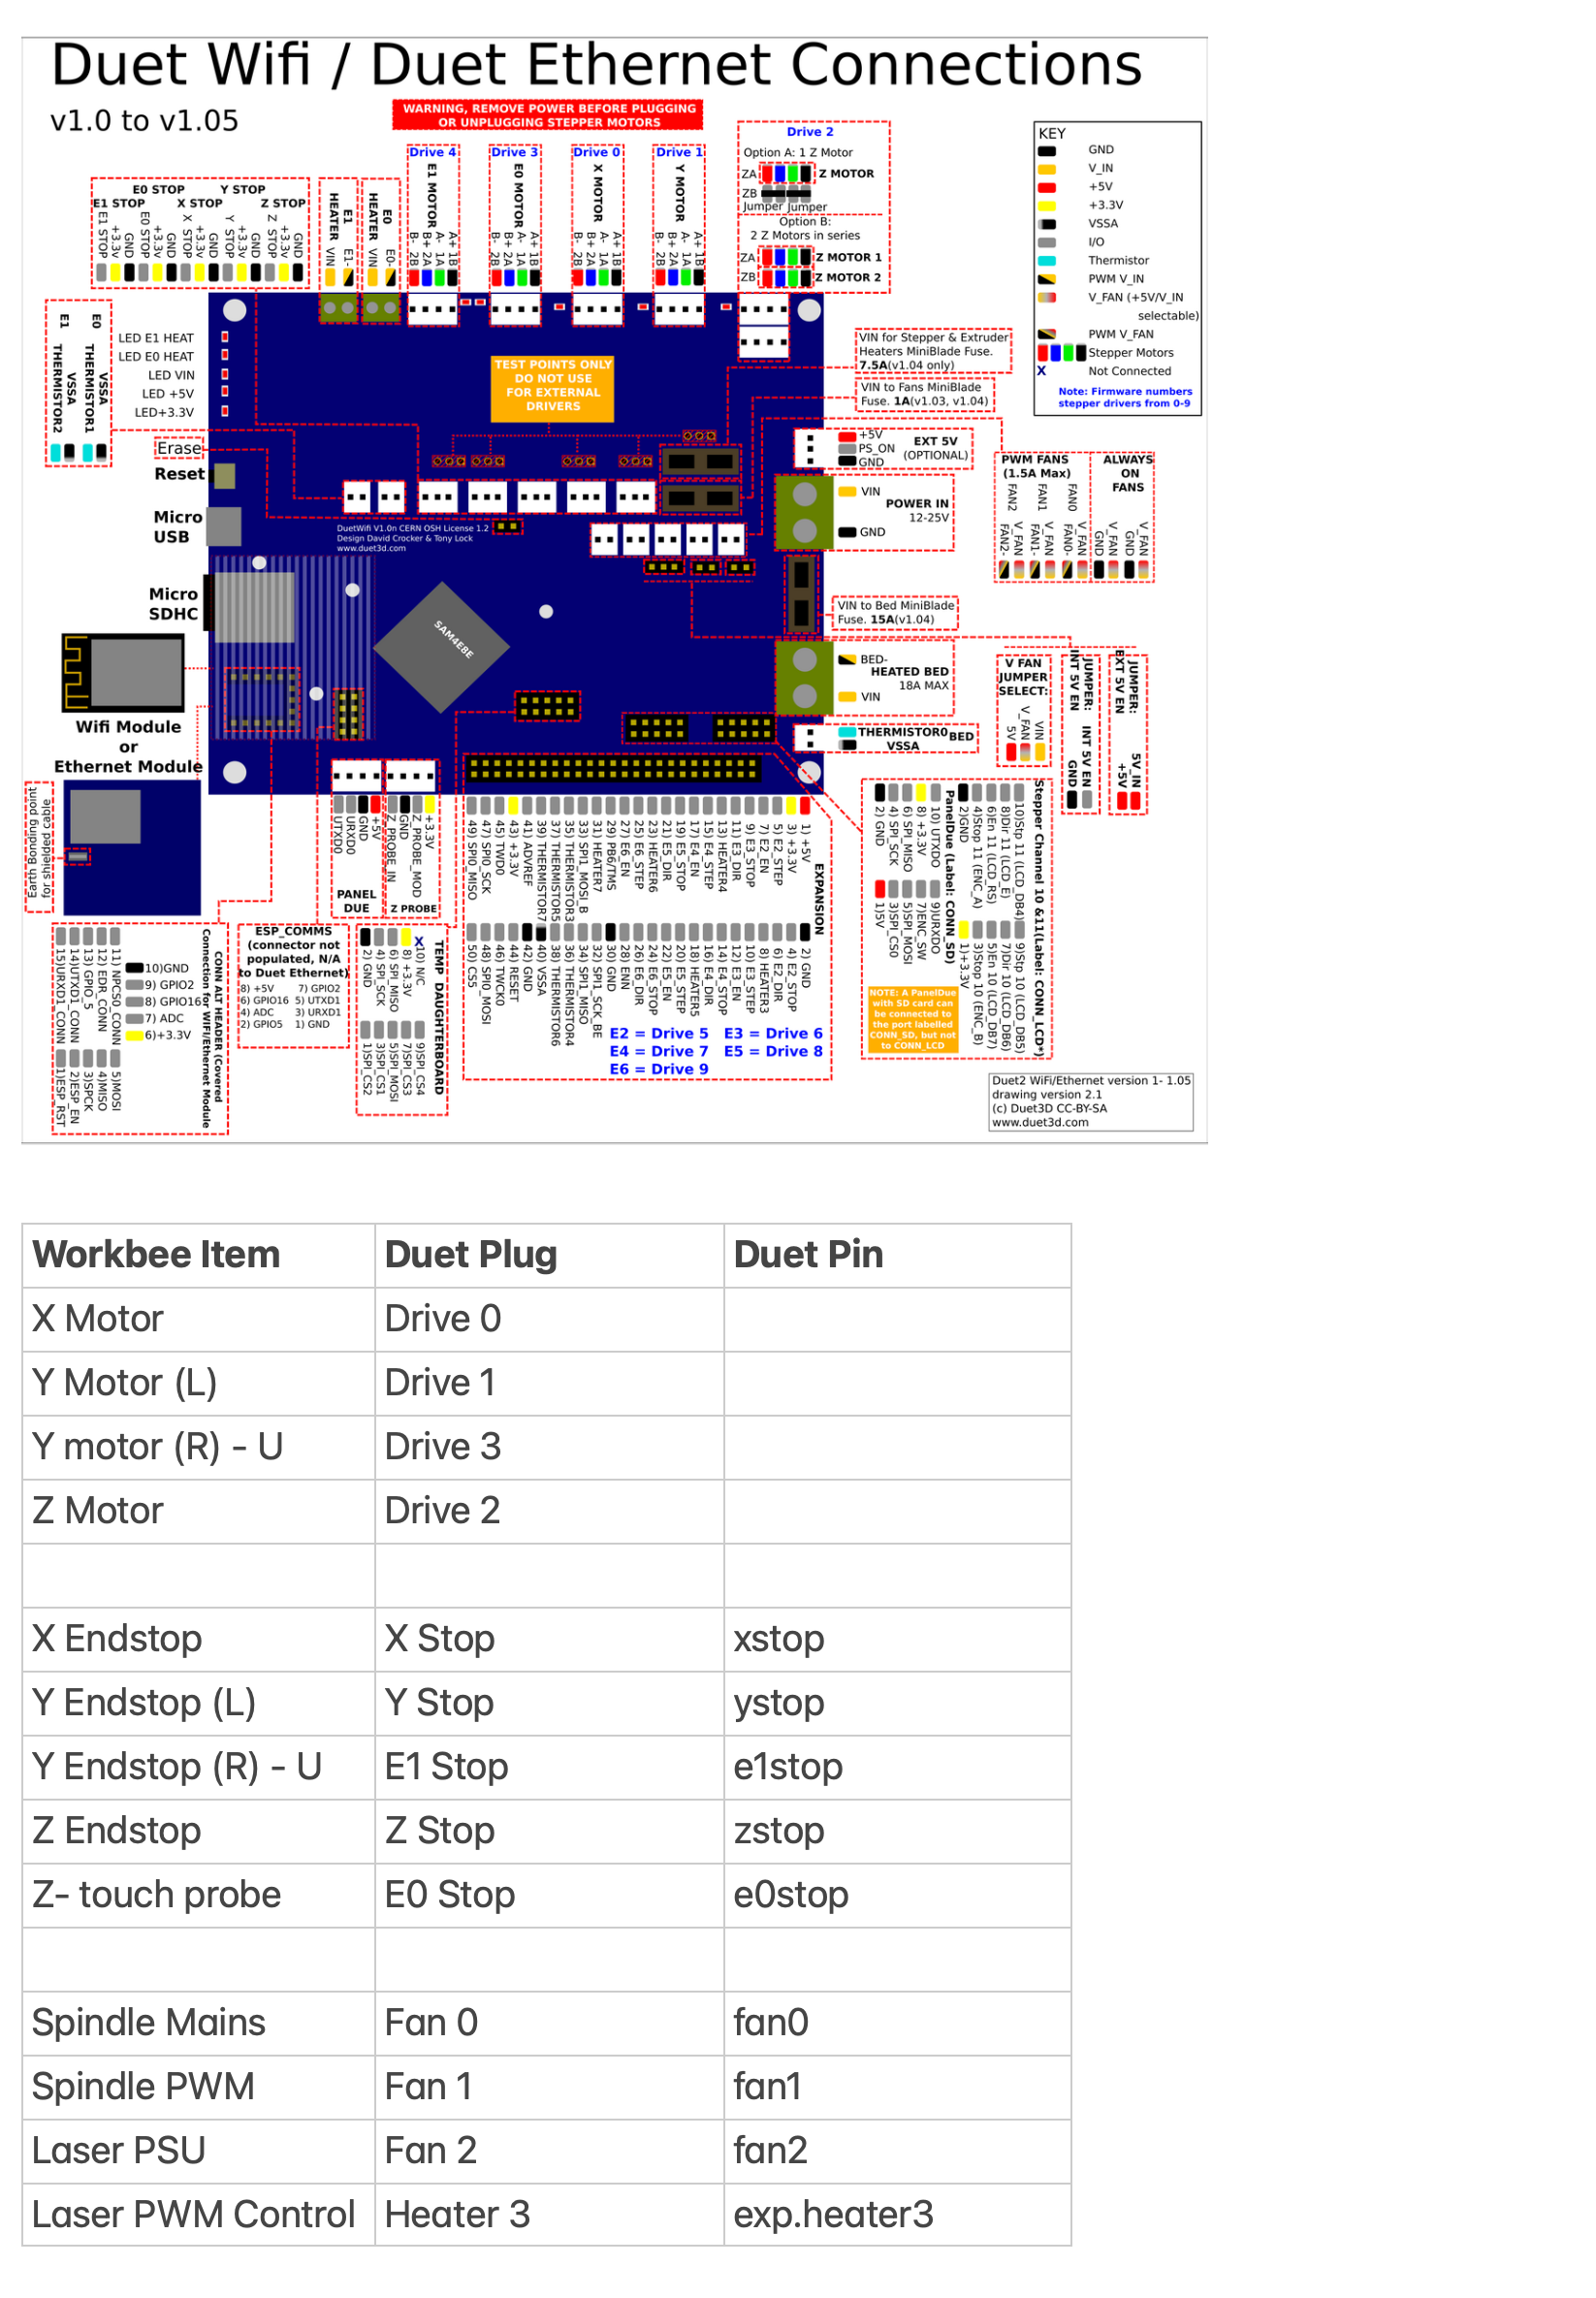
My wiring setup is as the picture below shows:
any help on sorting this out would be much welcome. I just wished there were Endstop Offsets to make life a bit easier...
Thanks in advance!
-
If the endstops are mobile or you can shim the switch contact so that when the endstops are hit the axis will be square you could use a simplified M574 Y2 P"ystop+e1stop" S1 and then home Y as a combined axis and it will move both motors until each respective endstop is hit. That way the homing itself does the squaring.
Is that not possible?
-
@phaedrux to be honest, when I saw all the code I had to modify, this was my first thought… but I wanted to try it programmatically, as it would have more room for fine tunning
-
Well if you know what you need to offset by you could home both at once as I describe, then split the axis, move whichever motor to the offset and use G92 to set it's position and then recombine.
I don't think it needs to be as complicated as that example.
-
@phaedrux from the time I started with 3D printers, I used to find really difficult to adjust the nozzle Z-Height by moving the Z-Endstop up and down. That's the main reason I tended to do it that way. I am not saying it is not possible, but I am unable to physically move one endstop on an Al-Profile by 0.x mm. Even if I loosen it up, and move it, say, 0.2mm, by the time I tighten it again, the forces upon the screw have already moved it...
anyway... I've made some progress yesterday and today. The main problem was that actually one of the wires on one motor was not crimped correctly. After that, I only had to adjust the code I was given. After modifying the endstops configuration and axis configuration, I had to modify the homeall.g and the homey.g files, which I attach here for future reference:
homeall.g
G91 ; relative positioning
G21 ; Set units to mm
G1 H1 Z{move.axes[2].max*2} F900 ; move quickly to Z axis endstop and stop there (first pass)
G1 H1 X{move.axes[0].max*2} F2400 ; move quickly to X axis endstops and stop there (first pass)
G1 H1 Y{move.axes[1].max*2} F2400 ; move quickly to Y axis endstops and stop there (first pass)

M584 P4 ; set 4 axis CNC
M669 K0 X1:0:0:0 Y0:1:0:0 U0:0:0:1 Z0:0:1:0 ; enable speed for U axis
G92 X{move.axes[0].max} Y{move.axes[1].max} U{move.axes[3].max} Z{move.axes[2].max} ; Set Home Position

G1 X-3 Y-5 U-5 F2400 ; go back a few mm in Y and U
G1 Z-3 F900 ; go back a few mm in Z
G1 H1 Y{move.axes[1].max*2} U{move.axes[3].max*2}F300 ; move slowly both Y and U axis enstops and stop there (second pass)

G1 Y-0.23 F150 ; fully align gantry IMPORTANT move only in negative direction (select Y or U and change accordingly)

G92 Y{move.axes[1].max} U{move.axes[3].max} ; set Y and U home Position

M584 P3 ; set 3 axis CNC
M669 K0 X1:0:0:0 Y0:1:0:1 Z0:0:1:0 ; enable Y speed for U axis
G1 H1 X{move.axes[0].max*2} F300 ; move slowly to X axis endstops once more (second pass)
G1 H1 Z{move.axes[2].max*2} F300 ; move slowly to Z axis endstop once more (second pass)
G92 X{move.axes[0].max} Y{move.axes[1].max} Z{move.axes[2].max}; Set Home Position
G90 ; absolute positioning
homey.g
G91 ; relative positioning
G21 ; Set units to mm
G1 H1 Z{move.axes[2].max*2} F900 ; move quickly to Z axis endstop and stop there (first pass)
G1 H1 Y{move.axes[1].max*2} F2400 ; move quickly to Y axis endstops and stop there (first pass)

M584 P4 ; set 4 axis CNC
M669 K0 X1:0:0:0 Y0:1:0:0 U0:0:0:1 Z0:0:1:0 ; enable speed for U axis
G92 Y{move.axes[1].max} U{move.axes[3].max} Z{move.axes[2].max} ; Set Home Position

G1 Y-5 U-5 F2400 ; go back a few mm in Y and U
G1 Z-3 F900 ; go back a few mm in Z
G1 H1 Y{move.axes[1].max*2} U{move.axes[3].max*2}F300 ; move slowly both Y and U axis enstops and stop there (second pass)

G1 Y-0.23 F150 ; fully align gantry IMPORTANT move only in negative direction (select Y or U and change accordingly)


G92 Y{move.axes[1].max} U{move.axes[3].max} ; set Y and U home Position

M584 P3 ; set 3 axis CNC
M669 K0 X1:0:0:0 Y0:1:0:1 Z0:0:1:0 ; enable Y speed for U axis
G1 H1 Z{move.axes[2].max*2} F300 ; move slowly to Z axis endstop once more (second pass)
G92 Y{move.axes[1].max} Z{move.axes[2].max}; Set Home Position
G90 ; absolute positioning
the problem I found is that after reassigning the axis with the M584 and M669 commands, the homing is lost. Even if I want to split the combined Y into Y and U for the autosquaring, when the M584 followed by the M669 command is executed, all the homing are lost, even X and Z.
Now, as I was collecting the info for the update, I remembered that on my 3D printers I am able to set an offset for the Z probe with the G31 command. I was wondering if I could use this G31 command to set offsets for the Y and U axis. That way, I guess I could skip the moving of one of the axis "manually" ?? or am I missing something here?
Thanks a lot!