BLtouch - Mesh doesnt works nice
-
Hello together!
Hi, everyone!
To be honest, I have a big problem (at least that's it for me ..) because I am simply not satisfied with the Mesh and BL Touch on my Sapphire Pro.First of all, I would like to say that I have built a Duet 2 Wifi into the printer for a long time and also an original BL Touch.
Unfortunately, this always causes problems.
And somehow it worked or did so again to some extent.In the last few days I've been desperate and now I'm at a point where I don't know any more ...
No matter what settings I try and how often I try the bed or how fast ... it just doesn't work properly.
At one point I am too close for the extruder to click and at another point I am far too far away so that the entire PETG clings to the nozzle until the nozzle is closed.
It can't be due to the permanent pressure plate either, as I've already tried a sanded FR4 and a PEI plate.
I just don't understand why he doesn't balance the mesh properly for me anymore ...
Do you have another idea? I'm currently so far and am considering giving up because I just can't do anything anymore ....
Here is my current config.g:
; Configuration file for Duet WiFi (firmware version 3)
; executed by the firmware on start-up
;
; generated by RepRapFirmware Configuration Tool v3.1.4 on Sun Sep 13 2020 21:49:48 GMT+0200 (Mitteleuropäische Sommerzeit)

; General preferences
G90                                            ; send absolute coordinates...
M83                                            ; ...but relative extruder moves
M550 P"Sapphire Pro"                           ; set printer name
M669 K1                                        ; select CoreXY mode

 ; Network
M552 S1                                        ; enable network
M586 P0 S1                                     ; enable HTTP
M586 P1 S0                                     ; disable FTP
M586 P2 S0                                     ; disable Telnet

; Drives
M569 P0 S1                                     ; physical drive 0 goes forwards
M569 P1 S0                                     ; physical drive 1 goes backwards
M569 P2 S1                                     ; physical drive 2 goes forwards
M569 P3 S0                                     ; physical drive 3 goes backwards
M584 X0 Y1 Z2 E3                               ; set drive mapping
M350 X16 Y16 Z16 E16 I1                        ; configure microstepping with interpolation
M92 X80.00 Y80.00 Z1600.00 E415.00             ; set steps per mm
;M566 X720.00 Y720.00 Z120.00 E300.00           ; set maximum instantaneous speed changes (mm/min)
M205 X8 Y8 Z0.6 E5                              ; Set max instantaneous speed change in mm/sec jerk - Z fährt langsamer & ruhiger nach unten beim Drucken / vorher 0.6 bei Z
;M205 X8 Y8 Z5 E5                               ; Set max instantaneous speed change in mm/sec jerk = Original
M203 X12000.00 Y12000.00 Z300.00 E6000.00      ; set maximum speeds (mm/min)
M201 X2000.00 Y2000.00 Z120.00 E1500.00        ; set accelerations (mm/s^2)
M906 X1250 Y1250 Z1000 E1000 I30               ; set motor currents (mA) and motor idle factor in per cent
M84 S180                                       ; Set idle timeout

; Axis Limits
M208 X0 Y0 Z0 S1                               ; set axis minima - (OLD Z-1 so that Bed Mesh Leveling could go negative also)
M208 X220 Y205 Z210 S0                         ; set axis maxima

; Endstops
M574 X1 S1 P"!xstop"                           ; configure active-high endstop for low end on X via pin !xstop
M574 Y1 S1 P"ystop"                            ; configure active-high endstop for low end on Y via pin ystop
M574 Z1 S2 P"zstop"                            ; NEW = configure Z-probe endstop for low end on Z /// OLD = configure active-high endstop for low end on Z via pin zstop
M591 D0 P1 C"e0stop" S1						   ; Enable filament monitoring when printing from SD card - simple sensor (high signal when filament present) - Connected to e0stop

; Z-Probe
;M558 P0 H5 F120 T6000                          ; disable Z probe but set dive height, probe speed and travel speed
;M557 X15:215 Y15:195 S20                       ; define mesh grid
M950 S0 C"exp.heater3"							; create servo pin 0 for BLTouch
M558 P9 C"^zprobe.in" H5 F100 T9000	A2			; set Z probe type to bltouch and the dive height + speeds + probe each Point 2x times
G31 X0 Y-40 Z1.780 P25
;M557 X15:215 Y15:195 S20                       ; define mesh grid - "Original"
M557 X0:220 Y0:205 S20                          ; define mesh grid - Neu - dadurch kommt der BLTouch auch weiter an den Rand des Bettes
M376 H3 										; Taper compensation at Z=3mm

; Heaters
M308 S0 P"bedtemp" Y"thermistor" T100000 B3950 ; configure sensor 0 as thermistor on pin bedtemp
M950 H0 C"bedheat" T0                          ; create bed heater output on bedheat and map it to sensor 0
M307 H0 B0 S1.00                               ; disable bang-bang mode for the bed heater and set PWM limit
M140 H0                                        ; map heated bed to heater 0
M143 H0 S150                                   ; set temperature limit for heater 0 to 120C
M308 S1 P"e0temp" Y"thermistor" T100000 B4725 C7.06e-8 ; configure sensor 1 as thermistor on pin e0temp
M950 H1 C"e0heat" T1                           ; create nozzle heater output on e0heat and map it to sensor 1
M307 H1 B0 S1.00                               ; disable bang-bang mode for heater  and set PWM limit
M143 H1 S270                                   ; set temperature limit for heater 1 to 270C

; Fans
M950 F0 C"fan0" Q500                           ; create fan 0 on pin fan0 and set its frequency
M106 P0 S0 H-1                                 ; set fan 0 value. Thermostatic control is turned off
M950 F1 C"fan1" Q500                           ; create fan 1 on pin fan1 and set its frequency
M106 P1 S1 H1 T45                              ; set fan 1 value. Thermostatic control is turned on

; Tools
M563 P0 D0 H1 F0                               ; define tool 0
G10 P0 X0 Y0 Z0                                ; set tool 0 axis offsets
G10 P0 R0 S0                                   ; set initial tool 0 active and standby temperatures to 0C

; Custom settings are not defined
M912 P0 S-12,45							  	   ; CPU Temperature Calibrating

; Miscellaneous
M501                                           ; load saved parameters from non-volatile memory
T0
Greetings from Austria
-
@xenon2008 said in BLtouch - Mesh doesnt works nice:
G31 X0 Y-40 Z1.780 P25
Hello, the config looks ok for me, you can check that the G31 offsets are ok: if your X axis is positive to the right and Y with positive in direction to the back, then X0 Y-40 means it is at the same X position like the nozzle and in front of the nozzle. If not, then the compensation will be at the wrong position later.
Other reasons need more information from you side:
- do you measure with nozzle and bed heated up to the temperature when you later start printing?
- content of mesh.g and an image of heightmap.csv
- how is the procedure to create the mesh? (G29, G30 etc) => so please post the homeall.g and homex/y/z files, config-override and mesh.g, bed.g if they exist
- are there possible mechanical reasons => please post images of the printer
- is BLTouch working? Please check retractprobe.g and deployprobe.g, you can test retract and deploy manually by M401 and M402 (when running your code after this, it shall be im retracted state)
-
@joergs5
the Offsets are OK. the BlTouch ist in front of the Nozzle (Y-40)-
Yes i always measure only the heated bed with same temperature & hotend "cold"
-
BLTouch is working
-
how i create a mesh? i Enter M561 in Console Und then G29
Bed mesh:
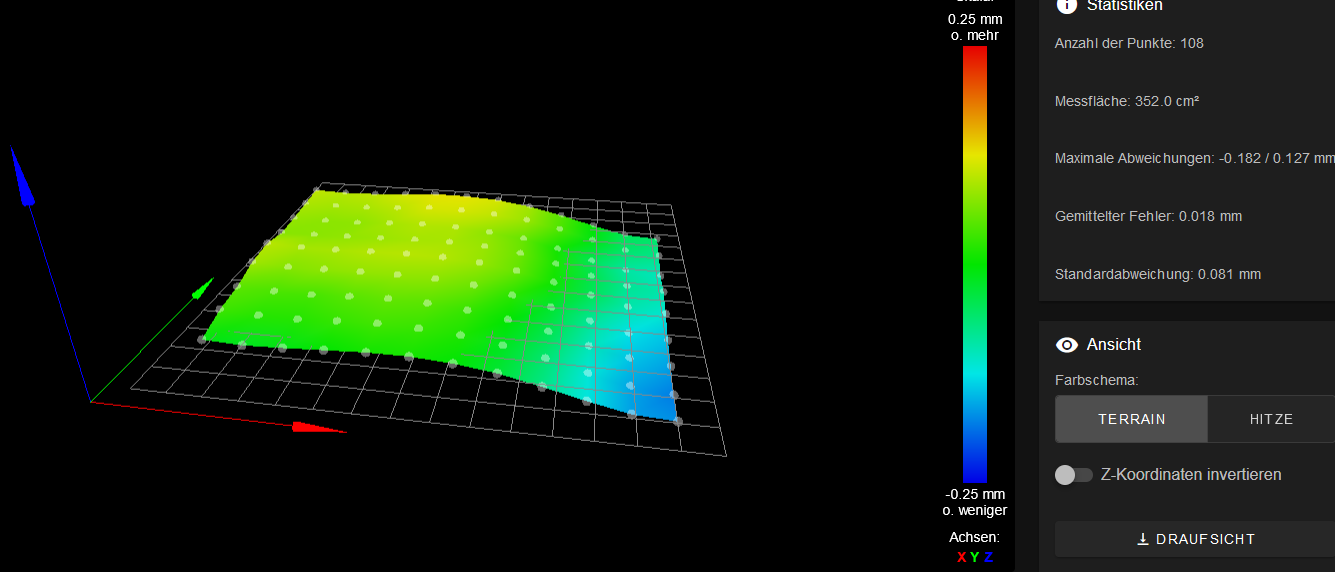
but i can not find a mesh.g file?bed.g
; bed.g
; called to perform automatic bed compensation via G32
;
; generated by RepRapFirmware Configuration Tool v3.1.4 on Sun Sep 13 2020 21:49:48 GMT+0200 (Mitteleuropäische Sommerzeit)
M561 ; clear any bed transform
G29  ; probe the bed and enable compensation
Homeall:
; homeall.g
; called to home all axes
;
; generated by RepRapFirmware Configuration Tool v3.1.4 on Sun Sep 13 2020 21:49:48 GMT+0200 (Mitteleuropäische Sommerzeit)
G91                     ; relative positioning
G1 H2 Z5 F6000          ; lift Z relative to current position
G1 H1 X-225 Y-215 F1800 ; move quickly to X or Y endstop and stop there (first pass)
G1 H1 X-225             ; home X axis
G1 H1 Y-215             ; home Y axis
G1 X5 Y5 F6000          ; go back a few mm
G1 H1 X-225 F360        ; move slowly to X axis endstop once more (second pass)
G1 H1 Y-215             ; then move slowly to Y axis endstop

;selbst ergänzt für BL-Touch
G90 G1 X110 Y142.5 F2000   ; Move BL-Touch to the center of the bed
M558 F150                ; Set the probing speed
G30
M558 F75                 ; Set a slower probing speed
G30
;G1 H1 Z-225 F360        ; move Z down stopping at the endstop (ist vom Optischen Endstop)
G90                      ; absolute positioning
G1 Z10 F6000 			 ; Rapidly move the Z axis to
;G92 Z0                  ; set Z position to axis minimum (you may want to adjust this) - (ist vom Optischen Endstop)

; Uncomment the following lines to lift Z after probing
;G91                    ; relative positioning
;G1 Z5 F100             ; lift Z relative to current position
;G90                    ; absolute positioning
HomeX:
; homex.g
; called to home the X axis
;
; generated by RepRapFirmware Configuration Tool v3.1.4 on Sun Sep 13 2020 21:49:48 GMT+0200 (Mitteleuropäische Sommerzeit)
G91               ; relative positioning
G1 H2 Z5 F6000    ; lift Z relative to current position
G1 H1 X-225 F1800 ; move quickly to X axis endstop and stop there (first pass)
G1 X5 F6000       ; go back a few mm
G1 H1 X-225 F360  ; move slowly to X axis endstop once more (second pass)
G1 H2 Z-5 F6000   ; lower Z again
G90               ; absolute positioning
HomeY:
; homey.g
; called to home the Y axis
;
; generated by RepRapFirmware Configuration Tool v3.1.4 on Sun Sep 13 2020 21:49:48 GMT+0200 (Mitteleuropäische Sommerzeit)
G91               ; relative positioning
G1 H2 Z5 F6000    ; lift Z relative to current position
G1 H1 Y-215 F1800 ; move quickly to Y axis endstop and stop there (first pass)
G1 Y5 F6000       ; go back a few mm
G1 H1 Y-215 F360  ; move slowly to Y axis endstop once more (second pass)
G1 H2 Z-5 F6000   ; lower Z again
G90               ; absolute positioning
HomeZ:
; Home Z Axis

;selbst ergänzt für BL-Touch damit dieser "sicher" zur Mitte des Bettes gefahren werden kann!
G91               		 ; relative positioning
G1 H2 Z5 F6000    		 ; lift Z relative to current position

G90 G1 X110 Y142.5 F2000   ; Move BL-Touch to the center of the bed

M558 F150                ; Set the probing speed
G30
M558 F75                 ; Set a slower probing speed
G30
G90 					 ; Make sure we are in absolute mode
G1 Z10 F6000 			 ; Rapidly move the Z axis to Z=10
one other Thing.... some people told my i could be an "Temperature Drift" from the BL TOuch because i have enclosured the printer?
-
-
@xenon2008 in newer firmware, bed.g and mesh.g are used for bed leveling and mesh compensation code. It's no problem if it doesn't exist. (G29 calls mesh.g and if it not exists, it runs G29 S0).
I am no expert for mesh code review, but others will be able to check (maybe not at weekend). I'll tell you if I find an error. => I don't see an error
I've not heard of temperatur drift of BLTouch before, but if the expansion of the push pin is meant, this effect should be minimal, as the pin is not very long.
You can check whether mesh compensation is active while printing by calling M122. There is a line which tells you whether mesh compensation is active.
Please post config-override.g also, because in your config.g is a M501 to load one.
-
@xenon2008 maybe the Z jerk and maximum speed changes
M205 X8 Y8 Z0.6 E5
are too low, because for mesh compensation Z needs to change values fast. The M376 H3 is at the lower limit also (20 * maximum error), so together the allowed speed change may be too low.
I tried to make a calculation: jerk 0.6 mm/s, bed is uneven by 0.3 mm on 100 mm, speed 200 mm/s, this may be too slow for Z jerk, because in 1/2 second it needs to correct 0.3 mm at the lowest level. Firmware could slow down speed, but I did not look how it behaves.
Instead of mesh compensation, you could also try to make the bed more flat. Maybe heating the bed up results in the bending result by the 4 screws. The bed needs a little bit space to expand when heating up. Loosing two screws at the side where it bends (or having a slot where the screws can slide about 1/2 mm) could prevent the bending. You may not need such an elaborated solution like this one: https://drmrehorst.blogspot.com/2017/07/ultra-megamax-dominator-3d-printer-bed.html but this blog gives good information about what I mean. To verify whether heating up bends the bed, you could make a BLTouch measurement with the bed unheated. But of course the bed could be unflat already.
-
@joergs5
Good Morning from Austria,Sorry i hope my English Skills are not too terrible

Here is my config-override.g:
; config-override.g file generated in response to M500 at 2022-01-06 11:57
; This is a system-generated file - do not edit
; Heater model parameters
M307 H0 R0.334 C176.800:176.800 D1.40 S1.00 V24.2 B0 I0
M307 H1 R2.743 C173.112:173.112 D5.79 S1.00 V24.1 B0 I0
; Workplace coordinates
G10 L2 P1 X0.00 Y0.00 Z0.00
G10 L2 P2 X0.00 Y0.00 Z0.00
G10 L2 P3 X0.00 Y0.00 Z0.00
G10 L2 P4 X0.00 Y0.00 Z0.00
G10 L2 P5 X0.00 Y0.00 Z0.00
G10 L2 P6 X0.00 Y0.00 Z0.00
G10 L2 P7 X0.00 Y0.00 Z0.00
G10 L2 P8 X0.00 Y0.00 Z0.00
G10 L2 P9 X0.00 Y0.00 Z0.00
And i double checked, i am at the latest Firmware
Board: Duet 2 WiFi (2WiFi)
Firmware: RepRapFirmware for Duet 2 WiFi/Ethernet 3.3 (2021-06-15)
Version von Duet WiFi Server: 1.26Regarding Z Jerk & Acceleration, which values would you suggest here?
I am of the opinion that I have read somewhere here in the forum that this does not seem to have any influence on the mesh, but unfortunately I can no longer find the post
-
With the thin Alu heatbed of Sapphire it is possible to have 0.2 deviations.
What surface are you using glass, spring steel or sticker?
Try this get 4 or 5 mm mirror 220x220 and put it on the bed then level it with something like this over the 4 screws
link textRun bed mesh
My sapphire pro have holes for 3 and for 4 screws. I am using 3 screw setup -
@xenon2008 said in BLtouch - Mesh doesnt works nice:
Regarding Z Jerk & Acceleration, which values would you suggest here?
A common value for jerk is 50 mm/min, so for your mm/s about 1, speed should be ok.
I would try to fix the flatness of plate on the right side, however. Because although mesh will allow printing, your object will be curved at that side, however.
-
@joergs5 i will try 1mm/s Jerk.
I print on a FlexSteel Plate with 1mm FR4 and/or a FlexSteel Plate with smooth PEI.
i also use a 6mm Aluminum Plat over the Heated Bed, but i think this is an "sapphire issue" with this "hanging bed"...
-
@xenon2008 Yes, temperature drift is absloutely a thing, which is why I don't run a permantly attached inductive probe but instead a magnetically attached mechanical switch probe (Klicky probe).
Also, it has been established that an enclosed aluminium frame moves and bends quite a lot while heated. The thermal expansion of aluminium is about 0,2 mm over a length of 300 mm with a delta T of 30° C.
Steel rails attached to aluminium extrusions will cause bending because of a diffrence in thermal expansion coefficients of the different materials.
So in order to get predictable results with an enclosed printer one has to calibrate Z with the same circumstances each time or using some automatic Z-calibration routine which is a bit more complicated.
That aside, how does your startup configuration look like? Do you have separate startup macro or do you have it in your slicer configuration?
Do you load the mesh file during print start or do you always run a G32/G29 before printing?
Have you read this bit ? https://duet3d.dozuki.com/Wiki/Using_mesh_bed_compensation specifically this part: https://duet3d.dozuki.com/Wiki/Using_mesh_bed_compensation#Section_Establish_a_Z_0_datum_using_the_Z_probe
-
@gixxerfast said in BLtouch - Mesh doesnt works nice:
@xenon2008 Yes, temperature drift is absloutely a thing, which is why I don't run a permantly attached inductive probe but instead a magnetically attached mechanical switch probe (Klicky probe).
Also, it has been established that an enclosed aluminium frame moves and bends quite a lot while heated. The thermal expansion of aluminium is about 0,2 mm over a length of 300 mm with a delta T of 30° C.
Steel rails attached to aluminium extrusions will cause bending because of a diffrence in thermal expansion coefficients of the different materials.
So in order to get predictable results with an enclosed printer one has to calibrate Z with the same circumstances each time or using some automatic Z-calibration routine which is a bit more complicated.
That aside, how does your startup configuration look like? Do you have separate startup macro or do you have it in your slicer configuration?
Do you load the mesh file during print start or do you always run a G32/G29 before printing?
Have you read this bit ? https://duet3d.dozuki.com/Wiki/Using_mesh_bed_compensation specifically this part: https://duet3d.dozuki.com/Wiki/Using_mesh_bed_compensation#Section_Establish_a_Z_0_datum_using_the_Z_probe
i Load the saved Mesh through the Slicers Start Code
I understand, i also have a 2.4 Voron in Build (its finish, but i dont have time to configure it ...) and know about the klicky...
But then i must "live" with that "problem" ....
Because i dont know how i could solve that with a inductive probe, and i dont could install a klicky on my Sapphire ^^