Duet3D Logo Duet3D
    • Tags
    • Documentation
    • Order
    • Register
    • Login

    E3D Pancake stepper motor

    Scheduled Pinned Locked Moved
    Duet Hardware and wiring
    9
    21
    3.0k
    Loading More Posts
    • Oldest to Newest
    • Newest to Oldest
    • Most Votes
    Reply
    • Reply as topic
    Log in to reply
    This topic has been deleted. Only users with topic management privileges can see it.
    • Sharpieundefined
      Sharpie
      last edited by

      Has anyone used
      https://www.filastruder.com/collections/electronics/products/nema17-stepper-motor

      For their extruder, i have looked at the data sheet on the duet wifi wiring diagram and cant seem to get the correct pin out to get this motor moving.

      As of now it just studders when i sent it a command.

      Any help and I would be super grateful as at this point I am so lost.

      1 Reply Last reply Reply Quote 0
      • DADIYundefined
        DADIY
        last edited by

        I used this motor with the cable supplied and it worked fine. A stuttering motor can be a sign of bad wiring especially in a connector.

        1 Reply Last reply Reply Quote 0
        • DjDemonDundefined
          DjDemonD
          last edited by

          If you want to check a motor's wiring it's fairly simple. Get a multimeter and attach it to any 2 of the motor wires, is there resistance or open circuit? If there is resistance they are a pair, if not unclip one wire and try another. The other two wires are the other pair.

          Wire one pair to one "side" of the 4 pin motor plug, wire the other pair to the other "side". Motor direction is determined by which way around the plug is inserted, which is why I would not use Molex plugs for motors, use DuPont plugs, they do not need to be polarised.

          If the motor is just jittering then one pair is not connected. Check the plug, maybe crimp a new one on. Intermittent connections are a potential cause of blown driver chips, and as someone else here recently experienced, possibly blown motors too.

          Simon. Precision Piezo Z-Probe Technology
          www.precisionpiezo.co.uk
          PT1000 cartridge sensors NOW IN, just attach to your Duet board directly!

          1 Reply Last reply Reply Quote 0
          • Dougal1957undefined
            Dougal1957
            last edited by

            Trouble with Dupont plugs is that they are not all equal and some are very loose fitting on the Molex headers and after all if the motor rotates the wrong way it is probably as quick to reverse it in the Config file then it is to get access to the Duet to reverse a connector

            Doug

            1 Reply Last reply Reply Quote 0
            • DjDemonDundefined
              DjDemonD
              last edited by

              True, I find the ones I use are actually rather too tight, but then as you say they are quite variable..

              Simon. Precision Piezo Z-Probe Technology
              www.precisionpiezo.co.uk
              PT1000 cartridge sensors NOW IN, just attach to your Duet board directly!

              1 Reply Last reply Reply Quote 0
              • Sharpieundefined
                Sharpie
                last edited by

                How do I tell what is A1 and B1 is that negative or positive?

                1 Reply Last reply Reply Quote 0
                • DjDemonDundefined
                  DjDemonD
                  last edited by

                  Not sure what a1and b1 are? If you mean the polarity within each coil/pair of wires it doesn't matter. It's just a case of connecting one coil to pins 1,2 and one coil to pins 3,4. As Doug says if you chose to use molex connectors then you might need to change the drive direction for that motor in firmware. If you use dupont just turn the connector around.

                  Simon. Precision Piezo Z-Probe Technology
                  www.precisionpiezo.co.uk
                  PT1000 cartridge sensors NOW IN, just attach to your Duet board directly!

                  1 Reply Last reply Reply Quote 0
                  • Sharpieundefined
                    Sharpie
                    last edited by

                    This is what I am going off of so I am kinda lost on what the pairs are. the Letters or the numbers.

                    https://drive.google.com/file/d/0B8LIjfxtpbZAY2tObjIyRS0yeTg/view?usp=sharing

                    1 Reply Last reply Reply Quote 0
                    • DjDemonDundefined
                      DjDemonD
                      last edited by

                      Okay so attach one pair to 1a and 1b and one pair to 2a and 2b

                      Simon. Precision Piezo Z-Probe Technology
                      www.precisionpiezo.co.uk
                      PT1000 cartridge sensors NOW IN, just attach to your Duet board directly!

                      1 Reply Last reply Reply Quote 0
                      • Sharpieundefined
                        Sharpie
                        last edited by

                        so far none of the combinations have worked is there a way I can test the the motor off the board?

                        1 Reply Last reply Reply Quote 0
                        • elmoretundefined
                          elmoret
                          last edited by

                          First, check the motor. You should see about 2 ohms between blue and red. You should also see two ohms between green and black.

                          Next up, matching the wire colors to the colors in the screenshot you posted should do gainer, since blue/red is a pair and green/black is a pair.

                          What command are you sending? What accelerations are you using? You may be trying to accelerate the motors faster than is possible. Would be good if you could post your config.g.

                          1 Reply Last reply Reply Quote 0
                          • Sharpieundefined
                            Sharpie
                            last edited by

                            so when I test the pairs I get 2.3-2.5ohms each

                            here is my config.g

                            ; CoreXY sample config file for dc42 Duet firmware

                            M111 S0 ; Debug off
                            M550 PBig-D ; Machine name (can be anything you like)
                            M551 Preprap ; Machine password (used for FTP connections)
                            ns)
                            ;*** If you have more than one Duet on your network, they must all have different MAC addresses, so change the last digits
                            M540 P0xBE:0xEF:0xDE:0xAD:0xFE:0xED ; MAC Address
                            ;*** Wifi Networking
                            M552 S1 ; Enable WiFi

                            M555 P2 ; Set output to look like Marlin
                            ;M575 P1 B57600 S1 ; Comms parameters for PanelDue

                            ; Machine configuration
                            M569 P0 S0 ; Drive 0 goes forwards (change to S0 to reverse it)
                            M569 P1 S1 ; Drive 1 goes forwards
                            M569 P2 S0 ; Drive 2 goes forwards
                            M569 P3 S1 ; Drive 3 goes forwards
                            M569 P4 S1 ; Drive 4 goes forwards
                            ; If you use an endstop switch for Z homing, change Z0 to Z1 in the following line, and see also M558 command later in this file
                            M574 X1 Y2 Z1 S0 ; set endstop configuration (X and Y and endstops only, at low end, active high)
                            M667 S1 ; set CoreXY mode
                            M350 X64 Y64 Z64 E64 I0 ; Set 16x microstepping with interpolation
                            M92 X400 Y400 Z1600 ; Set axis steps/mm
                            M92 E1643:1643 ; Set extruder steps/mm
                            M906 X800 Y800 Z800 E800 ; Set motor currents (mA)
                            M201 X1000 Y1000 Z300 E4000 ; Accelerations (mm/s^2)
                            M203 X15000 Y15000 Z500 E1500 ; Maximum speeds (mm/min)
                            M566 X800 Y800 Z24 E1200 ; Maximum jerk speeds mm/minute
                            M208 X290 Y285 Z320 ; set axis maxima (adjust to suit your machine)
                            M208 X-10 Y0 S1 ; set axis minima (adjust to make X=0 and Y=0 the edges of the bed)
                            G21 ; Work in millimetres
                            G90 ; Send absolute coordinates…
                            M83 ; ...but relative extruder moves

                            ; Z probe
                            M558 P1 X0 Y0 Z0 ; Analog Z probe, also used for homing the Z axis
                            ;G31 Z2.47 P500 S1 ; Set the probe height and threshold (put your own values here)
                            ; The following M557 commands are not needed if you are using a bed.g file to perform bed compensation
                            ;*** Adjust the XY coordinates in the following M557 commands to suit your build and the position of the Z probe
                            ;M557 P0 X30 Y25 ; Four...
                            ;M557 P1 X30 Y155 ; ...probe points...
                            ;M557 P2 X250 Y125 ; ...for bed...
                            ;M557 P3 X250 Y25 ; ...levelling
                            ;M557 P4 X150 Y95 ; 5th probe point for levelling

                            ; Thermistors and heaters
                            ;*** You can use S and B parameters to define the parameters of the thermistors you are using
                            M305 P0 T100000 B4388 R4700 H0 L0 ; Put your own H and/or L values here to set the bed thermistor ADC correction
                            M305 P1 T100000 B4388 R4700 H0 L0 ; Put your own H and/or L values here to set the first nozzle thermistor ADC correction
                            M305 P2 T100000 B3974 R4700 H0 L0 ; Put your own H and/or L values here to set the second nozzle thermistor ADC correction
                            M301 H1 P10 I0.10 D100 T0.50 S1.0 ; PID settings for extruder 0
                            M301 H2 P10 I0.10 D100 T0.50 S1.0 ; PID settings for extruder 1
                            M570 S120 ; Increase to allow extra heating time if needed
                            M307 H0 A86.7 C612.7 D6.0 B0
                            M307 H1 A406.3 C166.4 D10.3 B0

                            ; Fans
                            M106 P0 T50 H1
                            M106 P1 T50 H1
                            M106 P2 T50 H1

                            ; Tool definition
                            M563 P0 D0 H1 ; Define tool 0
                            G10 P0 S0 R0 ; Set tool 0 operating and standby temperatures
                            ;*** If you have a dual-nozzle build, un-comment the following 3 lines
                            ;M563 P1 D1 H2 ; Define tool 1
                            ;G10 P1 S0 R0 ; Set tool 1 operating and standby temperatures

                            ;*** If you are using axis compensation, put the figures in the following command
                            M556 S78 X0 Y0 Z0 ; Axis compensation here
                            T0 ; select first hot end

                            1 Reply Last reply Reply Quote 0
                            • dc42undefined
                              dc42 administrators
                              last edited by

                              Have you tried a different motor connected to that motor output on the Duet, or that motor connected to a different motor output, in case the problem is a faulty driver?

                              Duet WiFi hardware designer and firmware engineer
                              Please do not ask me for Duet support via PM or email, use the forum
                              http://www.escher3d.com, https://miscsolutions.wordpress.com

                              1 Reply Last reply Reply Quote 0
                              • deckingmanundefined
                                deckingman
                                last edited by

                                Maybe also try 16X micro stepping instead of 64X (but don't forget to divide your steps per mm by 4)? Dunno - just a long shot.

                                Ian
                                https://somei3deas.wordpress.com/
                                https://www.youtube.com/@deckingman

                                1 Reply Last reply Reply Quote 0
                                • kraegarundefined
                                  kraegar
                                  last edited by

                                  That motor requires a really high current to get it to move. Try between 1200 - 1400ma, going off of memory.

                                  Here's the E3D thread for it. https://forum.e3d-online.com/index.php?threads/nema17-slimline-rated-current.2720/

                                  I ran it at 1200, but didn't care for it as the connector could come loose. It never popped off while printing, but was well on its way there a couple times, and I didn't want it to pop loose and kill a driver.

                                  Co-Creator of the RailcoreII CoreXY printer
                                  https://www.thingiverse.com/thing:2407174

                                  1 Reply Last reply Reply Quote 0
                                  • Sharpieundefined
                                    Sharpie
                                    last edited by

                                    no good, any there suggestions?

                                    is there a way I can skip E0 and use E1?

                                    1 Reply Last reply Reply Quote 0
                                    • dc42undefined
                                      dc42 administrators
                                      last edited by

                                      @Sharpie:

                                      no good, any there suggestions?

                                      is there a way I can skip E0 and use E1?

                                      Yes, put M584 E4 in your config.g file, earlier than the M906 command.

                                      Duet WiFi hardware designer and firmware engineer
                                      Please do not ask me for Duet support via PM or email, use the forum
                                      http://www.escher3d.com, https://miscsolutions.wordpress.com

                                      1 Reply Last reply Reply Quote 0
                                      • DjDemonDundefined
                                        DjDemonD
                                        last edited by

                                        Probably not helpful, but if that E3D motor is a lot of trouble consider this one https://www.omc-stepperonline.com/hybrid-stepper-motor/nema-17-bipolar-18deg-13ncm-184ozin-1a-35v-42x42x20mm-4-wires-17hs08-1004s.html instead it's only $6.60, its 13 Ncm but smaller size and I drive it at 650mA with titan extruders, yes its 1.8 degrees but running a geared extruder 0.9 degrees is overkill plus needs to be bigger to achieve the same torque (and apparently uses more than double the current!).

                                        Simon. Precision Piezo Z-Probe Technology
                                        www.precisionpiezo.co.uk
                                        PT1000 cartridge sensors NOW IN, just attach to your Duet board directly!

                                        1 Reply Last reply Reply Quote 0
                                        • Martin_Sundefined
                                          Martin_S
                                          last edited by

                                          Hello Sharpie, I run it at 900ma with x16 microstepping and seems to perform well.
                                          This is how it came wired:

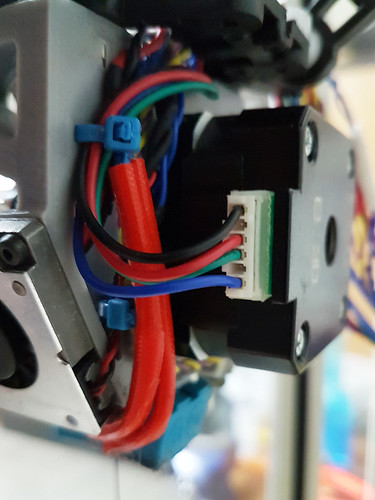
                                          Are you testing it alone or already assembled with the extruder? Maybe the gears are not aligned and that's why it stalls.
                                          Long shot, but worth asking.

                                          Hope it helps.

                                          If it ain't broke, fix it till it is =)

                                          1 Reply Last reply Reply Quote 0
                                          • Sharpieundefined
                                            Sharpie
                                            last edited by

                                            It turned out to be a bad driver on the motherboard, when I plugged into E1 the moved as expected =(

                                            But at least we are online.

                                            1 Reply Last reply Reply Quote 0
                                            • First post
                                              Last post
                                            Unless otherwise noted, all forum content is licensed under CC-BY-SA