Layer count error
-
Can you share your gcode file? Do you do any Z moves in your end gcode?
-
@phaedrux Here is the file
https://www.dropbox.com/s/u4ugpknruystjn8/BodyBottom Try 1 PLA%2B.gcode?dl=0End Gcode
;{if max_layer_z < max_print_height}G1 Z{z_offset+min(max_layer_z+2, max_print_height)} F600{endif} ; Move print bed down G91 ; relative movement mode G1 Z50 F300 ; move print head out of the way G90 ;absolute movement mode ;{if max_layer_z < max_print_height-10}G1 Z{z_offset+max_print_height-10} F600{endif} ; Move print bed close to the bottom M140 S0 ; turn off heatbed M104 S0 ; turn off temperature M107 ; turn off fan ;M84 X Y E0 ; disable motors M300 M300 -
@adamfilip said in Layer count error:
G1 Z50 F300 ; move print head out of the way
It's probably this line that DW is picking up as extra height and calculating the phantom layers from. Please try modifying the line like so
G1 Z50 F300 ;E move print head out of the wayThe E will make DWC think it is an extrusion move and ignore it instead of taking it as a z height layer adjustment.
-
@adamfilip it might be as @Phaedrux has said or it might be that you seem to be using some form of Z hop every time you retract the filament. So there are a huge number of G1 Z (layer height+0.5) moves followed by other G1 Z (back to layer height) moves which DWC might be interpreting as layer changes (because technically that's what they are).
-
@adamfilip
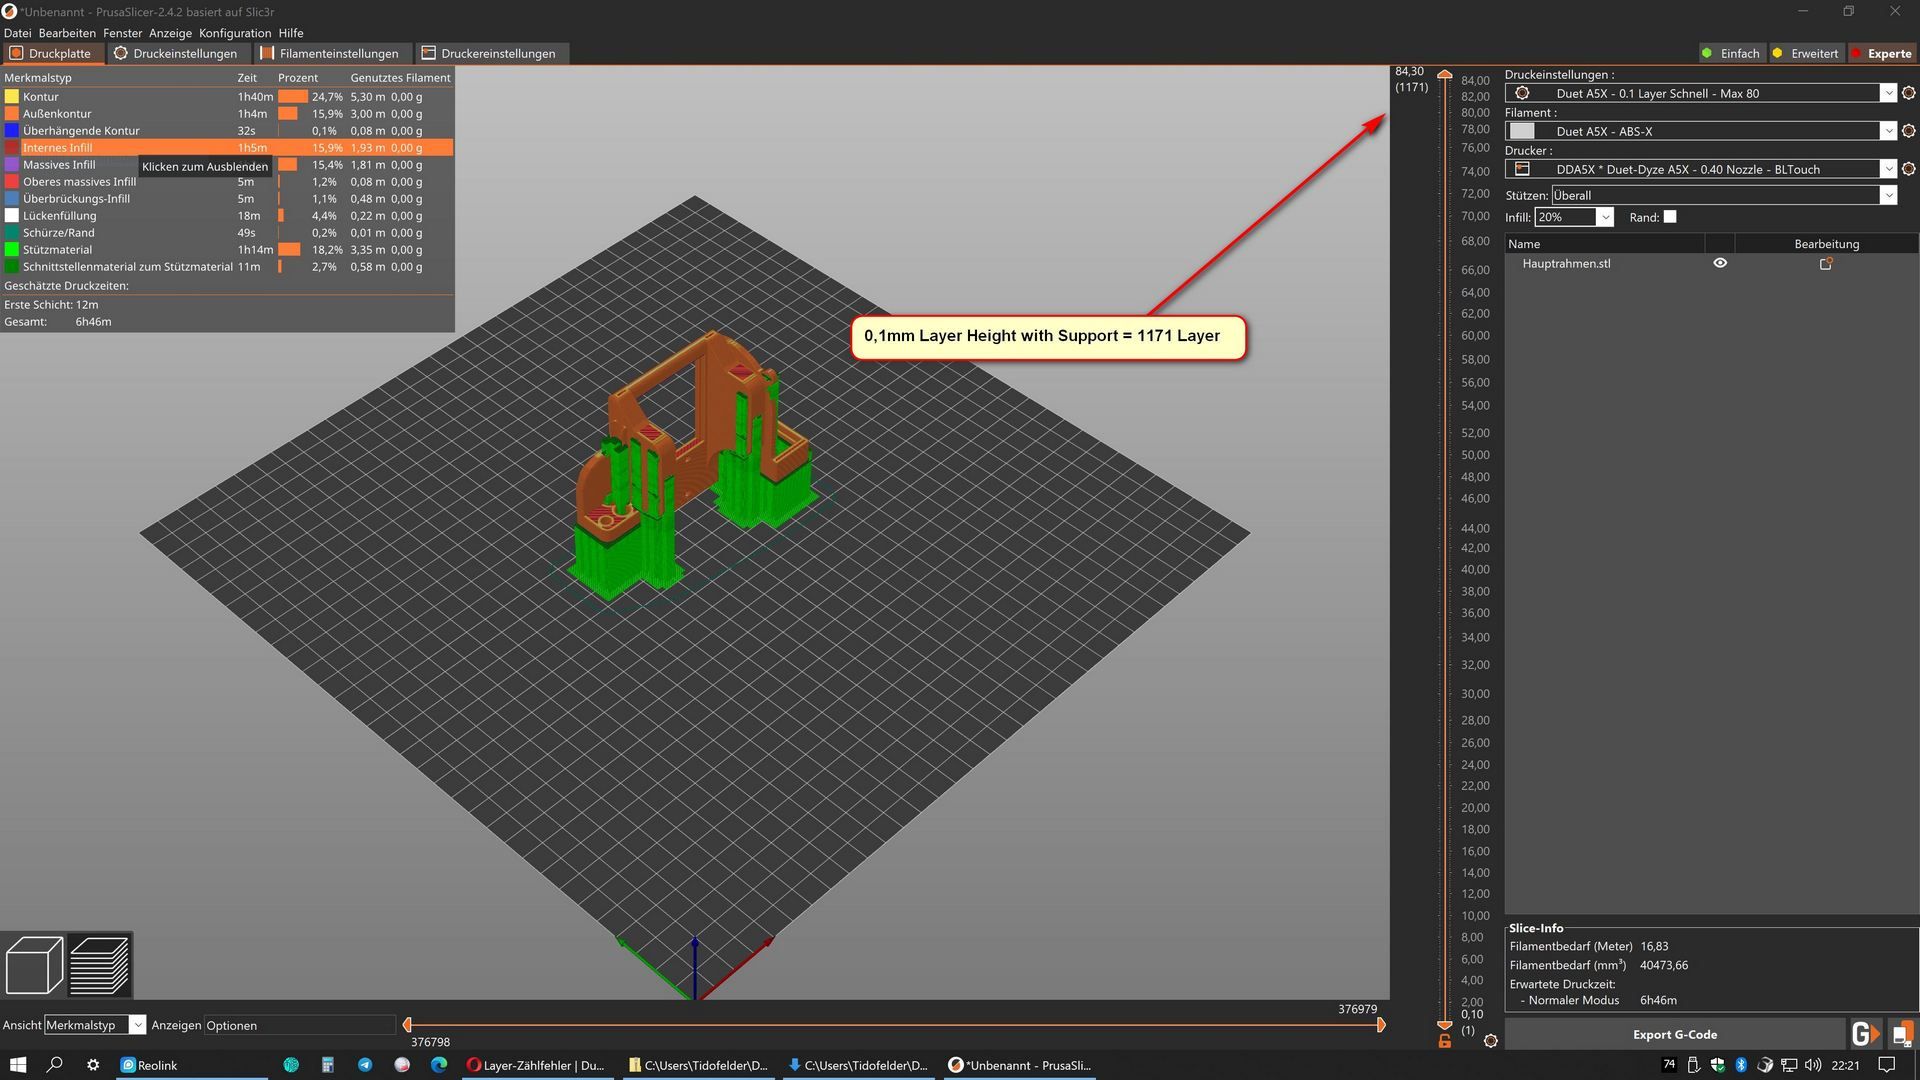
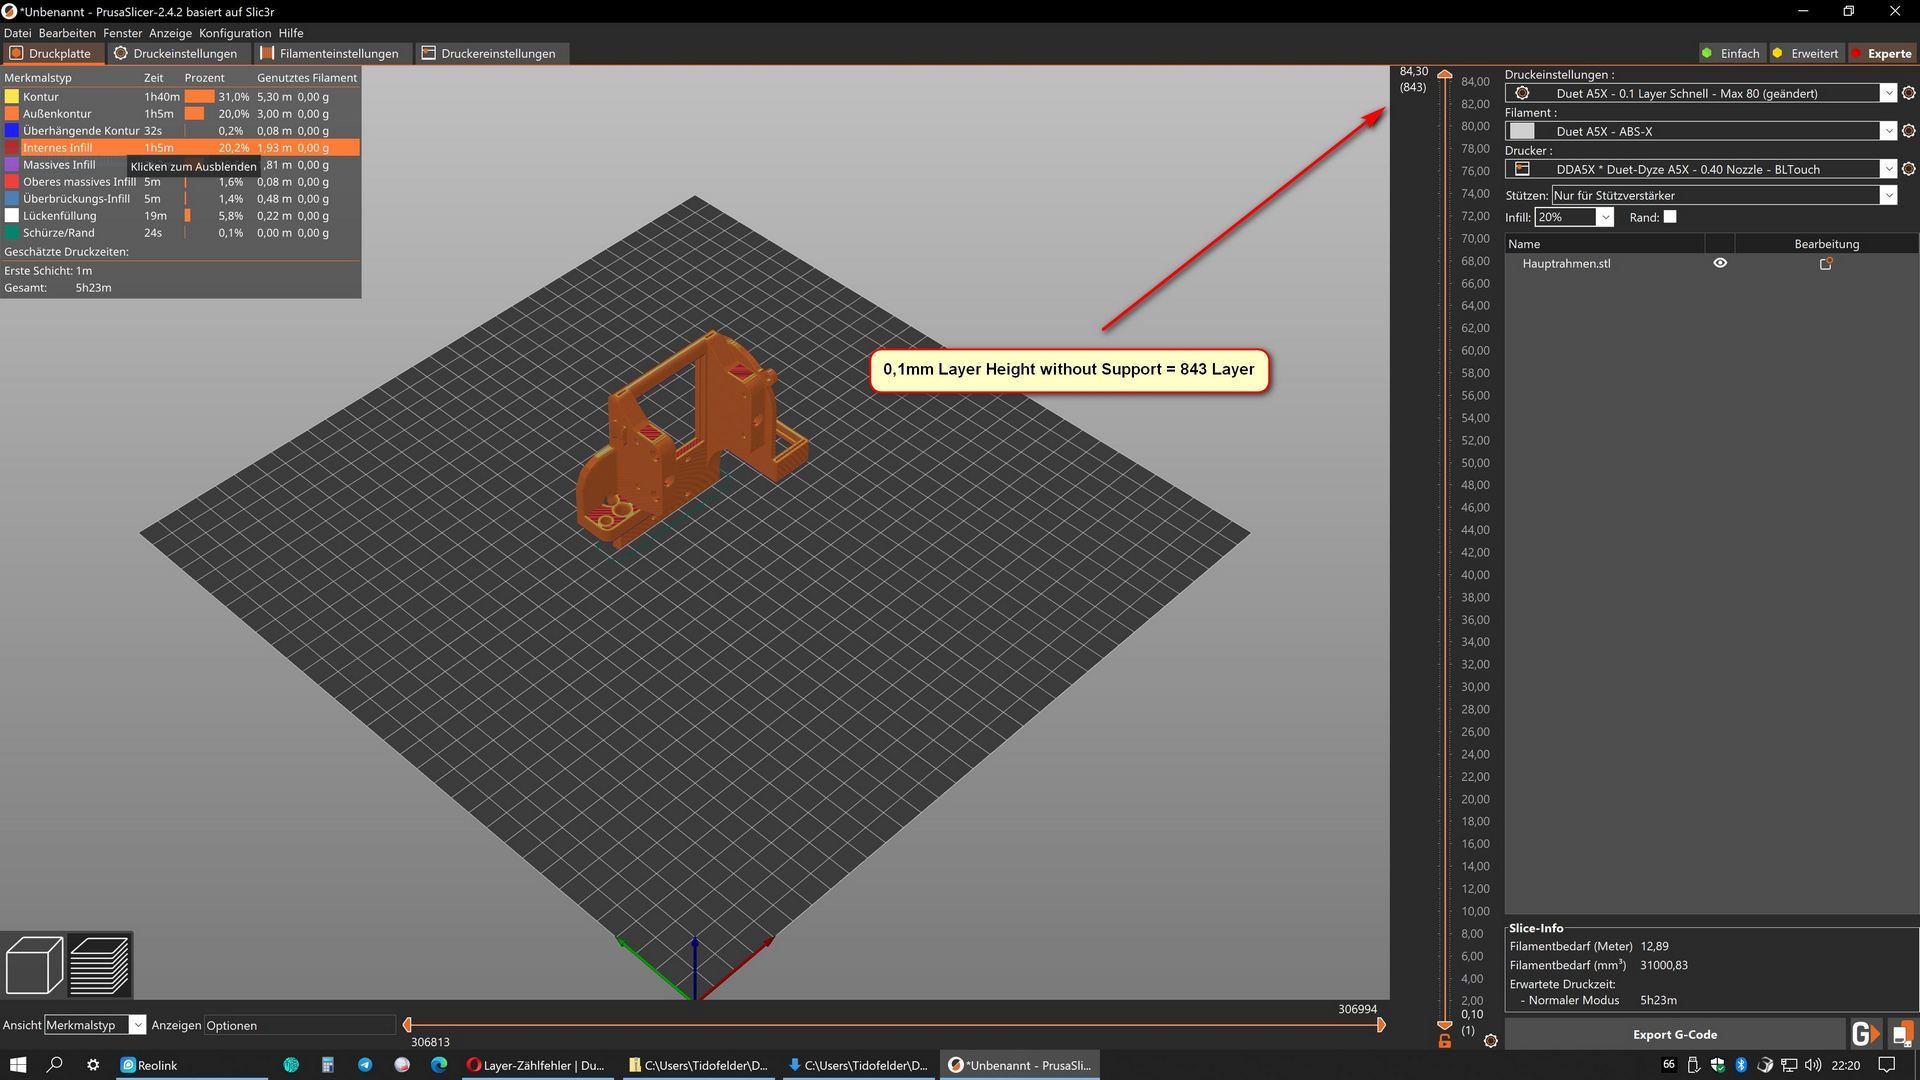
I once noticed that a print with a layer height of 0.1mm showed an incorrect number of layers.
The reason was that the support structures were printed with 0.2mm, resulting in a different number of layers.P.S.:
The different layers were simply added together, resulting in a higher number of layers.
Try slicing the component without a support structure and then compare the result.Google Translate
--- Original Text ---Mir ist einmal aufgefallen das ein Druck mit 0,1mm Schichthöhe eine Falsche Schichtanzahl anzeigte.
Der Grund war das die Stützstrukturen mit 0,2mm gedruckt wurden und sich so eine andere Schichtanzahl ergab.P.S.:
Die unterschiedlichen Layer wurden einfach zusammen addiert, und ergaben somit eine höhere Anzahl der Schichten.
Probiere mal das Bauteil ohne Stützstruktur zu slicen und vergleiche dann das Ergebnis. -
-
This happens when PrusaSlicer/SuperSlicer creates non-synchronized support layers.. They aren't counted like they should be in DWC.
-
So if you want to know exactly what is about to be printed, i.e. you compare the active pressure with the component in the slicer... then don't pay attention to the layers but to the Z-height from the slicer and the display in the DWC where the nozzle is at the moment located.
This is useful, for example, if you want to observe how a difficult spot such as a bridge is being printed and you want to intervene if necessary.
This information is always correct!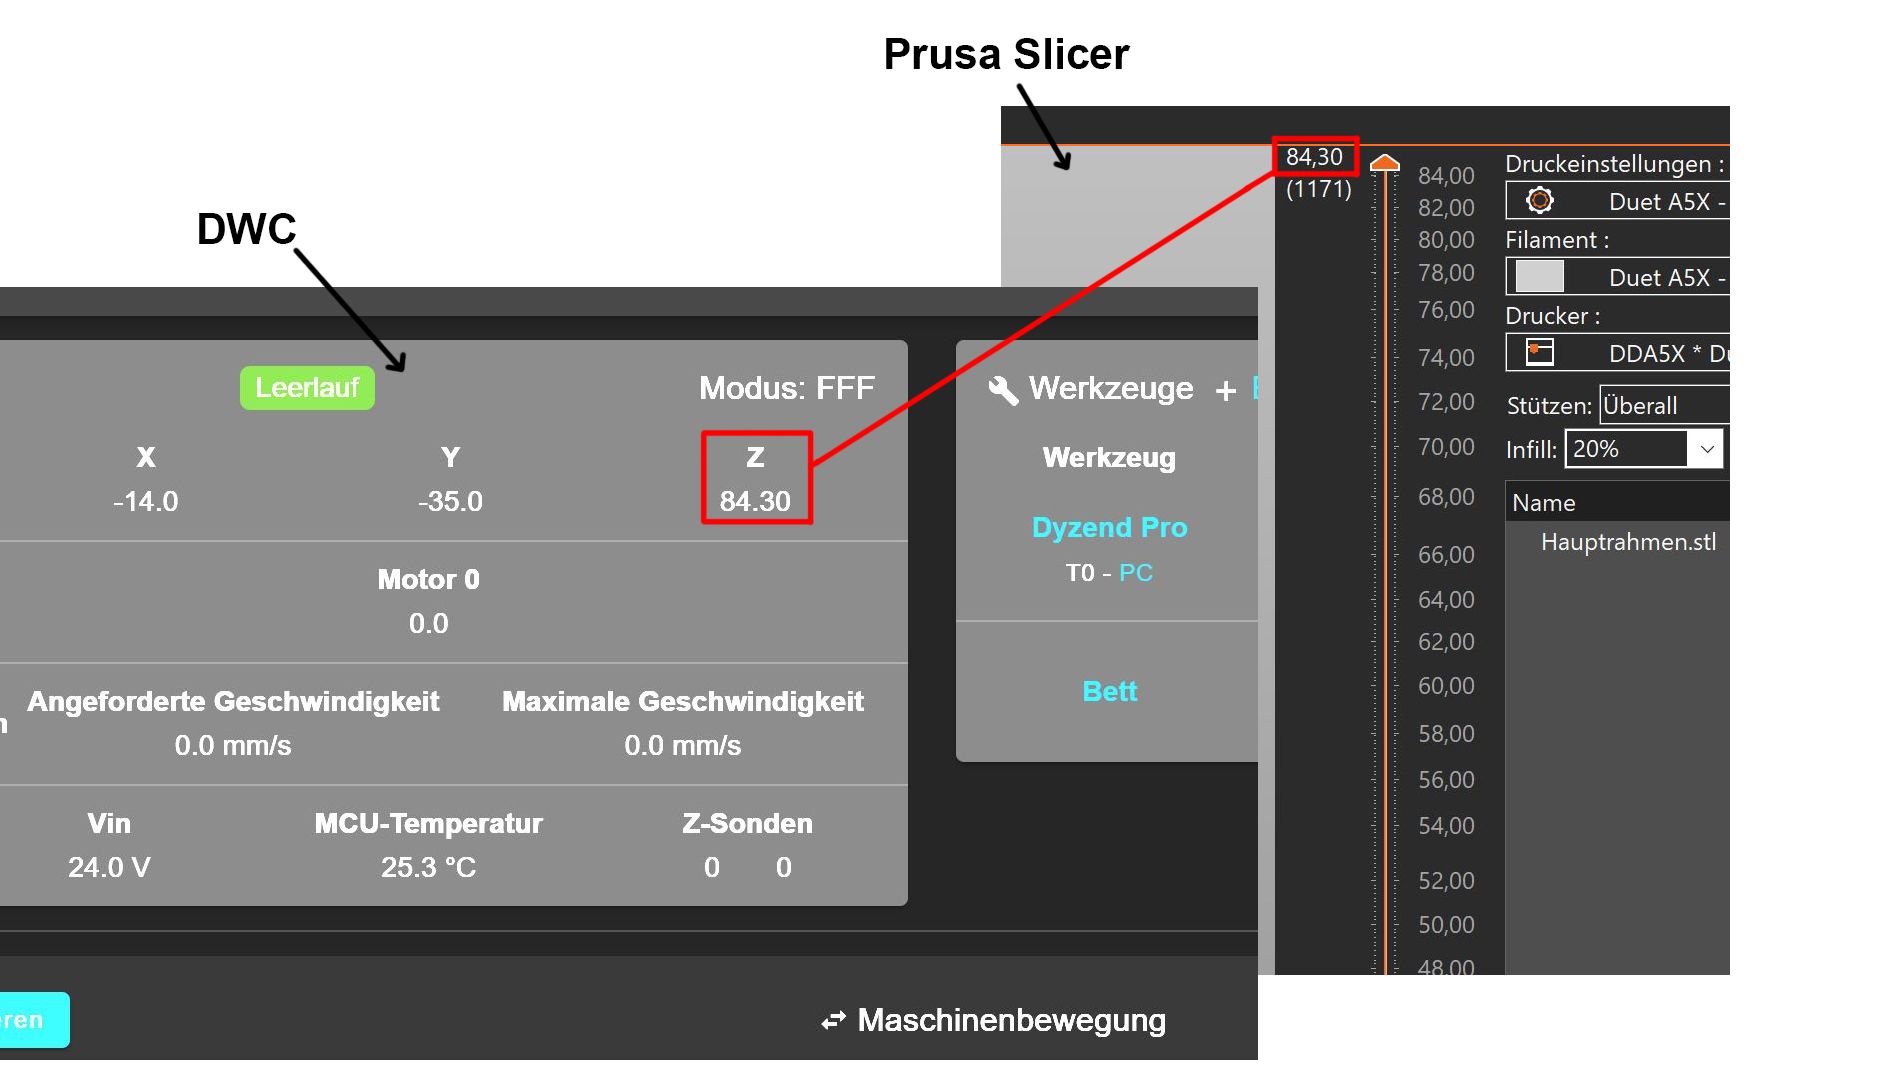
Google Translate
--- Original Text ---Wenn Du also genau wissen möchtest was gleich gedruckt wird, Du also den aktiven Druck mit dem Bauteil im Slicer vergleichst... dann achte nicht auf die Layer sondern auf die Z-Höhe aus dem Slicer und der Anzeige im DWC wo sich die Düse gerade befindet.
Das ist zB nützlich wenn Du beobachten möchtest wie eine schwierige Stelle wie zB eine Brücke gedruckt wird und Du ggf eingreifen möchtest.
Diese Angaben sind immer korrekt ! -
@adamfilip
As far as I know you can synchronize the layers of the support with those of the component in Prusa Slicer.
Check the support settings.
Activate the expert mode beforehand, otherwise this option may not be displayed.I've never used it myself, but I remember seeing it once.

Sorry for the many comments in a row.
Almost looks like spam.
Google Translate
--- Original Text ---Soweit ich weiß kann man im Prusa Slicer die Schichten vom Support mit denen des Bauteils synchronisieren.
Guck mal in den Einstellungen des Supports.
Vorher den Expertenmodus aktivieren, sonst wird diese Option eventuell nicht angezeigt.Ich selber habe sie nie benutzt, aber ich kann mich noch erinnern das ich sie mal gesehen habe.

Sorry für die vielen Kommentare hintereinander.
Sieht fast wie Spam aus.
-
PrusaSlicer Support Settings (Expert Mode)
To make the option selectable, you must first set the Z distance to 0. You should then define the ceiling of the supports in such a way that they can be detached again later.
Now the layers of the support and the part are synchronized and the number of layers is identical to that of the part.
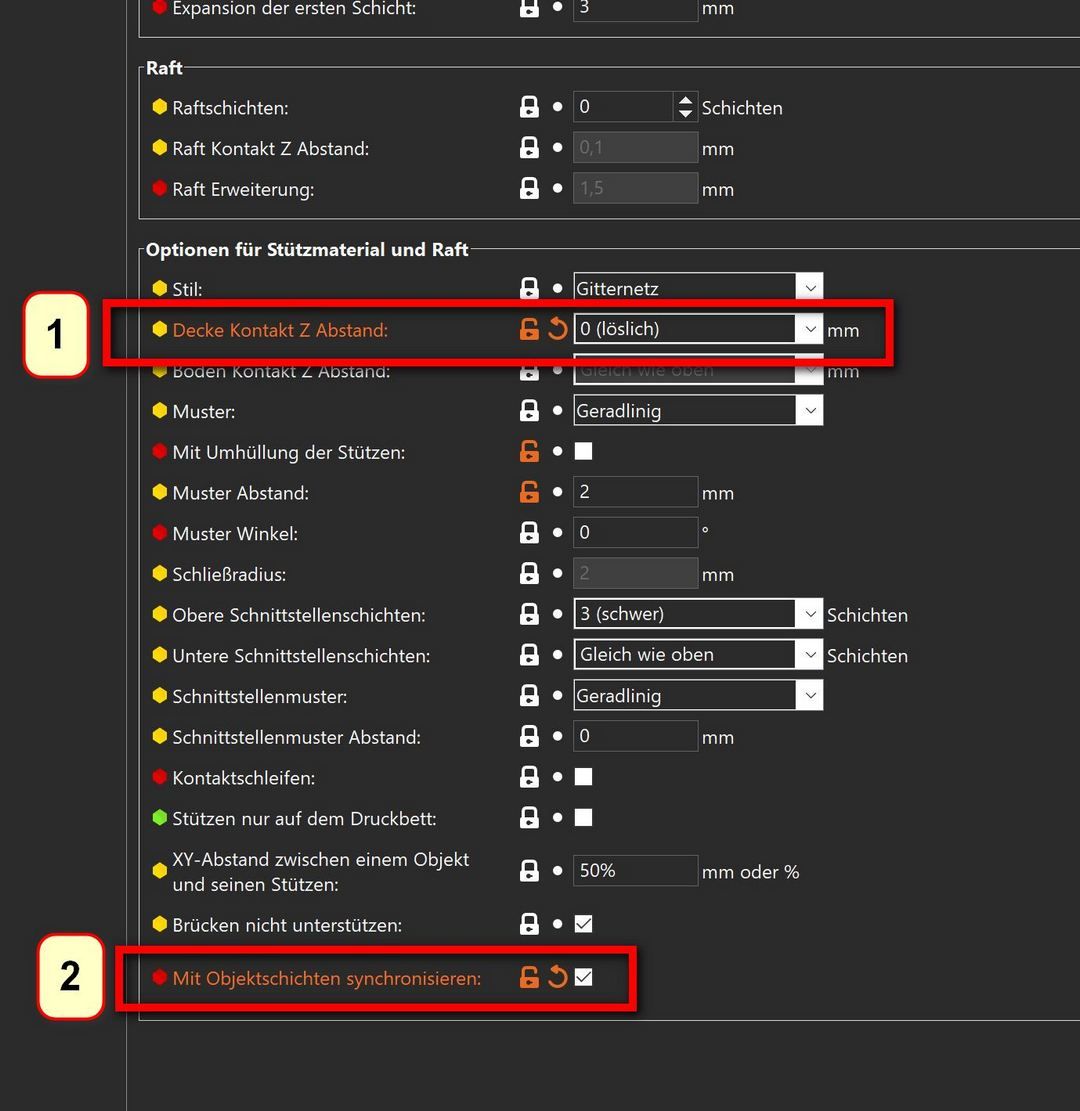
Sorry... German layout from PrusaSlicer.
But you will find it with you, I think!?So, enough for today

Google Translate
--- Original Text ---Um die Option wählbar zu machen, muss man vorher den Z-Abstand auf 0 setzen. Man sollte dann die Decke der Stützen so definieren dass sie sich später auch wieder lösen lassen.
Jetzt sind die Layer vom Support und vom Bauteil synchronisiert und die Anzahl der Layer ist identisch mit dem des Bauteils.
Sorry... deutsches Layout vom PrusaSlicer.
Aber Du wirst es bei Dir schon finden, denke ich !?So, nun auch genug für Heute

-
Appreciate all the response to this thread.
-
 undefined Norder referenced this topic
-
 undefined Norder referenced this topic