Duet3D Logo Duet3D
    • Tags
    • Documentation
    • Order
    • Register
    • Login

    Z optical switch.

    Scheduled Pinned Locked Moved
    Duet Hardware and wiring
    3
    9
    411
    Loading More Posts
    • Oldest to Newest
    • Newest to Oldest
    • Most Votes
    Reply
    • Reply as topic
    Log in to reply
    This topic has been deleted. Only users with topic management privileges can see it.
    • Karimundefined
      Karim
      last edited by Karim

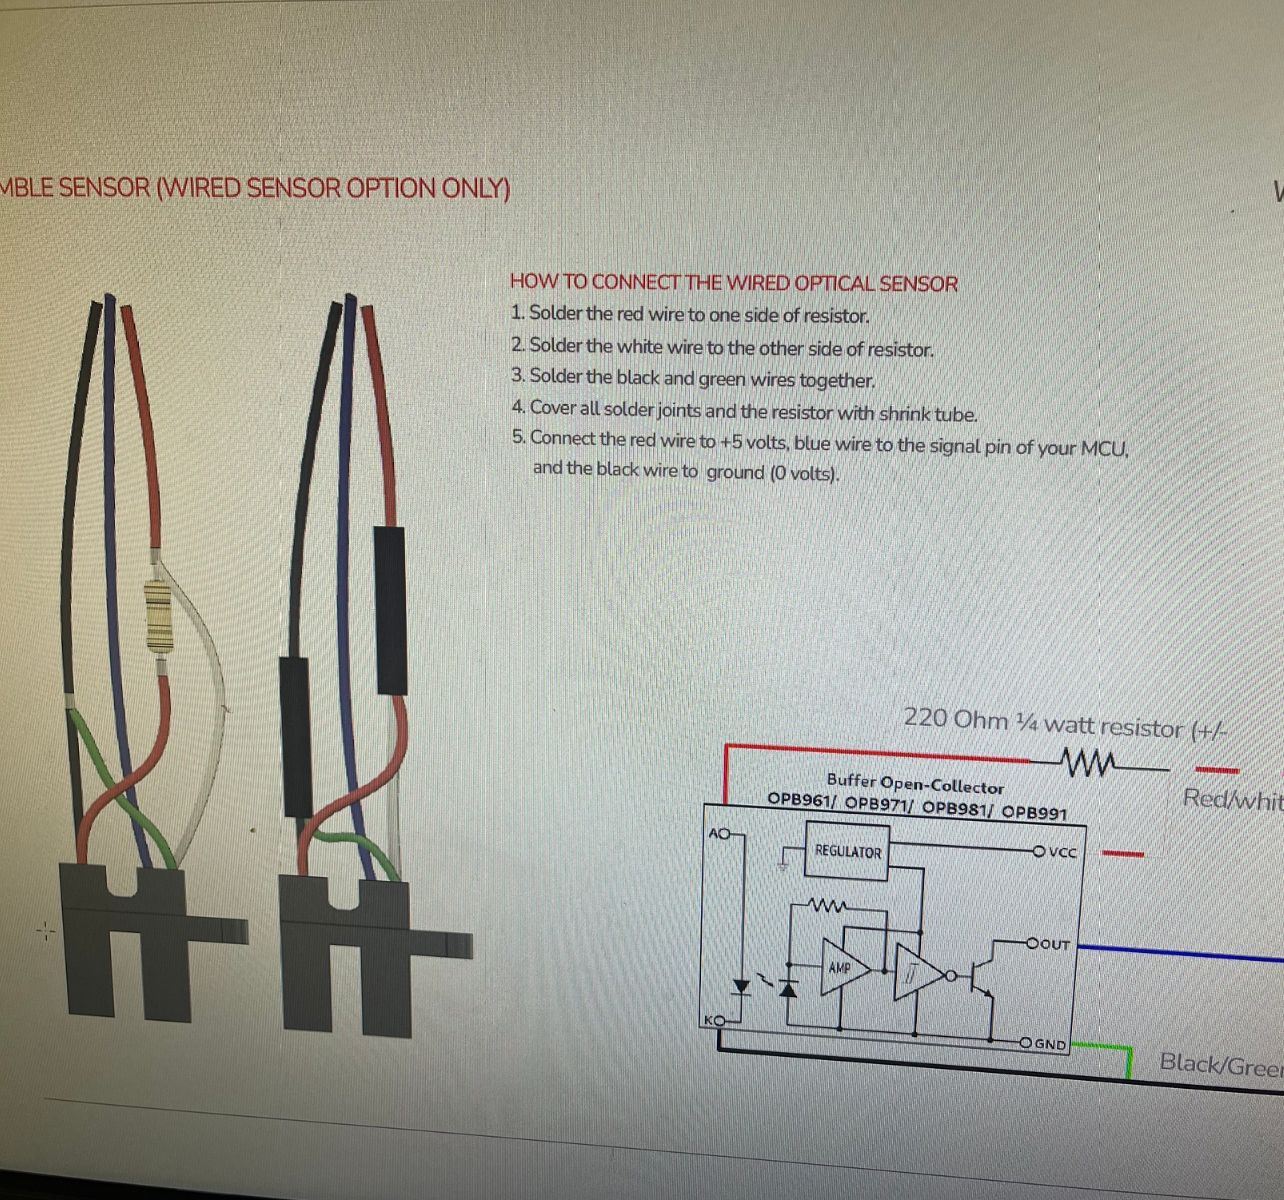
      Hey guys how do I wire this switch below on a duet 2 wifi. Also do I configure and prob or switch. I want to use this as a Z probe. (Voron Tap)
      E2D9368E-0F95-41D9-BEEF-B0ABADE4D74C.jpeg ![alt text](image url)

      jay_s_ukundefined mrehorstdmdundefined 2 Replies Last reply Reply Quote 0
      • jay_s_ukundefined
        jay_s_uk @Karim
        last edited by

        @Karim best to use the probe header. You just need 5v, ground and probe.in

        Owns various duet boards and is the main wiki maintainer for the Teamgloomy LPC/STM32 port of RRF. Assume I'm running whatever the latest beta/stable build is

        Karimundefined 1 Reply Last reply Reply Quote 0
        • Karimundefined
          Karim @jay_s_uk
          last edited by

          @jay_s_uk I got 5v +- from the panel due port. I am trying to configure it. below is my Endstop and probe.

          ; Endstops
          M574 X2 S1 P"^xstop"                              ; Xmax endstop on hall effect board
          M574 Y2 S1 P"^ystop"                              ; Ymax endstop on hall effect board
          M574 Z1 S2                                        ; configure Z-probe endstop for low end on Z
          
          
          ; Z probes
          M558 P5 C"^zprobe.in" H5 F300 T6000            ; set Z probe type to switch and the dive height + speeds
          G31 P500 X0 Y0 Z.74                       ; set Z probe trigger value, offset and trigger height
          M557 X0:282 Y0:275 S40                        ; define mesh grid
          
          jay_s_ukundefined 1 Reply Last reply Reply Quote 0
          • jay_s_ukundefined
            jay_s_uk @Karim
            last edited by

            @Karim that should be sufficient. You don't need the M574 Z1 S2 line.
            Does it not work with that setup?

            Owns various duet boards and is the main wiki maintainer for the Teamgloomy LPC/STM32 port of RRF. Assume I'm running whatever the latest beta/stable build is

            Karimundefined 1 Reply Last reply Reply Quote 0
            • Karimundefined
              Karim @jay_s_uk
              last edited by Karim

              @jay_s_uk no, the switch doesn’t work , z axis doesn’t stop when triggered. That setup work when the probe was installed.

              jay_s_ukundefined 1 Reply Last reply Reply Quote 0
              • jay_s_ukundefined
                jay_s_uk @Karim
                last edited by

                @Karim assuming you've followed the wiring above, i don't see why it wouldn't work.
                you could try removing the ^
                I have a tap kit on the way. i'll be using an assembled PCB though rather than just the bare sensor

                Owns various duet boards and is the main wiki maintainer for the Teamgloomy LPC/STM32 port of RRF. Assume I'm running whatever the latest beta/stable build is

                Karimundefined 2 Replies Last reply Reply Quote 0
                • Karimundefined
                  Karim @jay_s_uk
                  last edited by

                  @jay_s_uk I got the 24v on order too, but it will ship mid December, when I get home I will work on it.

                  1 Reply Last reply Reply Quote 1
                  • mrehorstdmdundefined
                    mrehorstdmd @Karim
                    last edited by mrehorstdmd

                    @Karim I use a sensor similar to this one in X, Y, and Z. It's a simple 3 wire interface, and the LM393 comparator helps keep precision very high. It has an LED on board so you can tell when it's triggered without having to look at the controller.

                    https://drmrehorst.blogspot.com/

                    1 Reply Last reply Reply Quote 1
                    • Karimundefined
                      Karim @jay_s_uk
                      last edited by

                      @jay_s_uk Hey I got it working, But the Z offset is a little different.

                      1 Reply Last reply Reply Quote 1
                      • First post
                        Last post
                      Unless otherwise noted, all forum content is licensed under CC-BY-SA