Never Printing Flat
-
Hi All,
I was just wondering if anyone would be able to help me.
I can never seem to get a nice flat initial printing layer, I have EZABL and have calibrated it as the guide says.
I have been going at this for around a month now and I cannot seem to get a good first layer, one side of my print is too close to bed and the other is too far away,
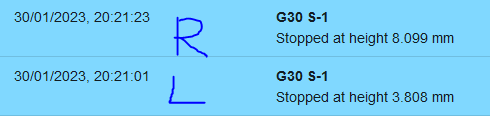
I then had the idea to do some Z probes around the bed to see what the variation was. Please see my attached readouts from both left and right-hand sides. Does anyone know what is causing this, and if so, how would I fix it and ensure that my probing figures are correct all around my plate?
Thank you.
-
That's a pretty big difference in trigger height. That may indicate the probe is tilting as it moves in XY.
What kind of printer is this? Can you give some more details? How is the Z axis arranged? How do you home? Are you doing manual leveling as well?
How is the probe mounted?
Please share your config.g, homing files, and bed.g
Please send M122 and M98 P"config.g" and copy and paste the results here.
-
@Phaedrux Hi there,
Yes, I thought the same!! This is my own built 3D printer and the layout of the Z axis is a triangular shape using 3 lead screws at each point in a symmetrical triangle. I don't think it's the probe as the probe cable is fixed locally to it ensuring it is static. I home XY at end of travel and Z in the centre of the bed. The probe is mounted using its standard hole mount with 2 nuts.
Would ABL solve this? or even true bed levelling?
Home all code:
G91                     ; relative positioning
G1 H2 Z5 F6000          ; lift Z relative to current position
G1 H1 X-555 Y-415 F1800 ; move quickly to X or Y endstop and stop there (first pass)
G1 H1 X-555             ; home X axis
G1 H1 Y-415             ; home Y axis
G1 X5 Y5 F6000          ; go back a few mm
G1 H1 X-555 F360        ; move slowly to X axis endstop once more (second pass)
G1 H1 Y-415             ; then move slowly to Y axis endstop
G90                     ; absolute positioning
G1 X270 Y180 F6000       ; go to first bed probe point and home Z
;G1 X-20 Y10 F6000       ; go to first bed probe point and home Z
G30                     ; home Z by probing the bed
config.g
G90                                            ; send absolute coordinates...
M83                                            ; ...but relative extruder moves
M550 P"Printer"                                 ; set printer name
M669 K1                                        ; select CoreXY mode

; Network
M552 S1                                        ; enable network
M586 P0 S1                                     ; enable HTTP
M586 P1 S0                                     ; disable FTP
M586 P2 S0                                     ; disable Telnet

; Drives
M569 P0 S1                                     ; physical drive 0 goes forwards
M569 P1 S1                                     ; physical drive 1 goes forwards
M569 P2 S1                                     ; physical drive 2 goes forwards
M569 P3 S1                                     ; physical drive 3 goes forwards
M569 P4 S0                                     ; physical drive 4 goes forwards - E1

M584 X0 Y1 Z2:5:4 E3                               ; set drive mapping
M350 X16 Y16 Z16 E16 I1                        ; configure microstepping with interpolation
M92 X80.00 Y80.00 Z1066.67 E446.8              ; set steps per mm
M566 X900.00 Y900.00 Z60.00 E120.00            ; set maximum instantaneous speed changes (mm/min)
M203 X6000.00 Y6000.00 Z180.00 E1200.00        ; set maximum speeds (mm/min)
M201 X500.00 Y500.00 Z20.00 E250.00            ; set accelerations (mm/s^2)
M906 X1500 Y1500 Z1500 E1000 I30                   ; set motor currents (mA) and motor idle factor in per cent
M84 S30                                        ; Set idle timeout

; Axis Limits
M208 X0 Y0 Z0 S1                               ; set axis minima
M208 X550 Y410 Z500 S0                         ; set axis maxima

; Endstops
M574 X1 S1 P"!xstop"                            ; configure switch-type (e.g. microswitch) endstop for low end on X via pin xstop
M574 Y1 S1 P"!ystop"                            ; configure switch-type (e.g. microswitch) endstop for low end on Y via pin ystop
M574 Z1 S2                                     ; configure Z-probe endstop for low end on Z

; Z-Probe
M558 P1 C"!zprobe.in" H10 F240 T6000            ; set Z probe type to unmodulated and the dive height + speeds
G31 P500 X35 Y0 Z5.7                          ; set Z probe trigger value, offset and trigger height
M557 X15:525 Y10:400 S50                       ; define mesh grid

; Heaters
M308 S0 P"bedtemp" Y"thermistor" T100000 B4138 ; configure sensor 0 as thermistor on pin bedtemp
M950 H0 C"bedheat" T0                          ; create bed heater output on bedheat and map it to sensor 0
M307 H0 R0.310 K0.291:0.000 D1.41 E1.35 S1.00 B0                              ; enable bang-bang mode for the bed heater and set PWM limit
M140 H0                                        ; map heated bed to heater 0
M143 H0 S120                                   ; set temperature limit for heater 0 to 120C
M308 S1 P"e0temp" Y"thermistor" T100000 B4138  ; configure sensor 1 as thermistor on pin e0temp
M950 H1 C"e0heat" T1                           ; create nozzle heater output on e0heat and map it to sensor 1
M307 H1 B0 S1.00                               ; disable bang-bang mode for heater  and set PWM limit
M143 H1 S300                                   ; set temperature limit for heater 1 to 300C

; Fans
M950 F0 C"fan0" Q500                           ; create fan 0 on pin fan0 and set its frequency
M106 P0 S0 H-1                                 ; set fan 0 value. Thermostatic control is turned off
M950 F1 C"fan1" Q500                           ; create fan 1 on pin fan1 and set its frequency
M106 P1 S1 H1 T45                              ; set fan 1 value. Thermostatic control is turned on

; Tools
M563 P0 S"MATERIAL 1" D0 H1 F0                 ; define tool 0
G10 P0 X0 Y0 Z0                                ; set tool 0 axis offsets
G10 P0 R0 S0                                   ; set initial tool 0 active and standby temperatures to 0C
M563 P1 S"MATERIAL 2" D0 H1 F0                 ; define tool 1
G10 P1 X0 Y0 Z0                                ; set tool 1 axis offsets
G10 P1 R0 S0                                   ; set initial tool 1 active and standby temperatures to 0C
bed.g
G28 ; home
G30 P0 X50 Y410 Z-99999 ; probe near a leadscrew, half way along Y axis
G30 P1 X550 Y410 Z-99999 ; probe near a leadscrew and calibrate
G30 P2 X275 Y3 Z-99999
M122:
=== Diagnostics ===
RepRapFirmware for Duet 2 WiFi/Ethernet version 3.4.4 (2022-10-20 16:17:41) running on Duet WiFi 1.02 or later
Board ID: 08DGM-917NK-F23T0-6JKDJ-3SD6N-TDBJF
Used output buffers: 1 of 26 (13 max)
=== RTOS ===
Static ram: 23860
Dynamic ram: 75216 of which 0 recycled
Never used RAM 12932, free system stack 116 words
Tasks: NETWORK(notifyWait,14.0%,237) HEAT(notifyWait,0.0%,333) Move(notifyWait,0.0%,294) MAIN(running,85.9%,458) IDLE(ready,0.1%,30), total 100.0%
Owned mutexes: WiFi(NETWORK)
=== Platform ===
Last reset 00:37:27 ago, cause: software
Last software reset at 2023-01-30 21:01, reason: User, GCodes spinning, available RAM 12932, slot 2
Software reset code 0x0003 HFSR 0x00000000 CFSR 0x00000000 ICSR 0x0041f000 BFAR 0xe000ed38 SP 0x00000000 Task MAIN Freestk 0 n/a
Error status: 0x00
Step timer max interval 0
MCU temperature: min 33.0, current 34.6, max 37.3
Supply voltage: min 23.9, current 24.2, max 24.5, under voltage events: 0, over voltage events: 0, power good: yes
Heap OK, handles allocated/used 0/0, heap memory allocated/used/recyclable 0/0/0, gc cycles 0
Events: 0 queued, 0 completed
Driver 0: standstill, SG min 0
Driver 1: standstill, SG min 0
Driver 2: standstill, SG min 0
Driver 3: standstill, SG min n/a
Driver 4: standstill, SG min 0
Driver 5:
Driver 6:
Driver 7:
Driver 8:
Driver 9:
Driver 10:
Driver 11:
Date/time: 2023-01-30 21:39:08
Cache data hit count 4294967295
Slowest loop: 34.57ms; fastest: 0.18ms
I2C nak errors 0, send timeouts 0, receive timeouts 0, finishTimeouts 0, resets 0
=== Storage ===
Free file entries: 10
SD card 0 detected, interface speed: 20.0MBytes/sec
SD card longest read time 7.7ms, write time 1.1ms, max retries 0
=== Move ===
DMs created 83, segments created 3, maxWait 418264ms, bed compensation in use: mesh, comp offset 0.000
=== MainDDARing ===
Scheduled moves 250, completed 250, hiccups 0, stepErrors 0, LaErrors 0, Underruns [0, 0, 0], CDDA state -1
=== AuxDDARing ===
Scheduled moves 0, completed 0, hiccups 0, stepErrors 0, LaErrors 0, Underruns [0, 0, 0], CDDA state -1
=== Heat ===
Bed heaters 0 -1 -1 -1, chamber heaters -1 -1 -1 -1, ordering errs 0
=== GCodes ===
Segments left: 0
Movement lock held by null
HTTP is idle in state(s) 0
Telnet is idle in state(s) 0
File is idle in state(s) 0
USB is idle in state(s) 0
Aux is idle in state(s) 0
Trigger is idle in state(s) 0
Queue is idle in state(s) 0
LCD is idle in state(s) 0
Daemon is idle in state(s) 0
Autopause is idle in state(s) 0
Code queue is empty
=== Network ===
Slowest loop: 97.08ms; fastest: 0.00ms
Responder states: HTTP(0) HTTP(0) HTTP(0) HTTP(0) FTP(0) Telnet(0)
HTTP sessions: 1 of 8
= WiFi =
Network state is active
WiFi module is connected to access point
Failed messages: pending 0, notready 0, noresp 0
WiFi firmware version 1.27
WiFi MAC address b4:e6:2d:53:0c:f9
WiFi Vcc 3.37, reset reason Turned on by main processor
WiFi flash size 4194304, free heap 24528
WiFi IP address 192.168.1.247
WiFi signal strength -47dBm, mode 802.11n, reconnections 0, sleep mode modem
Clock register 00002002
Socket states: 0 0 0 0 0 0 0 0
M98 Returns an error?
M98
Error: M98: No P or R parameter
Thank you for your help, any help in getting to the bottom of this would be greatly appreciated.
Kind Regards,
Adam -
@Phaedrux said in Never Printing Flat:
M98 P"config.g"
-
Have you tried setting up automatic leveling?
https://docs.duet3d.com/en/User_manual/Connecting_hardware/Z_probe_auto_levelling
-
@Phaedrux oooh, what does M98 do?
Is automatic levelling different to ABL? Like the one seen in my bed.g file?
-
@Adam_Sw3 said in Never Printing Flat:
what does M98 do?
It calls a macro to run. M98 P"config.g" will call config.g to run as it does on startup, but since the system is already running it can catch syntax errors that might otherwise get missed at startup.
@Adam_Sw3 said in Never Printing Flat:
Is automatic levelling different to ABL? Like the one seen in my bed.g file?
No its the same thing but your bed.g appears to be missing the S parameter on the last probe point to do the calculation, but maybe that's just a copy and paste error?
-
This post is deleted! -
@Phaedrux Thank you for this! I will read through the documentation! Hopefully this should solve it!
-
@Phaedrux Hi There, I have just had a crack at this tonight and I am getting an error "Some computed corrections exceed configured limit of 0.50mm: -0.487 5.186 -8.188" I understand that this is out of the tolerance for the machine to avoid it damaging itself.
I am thinking that the way I have wired it up may be the issue, 2 Z's are connected to both Z drivers. and the other "Z driver" is connected to E0. I, therefore, believe the 2 Z's arent independent. Is this the case or are they individually addressable?
Thank you.
-
@Adam_Sw3 said in Never Printing Flat:
Some computed corrections exceed configured limit of 0.50mm
You can adjust the tolerance in the M671 S parameter.
-
@Phaedrux to like +-10mm?! Are the dual Z's independent?
-
@Adam_Sw3 said in Never Printing Flat:
to like +-10mm?!
Well you'll have to determine what a safe amount of movement is to prevent damage. However, the whole point of the feature is to reduce the difference between the points, so it should be bringing things closer to spec.
I would suggest trying 2 or 3mm and manually leveling the sides to begin with. Then there shouldn't be much of a difference between the sides and only a small amount of correct would be needed.
@Adam_Sw3 said in Never Printing Flat:
2 Z's are connected to both Z drivers. and the other "Z driver" is connected to E0. I, therefore, believe the 2 Z's arent independent. Is this the case or are they individually addressable?
I'm not exactly sure I follow. Which motors are wired where? The Z driver on the Duet 2 board is a single driver. The two ports for that driver are wired in series. So to use independent control each motor must have it's own driver.
From your config.g I see your driver mapping is a little wrong.
M584 X0 Y1 Z2:5:4 E3
There are only 5 drivers on the Duet, but you have 6 mapped. There is no driver 5, only 0,1,2,3,4.
So you can't actually do 3 motor leveling (and still have an extruder) on a duet 2 without either a Duex or external driver expansion.
-
@Phaedrux Ohhhhh!! I am misunderstood sorry about that. Yes it is massively better now thank you and watching it in action is extremely awesome!
Yes my fault, I don't know why I stuck 5 in there!! I have since removed that now. Thanks for your help!
Cheers!
-
Well how many Z motors do you have?