Inconsistent layer heigh on modified Ender 3 Pro with Duet Wifi
-
Good evening everyone,
I need your help with my modified Ender 3 Pro. Since a few weeks, I've significant difficulties with my layer heigh.
This also happens on corkscrew / Vase mode, indepentend of the slicer (Prusa or Simplify3D)
My board is a Duet2 Wifi.
- First I had the Z axis in suspicion, because I had noticed that on one side the mechanics sometimes hangs a little and upgraded to dual z Axis (it was not)
- Then I have all V-rollers exchanged against a few "high-quality" with Italian ball bearings (also negative)
- The Hotend exchanged against a Swiss3D (nope)
- Exchanged the extruder for a Bondtech clone (didn't help)
- Exchanged the extruder for a Swiss3D Direct drive (no improvement)
- Exchanged the Y axis for Linear Rails (no improvement)
- Changed the whole part to a CoreXZ (to eliminate any Z fragments (nope, was just expensive)
- Converted the X axis to Linear Rails (negative)
- Changed the extruder to a BIQU Orbiter Extruder V2.0 - (nope, but looks nice)
- Replaced the stepper motors with newer ones from Stepperonline (also negative)
- Framed the whole 3D printer to make it more stable (Nope, but it looks nice too)
- Changed the nozzle from 0,4 to 0,6 ... nope (both coated)
- Power supply exchanged (brought also nothing)
- "played" with the voltage of the stepper motors between 500 and 1200
After changing almost every mechanical and electrical component and it didn't get better, I tried different slicers, but both Prusaslicer and Simplify3D have the problem.
Bed and Hotend have received a PID Tuning. Tried printing without a heated bed and printing with BangBang, but no change.
In the Duet webinterface the values are also stable concerning the temperature. (Bed remains constant at 65°C, Hotend oscillates between 119.5 and 220.3°C.)
Steps from the extruder are of course set and tested
At the moment, no one who I asked has any Idea - Someone in this forum had a similar issue (I guess he called it inconsistent extrusion) and he solved it, but without any further notice how to solve the issue itself.
The config is as shown below:
; General preferences G90 ; send absolute coordinates... M83 ; ...but relative extruder moves M550 P"CoreXZ" ; set printer name M918 P1 E4 F2000000 ; configure direct-connect display ; Network M552 S1 ; enable network M586 P0 S1 ; enable HTTP M586 P1 S0 ; disable FTP M586 P2 S0 ; disable Telnet ; Drives M569 P0 S0 ; physical drive 0 goes backwards M569 P1 S0 ; physical drive 1 goes backwards M569 P2 S0 ; physical drive 2 goes forwards M569 P3 S0 ; physical drive 3 goes backwards M584 X0 Y1 Z2 E3 ; set drive mapping M669 K2 X1:0:1 Y0:1:0 Z1:0:-1 M572 D0 S0.025 ; Pressure advance M206 X-10 Y-40 M671 X-43.0:309.0 Y137.5:137.5 S4 M350 X16 Y16 Z16 E16 I0 ; configure microstepping with interpolation M92 X80.50 Y80.5 Z80.50 E670 ; set steps per mm M566 X500.00 Y500.00 Z500.00 E500.00 ; set maximum instantaneous speed changes (mm/min) M203 X60000.00 Y60000.00 Z60000.00 E7200.00 ; set maximum speeds (mm/min) M201 X2000.00 Y2000.00 Z2000.00 E3000.00 ; set accelerations (mm/s^2) M906 X1200 Y1200 Z1200 E400 I50 ; set motor currents (mA) and motor idle factor in per cent ;M207 S1.5 F72000 Z0.2 ; Firmware Retracttion M84 S30 ; Set idle timeout M564 H0 ; Axis Limits M208 X0 Y0 Z0 S1 ; set axis minima M208 X245 Y275 Z225 S0 ; set axis maxima ; Endstops M574 X1 S1 P"xstop" ; X min active high endstop switch M574 Y1 S1 P"ystop" ; Y min active high endstop switch M574 Z1 S2 P"zprobe" ; Z min active high endstop switch ; Z-Probe M558 P1 C"zprobe.in" H5 R0.5 A1 B1 F300 T9000 ; set Z probe type to unmodulated and the dive height + speeds G31 P500 X0 Y-18 Z0.182 ; set Z probe trigger value, offset and trigger height M557 X20:220 Y20:200 S20 ; define mesh grid ;Laser ;M452 C"duex.pwm4" R255 F500 ; Enable Laser mode, on exp.heater3, with max intensity being 255, and a PWM frequency of 200 ; Heaters M308 S0 P"bedtemp" Y"thermistor" T100000 B4092 ; configure sensor 0 as thermistor on pin bedtemp M950 H0 C"bedheat" T0 ; create bed heater output on bedheat and map it to sensor 0 M140 H0 ; map heated bed to heater 0 M143 H0 S125 ; set temperature limit for heater 0 to 125C M308 S1 P"e0temp" Y"thermistor" T100000 B4092 ; configure sensor 1 as thermistor on pin e0temp M950 H1 C"e0heat" T1 ; create nozzle heater output on e0heat and map it to sensor 1 M307 H1 B0 S1.00 ; disable bang-bang mode for heater and set PWM limit M307 H0 R0.323 K0.327:0.000 D4.76 E1.35 S1.00 B0 M143 H1 S275 ; set temperature limit for heater 1 to 275C T0 ; Fans M950 F0 C"fan0" Q500 ; create fan 0 on pin fan0 and set its frequency M106 P0 S0 H T60 ; set fan 0 value. Thermostatic control is turned on M950 F1 C"fan1" Q500 ; create fan 1 on pin fan1 and set its frequency M106 P1 S0 H-1 ; set fan 1 value. Thermostatic control is turned off M950 F2 C"fan2" Q500 ; create fan 2 on pin fan2 and set its frequency M106 P2 S0 H-1 ; set fan 2 value. Thermostatic control is turned off ; Tools M563 P0 D0 H1 F0 ; define tool 0 G10 P0 X0 Y0 Z0 ; set tool 0 axis offsets G10 P0 R0 S20 ; set initial tool 0 active and standby temperatures to 0C ; Custom settings are not defined ; Miscellaneous M501 ; load saved parameters from non-volatile memory -
@Pascal-0 How tall is the part you are printing, ie is it accurate? I'd say either the Z is moving incorrectly (though it this is now a CoreXZ, I'd think you would see an error in X as well), or there is something very odd with your extrusion going on.
It is possible you have a failing stepper driver on the Duet, so it may be worth swapping one of the axes (Z or E) to the E1 stepper driver output. All you need to do to swap the Z axis to E1 is to add an M569 for the E1 stepper driver, and remap the drives with M584. eg:
M569 P4 S0                                     ; physical drive 3 goes backwards
M584 X0 Y1 Z4 E3                               ; set drive mapping
Then move the Z axis motor to the E1 driver header and test. If that doesn't help, move the extruder on to the Z axis.
Ian
Bed-slinger - Mini5+ WiFi/1LC | RRP Fisher v1 - D2 WiFi | Polargraph - D2 WiFi | TronXY X5S - 6HC/Roto | CNC router - 6HC | Tractus3D T1250 - D2 Eth
-
@droftarts said in Inconsistent layer heigh on modified Ender 3 Pro with Duet Wifi:
@Pascal-0 How tall is the part you are printing, ie is it accurate? I'd say either the Z is moving incorrectly (though it this is now a CoreXZ, I'd think you would see an error in X as well), or there is something very odd with your extrusion going on.
It is possible you have a failing stepper driver on the Duet, so it may be worth swapping one of the axes (Z or E) to the E1 stepper driver output. All you need to do to swap the Z axis to E1 is to add an M569 for the E1 stepper driver, and remap the drives with M584. eg:
M569 P4 S0                                     ; physical drive 3 goes backwards
M584 X0 Y1 Z4 E3                               ; set drive mapping
Then move the Z axis motor to the E1 driver header and test. If that doesn't help, move the extruder on to the Z axis.
Ian
Hi @droftarts
thanks for the feedback and interesting input, which i honestly never thought about, because looking back to the old days with the stepper drivers a4988, for me a driver is either dead or alive.
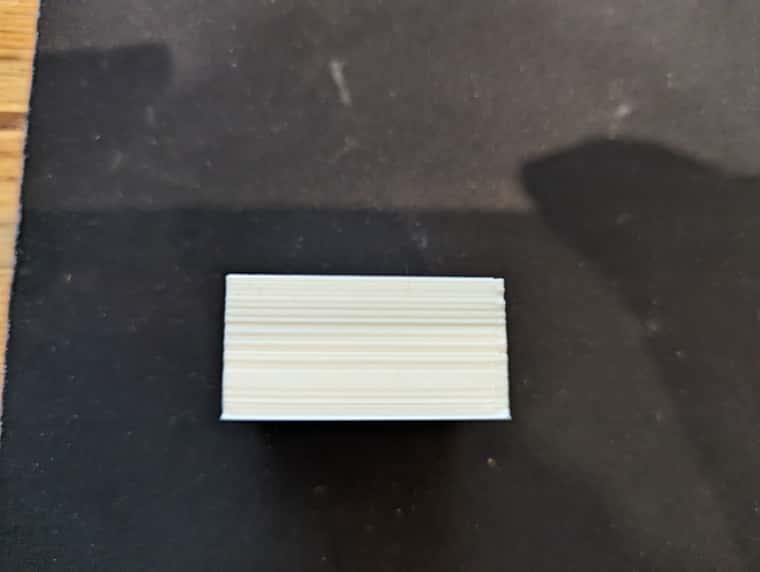
The heigh of an 20mm object is round about 19,85mm. Maybe because of the first layer?
I tried to switch the stepper mapping as proposed. First the Z to E2 than the X to E2. With the second option, the surface quality is a lot better, but not as good as it has been a few months ago.My Board has had a short voltage a long time ago, resulting that the onboard 5v converter from 12/24 V Board input is not working anymore and I've to supply 5V externally via the usb slot. Maybe this also effected the stepper drivers.
Unfortunately there is no money at the moment to get a new Board or switch to Duet3D mini.
Thanks for your help.
Pascal