reference the X-axis on both rails
-
@droftarts
I have now adjusted the names, but the endstops are still not accepted. Here is the message from the m119 command and the M98 P"config.g" command. And below again my adapted codeM98 P"config.g"
HTTP is enabled on port 80
FTP is enabled on port 21
TELNET is enabled on port 23
Error: in file macro line 50 column 65: M574: string too long
Warning: Macro file config-override.g not found
16.11.2023, 15:50:48m119
Endstops - X: at min stop, Y: not stopped, Z: no endstop, Z probe: not stoppedAll control LEDs respond...The 4 motors on the expansion board react and can be controlled
I think it's not a hardware error it is a DueX5 xspansionboard
again my adapted code:
; Configuration file for Duet WiFi (firmware version 3.3)
; executed by the firmware on start-up
;
; generated by RepRapFirmware Configuration Tool v3.3.16 on Sun May 28 2023 15:23:44 GMT+0200 (Mitteleuropäische Sommerzeit); General preferences
M575 P1 S1 B57600 ; enable support for PanelDue
G90 ; send absolute coordinates...
M83 ; ...but relative extruder moves
M550 P"DUKA1300" ; set printer name; Network
M552 S1 ; enable network
M586 P0 S1 ; enable HTTP
M586 P1 S1 ; enable FTP
M586 P2 S1 ; enable Telnet; Drives
;M569 P4 R-1 ; Treiber 4 deaktivieren
;M569 P3 R-1 ; Treiber 4 deaktivieren
M569 P0 S1 ; physical drive 0 goes forwards
M569 P1 S1 ; physical drive 1 goes forwards
M569 P2 S1 ; physical drive 2 goes forwards
M569 P3 S1 ; physical drive 3 goes forwards
M569 P4 S0 ; physical drive 3 goes forwards
M569 P5 S1 ; physical drive 3 goes forwards Expansionboard
M569 P6 S1 ; physical drive 3 goes forwards Expansionboard
M569 P7 S1 ; physical drive 3 goes forwards Expansionboard
M569 P8 S1 ; physical drive 3 goes forwards Expansionboard
;M584 X0 Z2 E1 ; set drive mapping
;M584 X0 Z2 E1 ; set drive mapping
;M584 X0:4 Y1 Z2 E3 ; set drive mapping
M584 X0:4 Y1 Z5:6:7:8 E3 ; set drive mapping
M350 X16 Y16 Z16 E16 I1 ; configure microstepping with interpolation
M92 X80.00 Y80.00 Z640 E322.58 ; set steps per mm
M566 X900.00 Y900.00 Z100.00 E120.00 ; set maximum instantaneous speed changes (mm/min)
M203 X6000.00 Y6000.00 Z300.00 E1200.00 ; set maximum speeds (mm/min)
;M201 X500.00 Y500.00 Z20.00 E250.00 ; set accelerations (mm/s^2)
M201 X500.00 Y500.00 Z40.00 E250.00 ; set accelerations (mm/s^2)
M906 X1800 Y1800 Z1700 E1600 I30 ; set motor currents (mA) and motor idle factor in per cent
M84 S30 ; Set idle timeout; Axis Limits
M208 X100 Y0 Z0 S1 ; set axis minima
M208 X750 Y640 Z1220 S0 ; set axis maxima; Endstops
M574 X1 S1 P"xstop + e0stop" ; configure switch-type (e.g. microswitch) endstop for low end on X via pin xstop
M574 Y1 S1 P"ystop" ; configure switch-type (e.g. microswitch) endstop for low end on Y via pin ystop
M574 Z1 S1 P"duex.e2stop + duex.e3stop + duex.e4stop + duex.e5stop" ; configure switch-type (e.g. microswitch) endstop for low end on Y via pin ystop; Z-Probe
;M558 K0 P1 C"e1stop" ;H5 F120 T6000
M558 K0 P5 C"!zprobe.in" H5 F120 T6000 ; set Z probe type to unmodulated and the dive height + speeds (Kapazitiver Sensor)
;M557 X0:735 Y-27:573 S35 ; define mesh grid; Z-Probe two of them
;M558 K0 P1 C"!zprobe.in" H5 F120 T6000 ; set Z probe type to unmodulated and the dive height + speeds (Kapazitiver Sensor)
;M558 K1 P8 A2 S0.2 C"!zstop" H5 F80 T3000
;G31 P1000 K0 X-1 Y-61 Z0.484 ; set Z probe trigger value, offset and trigger height (Kapazitiver Sensor)
;G31 P1000 K1 X0 Y0 Z12.664 ; Second Z-offset
;M557 X0:735 Y-27:573 S35 ; define mesh grid; Heaters
; Bed
M308 S0 P"bedtemp" Y"thermistor" T100000 B4138 ; configure sensor 0 as thermistor on pin bedtemp
M950 H0 C"bedheat" T0 ; create bed heater output on bedheat and map it to sensor 0
;M307 H0 B1 S1.00 ; enable bang-bang mode for the bed heater and set PWM limit
;M307 H2 R0.283 K0.463:0.000 D7.17 E1.35 S1.00 B0 ; enable bang-bang mode for the bed heater and set PWM limit
M307 H0 R0.283 K0.463:0.000 D7.17 E1.35 S1.00 B0 ; enable bang-bang mode for the bed heater and set PWM limit
M140 H0 ; map heated bed to heater 0
M143 H0 S280 ; set temperature limit for heater 0 to 120C;Hotend
M308 S1 P"e0temp" Y"thermistor" T100000 B4138 ; configure sensor 1 as thermistor on pin e0temp
M950 H1 C"e0heat" T1 ; create nozzle heater output on e0heat and map it to sensor 1
M307 H1 R1.797 K0.742:0.000 D7.57 E1.35 S1.00 B0 V23.8 ; disable bang-bang mode for heater and set PWM limit
M143 H1 S400 ; set temperature limit for heater 1 to 400C; Fans
M950 F0 C"fan0" Q500 ; create fan 0 on pin fan0 and set its frequency
M106 P0 S0 H-1 ; set fan 0 value. Thermostatic control is turned off
M950 F2 C"fan2" Q350 ; create fan 2 on pin fan2 and set its frequency
M106 P2 S1 H1 T60 ; set fan 2 value. Thermostatic control is turned on; Tools
M563 P0 D0 H1 F0 ; define tool 1
G10 P0 X0 Y0 Z0 ; set tool 1 axis offsets
G10 P0 R0 S0 ; set initial tool 1 active and standby temperatures to 0C; Filamentsensor
;M591 D0 P1 C"zstop" S1 ;R40:120 E3.0 S1 Filament Sensor;Auto Z-Offset
; Custom settings are not defined
M501 -
Did you try shortening the line? I believe the comment is included when it comes to being too long.
And you can remove the M501 at the end if you wish to silence the error about config-override.g being missing.
Frederick
-
@axiom What firmware version are you on? This has come up before, and it's because the string for the endstops is too long. See https://forum.duet3d.com/topic/32954/duet-2-wifi-voron-2-4-multiple-z-endstops-query
This was fixed in RRF 3.4.6, with an increase from 50 to 61.However, I think you just need to take out the spaces in yours to get under the 50 character limit, ie
M574 Z1 S1 P"duex.e2stop+duex.e3stop+duex.e4stop+duex.e5stop" ; configure switch-type (e.g. microswitch) endstop for low end on Y via pin ystopThat's 47 characters.
Ian
Bed-slinger - Mini5+ WiFi/1LC | RRP Fisher v1 - D2 WiFi | Polargraph - D2 WiFi | TronXY X5S - 6HC/Roto | CNC router - 6HC | Tractus3D T1250 - D2 Eth
-
@droftarts Deleting the spaces was the solution...it no longer gives an error
 message and the g1 h1 z0 command works and the bed stops at the endstops...now I can continue researching! Thank you so much!!!!
 -
@axiom What firmware version? Send M115 in the console and post response, please.
Ian
Bed-slinger - Mini5+ WiFi/1LC | RRP Fisher v1 - D2 WiFi | Polargraph - D2 WiFi | TronXY X5S - 6HC/Roto | CNC router - 6HC | Tractus3D T1250 - D2 Eth
-
-
@axiom You'll probably find it easier if you update to RRF 3.4.6, the current release. You shouldn't have to change your configuration.
Ian
Bed-slinger - Mini5+ WiFi/1LC | RRP Fisher v1 - D2 WiFi | Polargraph - D2 WiFi | TronXY X5S - 6HC/Roto | CNC router - 6HC | Tractus3D T1250 - D2 Eth
-
@droftarts said in reference the X-axis on both rails:
You'll probably find it easier if you update to RRF 3.4.6, the current release. You shouldn't have to change your configuration.
IanCan I just click on it here, or do I have to prepare something?

-
@axiom download "Duet2and3Firmware-3.4.6.zip" from https://github.com/Duet3D/RepRapFirmware/releases/tag/3.4.6 without unzipping it, then upload it to the Duet. It will unpack it and install the firmware update.
There's a whole wiki page on firmware updates: https://docs.duet3d.com/User_manual/RepRapFirmware/Updating_firmware
Ian
Bed-slinger - Mini5+ WiFi/1LC | RRP Fisher v1 - D2 WiFi | Polargraph - D2 WiFi | TronXY X5S - 6HC/Roto | CNC router - 6HC | Tractus3D T1250 - D2 Eth
-
@droftarts Is there something to update for the Due5 expansion board...or is that okay?

-
The Duex does not have it's own firmware.
-
@fcwiltI have now adapted the home files according to your stage directions (see below) and removed the homeall.g as you said. when I click the reference button on the user interface
 , the error message comes up:

Now I don't know what homeall.g should look like?Here are my new homing files:
; homex.g
; called to home the X axis
;
; generated by RepRapFirmware Configuration Tool v3.3.16 on Sun May 28 2023 15:23:44 GMT+0200 (Mitteleuropäische Sommerzeit)
G91 ; relative positioning
G1 H1 Z5 F6000 ; lift Z relative to current position
G1 H1 X-755 F6000 ; move quickly to X axis endstop and stop there (first pass)
G1 H1 X10 ; go back a few mm
G1 H1 X-10 F600 ; move slowly to X axis endstop once more (second pass)
G1 H1 Z-5 F6000 ; lower Z again
G92 X0 ; where ### is the actual axis position when the motion stopped - usually determined by testing; homey.g
; called to home the Y axis
;
; generated by RepRapFirmware Configuration Tool v3.3.16 on Sun May 28 2023 15:23:44 GMT+0200 (Mitteleuropäische Sommerzeit)
G91 ; relative positioning
G1 H1 Z5 F6000 ; lift Z relative to current position
G1 H1 Y-643 F6000 ; move quickly to Y axis endstop and stop there (first pass)
G1 H2 Y10 ; go back a few mm
G1 H1 Y-10 F600 ; move slowly to Y axis endstop once more (second pass)
G1 H2 Z-5 F6000 ; lower Z again
G92 Y0 ;where ### is the actual axis position when the motion stopped - usually determined by testing; homez.g
; called to home the Z axis
;
; generated by RepRapFirmware Configuration Tool v3.3.16 on Sun May 28 2023 15:23:44 GMT+0200 (Mitteleuropäische Sommerzeit)
G91 ; relative positioning
G1 H1 Z-1230 F6000 ; lift Z relative to current position
G1 Z20 ; back off a bit
G1 H1 Z-20 F300 ; slow move to min endstop
G92 Z7,1 ; home Z by probing the bed -
I don't recall saying to remove the homeALL.g file.
What I think I said was I don't duplicate homing code so my homeALL.g file looks something like this:
M98 P"homeZ.g"
M98 P"homeX.g"
M98 P"homeY.g"
The results are the same but there is no actual "homing" code in homeALL.g.
Frederick
-
And since you now have Z endstops you don't need to use the type of homing code the configuration tool generates.
I also suggest you work towards not using the configuration tool and learn how to create your own code.
Your code will likely be better and fixing code related problems will be easier since you fully understand what you coded.
Didn't I post examples of what your basic homing files would look like?
Basically you do:
- a fast G1 H1 move toward the endstop
- a short fast move G1 move away from the endstop
- a slow G1 H1 move toward the endstop
- a possible G92 to set the logical position of the axis being homed to match the physical position
Assume a printer where the X endstop is at the min end of the X axis and the axis has a range of motion of 300mm:
G1 H1 X-310 F6000
G1 X20
G1 H1 X-25 F600
G92 X=nnn ; where nnn is actual position of the X axis after the 3 moves above
Frederocl
-
I'm just stuck...if my z-endstops are set to 4 and I want to reference...but the bed is already above the end stops, e.g. 2...then the bed moves into the head. So I currently have to move the bed below the endstops before referencing...how can I correct this in the z-home. Here are my files again:
; homez.g
; called to home the Z axis
;
; generated by RepRapFirmware Configuration Tool v3.3.16 on Sun May 28 2023 15:23:44 GMT+0200 (Mitteleuropäische Sommerzeit)
G91 ; relative positioning
G1 H1 Z-1225 F4000 ; lift Z relative to current position
G1 Z10 ; back off a bit
G1 H1 Z-10 F300; slow move to min endstop
G92 Z4 ; home Z by probing the bed; homex.g
; called to home the X axis
;
; generated by RepRapFirmware Configuration Tool v3.3.16 on Sun May 28 2023 15:23:44 GMT+0200 (Mitteleuropäische Sommerzeit)
G91 ; relative positioning
G1 H1 Z5 F4000 ; lift Z relative to current position
G1 H1 X-755 F4000 ; move quickly to X axis endstop and stop there (first pass)
G1 H1 X10 ; go back a few mm
G1 H1 X-10 F300 ; move slowly to X axis endstop once more (second pass)
G1 H1 Z-5 F4000 ; lower Z again
G92 X0 ; where ### is the actual axis position when the motion stopped - usually determined by testing
G1 x10; homey.g
; called to home the Y axis
;
; generated by RepRapFirmware Configuration Tool v3.3.16 on Sun May 28 2023 15:23:44 GMT+0200 (Mitteleuropäische Sommerzeit)
G91 ; relative positioning
G1 H1 Z5 F4000 ; lift Z relative to current position
G1 H1 Y-643 F4000 ; move quickly to Y axis endstop and stop there (first pass)
G1 H2 Y10 ; go back a few mm
G1 H1 Y-10 F300 ; move slowly to Y axis endstop once more (second pass)
G1 H2 Z-5 F64000 ; lower Z again
G92 Y0 ;where ### is the actual axis position when the motion stopped - usually determined by testing
G1 y10and homeall:
M98 P"homeY.g"
M98 P"homeX.g"
M98 P"homeZ.g"
; Configuration file for Duet WiFi (firmware version 3.3)
; executed by the firmware on start-up
;
; generated by RepRapFirmware Configuration Tool v3.3.16 on Sun May 28 2023 15:23:44 GMT+0200 (Mitteleuropäische Sommerzeit); General preferences
M575 P1 S1 B57600 ; enable support for PanelDue
G90 ; send absolute coordinates...
M83 ; ...but relative extruder moves
M550 P"DUKA1300" ; set printer name; Network
M552 S1 ; enable network
M586 P0 S1 ; enable HTTP
M586 P1 S1 ; enable FTP
M586 P2 S1 ; enable Telnet; Drives
;M569 P4 R-1 ; Treiber 4 deaktivieren
;M569 P3 R-1 ; Treiber 4 deaktivieren
M569 P0 S1 ; physical drive 0 goes forwards
M569 P1 S1 ; physical drive 1 goes forwards
M569 P2 S1 ; physical drive 2 goes forwards
M569 P3 S1 ; physical drive 3 goes forwards
M569 P4 S0 ; physical drive 3 goes forwards
M569 P5 S1 ; physical drive 3 goes forwards Expansionboard
M569 P6 S1 ; physical drive 3 goes forwards Expansionboard
M569 P7 S1 ; physical drive 3 goes forwards Expansionboard
M569 P8 S1 ; physical drive 3 goes forwards Expansionboard
;M584 X0 Z2 E1 ; set drive mapping
;M584 X0 Z2 E1 ; set drive mapping
;M584 X0:4 Y1 Z2 E3 ; set drive mapping
M584 X0:4 Y1 Z5:6:7:8 E3 ; set drive mapping
M350 X16 Y16 Z16 E16 I1 ; configure microstepping with interpolation
M92 X80.00 Y80.00 Z640 E322.58 ; set steps per mm
M566 X900.00 Y900.00 Z100.00 E120.00 ; set maximum instantaneous speed changes (mm/min)
M203 X6000.00 Y6000.00 Z300.00 E1200.00 ; set maximum speeds (mm/min)
M201 X500.00 Y500.00 Z40.00 E250.00 ; set accelerations (mm/s^2)
M906 X1800 Y1800 Z1700 E1600 I30 ; set motor currents (mA) and motor idle factor in per cent
M84 S30 ; Set idle timeout; Axis Limits
M208 X0 Y0 Z0 S1 ; set axis minima
M208 X750 Y643 Z1220 S0 ; set axis maxima; Endstops
M574 X1 S1 P"xstop + e0stop" ; configure switch-type (e.g. microswitch) endstop for low end on X via pin xstop
M574 Y1 S1 P"ystop" ; configure switch-type (e.g. microswitch) endstop for low end on Y via pin ystop
M574 Z1 S1 P"duex.e2stop+duex.e3stop+duex.e4stop+duex.e5stop" ; configure switch-type (e.g. microswitch) endstop for low end on Y via pin ystop; Z-Probe
M558 K0 P5 C"!zprobe.in" H5 F120 T6000 ; set Z probe type to unmodulated and the dive height + speeds (Kapazitiver Sensor)
M558 K1 P8 A2 S7 C"duex.e6stop" H5 F80 T3000
G31 P1000 K0 X0 Y-25 Z0.817 ; set Z probe trigger value, offset and trigger height (Kapazitiver Sensor)
M557 X0:735 Y-25:573 S35 ; define mesh grid; Heaters
; Bed
M308 S0 P"bedtemp" Y"thermistor" T100000 B4138 ; configure sensor 0 as thermistor on pin bedtemp
M950 H0 C"bedheat" T0 ; create bed heater output on bedheat and map it to sensor 0
M307 H0 R0.283 K0.463:0.000 D7.17 E1.35 S1.00 B0 ; enable bang-bang mode for the bed heater and set PWM limit
M140 H0 ; map heated bed to heater 0
M143 H0 S280 ; set temperature limit for heater 0 to 120C;Hotend
M308 S1 P"e0temp" Y"thermistor" T100000 B4138 ; configure sensor 1 as thermistor on pin e0temp
M950 H1 C"e0heat" T1 ; create nozzle heater output on e0heat and map it to sensor 1
M307 H1 R1.797 K0.742:0.000 D7.57 E1.35 S1.00 B0 V23.8 ; disable bang-bang mode for heater and set PWM limit
M143 H1 S400 ; set temperature limit for heater 1 to 400C; Fans
M950 F0 C"fan0" Q500 ; create fan 0 on pin fan0 and set its frequency
M106 P0 S0 H-1 ; set fan 0 value. Thermostatic control is turned off
M950 F2 C"fan1" Q350 ; create fan 2 on pin fan2 and set its frequency
M106 P2 S1 H1 T60 ; set fan 2 value. Thermostatic control is turned on; Tools
M563 P0 D0 H1 F0 ; define tool 1
G10 P0 X0 Y0 Z0 ; set tool 1 axis offsets
G10 P0 R0 S0 ; set initial tool 1 active and standby temperatures to 0C; Filamentsensor
M591 D0 P1 C"e1stop" S1 ;R40:120 E3.0 S1 Filament Sensor;Auto Z-Offset
; Custom settings are not defined
M501 -
You have to design the mounting of the endstops so they are triggered to the very end of travel.
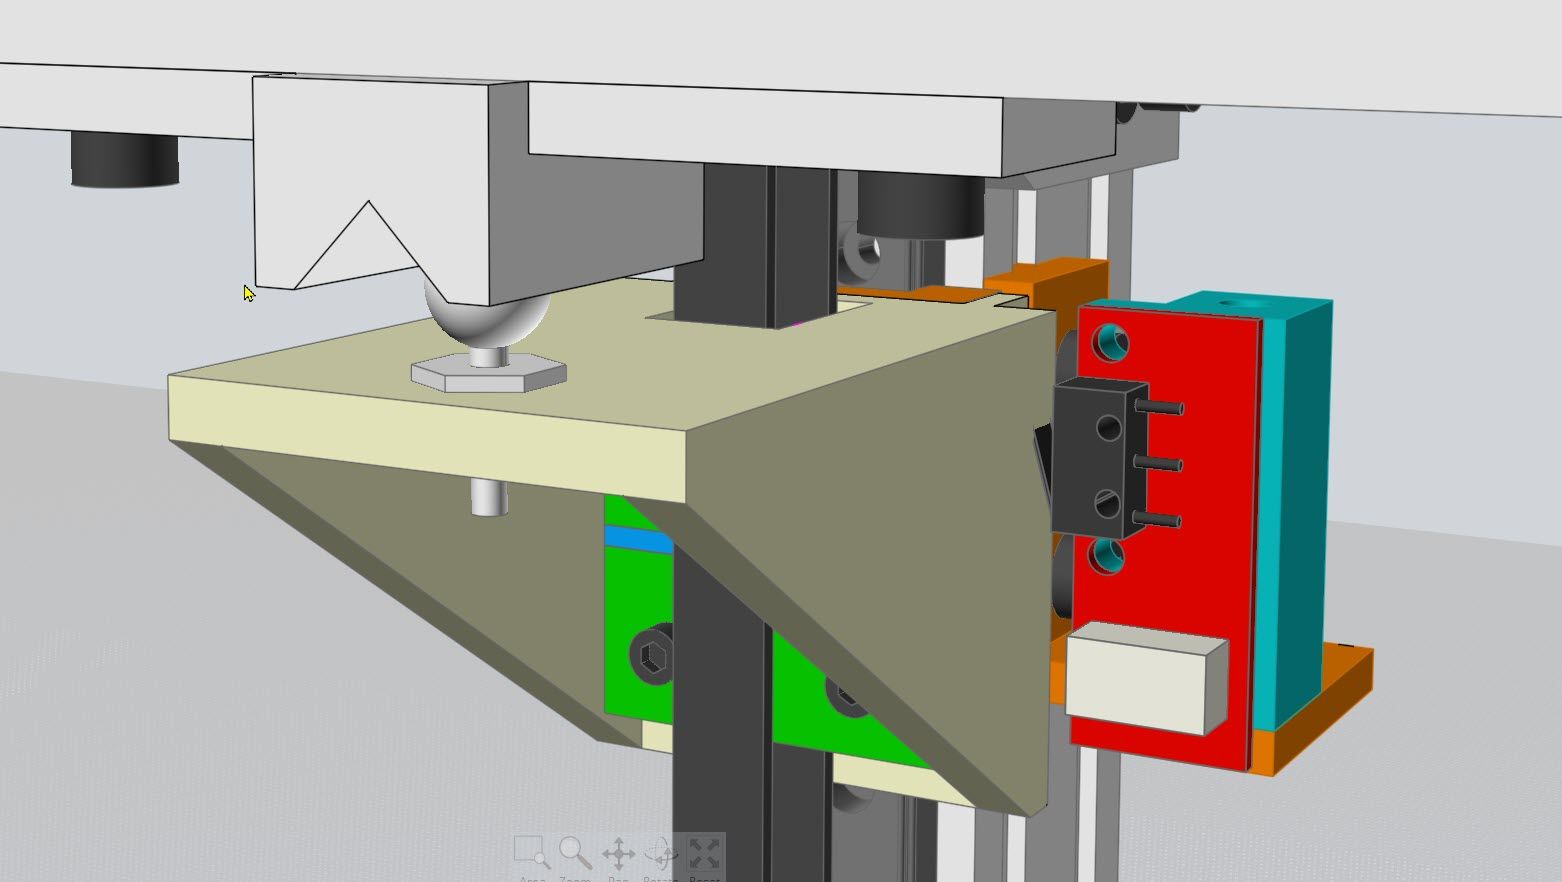
Here you can see part of the Z axis setup on my tripple Z stepper printer. The endstop switch is activated by the side of that bracket that is supporting the ball stud. The bracket travels along the linear rail. The endstop switch is first activated well before the end of Z travel but remains activated to the very end of travel.
So you cannot move "past" the endstop.
Let's suppose you use a typical bit of homing code like below:
G91
G1 H1 Z-300 F1200
G1 Z50
G1 H1 Z-55 F300
If you start with endstop already activated the first G1 move doesn't actually move and the code continues doing the backup move and then the slow move to endstop.
Some folks include a test to see if the homing code starts out with the endstop activated and if it is the code backs off enough to insure the endstop should no longer be activated and if it is still activated they abort the homing and display and error message.
That "safety" check is a pretty good idea.
Frederick
-
@fcwilt but you wrote to me that if my endstops are further down, then I can simply define the position, e.g. 4, with the G92 command... I need the information on how to automatically go deeper than 10 mm when referencing ...when it starts up it encounters the endstops...is the G91 command at the beginning perhaps wrong?
-
You can use G92 to sync up the logical position with the actual physical position.
But if you can move past the endstop until it is no longer triggered you would have to insure that every Z homing operation began with a relative move to be sure you were no longer past the endstop. And that move could cause a problem if you happened to be near the max end of travel.
As you can see I deal with that problem by insuring that endstop can be triggered all the way to the end of travel regardless of where it is initially triggered.
Frederick
