Input Shaping and Accelerometer, how do I make it useful?
-
I feel like the user interface is much too dumbed down to be useful. The accelerometer plugin was deleted, so I can't take samples while printing to get some real world examples.
Every example of IS I've seen on klipper shows the machine practically vibrating the head to get signal. What am I supposed to do with 1 X and 1 Y move?
I don't know how these things work, but it seems like there can't possibly be enough information there.
-
@gnydick I think you mean Input Shaping (IS) not Linear Advance? Linear Advance is the Marlin equivalent od RRF's Pressure Advance (see: https://marlinfw.org/docs/features/lin_advance.html) as far as I know neither use an accelerometer as part of the tuning mechanism.
As to the sampling technique used to obtain resonance data take a look at the discussion here: https://forum.duet3d.com/topic/25975/comparing-klipper-and-rrf-input-shaper-data-collection?_=1715190482354
Both systems essentially should be generating the same data. From my understanding you can't really generate any useful data by sampling during an actual print (Klipper has no tools for this either), all you would be doing would be measuring the acceleration moves from the print.
-
@gloomyandy oh, geez, yes, thank you. I fixed the title. it looks like, long story short, just follow the existing instructions. Was that right?
I don't see any differences with our without input shaping, i still get horrible ringing around sharp edges at high speed.
pressure advance doesn't help either. i really don't know what else to do.
I guess I have to take a more methodical approach and tweak one variable at a time.
thanks
-
@gnydick Maybe post the graphs you are getting out of the plugin and examples of the ringing you are seeing on actual prints along with the details of what speeds, accelerations and jerk settings you are using. It is unusual to see no differences with/without IS. However the current implementation of IS in RRF is not applied in all situations (in particular to short moves), this limitation is currently being work on.
-
You can put in and record your own moves with IS if needed, if you want to utilize moves other than what is available on the IS interface in DWC.
For example, on a corexy machine, it can be useful to run opposite xy diagonal moves to check the variance on belt tension, in a similar manner that Klipper does. I run a code such as this. These moves will show up as move 4 and 5 in the input shaper graph after refreshing the screen. I then compare the xy frequency peaks of each move to verify.
G1 X-150 Y-150 G4 S3 M956 P120.0 S1000 A0 F"5-X64-191-0-none.csv" G4 P10 G1 X150 Y150 F10000
G1 X150 Y-150 G4 S3 M956 P120.0 S1000 A0 F"4-X64-191-0-none.csv" G4 P10 G1 X-150 Y150 F10000
Obviously you will need to modify the code for your own machine, and depending on where your xy origin is.
-
@gloomyandy will do when I get a chance. thank you.
-
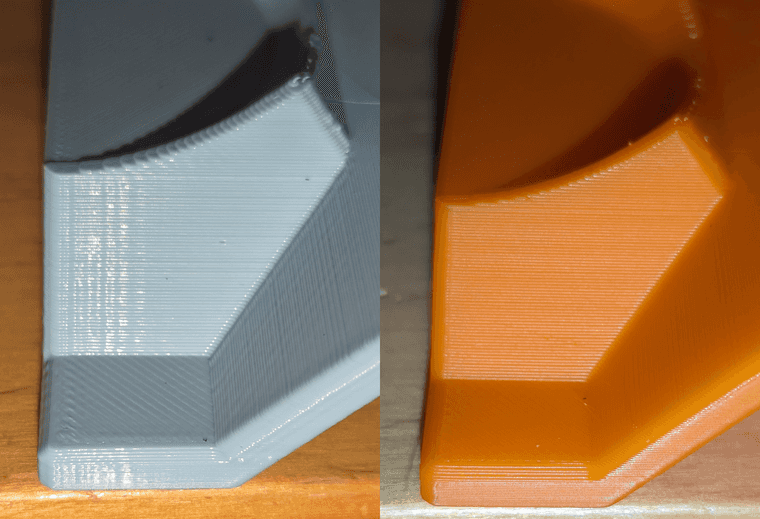
I've found a few key things that needed fixing on my printer that has made a huge difference, so now pressure advance and input shaping have to start over.
- my CoreXY belts were not equal length. While I could square the gantry, the belts were never the same tension. Now they are.
- My motors were set to
X16 Y16 I1microstepping. Made lots of harsh vibrations at many different speeds. I was tired of the noise so I started playing with the microstepping and ended up withX64 Y64 I0and it's sooo much better. I did also try different driver settings like stealthChop, but that didn't make a difference. Maybe it will now that the vibrations are gone. - Last but not least, my X rails weren't equally spaced. They were parallel, but I overtightened some screws and it made the rail wavy on a small scale. I loosened all of the screws between the ends and re-torqued them all to just-barely-firm and that seems to have fixed it. Now my gantry just sounds like recirculating ball bearings.
I made a new print and it's quite literally perfect. Old print on the left, new print on the right.
-
@gnydick fantastic results! Regarding rails, in the kit bulider communities people tend to use only every other hole to affix the rails, with only light torque for the reasons you describe.
-
@gnydick So you are running an upper and lower rail on your x gantry? What model printer? I only ask because I have contemplated running dual x rails myself on my corexy.
Of the things you fixed, which of the fixes do you think was the most influencing change, in regards to solving your resonance issue?
Are you running damper plates on your stepper motors? I found that those quieted mine down immensely.
-
@br7408 no, not dual rails. Just one at each end of the Y axis.
No dampers, I have double shear stepper mounts.