Neopixel not working after install komponents
-
Does anyone have an idea why my neopixel LED is not working anymore? I have only installed a tool distribution board and two tool boards in my Idex printer which runs with a duet mini. Everything works perfectly except for the LED. I have the current firmware 3.5.2 release candidate 1.
; Configuration file for Duet 3 Mini 5+ (firmware version 3.3)
; General preferences_____________________________________________________________________________________________
M575 P1 S1 B57600                                         ; enable support for PanelDue
G90                                                       ; send absolute coordinates...
M83                                                       ; ...but relative extruder moves
M550 P"Proschi 3D E2"                                        ; set printer name
M552 S1                                                   ; enable network
M586 P0 S1                                                ; enable HTTP
M586 P1 S1                                                ; disable FTP
M586 P2 S0                                              ; enable Telnet
G4 S5
; Drives___________________________________________________________________________________________________________
M569 P0.4 S0 D3 H50 V30                                          ; physical drive 0.0 goes forwards
M915 P0.4 T50
M569 P0.1 S1 D3 H45 V35                                           ; Y Achse physical drive 0.1 goes forwards
M915 P0.1 T50
M569 P0.2 S0 D3 H50 V30                                           ; physical drive 0.2 goes forwards
M915 P0.2 T50
M569 P10.0 S0                                        ; physical drive 0.3 goes forwards
M569 P0.0 S0 D3 H50 V30                                           ; physical drive 0.4 goes forwards
M915 P0.0 T50
M569 P11.0 S1                                           ; physical drive 0.5 goes forwards
;M569 P25.0 S0 D3 H50 V30                    ; physical drive 0.5 goes forwards
M584 X0.4 Y0.1 Z0.2 E10.0:11.0 U0                   ; set drive mapping
M350 X16 Y16 U16 Z16 E16:16 I1                     ; configure microstepping without interpolation
M92 X80 Y160 U80 Z800 E286.216 :286.216             ; set steps per mm
M566 X480 Y480 U480 Z30 E300:300                   ; set maximum instantaneous speed changes (mm/min)
M203 X9000 U9000 U9000 Y7200 Z650  E3000:3000             ; set maximum speeds (mm/min)
M201 X1000 U1000 Y1000 Z120 0 E3000:3000            ; set accelerations (mm/s^2)
M906 X1200 U1200 Y1400 Z900 E800:800 I30            ; set motor currents (mA) and motor idle factor in per cent
M84 S30                                            ; Set idle timeout

; Axis Limits_________________________________________________________________________________________________________________
M208 X10 Y-3 Z-0.3 U35 S1                                         ; set axis minima
M208 X335 Y255 Z240 U355 S0                                    ; set axis maxima

; Endstops____________________________________________________________________________________________________________________
M574 Y1 S1 P"io1.in"
M574 X1 S1 P"io2.in"
M574 U2 S1 P"Io4.in"
;M574 Z1 S1 P"!Io6.in"      ; Auto Z offset
;M915 X S-63 H10 R1 ; Set very sensitive stall detect
;M574 X1 S3 ; configure endstop for stall detection
;M915 X S20 H140 R0 ; Set very sensitive stall detect
;M915 X S-63 H10 R1 ; Set very sensitive stall detect

; Filament Sensoren___________________________________________________________________________________________________________
;M591 D1 P1 C"io5.in"  S1
;M591 D0 P1 C"spi.cs2" S1
M950 J3 C"spi.cs2"
M581 P1:2 S1 T3 R0	; T5 only while processing gcode
M581 P1:2 S0 T4 R0
M950 J2 C"io5.in"
M581 P1:2 S1 T1 R0	; T5 only while processing gcode
M581 P1:2 S0 T2 R0
; Z-Probe_____________________________________________________________________________________________________________________
M558 K0 P8 C"io3.in" H5 S0.008 F200 T6000           ; set Z probe type to unmodulated and the dive height + speeds
G31 K0 P500 X10 Y30  ;0.55 Simplify set Z probe trigger value, offset and trigger height
;BL Touch________________________________________________________________________________________________________________________
M950 K1 S0 C"10.io0.out"
M558 K1 C"10.io0.in" P9 H5 F200 T18000 B0 A4 S0.005 R0.4			; disable Z probe but set dive height, probe speed and travel speed
G31 K1 P500 X15 Y-5.50 Z2.381
;M557 X30:330 Y50:200 P14                             ; define mesh grid
;G31 P500 X10 Y30									; BLTouch X and Y offset
M557 X{move.axes[0].min + sensors.probes[0].offsets[0] + 1, move.axes[0].max + sensors.probes[0].offsets[0] - 1} Y{move.axes[1].min + sensors.probes[0].offsets[1] + 0, move.axes[1].max + sensors.probes[0].offsets[1] - 75} P15:10
; The M557 is used to define the mesh grid area. It uses the P parameter to set the amount of probing points. P10:10 would be a 10x10 grid. Supports up to a 21x21 grid.
M98 P"config_probe.g"										; Load the Z-offset from the config_probe.g file
; The Z_offset value is now set in config_probe.g, not in config.g
; Adjust the values there, do not adjust anything here.

; Heaters_______________________________________________________________________________________________________________________
M308 S0 P"Temp0" Y"thermistor" T100000 B4138              ; configure sensor 0 as thermistor on pin temp0
M950 H0 C"out0" T0                                        ; create bed heater output on out0 and map it to sensor 0
M307 H0 B1 S1.00                                          ; enable bang-bang mode for the bed heater and set PWM limit
M140 H0                                                   ; map heated bed to heater 0
M143 H0 S120                                              ; set temperature limit for heater 0 to 120C
M308 S1 P"11.Temp0" Y"thermistor" T100000 B4725 C7.06e-8    ; configure sensor 1 as thermistor on pin temp1
M950 H1 C"10.out0" T2                                       ; create nozzle heater output on out1 and map it to sensor 1
M307 H1 B0 S1.00                                          ; disable bang-bang mode for heater  and set PWM limit
M143 H1 S340                                              ; set temperature limit for heater 1 to 340C
M308 S2 P"10.Temp0" Y"thermistor" T100000 B4725 C7.06e-8   ; configure sensor 2 as thermistor on pin temp2
M950 H2 C"11.out0" T1                                        ; create nozzle heater output on out2 and map it to sensor 2
M307 H2 B0 S1.00                                          ; disable bang-bang mode for heater  and set PWM limit
M143 H2 S340                                              ; set temperature limit for heater 2 to 340C
M308 S3 P"25.temp0" Y"thermistor" A"Gehäuse" T100000 B4138           ; configure sensor 1 as thermistor on pin temp1
; Temp Sensoren_________________________________________________________________________________________________________________________
M308 S10 Y"mcu-temp" A"MCU" ; defines sensor 10 as MCU temperature sensor
;M308 S11 Y"drivers" A"Duet stepper drivers" ; defines sensor 11 as stepper driver temperature sensor
M308 S8 Y"mcu-temp" P"25.dummy" A"Can MCU"
;M308 S9 Y"drivers" P"25.dummy" A"Can Stepper"

; Fans___________________________________________________________________________________________________________________________________
M950 F1 C"10.out1" Q500                                      ; create fan 0 on pin out4 and set its frequency
M106 P1 C"Links" S0 H-1
M950 F0 C"11.out1" Q500                                      ; create fan 0 on pin out4 and set its frequency
M106 P0 C"Rechts" S0 H-1
M950 F7 C"11.out2" Q500                               ; create fan 0 on pin out3 and set its frequency
M106 P7 C"Hotend Fan rechts" S1 H1 T45                        ; set fan 0 name and value. Thermostatic control turned on for Hotend
M950 F8 C"10.out2" Q500                               ; create fan 0 on pin out3 and set its frequency
M106 P8 C"Hotend Fan links" S1 H2 T45
;M950 F5 C"out6" Q500
;M106 P5 C"Board" S0 H-1
M950 F2 C"out3" Q500                                    ; create fan 0 on pin out4 and set its frequency
M106 P2 C"Filter Lüfter" S0 H-1 Q25000                                        ; set fan 0 value. Thermostatic control is turned off
M950 F3 C"out5" Q500                                      ; create fan 2 on pin vfd and set its frequency
M106 P3 C"LED" S150 H-1                                            ; set fan 2 value. Thermostatic control is turned off
M950 F4 C"out4+out4.tach" Q25000
M106 P4 C"Aktiv Kühlung" S0 H-1
M950 F5 C"25.out5" Q100
M106 P5 C"Board Kühler"   ;Die Lüftersteuerung ist in Deamon.g festgelegt            ; Create a tool that uses the low end (X) carriage
M950 F6 C"25.out4+out4.tach" Q100
M106 P6 C"CanBoard"

;Acclerometer
M955 P11.0 I24                ; configure accelerometer on toolboard with CAN address 121 and specify orientation
M593 F37.1 S0.2  P"ZVDDD"
M955 P10.0 I24                ; configure accelerometer on toolboard with CAN address 121 and specify orientation
;Switch_______________________________________________________________________________________________________________________________
M950 J1 C"25.io6.in"
M581 P1 S0 T5 R0	; T5 only while processing gcode
M581 P1 S1 T6 R0
;Tools________________________________________________________________________________________________________________________________
M563 P0 D0 H1 F1  S"linker Extruder"           ; tool 0 uses extruder 0, heater 1 and fan 0
G10 P0 X0 Y0 Z-0.1 S0 R0       ; set tool 0 offsets and temperatures

; Create a tool that uses the high end (U) carriage
M563 P1 D1 H2 X3 F0  S"rechter Extruder"        ; tool 1 uses extruder 1, heater 2, fan 2, and maps X to U
G10 P1 Y-0.2 U27,3 Z-0.1 R0       ; set tool 1 offsets and temperatures

; Create a tool that prints 2 copies of the object using both carriages
M563 P2 D0:1 H1:2 X0:3 F0:0 S"Duplicate"; tool 2 uses both extruders, hot end heaters and fans, and maps X to both X and U
G10 P2 X-25 Y0 U-176.3 Z0.0 S0 R0 ; set tool offsets and temperatures
G10 P2 R0 S0
M567 P2 E1:1 ; set mix ratio 100% on both extruders
;Create a tool that Prints in Mirrior Mode
M563 P3 S"Mirror" H1:2 D0:1 X0:3 F0:0
G10 P3 X165 Y0 U-165 Z0 S0 R0
G10 P3 R0 S-2
; Custom settings are not defined
;Temperatur anpassung MCU
M912 P0 S2
; Miscellaneous_________________________________________________________________________________________________________________________________
M501                                                      ; load saved parameters from non-volatile memory
;M911 S10 R11 P"M913 X0 U0 Y0 G91 M83 G1 Z3 E-5 F1000"        ; set voltage thresholds and actions to run on power loss
;Global Variables_______________________________________________________________________________________________________________________________
M98 P"GlobaleBuildplate.g"
;LED Neopixel___________________________________________________________________________________________________________________________________
M950 E1 C"led" T1 U16
=== Diagnostics === RepRapFirmware for Duet 3 Mini 5+ version 3.5.2-rc.1 (2024-05-28 11:53:48) running on Duet 3 Mini5plus WiFi (standalone mode) Board ID: L0Z2A-S096U-D65J0-40KMU-MY03Z-RMV8H Used output buffers: 31 of 40 (35 max) === RTOS === Static ram: 103368 Dynamic ram: 123808 of which 0 recycled Never used RAM 11384, free system stack 192 words Tasks: NETWORK(2,nWait 7,31.7%,211) HEAT(3,nWait 6,0.0%,331) Move(4,nWait 6,0.0%,341) CanReceiv(6,nWait 1,0.1%,796) CanSender(5,nWait 7,0.0%,336) CanClock(7,delaying,0.0%,348) TMC(4,nWait 6,0.8%,101) MAIN(1,running,66.0%,665) IDLE(0,ready,0.4%,29) AIN(4,delaying,0.9%,259), total 100.0% Owned mutexes: WiFi(NETWORK) === Platform === Last reset 00:01:55 ago, cause: power up Last software reset at 2024-06-02 10:31, reason: User, Gcodes spinning, available RAM 11296, slot 0 Software reset code 0x0003 HFSR 0x00000000 CFSR 0x00000000 ICSR 0x00000000 BFAR 0xe000ed38 SP 0x00000000 Task MAIN Freestk 0 n/a Error status: 0x00 Aux0 errors 0,0,0 MCU revision 3, ADC conversions started 115268, completed 115266, timed out 0, errs 0 MCU temperature: min 12.2, current 22.6, max 22.6 Supply voltage: min 23.7, current 23.8, max 23.9, under voltage events: 0, over voltage events: 0, power good: yes Heap OK, handles allocated/used 99/1, heap memory allocated/used/recyclable 2048/20/0, gc cycles 0 Events: 0 queued, 0 completed Driver 0: standstill, SG min 0, read errors 0, write errors 0, ifcnt 15, reads 6032, writes 15, timeouts 0, DMA errors 0, CC errors 0 Driver 1: standstill, SG min 0, read errors 0, write errors 0, ifcnt 15, reads 6032, writes 15, timeouts 0, DMA errors 0, CC errors 0 Driver 2: standstill, SG min 0, read errors 0, write errors 0, ifcnt 15, reads 6031, writes 15, timeouts 0, DMA errors 0, CC errors 0 Driver 3: standstill, SG min 0, read errors 0, write errors 0, ifcnt 10, reads 6036, writes 10, timeouts 0, DMA errors 0, CC errors 0 Driver 4: standstill, SG min 0, read errors 0, write errors 0, ifcnt 15, reads 6032, writes 15, timeouts 0, DMA errors 0, CC errors 0 Driver 5: not present Driver 6: not present Date/time: 2024-06-04 10:01:18 Cache data hit count 199703773 Slowest loop: 36.14ms; fastest: 0.12ms === Storage === Free file entries: 19 SD card 0 detected, interface speed: 22.5MBytes/sec SD card longest read time 6.3ms, write time 0.0ms, max retries 0 === Move === DMs created 83, segments created 0, maxWait 0ms, bed compensation in use: none, height map offset 0.000, max steps late 0, min interval 0, bad calcs 0, ebfmin 0.00, ebfmax 0.00 no step interrupt scheduled Moves shaped first try 0, on retry 0, too short 0, wrong shape 0, maybepossible 0 === DDARing 0 === Scheduled moves 0, completed 0, hiccups 0, stepErrors 0, LaErrors 0, Underruns [0, 0, 0], CDDA state -1 === DDARing 1 === Scheduled moves 0, completed 0, hiccups 0, stepErrors 0, LaErrors 0, Underruns [0, 0, 0], CDDA state -1 === Heat === Bed heaters 0 -1 -1 -1, chamber heaters -1 -1 -1 -1, ordering errs 0 === GCodes === Movement locks held by null, null HTTP is idle in state(s) 0 Telnet is idle in state(s) 0 File is idle in state(s) 0 USB is idle in state(s) 0 Aux is idle in state(s) 0 Trigger is idle in state(s) 0 Queue is idle in state(s) 0 LCD is idle in state(s) 0 SBC is idle in state(s) 0 Daemon is idle in state(s) 0 Aux2 is idle in state(s) 0 Autopause is idle in state(s) 0 File2 is idle in state(s) 0 Queue2 is idle in state(s) 0 Q0 segments left 0, axes/extruders owned 0x0000000 Code queue 0 is empty Q1 segments left 0, axes/extruders owned 0x0000000 Code queue 1 is empty === CAN === Messages queued 1083, received 6337, lost 0, errs 0, boc 0 Longest wait 2ms for reply type 6053, peak Tx sync delay 53, free buffers 26 (min 25), ts 576/575/0 Tx timeouts 0,0,0,0,0,0 === Network === Slowest loop: 146.02ms; fastest: 0.00ms Responder states: MQTT(0) HTTP(2) HTTP(2) HTTP(0) HTTP(0) FTP(0) Telnet(0) HTTP sessions: 2 of 8 === WiFi === Interface state: active Module is connected to access point Failed messages: pending 0, notrdy 0, noresp 1 Firmware version 2.1.0 MAC address f0:08:d1:03:80:5e Module reset reason: Power up, Vcc 3.39, flash size 2097152, free heap 23280 WiFi IP address 192.168.178.91 Signal strength -34dBm, channel 6, mode 802.11n, reconnections 0 Clock register 00002001 Socket states: 0 3 0 0 0 0 0 04.6.2024, 10:01:20M122 === Diagnostics === RepRapFirmware for Duet 3 Mini 5+ version 3.5.2-rc.1 (2024-05-28 11:53:48) running on Duet 3 Mini5plus WiFi (standalone mode) Board ID: L0Z2A-S096U-D65J0-40KMU-MY03Z-RMV8H Used output buffers: 31 of 40 (35 max) === RTOS === Static ram: 103368 Dynamic ram: 123808 of which 0 recycled Never used RAM 11384, free system stack 192 words Tasks: NETWORK(2,nWait 7,31.7%,211) HEAT(3,nWait 6,0.0%,331) Move(4,nWait 6,0.0%,341) CanReceiv(6,nWait 1,0.1%,796) CanSender(5,nWait 7,0.0%,336) CanClock(7,delaying,0.0%,348) TMC(4,nWait 6,0.8%,101) MAIN(1,running,66.0%,665) IDLE(0,ready,0.4%,29) AIN(4,delaying,0.9%,259), total 100.0% Owned mutexes: WiFi(NETWORK) === Platform === Last reset 00:01:55 ago, cause: power up Last software reset at 2024-06-02 10:31, reason: User, Gcodes spinning, available RAM 11296, slot 0 Software reset code 0x0003 HFSR 0x00000000 CFSR 0x00000000 ICSR 0x00000000 BFAR 0xe000ed38 SP 0x00000000 Task MAIN Freestk 0 n/a Error status: 0x00 Aux0 errors 0,0,0 MCU revision 3, ADC conversions started 115268, completed 115266, timed out 0, errs 0 MCU temperature: min 12.2, current 22.6, max 22.6 Supply voltage: min 23.7, current 23.8, max 23.9, under voltage events: 0, over voltage events: 0, power good: yes Heap OK, handles allocated/used 99/1, heap memory allocated/used/recyclable 2048/20/0, gc cycles 0 Events: 0 queued, 0 completed Driver 0: standstill, SG min 0, read errors 0, write errors 0, ifcnt 15, reads 6032, writes 15, timeouts 0, DMA errors 0, CC errors 0 Driver 1: standstill, SG min 0, read errors 0, write errors 0, ifcnt 15, reads 6032, writes 15, timeouts 0, DMA errors 0, CC errors 0 Driver 2: standstill, SG min 0, read errors 0, write errors 0, ifcnt 15, reads 6031, writes 15, timeouts 0, DMA errors 0, CC errors 0 Driver 3: standstill, SG min 0, read errors 0, write errors 0, ifcnt 10, reads 6036, writes 10, timeouts 0, DMA errors 0, CC errors 0 Driver 4: standstill, SG min 0, read errors 0, write errors 0, ifcnt 15, reads 6032, writes 15, timeouts 0, DMA errors 0, CC errors 0 Driver 5: not present Driver 6: not present Date/time: 2024-06-04 10:01:18 Cache data hit count 199703773 Slowest loop: 36.14ms; fastest: 0.12ms === Storage === Free file entries: 19 SD card 0 detected, interface speed: 22.5MBytes/sec SD card longest read time 6.3ms, write time 0.0ms, max retries 0 === Move === DMs created 83, segments created 0, maxWait 0ms, bed compensation in use: none, height map offset 0.000, max steps late 0, min interval 0, bad calcs 0, ebfmin 0.00, ebfmax 0.00 no step interrupt scheduled Moves shaped first try 0, on retry 0, too short 0, wrong shape 0, maybepossible 0 === DDARing 0 === Scheduled moves 0, completed 0, hiccups 0, stepErrors 0, LaErrors 0, Underruns [0, 0, 0], CDDA state -1 === DDARing 1 === Scheduled moves 0, completed 0, hiccups 0, stepErrors 0, LaErrors 0, Underruns [0, 0, 0], CDDA state -1 === Heat === Bed heaters 0 -1 -1 -1, chamber heaters -1 -1 -1 -1, ordering errs 0 === GCodes === Movement locks held by null, null HTTP is idle in state(s) 0 Telnet is idle in state(s) 0 File is idle in state(s) 0 USB is idle in state(s) 0 Aux is idle in state(s) 0 Trigger is idle in state(s) 0 Queue is idle in state(s) 0 LCD is idle in state(s) 0 SBC is idle in state(s) 0 Daemon is idle in state(s) 0 Aux2 is idle in state(s) 0 Autopause is idle in state(s) 0 File2 is idle in state(s) 0 Queue2 is idle in state(s) 0 Q0 segments left 0, axes/extruders owned 0x0000000 Code queue 0 is empty Q1 segments left 0, axes/extruders owned 0x0000000 Code queue 1 is empty === CAN === Messages queued 1083, received 6337, lost 0, errs 0, boc 0 Longest wait 2ms for reply type 6053, peak Tx sync delay 53, free buffers 26 (min 25), ts 576/575/0 Tx timeouts 0,0,0,0,0,0 === Network === Slowest loop: 146.02ms; fastest: 0.00ms Responder states: MQTT(0) HTTP(2) HTTP(2) HTTP(0) HTTP(0) FTP(0) Telnet(0) HTTP sessions: 2 of 8 === WiFi === Interface state: active Module is connected to access point Failed messages: pending 0, notrdy 0, noresp 1 Firmware version 2.1.0 MAC address f0:08:d1:03:80:5e Module reset reason: Power up, Vcc 3.39, flash size 2097152, free heap 23280 WiFi IP address 192.168.178.91 Signal strength -34dBm, channel 6, mode 802.11n, reconnections 0 Clock register 00002001 Socket states: 0 3 0 0 0 0 0 04.6.2024, 10:01:07Verbindung zu 192.168.178.91 hergestellt -
So it worked before installing the Tool distro board and tool boards?
Did you update the firmware at the same time? IE, does it work on 3.5.1?
-
@Phaedrux Yes, it worked flawlessly before. However, I did the update to 3.5.2 on all components at the same time right after the hardware installation.
For example, when I send M150 E1 B255 S16, the command goes through without error, but the neopixel remains off. I have also connected a second neopixel for testing, but without success.
-
What firmware were you on before 3.5.2 rc1? Can you try going back?
-
@Phaedrux Yes, I will go back to 3.5.0 tomorrow to test it. I will report back then.
Love my Duet 3 Mini.
https://www.instagram.com/proschi3d
https://youtube.com/@proschi3d
https://www.proschi3d.de -
I just tried it with the firmware that was installed before, unfortunately without success, the LED does not turn on.
-
I'm not super fluent with neo pixels. How do you have it connected?
-
@Phaedrux
I connected them to the Neopixel output on the Duet Mini, and it worked until I connected the other hardware. I connected the first Duet to the tool distribution board, then the two tool boards, and on the tool distribution board’s CAN out, a second Duet Mini. They also don’t work on the second Duet, I’ve already tried that.M950 E1 C"led" T1 U16 -
And if you remove the newly added hardware?
Do you have any seperate way of confirming that Neopixel is still functional at all? -
@Phaedrux I’ve ordered some new ones again that I will test. But actually, I can’t imagine that all of them have broken down together. We will see.
-
@Phaedrux
I have now connected a new neopixel, without success. I cannot explain why it no longer works. Neither on one duet mini nor on the other.Perhaps someone here who operates the neopixel on the duet3 mini with firmware 5.1.2 rc1 can post the config.g and the M150 commands?
Love my Duet 3 Mini.
https://www.instagram.com/proschi3d
https://youtube.com/@proschi3d
https://www.proschi3d.de -
@Proschi78 How is the LED strip wired? Does it connect to 5V and GND on the NEOPIXEL connector? Or have you connected to different 5V and GND pins?
The 5V_EXT_IN pin on the NEOPIXEL connector needs to be supplied by an external 5V source. See the Mini 5+ tab here https://docs.duet3d.com/User_manual/Connecting_hardware/IO_Neopixel_DotStar#connections
You can wire the LED 5V and GND to the 5V_EXT and GND on the 12864_EXP1 connector to test. But RGB LEDs typically use up to 60mA per LED, you have 16, so up to 720mA. If the LEDs were powered from the internal 5V, it may be that, with the addition of the other components, it is drawing too much current from the 5V regulator which has a limit of 1A total. The 5V regulator also has to run the rest of the low voltage circuitry, eg MCU, screens, power for CAN bus communication etc.
I've just tested this on RRF 3.5.1, and LEDs work correctly on the 'led' output, with 5V and GND wired to the 12864_EXP1 connector. I used these commands:
M950 E1 C"led" T1 U16
M150 E1 B255 S16
I only had 7 RGB LEDs connected, but they all lit up blue. If you connect yours like this, try just lighting up the first LED, with
M150 E1 B255 S1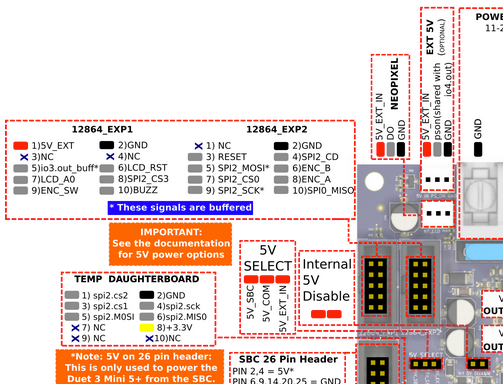
Ian
Bed-slinger - Mini5+ WiFi/1LC | RRP Fisher v1 - D2 WiFi | Polargraph - D2 WiFi | TronXY X5S - 6HC/Roto | CNC router - 6HC | Tractus3D T1250 - D2 Eth
-
@droftarts Thanks first of all. I will try it this way, with an external power supply.
-
@droftarts it works
") !
!
-
 undefined Phaedrux marked this topic as a question
-
undefined Phaedrux has marked this topic as solved