[Duet, BLTouch] Printing at wrong height, good calibration.
-
Hi,
I am totally stuck and need help. I tried searching for this here on the forums, but either my queries are wrong, or no one had the issue.
I have finally gotten round to installing the DuetWifi in my Ender3.
Everything's connected, works like a charm.My setup includes the E3D Titan Aero along with BLtouch for bed leveling.
The problem is this.
I have everything set up based on the great guide here.
I calibrated the Z offset (0.113 mm), put that into my G31 line.
When I reboot the printer and run homing (manually with G28 or through the button), calibration runs flawlessly and if I hit:
G1 Z0
The Z axis lowers itself exactly where it should - nozzle is lightly touching the bed.
What I do not get is that when I try to run an actual print (different files sliced by Simplify3D, Slic3r, CURA) - the nozzle is always about 2mm above the print bed. This setup (and sliced files) worked perfectly with the original Ender3 board.
I am only starting my 3DPrinting adventure, but I don't know where to look anymore. It must be my error, but..
Version of firmware is 2.02RC2(RTOS) (2018-09-07b2).
config.g:
; Configuration file for Duet WiFi (firmware version 1.21)
; executed by the firmware on start-up
;
; generated by RepRapFirmware Configuration Tool on Thu Sep 13 2018 10:04:19 GMT+0200 (Central European Daylight Time); General preferences
G90 ; Send absolute coordinates...
M83 ; ...but relative extruder moves; Drives
M569 P0 S0 ; Drive 0 goes backwards
M569 P1 S0 ; Drive 1 goes backwards
M569 P2 S1 ; Drive 2 goes forwards
M569 P3 S1 ; Drive 3 goes forwards
M350 X16 Y16 Z16 E16 I1 ; Configure microstepping with interpolation
M92 X80 Y80 Z2000 E821.28 ; Set steps per mm
M566 X900 Y900 Z12 E120 ; Set maximum instantaneous speed changes (mm/min)
M203 X6000 Y6000 Z180 E1200 ; Set maximum speeds (mm/min)
M201 X500 Y20 Z250 E250 ; Set accelerations (mm/s^2)
M906 X800 Y800 Z800 E800 I0 ; Set motor currents (mA) and motor idle factor in per cent
M84 S120 ; Set idle timeout; Axis Limits
M208 X0 Y0 Z0 S1 ; Set axis minima
M208 X230 Y230 Z250 S0 ; Set axis maxima; Endstops
M574 X1 Y1 S1 ; Set active high endstops
M574 Z1 S2 ; Define Z to use Probe. Home to Min; Z-Probe
M558 P5 H5 F500 T4000 X0 Y0 Z1 ; Set Z probe type to switch and the dive height + speeds
G31 P500 X-30 Y19 Z0.113 ; Set Z probe trigger value, offset and trigger height
M557 X20:220 Y20:220 S40 ; Define mesh grid; Heaters
M305 P0 T100000 B3950 C0 R4700 ; Set thermistor + ADC parameters for heater 0
M143 H0 S120 ; Set temperature limit for heater 0 to 120C
M305 P1 T100000 B4138 C7.060000e-8 R4700 ; Set thermistor + ADC parameters for heater 1
M143 H1 S280 ; Set temperature limit for heater 1 to 280C
M307 H7 A-1 C-1 D-1 ; Disable the 7th Heater to free up PWM channel 5 on the Duex board.; Fans
M106 P0 S0 I0 H-1 ; Set fan 0 value, PWM signal inversion and frequency. Thermostatic control is turned off
M106 P1 S0.3 I0 H-1 ; Set fan 1 value, PWM signal inversion and frequency. Thermostatic control is turned off
M106 P2 S0 H-1 ; Set fan 2 value, PWM signal inversion and frequency. Thermostatic control is turned off; Tools
M563 P0 D0 H1 ; Define tool 0
G10 P0 X0 Y0 Z0 ; Set tool 0 axis offsets
G10 P0 R0 S0 ; Set initial tool 0 active and standby temperatures to 0Chomeall.g
; homeall.g
; called to home all axes
;
; generated by RepRapFirmware Configuration Tool on Thu Sep 13 2018 10:04:19 GMT+0200 (Central European Daylight Time)
G91 ; relative positioning
G1 Z5 F6000 S2 ; lift Z relative to current position
G1 S1 X-235 Y-235 F1800 ; move quickly to X and Y axis endstops and stop there (first pass)
G1 X5 Y5 F6000 ; go back a few mm
G1 S1 X-235 Y-235 F360 ; move slowly to X and Y axis endstops once more (second pass)
G90 ; absolute positioning
G1 X125 Y125 F4000 ; Move to the center
G30 ; Do a single probe to home our Z axis
G1 Z10 F6000 ; rapidly move the Z axis to Z=10G92 Z0 ; set Z to axis minimum (you may want to adjust this); Uncomment the following lines to lift Z after probing
;G91 ; relative positioning
;G1 S2 Z5 F100 ; lift Z relative to current position
;G90 ; absolute positioning -
A couple things. Not sure if any will help but here goes
The trigger height of 0.1 is really low. It's saying that the nozzle is only 0.1 mm from the bed when the probe triggers. That's cutting it pretty close. How is your bltouch mounted? The BLTouch documentation says the base of the BLTouch body should be about 8mm from the tip of the nozzle. Can you post how you have it mounted?
Next in your M558 command you are using P5 for the probe type. You can now use P9 which is specifically for the BLTouch. Benefits include faster response to triggering. Your probe speed is quite fast. The slower you go the more consistent the BLTouch will be.
So you can modify your G31 and m558 a bit
M558 P9 H5 F100 T4000
G31 P25 X-30 Y19 Z0.113So that's changed:
G31 P25 (more sensitive trigger value)
M558 P9 F100 (slower probe speed)
And removed the xyz values from m558 as they are no longer used.
I notice you have your z speed maxed to 180 so you wouldn't see the probe speed hit 500 but if you ever changed the speed limit it could bite you then.Once you've made those changes you should remeasure your trigger height.
At the end of your homeall I can't tell if the G92 z0 is being executed or if it's behind the comment. You should delete that bit.
G1 Z10 F6000 ; rapidly move the Z axis to Z=10G92 Z0 ; set Z to axis minimum (you may want to adjust this)
If none of that helps can you post the first 50 lines or so of your sliced gcode file you're trying to print? Perhaps there is an offset being applied or something you aren't expecting.
Also have you run a mesh compensation mapping? Can you post the d
Resulting height map? -
Hi,
First up - thanks for taking the time to respond.
Now some answers quickly, before I start testing what you wrote.
The BLTouch is mounted using this mount and hotend bracket.
I just checked, the base of the BLTouch is pretty much bang on 8mm fron the tip of the nozzle (I tried taking a picture, but the graphic from the link shows it best).The G92 z0 was commented out, but it was a bad paste even from the original. I didn't notice it there. Regardless, it wasn't taking any effect.
Since I posted this, I tried a couple more things:
- Reverted back to 2.01 firmware
- Redid the config via the RepRap configurator (and this time tried it with P9)
None of it helped, but as I was checking it now - I realized my Z axis movement is totally bonkers.
The weird thing to me was that homing worked perfectly and commands like G1 Z0 also worked flawlessly.
But now, when I tried to check and measure the distance of the BLTouch from the nozzle tip - I noticed that when I hit +50 on Z on PanelDue - the motor was running and running and running until it got almost to the top and I hit emergency stop. At that time, the Z position reported by the screen was only 60.I'll readjust everything as you wrote, remove what needs to be removed and will need to read again on how to configure the z axis (I have the original screw and motor that come with Ender, I believe it's a T8 with a 2mm step).
-
@pkos said in [Duet, BLTouch] Printing at wrong height, good calibration.:
M92 X80 Y80 Z2000 E821.28 ; Set steps per mm
This would be the problem. 2000 is an odd number to have for z axis steps per mm. The configurator has a tool to calculate the steps per mm, but you have to use it for each axis.
Z Axis steps can be calculated with this formula:
Z_steps_per_mm = (motor_steps_per_rev * driver_microstep) / thread_pitchSo if you have common TR*8 lead screws, and 1.8 degree motors, using 16 microsteps, you would use 400 steps per mm which sounds far more likely for the ender 3.
-
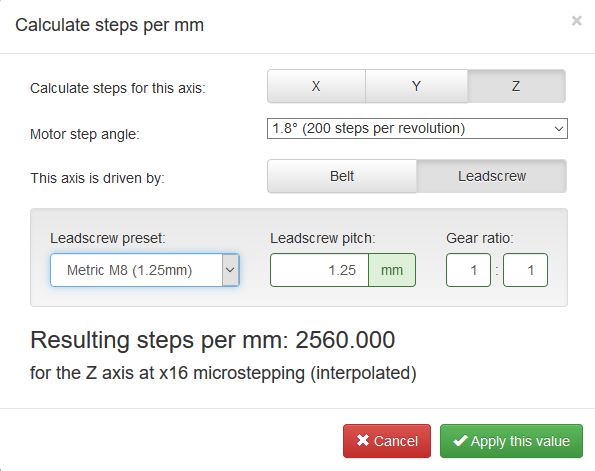
That would make total sense. I'll play around with it shortly, but I need to ask (so someone smarter than me tells me where I messed up).
This is a screenshot of the calculator and what I went with. I thought I had the data in correctly ;/
-
Your leadscrew pitch would be 8mm, not 1.25.
-
@Phaedrux is correct. That is for people who actually use a piece of m8 threaded rod as a lead screw. As you are using a proper leadscrew the pitch is 8mm. Leave the m8 there and just change pitch to 8 and you will be sorted.
Regards,
Sam -
Doh...
Now I understand.
I just wanted to say that @Phaedrux is a total rock star.
Thank you!
I just launched the very first print and I am absolutely and totally in love with the Duet and how quietly and amazingly it prints. I've never had layers this amazing (also thanks to the mesh leveling visualization).
Now I just need to understand how to blip the 5015 blower print cooling fan so it doesn't make weird noises at lower speeds and I'll be golden
")
-
https://duet3d.dozuki.com/Wiki/GCode#Section_M106_Fan_On
You can adjust the B and F values to change blip time and the PWM frequency.