Presentation of my CoreXY - PULLEYX-CUBE
-
That's a lot of linear guide for the Z motion on the bed. I'd be a little concerned about negative effects of thermal expansion with that setup, but if it works, who am I to argue? I suppose that 3030 extrusion is going to be quite stable due to its larger size as well.
I'd probable also wire the emergency stop to interrupt the 24VDC instead of the 5V line. With the 24V line interrupted, that will stop all of the heaters and motors while still allowing a connection to the wifi. It will throw all kinds of errors, but in an emergency, that's still better, and has less of a chance of damaging the SD card.
I just finished my printer, but I'm already looking at planning the next one, and CoreXY looks like a winner to me for print speed, so I've been looking at people's designs, to see what I want to attempt to copy.
-
@supraguy said in Presentation of my CoreXY - PULLEYX-CUBE:
That's a lot of linear guide for the Z motion on the bed....
Regarding the thermal expansion, I can not say anything accurate (negative) at the moment - a complete enclosure for a heated chamber is one of the next steps and than this issue will show up properly.
The alignment of the many linear guides in Z has cost a lot of time, but the axis runs completely free of play and also quite easily - but with self-locking.
Sure overdimensioned for a 3D printer actually, but I would do it exactly the same again - at least I say that today ... and tomorrow: what I am interested in my talk of yesterday
-
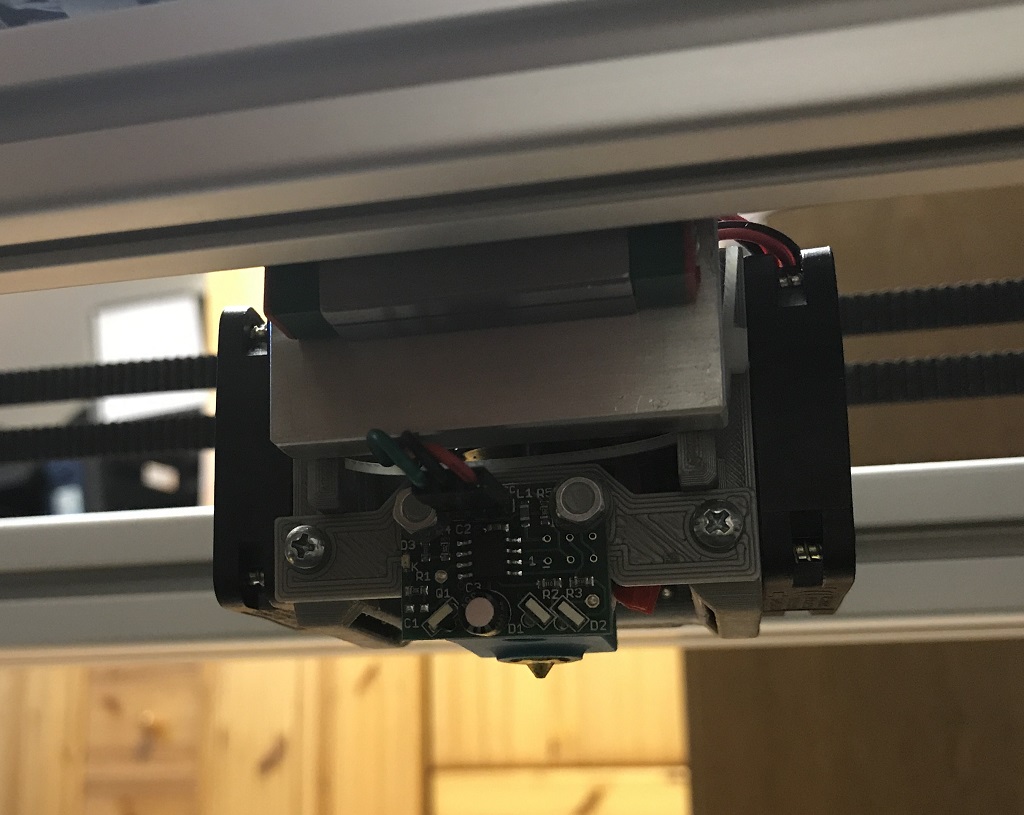
I replaced the Piezo Orion with a Mini IR probe.
Reasons:
-
Reduce the distance between the nozzle and the guide to avoid / reduce eventual vibrations (free length of the lever)
-
Contactless scanning to save the nozzle (even if the Piezo Orion really worked very well)
-
At the moment I'm more interested in building than in printing


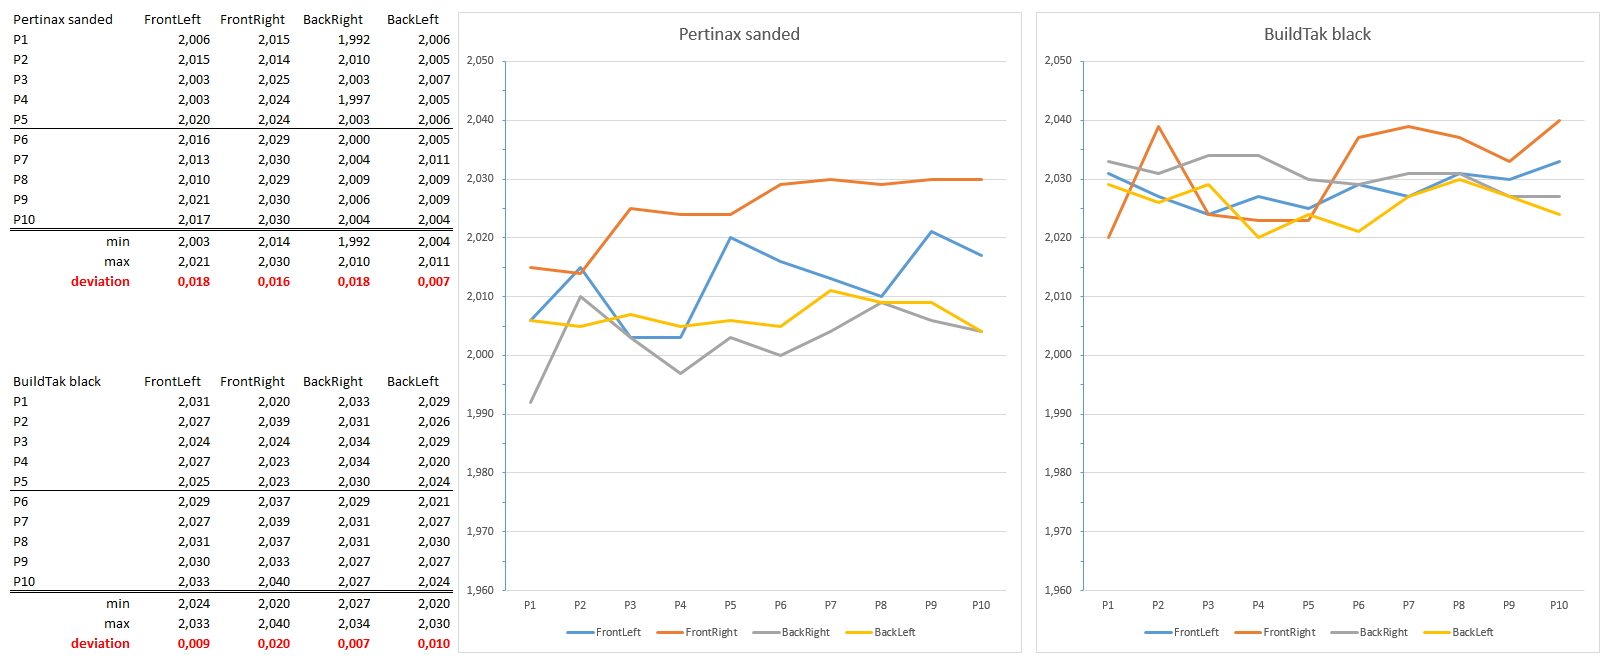
Here the results of measuring the bed corners - please note only the deviation, not the absolute values:

!the first 5 measuring points were with LED lighting of the bed, the 6 to 10 were without!As dc42 mentioned in a post, the resolution of the Z-axis must also be taken into account, i. in my case ball screw with pitch 4mm at 1.8 ° stepper motor -> 4.00mm / (360 ° / 1.8 °) = 0.02mm.
So I believe that the achieved accuracy or deviations of the individual measuring points is good enough - if not, then I ask for an objection.
-
-
Looks like a nice build. I would question the viability of 4 linear guides in the Z axis, especially if the chamber gets heated, but you'll know soon enough.
Does any air actually come out of the print cooling ducts/nozzles? Axial fans don't usually do well against back pressure that results from closing off one side.
-
Hi,
Very nice work.
Can you direct me to a resource (or can you explain) how to configure the firmware for two Z motors each having their own endstop switch?
Thanks.
Frederick
-
@mrehorstdmd said in Presentation of my CoreXY - PULLEYX-CUBE:
Does any air actually come out of the print cooling ducts/nozzles ...
Yes, at the Moment it is enough and no problem.
-
@fcwilt said in Presentation of my CoreXY - PULLEYX-CUBE:
Can you direct me to a resource (or can you explain) how to configure the firmware for two Z motors each having their own endstop switch?
Hi Frederik,
I will Show you my config and homez files but at the end of the week because i am not at home
-
@thwe said in Presentation of my CoreXY - PULLEYX-CUBE:
@fcwilt said in Presentation of my CoreXY - PULLEYX-CUBE:
Can you direct me to a resource (or can you explain) how to configure the firmware for two Z motors each having their own endstop switch?
Hi Frederik,
I will Show you my config and homez files but at the end of the week because i am not at home
That would be grand. Thanks.
Frederick
-
Now I could access my home network, below the files:
Attention, individual settings:
- Limit switch X -> min, Y -> min, Z -> max
- Installation of the two limit switches as Z-MAX and and finely aligned, so that the separate positioning (line 13 in homez.g) is not necessary for me - but can be aligned in the line exactly -> thus is an automatic heights - Alignment of the two nuts of the ball screw (Z-axis) given.
- Assignment of the two limit switches see my wiring diagram as already posted
Documentation: https://duet3d.dozuki.com/Wiki/Gcode#Section_M584_Set_drive_mapping
config.g
; ############## config.g -> configuration file of the Duet WiFi for my CoreXY - PULLEYX (thwe) ############## ; ; Firmware Electronics: 1.04 ; Board ID: 08DGM-9T6BU-FG3S0-7JKD0-3SN6T-KU6BH ;Firmware Name: RepRapFirmware for Duet 2 WiFi/Ethernet ;Firmware Electronics: Duet WiFi 1.02 or later ;Firmware Version: 2.03beta2 (2019-02-16b1) ;WiFi Server Version: 1.23beta1 ;Web Interface Version: 1.22.6 ; ############## General preferences ############## M667 S1 ; Switch to CoreXY mode G90 ; Send absolute coordinates... M83 ; ...but relative extruder moves M555 P1 ; Set firmware compatibility to look like RepRapFirmare ; ############## Network - Connect to a wifinet ############## M552 S0 ; Disable network M550 PDUTH-PULLEYX ; Set machine name ;M551 Pxxxxxxx ; Set password M552 S1 ; Enable network M586 P0 S1 ; Enable HTTP M586 P1 S0 ; Disable FTP M586 P2 S0 ; Disable Telnet ; ############## Drives ############## M569 P0 S1 ; Drive 0 -> X -> goes forwards M569 P1 S1 ; Drive 1 -> Y -> goes backwards M569 P2 S0 ; Drive 2 -> Z1 -> goes forwards (right one, viewd from ahead) M569 P3 S0 ; Drive 3 -> Z2 (U) -> goes forwards (right one, viewd from ahead) M569 P4 S1 ; Drive 4 -> EXTRUDER -> goes forwards ; ############## Dual Z-Drives ############## M584 X0 Y1 Z2:3 U3 E4 P3 ; Driver 0 = X, 1 = Y, 2+3 = Z, 3 = U, 4 = Extruder, 3 axis visible ; ############## Drives setting ############## M350 X16 Y16 Z16 U16 I1 ; Configure microstepping with interpolation M350 E16 I1 ; Configure microstepping with interpolation M92 X66.667 Y66.667 Z800 U800 ; Set axis steps per mm M92 E408 ; Set extruder steps per mm M566 X600 Y600 Z240 U240 E240 ; Set maximum instantaneous speed changes/jerk (mm/min) M203 X18000 Y18000 Z2100 U2100 E6000 ; Set maximum speeds (mm/min) M201 X2000 Y2000 Z600 U600 E3000 ; Set accelerations (mm/s^2) M906 X2000 Y2000 Z2000 U2000 E2000 I30 ; Set motor currents (mA) and motor idle factor in per cent M84 S30 ; Set idle timeout ; ############## Axis Limits ############## M208 X0.00 Y-5.00 Z0.00 U0.00 S1 ; Set axis S1 = minimum M208 X276.00 Y305.00 Z280.00 U280.00 S0 ; Set axis S0 = maximum ; ############## Endstops ############## M574 X1 Y1 Z2 U2 S1 ; X0 = without endstop, 1 = min endstop, 2 = max endstop, S1 = active high (NC), S0 active low (NO) ; ############## Z-Probe ############## ;M558 P8 I1 H5 R0.3 F300 T6000 ; Set Z probe Piezo-Orion: M558 P1 X0 Z0 ; Set Z probe Mini IR Probe: ; P8 = switch by default (normally closed)unfiltered / I1 = invert sw reading / H5 = dive height / ; R0.3 = Z probe recovery time after triggering / F300 = probing speed(mm/min) / T2000 = Travel speed(mm/min) ;G31 P500 Z-0.10 ; Set current probe status to Piezo Orion, P500 = trigger value G31 P500 Z2.04 ; Set current probe status to Mini IR Probe, P500 = trigger value ; ############## Define mesh grid ############## M557 X20:270 Y25:275 S31.25 ; Define mesh grid ; ############## Define position of the leadscrews ############## M674 X-41:331 Y150:150 S0.5 ; Define position of the leadscrews, S = maximum correction ; ############## Heater 0 - bed ### M307 H0 B0 S1.00 V23.9 A145.0 C635.0 D0.50 ; Set heating process parameters, disable bang-bang, pwm limit 100%, voltage, pid parameters M305 P0 S"Bed" T100000 B4138 C0 R4700 ; Set thermistor + ADC parameters for heater 0 M143 H0 S110 ; Set temperature limit for heater 0 to 110C ; ############## Heater 1 - nozzle ### M307 H1 A425.0 C231.0 D3.5 S0.60 V24.1 B0 ; Set heating process parameters, disable bang-bang, pwm limit, voltage, pid parameters M305 P1 S"Noz" T100000 B4725 C7.06e-8 ; Set thermistor + ADC parameters for heater 1 M143 H1 S275 ; Set temperature limit for heater 1 to 245C ; ############## Fans ############## M106 P0 S0.00 L0 I0 F500 H-1 C"PartFan" ; Set fan 0 value, PWM signal inversion and frequency, Thermostat control off M106 P1 T30:80 H1 ; Sets fan 1 up thermostatic fan depending H1 (T) in proportional mode M106 P2 S0.02 B0 L0 C"Lights" ; LED strip to P2 PWM fan outputs ; ############## Tools ############## M563 P1 D0 F0 H1 S"Noz" ; Define tool 1 with fan 0, drive 0, heater 1 G10 P1 X0 Y0 Z0 ; Set tool 1 axis offsets G10 P1 R0 S0 ; Set initial tool 1 active, standby temperature to 0C, temperature to 0C ; ############## Automatic power saving ############## M911 S10 R11 P"M913 X0 Y0 G91 M83 G1 Z3 E-5 F1000" ; Set voltage thresholds and actions to run on power loss ; ############## Custom settings ############## M81 ; 24VDC power supply OFF at starting M912 P0 S-1.9 ; Calibrating the CPU temperature M593 F66 ; Configure Dynamic Acceleration Adjustment (DAA), cancel ringing at 48Hz ;M572 D0 S0.15 ; Set extruder pressure advance (Bowden extruders S value between 0.1 and 0.25) ;M592 D0 A0.01 B0.0005 ; Configure nonlinear extrusion for drive 0 ; ############## Miscellaneous############## M501 ; Load saved parameters from non-volatile memory ; END OF FILE homez.g
; ############## homez.g -> called to home the Z axis ############## G91 ; relative positioning M584 Z2 U3 P4 ; Split Z into 2 (Z+U) G1 S1 Z999 U999 F600 ; Move the bed down in the Z direction. S1 to stop if endstop is triggered G1 S2 Z-3 U-3 F600 ; Move the bed up 3mm in the -Z direction, ignore if axis are not homed G1 S1 Z9 U9 F120 ; Move slowly in the +Z direction again to stop exactly at the homing switch M400 ; Wait for current moves to finish G4 P100 G1 S2 Z0.00 U0.00 F200 ; Compensation the limit switch from z-axis drive 2 (!!can be adjusted here!!) G4 P100 M584 Z2:3 P3 ; Join U to Z again G4 P200 G1 S2 Z-3.66 F240 ; move to position, ignore endstops also if axis has not been homed G4 P200 G92 Z280.00 ; set position of Z relativ to the bed (!!must be adjusted here!!) G4 P200 G90 ; Back to absolute mode G1 S2 Z270 F900 ; End of file -
Hi,
Thanks much.
I notice that you are using a number of G4 "dwell" commands - are they necessary?
I will have to give this dual endstop approach a try and see if it eliminates the manual "syncing" of the Z driver motors that I am doing now.
Frederick
-
@fcwilt said in Presentation of my CoreXY - PULLEYX-CUBE:
I notice that you are using a number of G4 "dwell" commands - are they necessary? ...
this is a habit of old times ... no idea if it works without it, but I think so