My Hypercube Evolution CoreXY variant
-
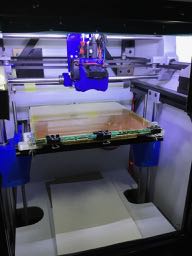
18 months to get this far. It first worked about 12 months ago but another 12 months to do some surgery to it, and build a second one that is smaller with a single Z screw. Change to E3D volcano, Zesty Nimble, Duet and full redesign of X carriage assembly.So a fairly basic configuration with print volume of 250 mm cube.
Key features are:
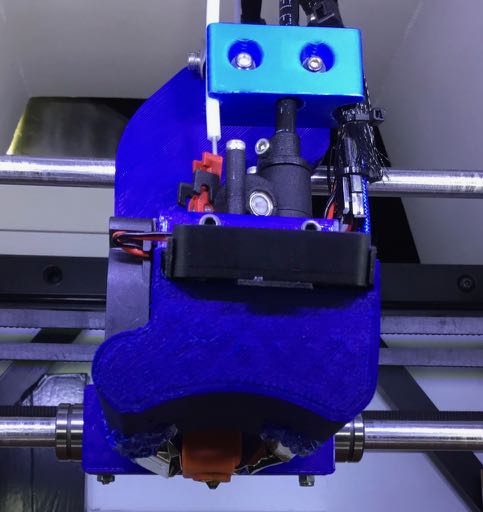
1 the configuration of the dual Z rods rather than 4 rods on the normal Hypercube and they are 16 mm. Y rods are 12 mm and X are hollow 10mm.
2 the X rods were changed from 45 to 90 mm vertical spacing
3 Zesty Nimble with tusk part cooling (hand rolled aluminium) requiring a bit of refinement.
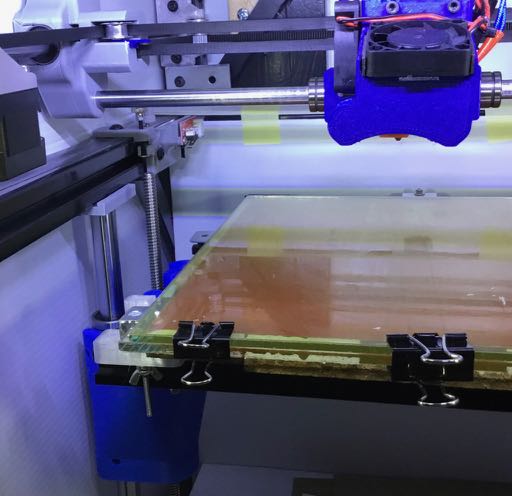
4 Dual 4mm glass beds, 1 fixed & heated and multiple removable print beds, on 3 levelling screws on a 2020 aluminium frame.Power supply and Duet mounted on the back.
It is mechanically quite accurate requiring no compensation or bed compensation, and at this stage just a Z mechanical Endstop and occasional Babystep variations.
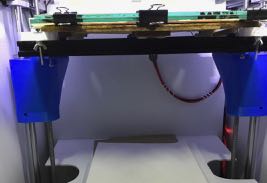
The Z belt arrangement for keeping screws synchronised when power off.
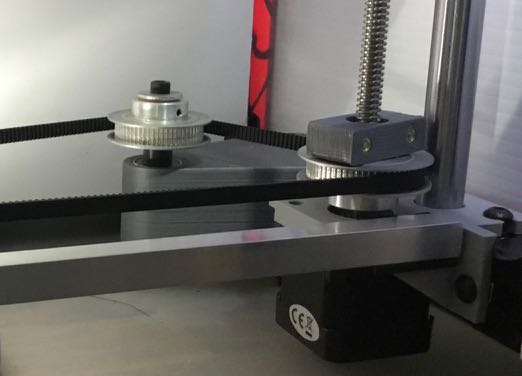

X carriage with 3 10mm bearings, 2 on the lower rod and 1 on the top, with the carriage (not shown) having a bit of complexity to allow in-situ tuning of the bearing separation and alignment with X rods to avoid binding. 2 40mm fans
-
Very nice. How is the volcano and the nimble working out?
-
@phaedrux Quite well !! Part of the lengthy build process was lots of redesigning in Fusion360 (every part from the Hypercube Thingiverse site I redesigned so that took time) and of course this X carriage is almost a complete new design for the Nimble and tusk part cooling feature and for the 90m rod spacing etc etc.
The original build was all PLA because I could not successfully use PETG. Now most parts including all critical parts are in PETG with modest print quality. I got there by writing a python script that allows me to optimise 3 Mcodes at 3 different speed and progressively iterate through lots of combinations, which was particularly important because of the Zesty Nimble's sensitivity to acceleration and jerk and because I am using a 0.6 nozzle in a volcano. So now having done many test prints I am "just" able to print PETG. The nimble jerk is 50% higher than recommended and the acceleration is also quite a bit higher. Also dc42 pointed me to driving the zesty stepper at max amps to overcome jerk inertia even though little torque is required otherwise. I will run some more combinations through my python script at some stage.
The volcano also is ok except that at full flow say 20mm3/sec I seem to get too much temperature gradient between the sensor and the filament with the temperature struggling to stay stable. The auto tune Mcode doesn't allow for the heat loss at high filament flow rates. I've fiddled with manual adjustment HE heater settings but have not yet got a good set of parameters. For example if I try to manually test a higher temperature on the fly, say raise the temperature a few degrees, it will not heat sufficiently fast and the Duet will shut down with a heater failure. (its all 24V and all genuine E3D)
The remaining challenge, unsolved, is how to print top layers in PETG. I don't need much infill for strength but it appears I need 33% just to minimise the sag of the first top layer. Also the speed is lowish at 45 otherwise the extrusion bulges a lot as it bridges the infill. Otherwise I can print PETG on perimeters at 70 to 80. Cura did not work for me but the latest KISSlicer alpha with rounded infill seems the best.
The other printer is a single Z screw cantilevered bed X150mm x Y200 with identical upper features except as the X is so short the 8mm X rods are light and so the whole moving mass is close to the lightest possible. Even just using 3 small 8mm linear bearings for weight and reduced friction and potential for binding. The last photo has the two 10mm bearings visible on the lower rod on the bigger printer.
Now I have both printers fully working as of yesterday, I can put my mind to further improvements to my limited knowledge of PETG and perhaps make something useful.
-
@garis said in My Hypercube Evolution CoreXY variant:
The auto tune Mcode doesn't allow for the heat loss at high filament flow rates.
I wonder if that could be a firmware feature request. At high flow rates melting the material is basically phase change cooling for the heater block.
-
Auto tuning while driving filament at different speeds would be interesting. Difficult to execute as the resistance to flow changes with temperature, not to mention the standard auto tune starting at around 40C. A pure required heating calculation correction may suffer significant error from the heating effect of ramming the larger filament through a smaller hole.