Duet3D Logo Duet3D
    • Tags
    • Documentation
    • Order
    • Register
    • Login

    Smart Effector separating heatsink fan from LEDs

    Scheduled Pinned Locked Moved
    Duet Hardware and wiring
    4
    14
    805
    Loading More Posts
    • Oldest to Newest
    • Newest to Oldest
    • Most Votes
    Reply
    • Reply as topic
    Log in to reply
    This topic has been deleted. Only users with topic management privileges can see it.
    • blt3dpundefined
      blt3dp
      last edited by

      Wondering if this scenario would be possible.

      I have the part fan on Fan0
      I have the heatsink fan on Fan1 and it's thermostatically controlled

      Say I move move over the cabling for the heatsink fan from Fan1 to an unused fan connector
      Then I unplug my heatsink fan from the Smart Effector and connect it directly to Fan1 on the Duet (bypassing the Smart Effector)

      This scenario would leave me with the heatsink fan plugged directly into the Duet as it were and then I'd have a separate connection between the Smart Effector (where only the LEDS are connected)

      That would allow me to control the LEDs on the Smart Effector correct? I figure I'd have to define it in config.g like a fan and turn it off and on like a fan?

      My 3D Printing YouTube Channel
      Better Living Through 3D Printing

      Follow me on Instagram and Twitter
      Instagram
      Twitter

      1 Reply Last reply Reply Quote 0
      • dc42undefined
        dc42 administrators
        last edited by

        Yes, that should work.

        Duet WiFi hardware designer and firmware engineer
        Please do not ask me for Duet support via PM or email, use the forum
        http://www.escher3d.com, https://miscsolutions.wordpress.com

        1 Reply Last reply Reply Quote 0
        • blt3dpundefined
          blt3dp
          last edited by blt3dp

          Thanks for the confirmation.

          While on the subject of fans, I'm super confused on speed control.

          Here's what I have in my config.g:

          ; Fans
          M106 P0 S0 I0 F500 H-1 ; Set fan 0 value, PWM signal inversion and frequency. Thermostatic control is turned off
          M106 P1 S1 I0 F500 H1 T45 ; Set fan 1 value, PWM signal inversion and frequency. Thermostatic control is turned on

          The fans I have connected are:
          Heatsink: 12v 30x30 mm 2-pin fan that comes with e3d v6
          Parts: Noctua 12v 40x40 3-pin fan (3rd wire not connected, treated as 2-pin)

          I guess my first question is, should I be able to control the speed of either fan?
          It seems as currently configured, it doesn't work.
          I was reading and maybe the F parameter is too high?

          I'm also super confused on the S parameter accepting 0-255 or 0.0-1.0

          From my understanding it's just the way you want to represent it, saying 50% of 255 is 127 is a little more difficult than saying 0.5. Am I correct in that?

          Edit: I'm not looking to control the hotend fan, it comes on when it should and I don't want to vary it's speed. But the part fan would be nice say if I have Slic3r set to do 35% power for some condition and 100% for another condition.

          My 3D Printing YouTube Channel
          Better Living Through 3D Printing

          Follow me on Instagram and Twitter
          Instagram
          Twitter

          1 Reply Last reply Reply Quote 0
          • Phaedruxundefined
            Phaedrux Moderator
            last edited by

            Based on what you have connected and how they are configured, you should be able to control the part cooling fan with the fan speed slider in the DWC.

            I've found that with the Noctua 40mm fan I have a much higher frequency works best. I use F30000.

            The S parameter for speed control can work as a percentage 0.1 = 10% to 1.0 = 100%, or as a binary value from 0-255. So you're exactly right with your interpretation, just purely a matter of how you want to express it.

            Z-Bot CoreXY Build | Thingiverse Profile

            1 Reply Last reply Reply Quote 0
            • blt3dpundefined
              blt3dp
              last edited by blt3dp

              Yeah, currently the slider doesn't change the speed at all. though I don't recall if sliding it all the way to 0 turns it off or if 100 turns it on.

              Curious as to the F30000, the wiki says that if you're unable to control the fan, try lowering it. I was thinking that since I currently have F500, which I believe I got from the configurator, that I'd try lowering it first to the "default" 250.

              Edit:
              This is the Noctua fan I have.

              https://www.amazon.com/Noctua-Cooling-Blades-Bearing-NF-A4x10/dp/B009NQLT0M/ref=sr_1_3?keywords=noctua+40mm&qid=1561735715&s=gateway&sr=8-3

              My 3D Printing YouTube Channel
              Better Living Through 3D Printing

              Follow me on Instagram and Twitter
              Instagram
              Twitter

              1 Reply Last reply Reply Quote 0
              • Phaedruxundefined
                Phaedrux Moderator
                last edited by

                The frequency range is viable all the way from 10hz to 30000hz. Every fan seems to be a bit different. You can quickly test by using the M106 P0 S1 F250 command in the console, then just change the F parameter and send it again.

                You can use the same command to test if the fan is controllable or not as well and bypass the slider.

                Some fans may also require a short blip of 100% speed to start reliably from a standstill. Use the B parameter for that. Adding a fraction of a second is usually enough. B0.5 for example.

                Z-Bot CoreXY Build | Thingiverse Profile

                blt3dpundefined 1 Reply Last reply Reply Quote 0
                • blt3dpundefined
                  blt3dp @Phaedrux
                  last edited by

                  @phaedrux said in Smart Effector separating heatsink fan from LEDs:

                  You can use the same command to test if the fan is controllable or not as well and bypass the slider.

                  To do that test if it's speed controllable and bypass the slider, I'd have to change the S parameter when I send the command correct?

                  My 3D Printing YouTube Channel
                  Better Living Through 3D Printing

                  Follow me on Instagram and Twitter
                  Instagram
                  Twitter

                  Phaedruxundefined 1 Reply Last reply Reply Quote 0
                  • Phaedruxundefined
                    Phaedrux Moderator @blt3dp
                    last edited by

                    @blt3dp Correct

                    Z-Bot CoreXY Build | Thingiverse Profile

                    1 Reply Last reply Reply Quote 0
                    • blt3dpundefined
                      blt3dp
                      last edited by blt3dp

                      Thanks, I'll test it out.

                      My 3D Printing YouTube Channel
                      Better Living Through 3D Printing

                      Follow me on Instagram and Twitter
                      Instagram
                      Twitter

                      1 Reply Last reply Reply Quote 0
                      • blt3dpundefined
                        blt3dp
                        last edited by

                        Yep, that took care of it. I ended up removing the frequency parameter and let it default to 250 and now I can control the fan speed.

                        My 3D Printing YouTube Channel
                        Better Living Through 3D Printing

                        Follow me on Instagram and Twitter
                        Instagram
                        Twitter

                        1 Reply Last reply Reply Quote 0
                        • blt3dpundefined
                          blt3dp
                          last edited by blt3dp

                          Reviving this, I just decoupled the hotend fan from the smart effector so I can have the fan set to thermostatic and be able to separately control the LEDs.

                          It works perfectly, I can issue M106 P2 S<whatever range> and it works. I've got nothing related to it defined in config.g

                          I was wondering if there would happen to be a way to put it on DWC as a slider but rename it to LEDs or something other than fan.

                          Edit: Figured it out, M106 C parameter

                          My 3D Printing YouTube Channel
                          Better Living Through 3D Printing

                          Follow me on Instagram and Twitter
                          Instagram
                          Twitter

                          1 Reply Last reply Reply Quote 0
                          • blt3dpundefined
                            blt3dp
                            last edited by

                            Reviving this again. Moving this setup to a Duet 3 and am planning to operate the hotend fan, part fan, and the leds on the smart effector from the Duet 3's 12v regulator. I know the power draw has to be less than 800mA. I know the specs of the fans I'm going to be using, just wanted to make sure the LEDs would still be ok.

                            From what I know, they're these:
                            https://www.digikey.com/product-detail/en/cree-inc/CLM3C-WKW-CWBYA153/CLM3C-WKW-CWBYA153CT-ND/6138617

                            3 of them at up to 100mA Peak, am I correct in that the 12v regulator on the Duet 3 should handle this?

                            My 3D Printing YouTube Channel
                            Better Living Through 3D Printing

                            Follow me on Instagram and Twitter
                            Instagram
                            Twitter

                            1 Reply Last reply Reply Quote 0
                            • Danalundefined
                              Danal
                              last edited by

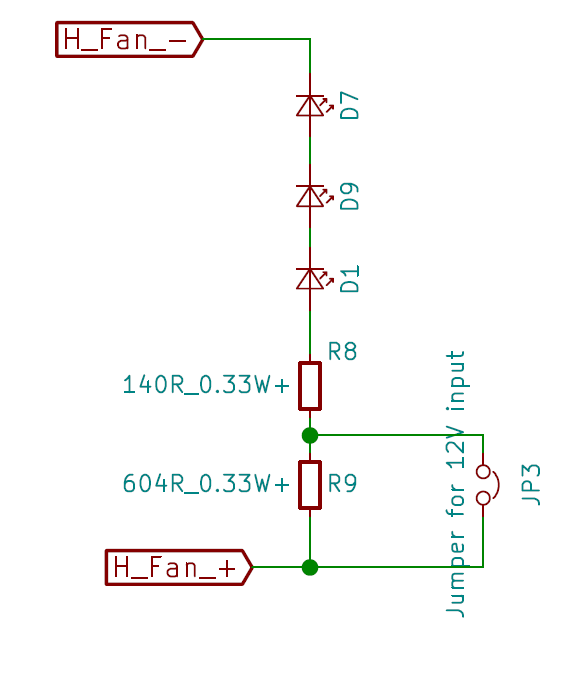
                              No where near 3x100Ma.

                              12V through the series resistor of 140 Ohms current will be about 85mA. It will actually be substantially less because of the three LEDs in series. Guesstimating at the LEDs forward voltage drop, the actual current will be around 18 to 20mA.

                              So it depends on your other loads; calculate 20mA for the LEDs.

                              11dc5dbb-eadc-4543-86ce-e758ba7a744c-image.png

                              Delta / Kossel printer fanatic

                              blt3dpundefined 1 Reply Last reply Reply Quote 0
                              • blt3dpundefined
                                blt3dp @Danal
                                last edited by

                                @Danal

                                Thanks, I did see that part of the schematic, just wanted to double check and see what i figured was correct.

                                My 3D Printing YouTube Channel
                                Better Living Through 3D Printing

                                Follow me on Instagram and Twitter
                                Instagram
                                Twitter

                                1 Reply Last reply Reply Quote 1
                                • First post
                                  Last post
                                Unless otherwise noted, all forum content is licensed under CC-BY-SA