Initial Homing issues - Sequence of Errors
-
@veti I thought that "Not Stopped" meant they had not been triggered, certainly when I manually trigger then one at a time the corresponding light comes on on the board.
-
"not stopped" is the current status, if you run M119 while triggered, the output text will change. But if the leds work, then M119 should reflect the same state.
Thats one step closer at least

-
so if the y endstop is working why exactly did the y home fail?
-
please post your config and all homing files.
-
@veti I think that was because of a failed Molex connection. I have repaired that now but am still trying to get homing to work. Am working my way through dc42's suggested reading.
-
@veti Hi, OK, got the files you requested but have removed the passwords from the config.g file.[0_1559075082911_Bart Config Files.zip](Uploading 100%) 0_1559075101598_config.g 0_1559075107396_homeall.g 0_1559075113958_homex.g 0_1559075118078_homey.g 0_1559075123270_homez.g
I hope this is how you attach the files. It wouldn't let me attached a .zip
-
A little progress here.
Using the information on the "Test_axes_or_motors_individually" I can confirm that the extruder can be moved through all planes and in the amounts specified via direct gcode entry. However, when I try anything in the main "Machine Control" section I still get the "G0/G1 Insufficient Axes homed".
-
unless you explicitly allow moving without homing, you need to press home all before jogging the axes
-
Perhaps this guide would help with testing things
https://duet3d.dozuki.com/Guide/Ender+3+Pro+and+Duet+Maestro+Guide+Part+3:+Commissioning/39
It's written for the Ender 3 but the methods would apply to any printer.
-
Your homing files need to be modified slightly to allow it to raise the Z axis before the homing moves.
For instance, your homez
G91                ; relative mode
G1 Z4 F200         ; raise head 4mm to ensure it is above the Z probe trigger height
G1 Z-210 F200 S1   ; move down to 210mm in the -Z direction, stopping if the homing switch is triggered
G90
Would become
G91                ; relative mode
G1 Z4 F200 S2        ; raise head 4mm to ensure it is above the Z probe trigger height
G1 Z-210 F200 S1   ; move down to 210mm in the -Z direction, stopping if the homing switch is triggered
G90
Notice the S2 on the first Z move to raise it. The S2 allows the axis to move before it is homed. The S1 after that is the move to the endstop.
The same thing would need to be changed in your other homing files. The first Z move needs the S2 switch.
-
It may be worth going through the Reprap configurator on your own and trying to input the values using this config as an example. The configs you got for the Wanhao may be for a much older version of the firmware.
-
@phaedrux said in Initial Homing issues - Sequence of Errors:
It may be worth going through the Reprap configurator on your own and trying to input the values using this config as an example. The configs you got for the Wanhao may be for a much older version of the firmware.
I tend to agree with you on this. There appear to be differences in the configuration that may be based on what version of the i3 you are using.
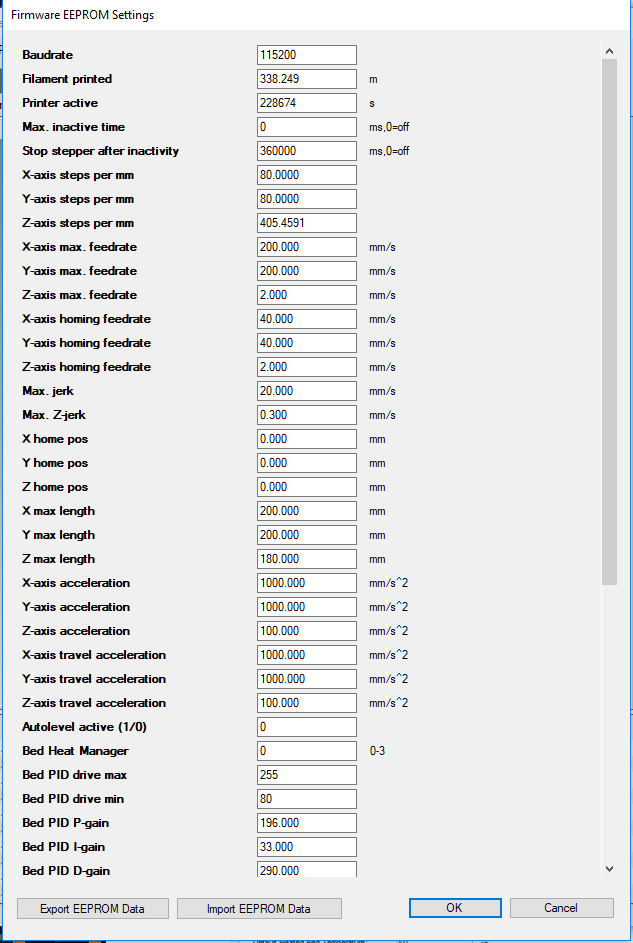
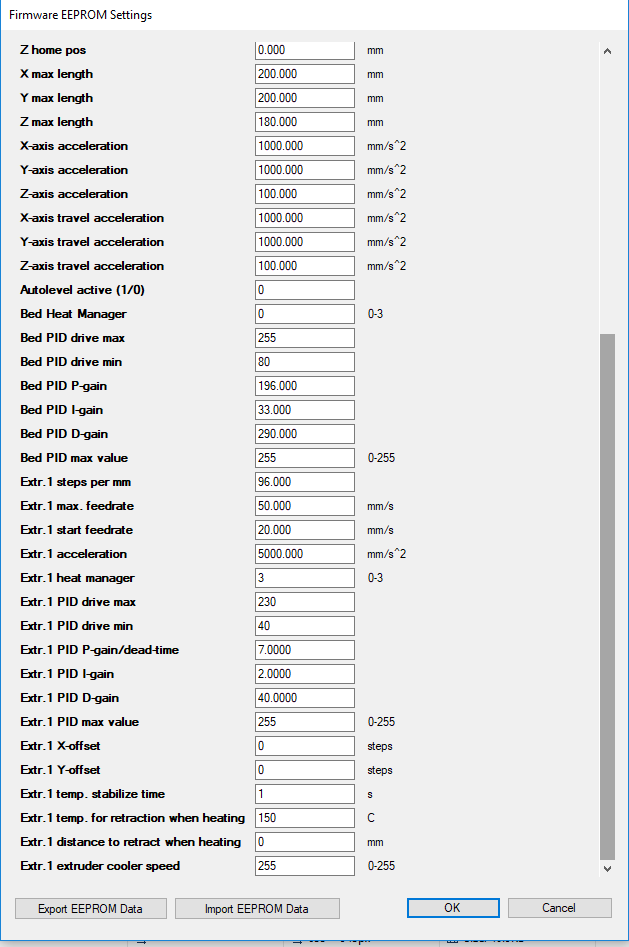
Prior to starting this upgrade I installed Repetier-Host and took screenshots of the EEPROM from my Melzi board. I have seen other examples of this that feature some differences in settings. I think this is linked to the version of the i3 and where Wanhao tweaked the config.
The big issue I have in running through the RepRap configurator from scratch is that I just can't seem to reconcile some of the settings it's asking for with what I have in the screenshots from my printer as it was working with the Melzi board. An example of this would be the "Max. Speed Change" setting. There isn't anything in the EEPROM that seems to match that and I don't know enough about these settings (Yet!) to make an educated guess as to whether it is safe to leave the setting at it's default on the Configurator page.
The Ender 3 article is a big help in just checking basic functionality and I will run through this again this evening once I am back in front of my printer.
At the heart of this I think is my misinterpretation of what I was seeing on the Duet Web Control screen. I thought that clicking on the "Home" buttons would perform the action needed and enter that into the config. I did not realize that I needed to have set the Gcode instruction (for whichever axes I was looking at) prior to this.
As a complete newbie with GCode and the Duet3D WiFi board it's all new to me. I have an inherent dislike of making assumptions so tend to grind to a halt when I don't understand something.
Again, I am very grateful to all here who are trying to help out. I am making progress and don't think I am too far away from completion of this upgrade.
----------------------------------------------
No fate but what we make ....
-
-
@b0m0a0k said in Initial Homing issues - Sequence of Errors:
At the heart of this I think is my misinterpretation of what I was seeing on the Duet Web Control screen. I thought that clicking on the "Home" buttons would perform the action needed and enter that into the config. I did not realize that I needed to have set the Gcode instruction (for whichever axes I was looking at) prior to this.
The configurator will generate the GCode instructions in the homex.g, homey.g, homez.g and homeall.g files for you, but they will obviously only be correct if you enter the correct information in the Endstops page of the configurator. Also you should test that the motors move in the correct directions before you test homing.
Duet WiFi hardware designer and firmware engineer
Please do not ask me for Duet support via PM or email, use the forum
http://www.escher3d.com, https://miscsolutions.wordpress.com -
@dc42 Thanks again for taking the time to reply. I ran through the commissioning guide you pointed me to and confirmed that just about everything is working with the exception of testing homing. I am focused on getting Home X working first. When I click on Home X the print head moves towards the stopswitch, but stops before it get's there (it moves about 80mm to the left).
----------------------------------------------
No fate but what we make ....
-
@phaedrux Thank you!
-
@b0m0a0k said in Initial Homing issues - Sequence of Errors:
When I click on Home X the print head moves towards the stopswitch, but stops before it get's there (it moves about 80mm to the left).
you need to increase the travel distance in the home file.
it probably reads something like
G1 X80 S1change the X80 part to match the length of your X axis + a little extra. (Possibly G0 instead of G1, makes no difference) -
@b0m0a0k said in Initial Homing issues - Sequence of Errors:
@dc42 Thanks again for taking the time to reply. I ran through the commissioning guide you pointed me to and confirmed that just about everything is working with the exception of testing homing. I am focused on getting Home X working first. When I click on Home X the print head moves towards the stopswitch, but stops before it get's there (it moves about 80mm to the left).
That could be caused by a few different things:
-
In the configurator you specified that the size of your printer was much smaller than it actually is. Send M208 from the console and check that the reported min/max axis limits look right.
-
You have specified the incorrect steps/mm, so that the motor is not moving as much as it should. Use G91 then G1 S2 moves to check that the motors are moving the right amount. For example, when you send G1 S2 X50 F1000 check that the amount of movement is 50mm.
-
You are getting interference on the endstop wires, or you have a bad connection in one of them. This is uncommon, but possible if you have the endstop wires running right next to stepper motor wires over a considerable distance.
Please post your config.g, homex.g, homey.g, homex.g and homeall.g files.
Duet WiFi hardware designer and firmware engineer
Please do not ask me for Duet support via PM or email, use the forum
http://www.escher3d.com, https://miscsolutions.wordpress.com -
-
@dc42 I will get back to this tonight and post the requested files. Thanks.
-
@dc42 As promised, here are my home config files;
config.g
; Configuration file for Duet WiFi (firmware version 1.17 to 1.19)
; executed by the firmware on start-up
;
; generated by RepRapFirmware Configuration Tool v2 on Wed May 29 2019 19:19:18 GMT+0100 (British Summer Time); General preferences
G90 ; Send absolute coordinates...
M83 ; ...but relative extruder moves; Network
M550 P"Removed" ; Set machine name
M551 P"Removed" ; Set password
M552 S1 ; Enable network
M587 S"Removed" P"Removed" ; Configure access point. You can delete this line once connected
M586 P0 S1 ; Enable HTTP
M586 P1 S0 ; Disable FTP
M586 P2 S0 ; Disable Telnet; Drives
M569 P0 S1 ; Physical drive 0 (X) goes forwards
M569 P1 S0 ; Physical drive 1 (Y) goes forwards
M569 P2 S1 ; Physical drive 2 (Z) goes backwards
M569 P3 S0 ; Physical drive 3 (E) goes forwards
M350 X128 Y128 Z128 E16 I0 ; Configure microstepping without interpolation
M92 X80.00 Y80.00 Z400.00 E100.00 ; Set steps per mm
M566 X900.00 Y900.00 Z12.00 E120.00 ; Set maximum instantaneous speed changes (mm/min)
M203 X6000.00 Y6000.00 Z600.00 E600.00 ; Set maximum speeds (mm/min)
M201 X1000.00 Y1000.00 Z100.00 E5000.00 ; Set accelerations (mm/s^2)
M906 X855.00 Y855.00 Z855.00 E855.00 I30 ; Set motor currents (mA) and motor idle factor in per cent
M84 S30 ; Set idle timeout; Axis Limits
M208 X0 Y0 Z0 S1 ; Set axis minima
M208 X200 Y200 Z180 S0 ; Set axis maxima; Endstops
M574 X1 Y1 Z1 S0 ; Set active low and disabled endstops; Z-Probe
M558 P0 H5 F120 T6000 ; Disable Z probe but set dive height, probe speed and travel speed
M557 X25:175 Y25:175 S20 ; Define mesh grid; Heaters
M305 P0 T100000 B3988 R4700 ; Set thermistor + ADC parameters for heater 0
M143 H0 S60 ; Set temperature limit for heater 0 to 60C
M305 P1 T100000 B3988 R4700 ; Set thermistor + ADC parameters for heater 1
M143 H1 S210 ; Set temperature limit for heater 1 to 210C; Fans
M106 P0 S0 I0 F500 H-1 ; Set fan 0 value, PWM signal inversion and frequency. Thermostatic control is turned off
M106 P1 S1 I0 F500 H1 T45 ; Set fan 1 value, PWM signal inversion and frequency. Thermostatic control is turned on
M106 P2 S1 I0 F500 H1 T45 ; Set fan 2 value, PWM signal inversion and frequency. Thermostatic control is turned on; Tools
M563 P0 D0 H1 ; Define tool 0
G10 P0 X0 Y0 Z0 ; Set tool 0 axis offsets
G10 P0 R0 S0 ; Set initial tool 0 active and standby temperatures to 0C; Custom settings are not configured
; Miscellaneous
T0 ; Select first toolhomez.g
; homez.g
; called to home the Z axis
;
; generated by RepRapFirmware Configuration Tool v2 on Wed May 29 2019 19:19:18 GMT+0100 (British Summer Time)
G91 ; relative positioning
G1 Z5 F6000 S2 ; lift Z relative to current position
G1 S1 Z-185 F1800 ; move Z down until the endstop is triggered
G92 Z0 ; set Z position to axis minimum (you may want to adjust this); Uncomment the following lines to lift Z after probing
;G91 ; relative positioning
;G1 S2 Z5 F100 ; lift Z relative to current position
;G90 ; absolute positioninghomey.g
; homey.g
; called to home the Y axis
;
; generated by RepRapFirmware Configuration Tool v2 on Wed May 29 2019 19:19:18 GMT+0100 (British Summer Time)
G91 ; relative positioning
G1 Z5 F6000 S2 ; lift Z relative to current position
G1 S1 Y-205 F1800 ; move quickly to Y axis endstop and stop there (first pass)
G1 Y5 F6000 ; go back a few mm
G1 S1 Y-205 F360 ; move slowly to Y axis endstop once more (second pass)
G1 Z-5 F6000 S2 ; lower Z again
G90 ; absolute positioninghomex.g
; homex.g
; called to home the X axis
;
; generated by RepRapFirmware Configuration Tool v2 on Wed May 29 2019 19:19:18 GMT+0100 (British Summer Time)
G91 ; relative positioning
G1 Z5 F6000 S2 ; lift Z relative to current position
G1 S1 X-205 F1800 ; move quickly to X axis endstop and stop there (first pass)
G1 X5 F6000 ; go back a few mm
G1 S1 X-205 F360 ; move slowly to X axis endstop once more (second pass)
G1 Z-5 F6000 S2 ; lower Z again
G90 ; absolute positioninghomeall.g
; homeall.g
; called to home all axes
;
; generated by RepRapFirmware Configuration Tool v2 on Wed May 29 2019 19:19:18 GMT+0100 (British Summer Time)
G91 ; relative positioning
G1 Z5 F6000 S2 ; lift Z relative to current position
G1 S1 X-205 Y-205 F1800 ; move quickly to X and Y axis endstops and stop there (first pass)
G1 X5 Y5 F6000 ; go back a few mm
G1 S1 X-205 Y-205 F360 ; move slowly to X and Y axis endstops once more (second pass)
G1 S1 Z-185 F1800 ; move Z down stopping at the endstop
G90 ; absolute positioning
G92 Z0 ; set Z to axis minimum (you may want to adjust this); Uncomment the following lines to lift Z after probing
G91 ; relative positioning
G1 S1 Z5 F100 ; lift Z relative to current position
G90 ; absolute positioning----------------------------------------------
No fate but what we make ....