ender 5 plus help
-
I have swapped in the duet 2 wifi but having a little trouble getting the printer to operate correctly.
-
the filament sensor isn't working at all I have it plugged into E0 stop and inserted
; Filament runout sensor
M581 E1 T1 S0 C1 ; Filament run-out sensor triggers a pause
into the config.g file have had no luck. I am using the original sensor that came with the printer -
when I am trying to get the trigger height for the BLtouch it doesn't display in the G-Code console and everytime I make adjustments it just simply adds to the z position. The BLtouch is setup as the z endstop but unsure if its also the bed leveler.
Any help is appreciated.
-
-
@nightmare90gt ideally, post your full config.g and response to M115. Also post you homeall.g and homez.g.
-
Use M591 for filament sensor, not M581; see https://duet3d.dozuki.com/Wiki/Gcode#Section_M591_Configure_filament_sensing and https://duet3d.dozuki.com/Wiki/Connecting_and_configuring_filament-out_sensors
-
Not sure how you are currently setting Z trigger height, but this is the way to do it: https://duet3d.dozuki.com/Wiki/Test_and_calibrate_the_Z_probe#Section_Calibrate_the_Z_probe_trigger_height
Ian
-
-
m115
FIRMWARE_NAME: RepRapFirmware for Duet 2 WiFi/Ethernet FIRMWARE_VERSION: 2.05.1 ELECTRONICS: Duet WiFi 1.02 or later FIRMWARE_DATE: 2020-02-09b1config.g
; Configuration file for Duet WiFi (firmware version 2.03)
; executed by the firmware on start-up
;
; generated by RepRapFirmware Configuration Tool v2.1.8 on Sun Mar 15 2020 12:19:59 GMT+0100 (Central European Standard Time); General preferences
G90 ; send absolute coordinates...
M83 ; ...but relative extruder moves
M550 P"Ender 5 plus" ; set printer name; Network
M552 S1 ; enable network
M586 P0 S1 ; enable HTTP
M586 P1 S0 ; disable FTP
M586 P2 S0 ; disable Telnet; Drives
M569 P0 S1 ; physical drive 0 goes forwards
M569 P1 S1 ; physical drive 1 goes forwards
M569 P2 S0 ; physical drive 2 goes backwards
M569 P3 S0 ; physical drive 3 goes backwards
M584 X0 Y1 Z2 E3 ; set drive mapping
M350 X32 Y32 Z32 E64 I1 ; Configure microstepping with interpolation
M92 X160.00 Y160.00 Z1600.00 E407.44 ; Set steps per mm
M566 X900.00 Y900.00 Z180.00 E120.00 ; Set maximum instantaneous speed changes (mm/min)
M203 X6000.00 Y6000.00 Z1200.00 E1200.00 ; Set maximum speeds (mm/min)
M201 X500.00 Y500.00 Z100.00 E250.00 ; Set accelerations (mm/s^2)
M906 X800.00 Y800.00 Z800.00 E800.00 I30 ; Set motor currents (mA) and motor idle factor in per cent
M84 S30 ; Set idle timeout; Axis Limits
M208 X0 Y0 Z0 S1 ; set axis minima
M208 X350 Y350 Z400 S0 ; set axis maxima; Endstops
M574 X1 Y1 S1 ; set active high endstops
M574 Z2 S2 ; set endstops controlled by probe
M574 X1 Y1 Z0 E0 S1 ; set filament runout sensor; Z-Probe
M307 H3 A-1 C-1 D-1 ; disable heater on PWM channel for BLTouch
M558 P9 H5 F600 T6000 ; set Z probe type to bltouch and the dive height + speeds
G31 P500 X48 Y10 Z3.00 ; set Z probe trigger value, offset and trigger height
M557 X50:300 Y10:340 S30 ; define mesh grid; Heaters
M307 H0 B0 S1.00 ; disable bang-bang mode for the bed heater and set PWM limit
M305 P0 T98801 B4185 R2200 ; set thermistor + ADC parameters for heater 0
M143 H0 S120 ; set temperature limit for heater 0 to 120C
M305 P1 T98801 B4185 R2200 ; set thermistor + ADC parameters for heater 1
M143 H1 S280 ; set temperature limit for heater 1 to 280C; Fans
M106 P0 S0 I0 F20 H-1 ; set fan 0 value, PWM signal inversion and frequency. Thermostatic control is turned off
M106 P1 S1 I0 F20 H1 T45 ; set fan 1 value, PWM signal inversion and frequency. Thermostatic control is turned on; Tools
M563 P0 S"Hotend" D0 H1 F0 ; define tool 0
G10 P0 X0 Y0 Z0 ; set tool 0 axis offsets
G10 P0 R0 S0 ; set initial tool 0 active and standby temperatures to 0C; Filament runout sensor
M581 E1 T1 S0 C1 ; Filament run-out sensor triggers a pause; Custom settings are not defined
; Miscellaneous
M911 S10 R11 P"M913 X0 Y0 G91 M83 G1 Z3 E-5 F1000" ; set voltage thresholds and actions to run on power loss
T0 ; select first tool -
; homeall.g
; called to home all axes
;
; generated by RepRapFirmware Configuration Tool v2.1.8 on Sun Mar 15 2020 12:19:59 GMT+0100 (Central European Standard Time)
G91 ; relative positioning
G1 H2 Z5 F6000 ; lift Z relative to current position
G1 H1 X-355 Y-355 F3000 ; move quickly to X and Y axis endstops and stop there (first pass)
G1 H2 X5 Y5 F6000 ; go back a few mm
G1 H1 X-355 Y-355 F360 ; move slowly to X and Y axis endstops once more (second pass)
G90 ; absolute positioning
G1 X175 Y175 F6000 ; go to first bed probe point and home Z
G30 ; home Z by probing the bed; Uncomment the following lines to lift Z after probing
G91 ; relative positioning
G1 X0 Y0 Z0 F100 ; lift Z relative to current position
G90 ; absolute positioning; homez.g
; called to home the Z axis
;
; generated by RepRapFirmware Configuration Tool v2.1.8 on Sun Mar 15 2020 12:19:59 GMT+0100 (Central European Standard Time)
G91 ; relative positioning
G1 H2 Z5 F6000 ; lift Z relative to current position
G90 ; absolute positioning
G1 X30 Y30 F6000 ; go to first probe point
G30 ; home Z by probing the bed; Uncomment the following lines to lift Z after probing
;G91 ; relative positioning
;G1 Z0 F100 ; lift Z relative to current position
;G90 ; absolute positioning -
Have you followed this?
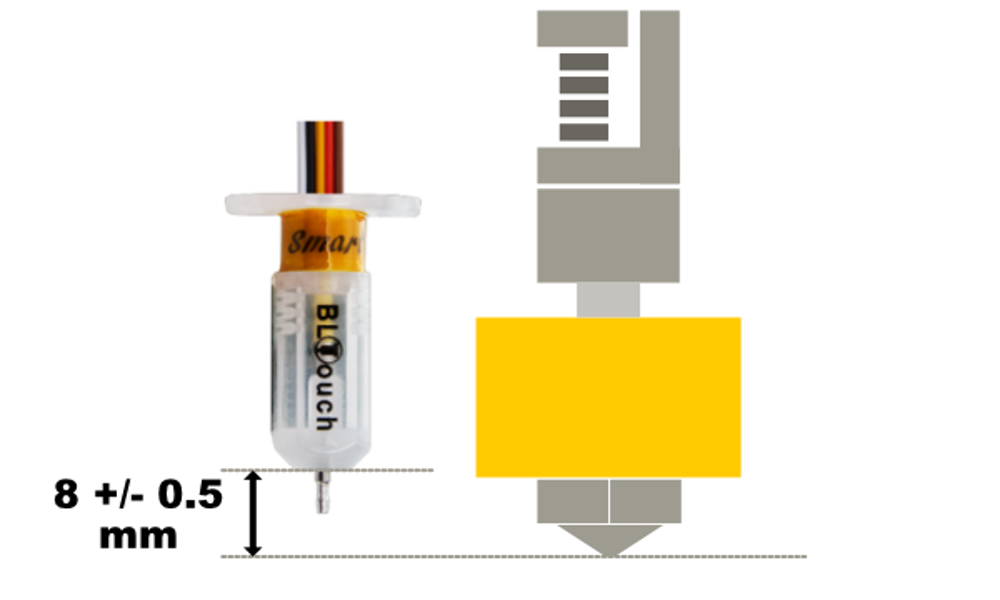
3mm trigger height seems a bit too high for the BLTouch. When mounted the base of the probe should be ~8mm above the nozzle tip, which will lead to a trigger height of ~2mm. This is important to get right because you don't want to pin to be too low during a print and get caught, and you don't want the nozzle tip to be below the probe pin when probing as you'll get a head crash.
Also take a look here: https://duet3d.dozuki.com/Guide/Ender+3+Pro+and+Duet+Maestro+Guide+Part+5:+Upgrades/54#s229
-
@nightmare90gt said in ender 5 plus help:
M350 X32 Y32 Z32 E64 I1 ; Configure microstepping with interpolation
your config says duet wifi, but interpolation like this only works on the maestro or duet3
-
@Veti would I just take the i1 out of the code.
-
It would be better to use x16 microstepping with interpolation enabled. Your motors will be quieter and smoother.
X64 on the extruder is ok since it gets you up to 400 ish steps per mm, which is good.
M350 X16 Y16 Z16 E64 I1
And don't forget to adjust your steps per mm for the X Y Z axis as well.
-
The 591 didnt work for the filament sensor the extruder will still move with no filament.
I will change the microstepping to 16 later today.
-
@nightmare90gt said in ender 5 plus help:
The 591 didnt work for the filament sensor the extruder will still move with no filament.
Please post the M591 command you are using. Note that filament sensing is only active when printing from SD card. You can see the status by sending M591 D[extruder_drive_number], and it should say if filament is present or not.
Ian
-
M591 E1 T1 S0 C1
Sent M591 D3 got nothing.
-
@nightmare90gt Please read the M591 documentation I posted in reply to your first post: https://duet3d.dozuki.com/Wiki/Gcode#Section_M591_Configure_filament_sensing
Your M591 command is wrong. You need D, P, C and S parameters in M591, where D is the extruder drive, P is the sensor type, C is the endstop pin, and S is enable.
Ian
-
@droftarts I am wanting to set my Ender 5 plus filament sensor up to my duet2wifi as well. Can anyone tell me what type of sensor it is to place in the Pnn parameter? And can the original connector / wiring be used?