Vcore pro CORE XY the X and Y axis home issue
-
I am trying to setup on the Vcore pro CORE XY the X and Y axis home.
I am trying to home as 0,0 on the left front corner.
I can home the x axis correctly on the left side but I cannot do the same for the Y axis – it goes opposite at the end of the bed.
I have put all the possible combinations (S0 and S1 for P0 and P1) on the following lines on the config.g but wthout be able to correct it.
M569 P0 S0 ; physical drive 0 goes backwards
M569 P1 S0 ; physical drive 0 goes backwards
In order to be able to home on the left front corner I had to modify the homey.g as follows:
91 ; relative positioning
G1 H2 Z5 F6000 ; lift Z relative to current position
G1 H1 Y335 F1800 ; move quickly to Y axis endstop and stop there (first pass)
G1 Y5 F6000       ; go back a few mm
G1 H1 Y335 F360  ; move slowly to Y axis endstop once more (second pass)
G1 H2 Z-5 F6000   ; lower Z again
G90               ; absolute positioning
I changed the Y-335 to Y335
My problem is that Duet reads now as home coordinates X0,Y330 which it is not correct.
Any suggestions what I am doing wrong ?I attach my config and home files.homey.g homex.g config.g

-
-
Validate that the machine motion works as intended in your reference frame.
-
Right now the config.g is set up to home Y on the maximum end of travel.
M574 X1 Y2 S1 ; set active high endstopsThe
Y2means y homes at the max end of the axis. Change this toY1to home at Y min:M574 X1 Y1 S1 ; home x and y at low end of axis, sensor is active high signalIf your homing script is moving to the wrong corner, it's likely your axis motion is incorrect, otherwise a homing move with -Y motion should be correct.
Old: The G1 H1 command along with
M574 Y2will result in the Y position being set to the ymax set in your M208 (330 in your case) when the home sensor is triggered. This is why it is now homing at Y330. WithM574 Y1it will set Y to 0 when it hits the home switch.G1 H1 Y335 F1800 ; move quickly to Y axis endstop and stop there (first pass) G1 Y5 F6000 ; go back a few mm G1 H1 Y335 F360 ; move slowly to Y axis endstop once more (second pass) G1 H2 Z-5 F6000 ; lower Z again G90 ; absolute positioningYou want to change the Y values in the moves back to negative:
G1 H1 Y-335 F1800 ; move quickly to Y axis endstop and stop there (first pass)
G1 Y5 F6000       ; go back a few mm
G1 H1 Y-335 F360  ; move slowly to Y axis endstop once more (second pass)
G1 H2 Z-5 F6000   ; lower Z again
G90               ; absolute positioning
If the machine moves in the wrong direction during the homing moves then it means your axis directions are flipped or incorrect and you should solve that first.
hope this helps
-
-
Nothing to do with homing, but the belts are not positioned correctly which will lead to varying belt tension as the extruder carriage moves in the XY plane. That will in turn lead to distorted prints and problems like ringing. The X and Y axes are kept square by belt tension. If the tension varies as things move, the X and Y axes won't stay square either.
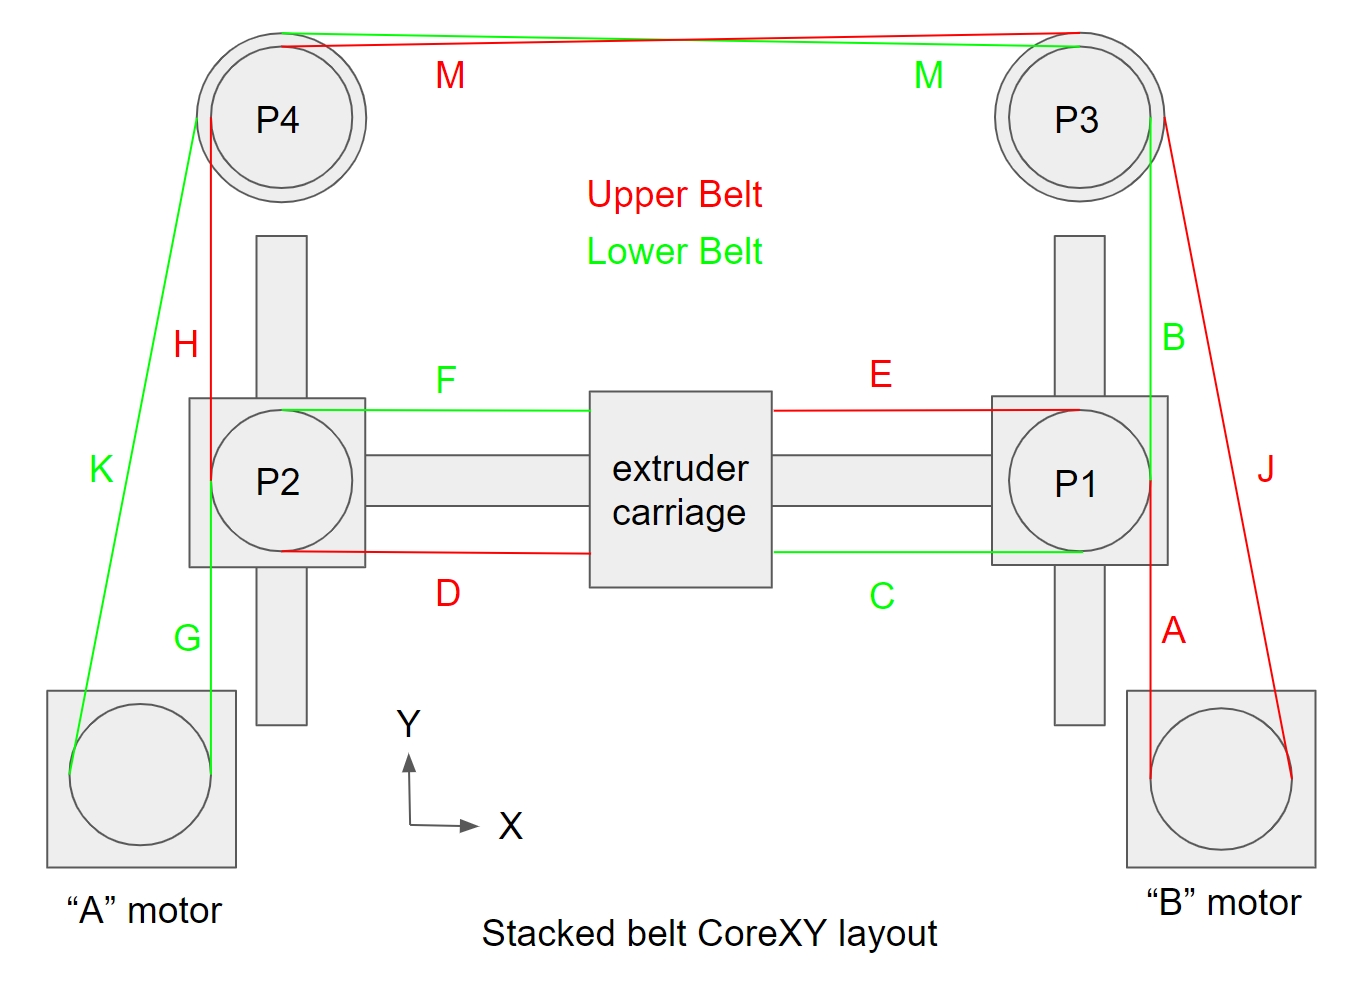
In the diagram below, belt segments labeled A-H all have to be kept parallel to the guide rails.

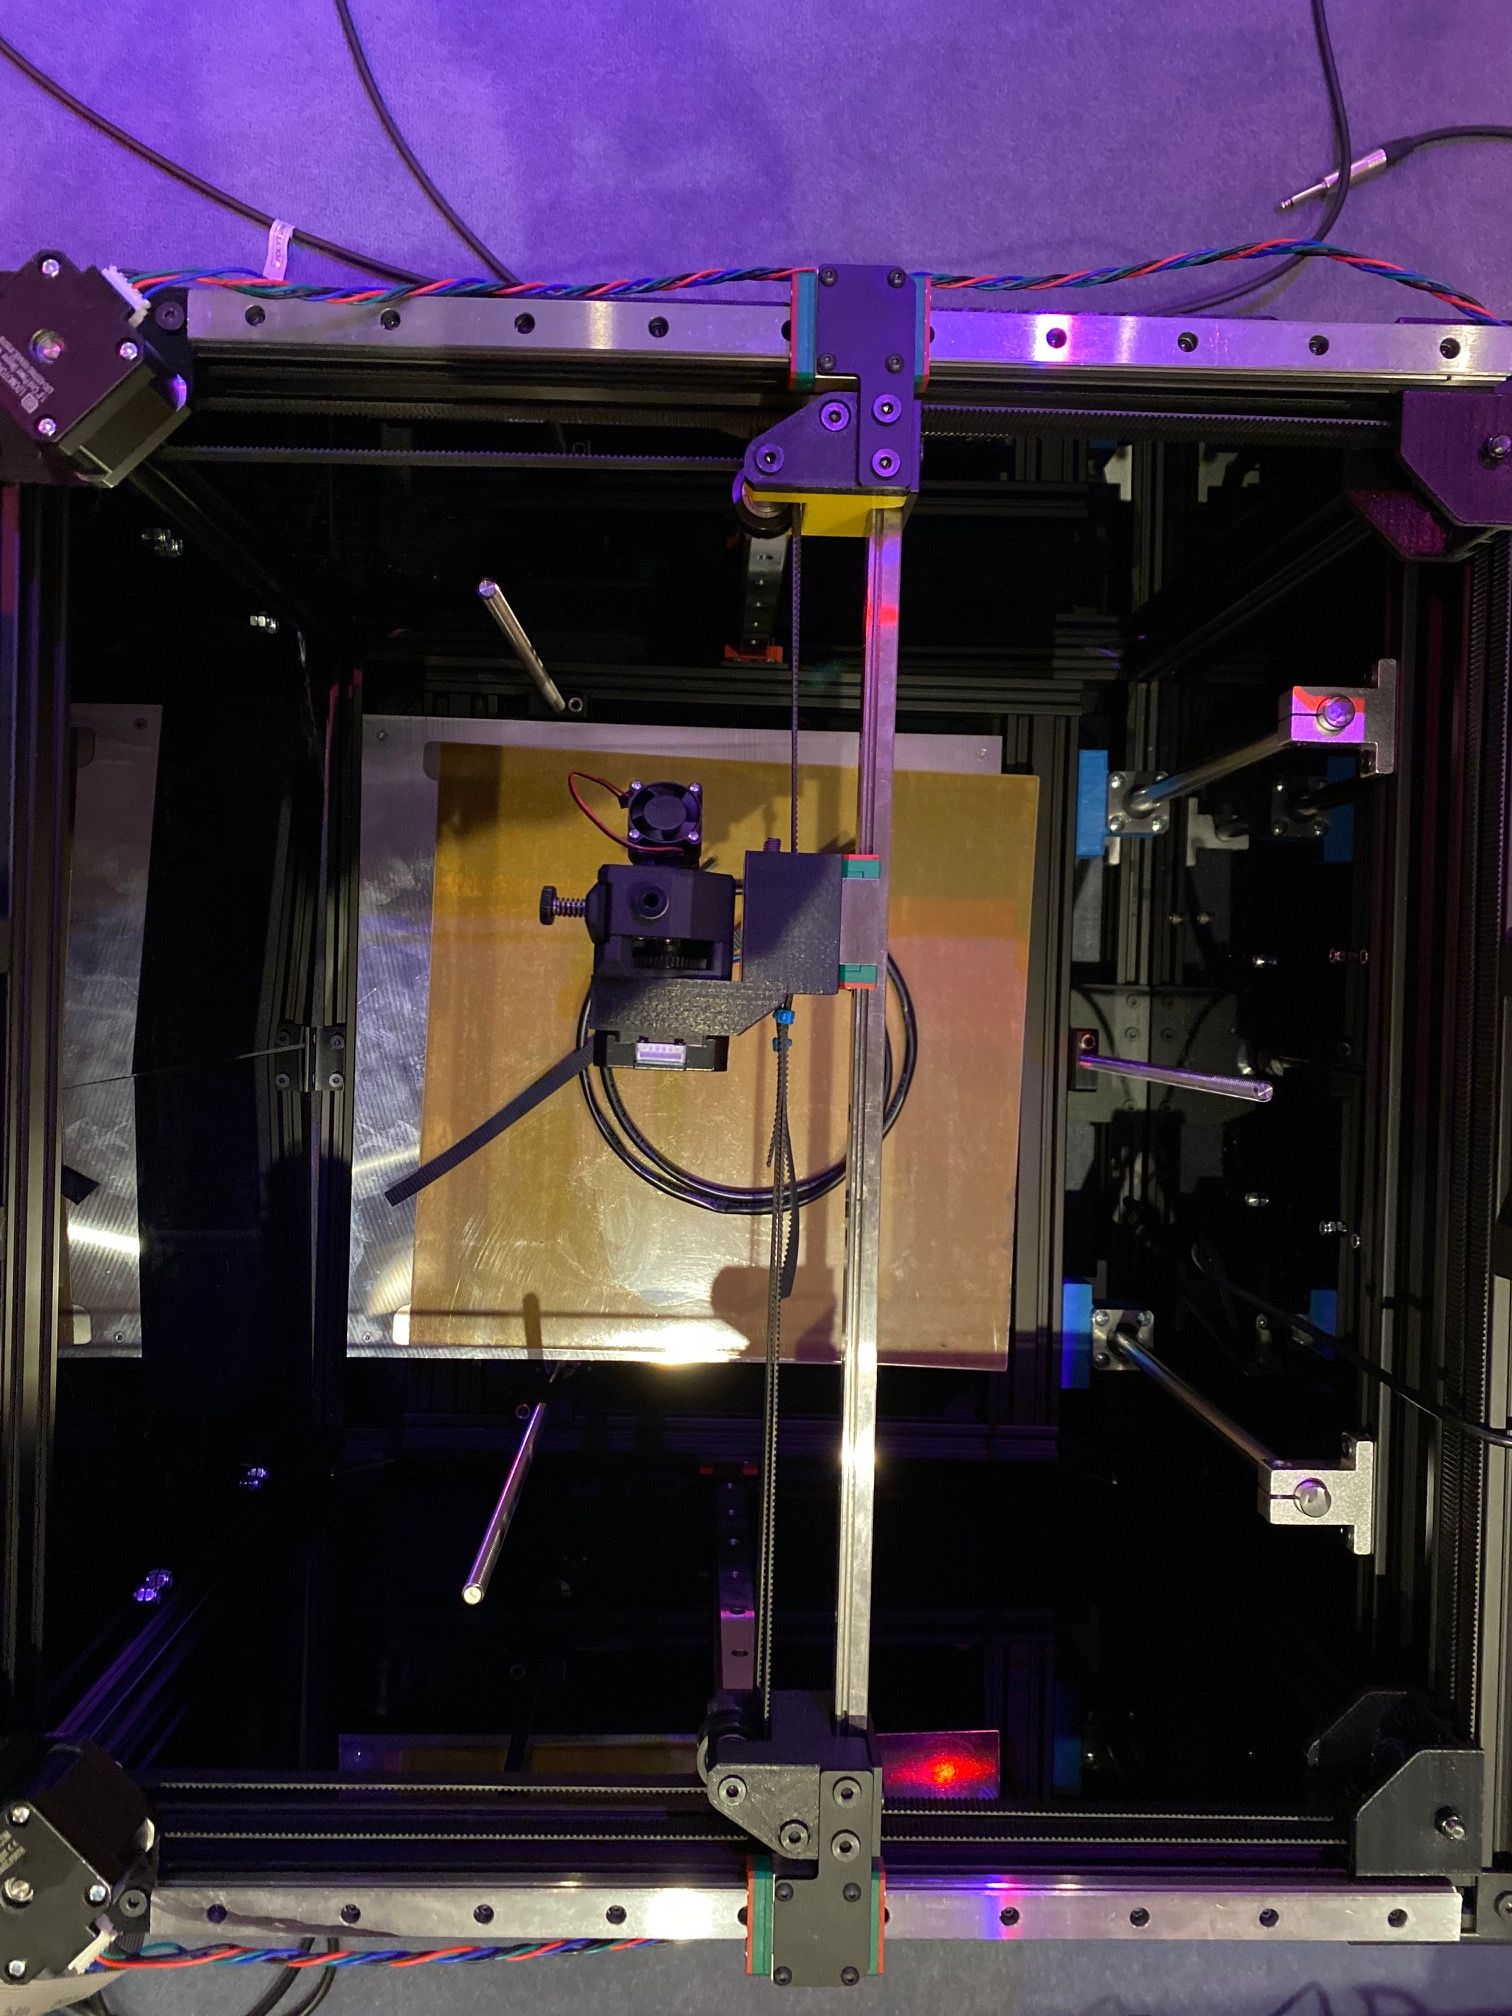
The photo of your printer shows segments A and G clearly not parallel to the Y axis rails and the belt at A looks loose. It also looks like C, D, E, and F are not parallel to the X axis rail.
See: https://drmrehorst.blogspot.com/2018/08/corexy-mechanism-layout-and-belt.html
-
Please have a look at this if you haven't already, particularly the motor direction test section.
https://duet3d.dozuki.com/Wiki/ConfiguringRepRapFirmwareCoreXYPrinter
It's very easy to get all screwed up on a corexy config once you start to mess with motor directions, homing directions, and endstop positions all at once. It's possible to get it acting like it's doing what you want but in reality it's completely mirrored or thinking that the print surface is outside the physical bounds of the printer.
First, choose a FRONT for the printer so that when you're looking at it standing in front of it 0,0 is the front left corner, X+ goes to the right, Y+ goes to the back. This does not change.
Next, Measure the axis length for X and Y amd enter that in your M208 command to set the axis limits. This does not change.
Now identify where your endstops are located. They can be at the low or high end of the axis. Define them with M574. This does not change.
Now setup your homing movements. If the endstop is at the low end of the axis, the homing move must be negative. And vice versa. This does not change.
Now do the motor tests as described in that link. The results of the test will guide you on your following moves. You may need to change a motor rotation direction, or you may need to swap the X and Y motor connection. DO NOT CHANGE ANYTHING ELSE.
https://duet3d.dozuki.com/Wiki/ConfiguringRepRapFirmwareCoreXYPrinter#Section_Movement_section
-
@mrehorstdmd is right the belts are wrong -- but that' s an issue with this build and not the V Core Pro design itself. The motor mount plates are swapped which makes the motors sit too far inside. On my V Core Pro the belts run perfectly parallel. For reference, see the original belt travel diagram at https://drive.google.com/drive/folders/1_7yTf3TPDbRCY7RIkf1loajXAJYhjxzX
-
Guys thanks a lot for your help !!!
Problem of motion solved now it homes correctly.
I think that i solved also the issue of non parallel belts. I swapped the stepper motors mount plates so now i think that the belts are parallel.
I hope that the tension is correct now as well ....Oliof do you have any idea for the mount of the end stops ? I have them connected and tested but not mounted ....
